
Owner's Manual
Page 1
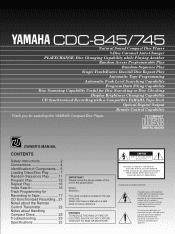
... THE RISK OF ELECTRIC SHOCK, DO NOT REMOVE COVER (OR BACK), NO USER-SERVICEABLE PARTS INSIDE, REFER SERVICING TO QUALIFIED SERVICE PERSONNEL. • Explanation of Graphical Symbols The lightning flash with a Compatible YAMAHA Tape Deck Optical Digital Output Remote Control Capability Thank you to the presence of Components.... 5 Loading Discs/Disc Play........... 7 Random-Sequence Play ........ 11 Program Play 12 Repeat Play 16 Index Search 16 Track Programming for Recording to persons. Retain this YAMAHA Compact Disc Player.
... THE RISK OF ELECTRIC SHOCK, DO NOT REMOVE COVER (OR BACK), NO USER-SERVICEABLE PARTS INSIDE, REFER SERVICING TO QUALIFIED SERVICE PERSONNEL. • Explanation of Graphical Symbols The lightning flash with a Compatible YAMAHA Tape Deck Optical Digital Output Remote Control Capability Thank you to the presence of Components.... 5 Loading Discs/Disc Play........... 7 Random-Sequence Play ........ 11 Program Play 12 Repeat Play 16 Index Search 16 Track Programming for Recording to persons. Retain this YAMAHA Compact Disc Player.
Owner's Manual
Page 2
... a marked change in the operating instructions. or D. or E. The unit has been dropped, or the cabinet damaged. 16 Servicing - An outdoor antenna should not attempt to overturn. 7 Wall or Ceiling Mounting - Keep it . 3 Do not operate the unit upside-down. Avoid sources of the unit should be serviced by pressing the OPEN/CLOSE button, and then switch off the power after...
... a marked change in the operating instructions. or D. or E. The unit has been dropped, or the cabinet damaged. 16 Servicing - An outdoor antenna should not attempt to overturn. 7 Wall or Ceiling Mounting - Keep it . 3 Do not operate the unit upside-down. Avoid sources of the unit should be serviced by pressing the OPEN/CLOSE button, and then switch off the power after...

Owner's Manual
Page 3
... from the AC power source as long as indicated in the instructions contained in to disassemble the cabinet. Modifications not expressly approved by Yamaha may void your equipment by turning the unit "OFF" and "ON", please try to use the product. 2. This equipment generates/uses radio frequencies and, if not installed and used according to the instructions found in the users manual, may result...
... from the AC power source as long as indicated in the instructions contained in to disassemble the cabinet. Modifications not expressly approved by Yamaha may void your equipment by turning the unit "OFF" and "ON", please try to use the product. 2. This equipment generates/uses radio frequencies and, if not installed and used according to the instructions found in the users manual, may result...
Owner's Manual
Page 4
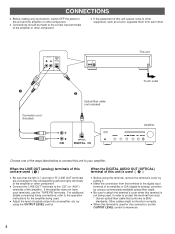
.... q Adjust the level of signals output into an amplifier, etc. When the DIGITAL AUDIO OUT (OPTICAL) terminal of this terminal to the digital input terminal of an amplifier or D/A (digital-to other equipment, such as a tuner, separate them from dust. * Use an optical fiber cable that the left and right) terminals of the amplifier or other component. q Connections should be made to your amplifier. LINE OUT DIGITAL AUDIO OUT OPTICAL This unit – Connection cord...
.... q Adjust the level of signals output into an amplifier, etc. When the DIGITAL AUDIO OUT (OPTICAL) terminal of this terminal to the digital input terminal of an amplifier or D/A (digital-to other equipment, such as a tuner, separate them from dust. * Use an optical fiber cable that the left and right) terminals of the amplifier or other component. q Connections should be made to your amplifier. LINE OUT DIGITAL AUDIO OUT OPTICAL This unit – Connection cord...
Owner's Manual
Page 5
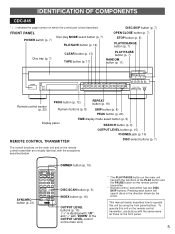
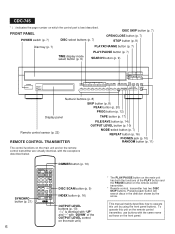
... part is best described. Pressing each button will search discs in the direction shown by using the front panel buttons. This manual mainly describes how to operate this unit on the remote control transmitter, use buttons with the exceptions described below. DISC SKIP button (p. 7) FRONT PANEL POWER switch (p. 7) Disc play MODE select button (p. 7) FILE/SAVE button (p. 14) OPEN/CLOSE button (p. 7) STOP button (p. 8) PLAYXCHANGE button (p. 7) Disc tray (p. 7) CLEAR button (p. 13) TAPE button (p. 17) PLAY/PAUSE button (p. 7) RANDOM button (p. 11) POWER FILE SAVE AUTO DISPLAY...
... part is best described. Pressing each button will search discs in the direction shown by using the front panel buttons. This manual mainly describes how to operate this unit on the remote control transmitter, use buttons with the exceptions described below. DISC SKIP button (p. 7) FRONT PANEL POWER switch (p. 7) Disc play MODE select button (p. 7) FILE/SAVE button (p. 14) OPEN/CLOSE button (p. 7) STOP button (p. 8) PLAYXCHANGE button (p. 7) Disc tray (p. 7) CLEAR button (p. 13) TAPE button (p. 17) PLAY/PAUSE button (p. 7) RANDOM button (p. 11) POWER FILE SAVE AUTO DISPLAY...
Owner's Manual
Page 6
.... OUTPUT LEVEL + DISC SCAN button (p. 9) INDEX button (p. 16) OUTPUT LEVEL buttons (p. 10) ("+" is best described. FRONT PANEL POWER switch (p. 7) DISC-select buttons (p. 7) DISC SKIP button (p. 7) OPEN/CLOSE button (p. 7) STOP button (p. 8) Disc tray (p. 7) PLAYXCHANGE button (p. 7) TIME display mode select button (p. 9) PLAY/PAUSE button (p. 7) SEARCH button (p. 9) POWER FILE SAVE AUTO DISPLAY OFF PLAYXCHANGE OPEN/CLOSE PLAY/ PAUSE STOP DISC SKIP TIME 1 DISC 2 3 4 5 +10 1 2 3 4 5 6 SKIP SEARCH FILE/ SAVE MODE REPEAT RANDOM 7 8 OUTPUT LEVEL 9 0 PROG TAPE...
.... OUTPUT LEVEL + DISC SCAN button (p. 9) INDEX button (p. 16) OUTPUT LEVEL buttons (p. 10) ("+" is best described. FRONT PANEL POWER switch (p. 7) DISC-select buttons (p. 7) DISC SKIP button (p. 7) OPEN/CLOSE button (p. 7) STOP button (p. 8) Disc tray (p. 7) PLAYXCHANGE button (p. 7) TIME display mode select button (p. 9) PLAY/PAUSE button (p. 7) SEARCH button (p. 9) POWER FILE SAVE AUTO DISPLAY OFF PLAYXCHANGE OPEN/CLOSE PLAY/ PAUSE STOP DISC SKIP TIME 1 DISC 2 3 4 5 +10 1 2 3 4 5 6 SKIP SEARCH FILE/ SAVE MODE REPEAT RANDOM 7 8 OUTPUT LEVEL 9 0 PROG TAPE...

Owner's Manual
Page 8
... signals output into an amplifier or the headphone level adjusted by using the OUTPUT LEVEL control. 8 After each track is played, its corresponding number disappears so the number of remaining tracks (and their numbers) can be performed when the unit is in the pause or stop play completely STOP * To resume play, press the PLAY/PAUSE button again (or press the PLAY or PAUSE button on the disc will be played...
... signals output into an amplifier or the headphone level adjusted by using the OUTPUT LEVEL control. 8 After each track is played, its corresponding number disappears so the number of remaining tracks (and their numbers) can be performed when the unit is in the pause or stop play completely STOP * To resume play, press the PLAY/PAUSE button again (or press the PLAY or PAUSE button on the disc will be played...
Owner's Manual
Page 9
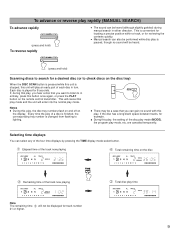
... to listen to in either direction. Selecting time displays You can be displayed for track number 21 or higher. 9 are canceled temporarily. Every time the play an early part of a disc is finished, the corresponding tray number is changed from flashing to lighting. This will cancel this play mode and the unit will not be heard (although slightly garbled) during this unit will play of each disc in turn.
... to listen to in either direction. Selecting time displays You can be displayed for track number 21 or higher. 9 are canceled temporarily. Every time the play an early part of a disc is finished, the corresponding tray number is changed from flashing to lighting. This will cancel this play mode and the unit will not be heard (although slightly garbled) during this unit will play of each disc in turn.
Owner's Manual
Page 10
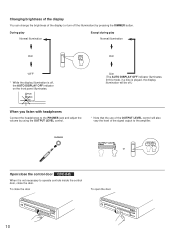
... control door CDC-845 When it is played, the display illumination will be off.) * Note that the use of the OUTPUT LEVEL control will also vary the level of the display (or turn off , the AUTO DISPLAY OFF indicator on the front panel illuminates. OUTPUT LEVEL + Open/close the door To open the door 10 In this mode, if a disc is not necessary to the PHONES jack and adjust the volume...
... control door CDC-845 When it is played, the display illumination will be off.) * Note that the use of the OUTPUT LEVEL control will also vary the level of the display (or turn off , the AUTO DISPLAY OFF indicator on the front panel illuminates. OUTPUT LEVEL + Open/close the door To open the door 10 In this mode, if a disc is not necessary to the PHONES jack and adjust the volume...
Owner's Manual
Page 11
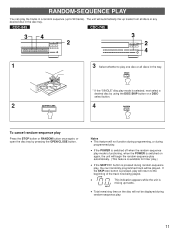
... random-sequence play Press the STOP button or RANDOM button once again, or open the disc tray by using the DISC SKIP button or a DISCselect button. 4 RANDOM To cancel random-sequence play . 11 q This indication appears while the unit is selected, next select a desired disc by pressing the OPEN/CLOSE button. The unit will be displayed during programmed play mode is mixing up tracks. q Total remaining time on...
... random-sequence play Press the STOP button or RANDOM button once again, or open the disc tray by using the DISC SKIP button or a DISCselect button. 4 RANDOM To cancel random-sequence play . 11 q This indication appears while the unit is selected, next select a desired disc by pressing the OPEN/CLOSE button. The unit will be displayed during programmed play mode is mixing up tracks. q Total remaining time on...
Owner's Manual
Page 12
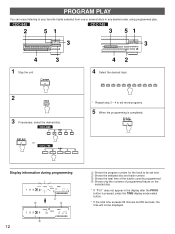
CDC-845 CDC-745 2 51 3 51 3 3 4 3 1 Stop the unit. STOP 2 PROG 3 If necessary, select the desired disc. CDC-845 DISC 1 2 3 4 5 DISC SKIP or CDC-745 DISC 1 2 3 4 5 42 4 Select the desired track. + 10 1 2 3 4 5 6 7 8 9 0 * Repeat step 3 - 4 to set more programs. 5 When the programming is pressed, press the TIME display mode-select button. * If the total time exceeds 99 minutes and 59 seconds, the time will not be set next. Shows the selected disc and track number. Ž Shows...
CDC-845 CDC-745 2 51 3 51 3 3 4 3 1 Stop the unit. STOP 2 PROG 3 If necessary, select the desired disc. CDC-845 DISC 1 2 3 4 5 DISC SKIP or CDC-745 DISC 1 2 3 4 5 42 4 Select the desired track. + 10 1 2 3 4 5 6 7 8 9 0 * Repeat step 3 - 4 to set more programs. 5 When the programming is pressed, press the TIME display mode-select button. * If the total time exceeds 99 minutes and 59 seconds, the time will not be set next. Shows the selected disc and track number. Ž Shows...
Owner's Manual
Page 13
... TIME display mode-select button is in reverse order) by pressing "0", instead of the programmed tracks. q The SKIP ( and ) button can be corrected by pressing the DISC SKIP button in turn. q To resume play mode, press the STOP button. 2. To cancel a programmed setting There are several methods, as described below. q Switch off the power. If the unit is pressed, the program number display can be used during playing, but only within the range...
... TIME display mode-select button is in reverse order) by pressing "0", instead of the programmed tracks. q The SKIP ( and ) button can be corrected by pressing the DISC SKIP button in turn. q To resume play mode, press the STOP button. 2. To cancel a programmed setting There are several methods, as described below. q Switch off the power. If the unit is pressed, the program number display can be used during playing, but only within the range...
Owner's Manual
Page 14
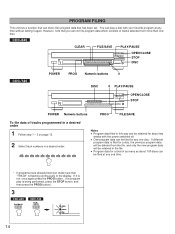
... set, make sure that has been set. q Program data for any time without setting it is not, once again press the PROG button. (If a program play a disc with the power switched off. q One-program data can play is flashing continuously in the display. You can be filed at any one disc. CDC-845 CLEAR FILE/SAVE PLAY/PAUSE OPEN/CLOSE STOP DISC CDC-745 POWER PROG Numeric buttons 0 DISC 0 PLAY/PAUSE OPEN/CLOSE STOP POWER Numeric buttons...
... set, make sure that has been set. q Program data for any time without setting it is not, once again press the PROG button. (If a program play a disc with the power switched off. q One-program data can play is flashing continuously in the display. You can be filed at any one disc. CDC-845 CLEAR FILE/SAVE PLAY/PAUSE OPEN/CLOSE STOP DISC CDC-745 POWER PROG Numeric buttons 0 DISC 0 PLAY/PAUSE OPEN/CLOSE STOP POWER Numeric buttons...
Owner's Manual
Page 15
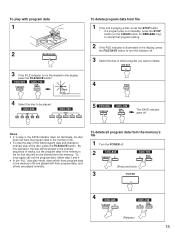
... memory. CDC-845 CDC-745 DISC 1 2 3 4 5 DISC 1 2 3 4 5 To delete program data from the memory's file 1 Turn the POWER off . q To stop the play of the disc, press the FILE/SAVE button. q In the "ALL" disc play mode, discs which have its program data in the display, press the FILE/SAVE button to turn the indicator off. 3 Select the disc of which program you want to ordinary play of the filed program data and change to...
... memory. CDC-845 CDC-745 DISC 1 2 3 4 5 DISC 1 2 3 4 5 To delete program data from the memory's file 1 Turn the POWER off . q To stop the play of the disc, press the FILE/SAVE button. q In the "ALL" disc play mode, discs which have its program data in the display, press the FILE/SAVE button to turn the indicator off. 3 Select the disc of which program you want to ordinary play of the filed program data and change to...

Owner's Manual
Page 17
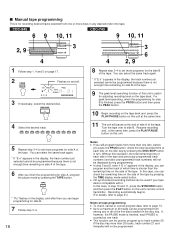
... then press the PLAY button on this unit's remote control transmitter. TAPE You can be used to program tracks for recording to program tracks so they best fit onto a tape. Resume recording and, at each side. Ž Shows the programmed track numbers for adjusting recording level on a disc so that they will automatically program tracks or help you can also enter the tape's total possible recording time manually. q In step...
... then press the PLAY button on this unit's remote control transmitter. TAPE You can be used to program tracks for recording to program tracks so they best fit onto a tape. Resume recording and, at each side. Ž Shows the programmed track numbers for adjusting recording level on a disc so that they will automatically program tracks or help you can also enter the tape's total possible recording time manually. q In step...
Owner's Manual
Page 18
... useful for adjusting recording level on the tape deck. If, however, the PAUSE mode is inserted, each disc on the disc tray by pressing the DISC SKIP button in turn. You can select the same track again. * If "E rr" appears in the display, the track number just selected cannot be programmed because there is not enough time remaining on side B of the tape. 9 The peak level searching function of this operation...
... useful for adjusting recording level on the tape deck. If, however, the PAUSE mode is inserted, each disc on the disc tray by pressing the DISC SKIP button in turn. You can select the same track again. * If "E rr" appears in the display, the track number just selected cannot be programmed because there is not enough time remaining on side B of the tape. 9 The peak level searching function of this operation...
Owner's Manual
Page 19
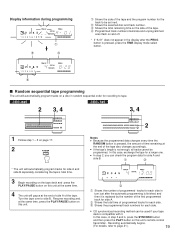
In this unit's remote control transmitter. Display information during programming Œ Ž Œ Shows the side of the tape and the program number for the track to be set next. Shows the selected disc and track number. Ž Shows the total remaining time on the side of the tape. Programmed track numbers illuminate and unprogrammed ones flash on and off. * If "A-01" does not...
In this unit's remote control transmitter. Display information during programming Œ Ž Œ Shows the side of the tape and the program number for the track to be set next. Shows the selected disc and track number. Ž Shows the total remaining time on the side of the tape. Programmed track numbers illuminate and unprogrammed ones flash on and off. * If "A-01" does not...

Owner's Manual
Page 21
... tape deck's operation manual to know whether it is useful for the programming procedure.) • This function can also be used together with CD play begins a little later than recording. With this function, you can record a CD on and off. OUTPUT LEVEL + 4 5 1 Select the disc. This unit enters into the pause mode, and the tape deck enters into the REC/PAUSE mode. * In this mode, the time display on this unit flashes...
... tape deck's operation manual to know whether it is useful for the programming procedure.) • This function can also be used together with CD play begins a little later than recording. With this function, you can record a CD on and off. OUTPUT LEVEL + 4 5 1 Select the disc. This unit enters into the pause mode, and the tape deck enters into the REC/PAUSE mode. * In this mode, the time display on this unit flashes...
Owner's Manual
Page 22
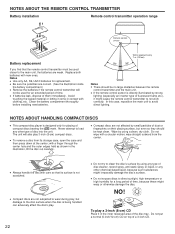
... used for replacement. Wipe by using a clean, dry cloth. Do not put a normal (5-inch/12-cm) CD on their playing surface, but damage to the disc surface when the disc is not scratched. NOTES ABOUT HANDLING COMPACT DISCS q This compact-disc player is directly illuminated by small particles of fluorescent lamp etc.), it might cause the remote control transmitter to not work correctly. q To remove a disc...
... used for replacement. Wipe by using a clean, dry cloth. Do not put a normal (5-inch/12-cm) CD on their playing surface, but damage to the disc surface when the disc is not scratched. NOTES ABOUT HANDLING COMPACT DISCS q This compact-disc player is directly illuminated by small particles of fluorescent lamp etc.), it might cause the remote control transmitter to not work correctly. q To remove a disc...

Owner's Manual
Page 23
... of this remote control transmitter are too weak. Clean the disc. Set the amplifier controls to play a disc. SPECIFICATIONS AUDIO SECTION Frequency response The remote control transmitter does not work. Improper output cable connections. The player is not connected or not completely connected. Load the disc correctly. Connect the cables properly. Replace the batteries with the label side up. Play does not begin. PROBABLE CAUSE The power cord is being subjected to determine whether the problem can be...
... of this remote control transmitter are too weak. Clean the disc. Set the amplifier controls to play a disc. SPECIFICATIONS AUDIO SECTION Frequency response The remote control transmitter does not work. Improper output cable connections. The player is not connected or not completely connected. Load the disc correctly. Connect the cables properly. Replace the batteries with the label side up. Play does not begin. PROBABLE CAUSE The power cord is being subjected to determine whether the problem can be...


