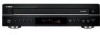
Owner's Manual
Page 2
... for replacement of the obsolete outlet. 10 Protect the power cord from being walked on the rear of important operating and maintenance (servicing) instructions in a safe place for your safety. This Class B digital apparatus complies with Canadian ICES-003. 1 Read these instructions. 2 Keep these instructions. 3 Heed all warnings. 4 Follow all servicing to rain or moisture, does not operate normally, or has been dropped. Install...
... for replacement of the obsolete outlet. 10 Protect the power cord from being walked on the rear of important operating and maintenance (servicing) instructions in a safe place for your safety. This Class B digital apparatus complies with Canadian ICES-003. 1 Read these instructions. 2 Keep these instructions. 3 Heed all warnings. 4 Follow all servicing to rain or moisture, does not operate normally, or has been dropped. Install...

Owner's Manual
Page 3
... L or coloured RED. This equipment generates/uses radio frequencies and, if not installed and used . Compliance with FCC regulations does not guarantee that your use only high quality shielded cables. If the antenna lead-in the home are on different branch (circuit breaker or fuse) circuits or install AC line filter/s. customers If the socket outlets in is connected to distribute this manual, meets...
... L or coloured RED. This equipment generates/uses radio frequencies and, if not installed and used . Compliance with FCC regulations does not guarantee that your use only high quality shielded cables. If the antenna lead-in the home are on different branch (circuit breaker or fuse) circuits or install AC line filter/s. customers If the socket outlets in is connected to distribute this manual, meets...
Owner's Manual
Page 4
... common operating errors before concluding that the front panel display indicates as follows. 2345 Never switch off the power if the front panel display is not pictured as it in a safe place for future reference. 2 Install this unit is plugged to the wall outlet, do not place: - Caution for moving this unit • When moving because the internal mechanism is not locked. This...
... common operating errors before concluding that the front panel display indicates as follows. 2345 Never switch off the power if the front panel display is not pictured as it in a safe place for future reference. 2 Install this unit is plugged to the wall outlet, do not place: - Caution for moving this unit • When moving because the internal mechanism is not locked. This...
Owner's Manual
Page 5
...Program Play ● Remote Control Capability Contents GETTING STARTED CD PREVENTIVE CARES 2 PREPARATIONS 3 Supplied Accessories 3 Remote Control Transmitter 3 Connecting to an Amplifier 4 Connecting the AC power cable 5 CONTROLS AND FUNCTIONS 6 Front Panel 6 Remote Control Transmitter 7 Display 8 PLAYING CDS BASIC OPERATION 9 Turning On and Off the Power 9 Loading and Playing Discs 9 PLAYXCHANGE 10 Scanning Discs 10 Skipping Tracks 11 Searching 11 CD TEXT 11 VARIOUS FUNCTIONS 12 Random Sequence Play 12 Program Play 13 Repeat Play 15 Index Search 15 Adjusting the Level...
...Program Play ● Remote Control Capability Contents GETTING STARTED CD PREVENTIVE CARES 2 PREPARATIONS 3 Supplied Accessories 3 Remote Control Transmitter 3 Connecting to an Amplifier 4 Connecting the AC power cable 5 CONTROLS AND FUNCTIONS 6 Front Panel 6 Remote Control Transmitter 7 Display 8 PLAYING CDS BASIC OPERATION 9 Turning On and Off the Power 9 Loading and Playing Discs 9 PLAYXCHANGE 10 Scanning Discs 10 Skipping Tracks 11 Searching 11 CD TEXT 11 VARIOUS FUNCTIONS 12 Random Sequence Play 12 Program Play 13 Repeat Play 15 Index Search 15 Adjusting the Level...
Owner's Manual
Page 7
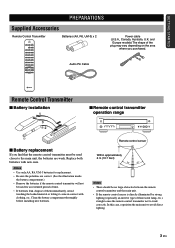
... the polarities are weak. CDC8 WH26170 Remote Control Transmitter ■ Battery installation 1 3 2 ■ Remote control transmitter operation range POWER ON OFF NATURAL SOUND COMPACT DISC PLAYER CDC-697 STANDBY /ON DISC 1 2 3 4 5 PLAYXCHANGE ■ Battery replacement If you purchased. In this case, reposition the main unit to work correctly. OUTPUT LEVEL + DISC SCAN DISC SKIP REPEAT RANDOM Batteries (AA, R6, UM-3) x 2 Audio Pin Cable Power cable (U.S.A., Canada, Australia, U.K. English 3 En Replace both batteries with clothing, etc...
... the polarities are weak. CDC8 WH26170 Remote Control Transmitter ■ Battery installation 1 3 2 ■ Remote control transmitter operation range POWER ON OFF NATURAL SOUND COMPACT DISC PLAYER CDC-697 STANDBY /ON DISC 1 2 3 4 5 PLAYXCHANGE ■ Battery replacement If you purchased. In this case, reposition the main unit to work correctly. OUTPUT LEVEL + DISC SCAN DISC SKIP REPEAT RANDOM Batteries (AA, R6, UM-3) x 2 Audio Pin Cable Power cable (U.S.A., Canada, Australia, U.K. English 3 En Replace both batteries with clothing, etc...

Owner's Manual
Page 8
This is connected to the components for factory use a high quality optical fiber cable. By connecting the REMOTE CONTROL OUT terminal of this unit to the REMOTE CONTROL IN terminal of the other component, you can operate this unit with the system remote control. In this way, up to 6 components can also operate it . • Make the connection from this terminal to the optical input terminal of an amplifier by using the OUTPUT LEVEL -/+ buttons. When this...
This is connected to the components for factory use a high quality optical fiber cable. By connecting the REMOTE CONTROL OUT terminal of this unit to the REMOTE CONTROL IN terminal of the other component, you can operate this unit with the system remote control. In this way, up to 6 components can also operate it . • Make the connection from this terminal to the optical input terminal of an amplifier by using the OUTPUT LEVEL -/+ buttons. When this...

Owner's Manual
Page 10
Front Panel CONTROLS AND FUNCTIONS 1 POWER ON OFF NATURAL SOUND COMPACT DISC PLAYER CDC-697 STANDBY /ON DISC 1 2 3 4 5 2 3 PLAYXCHANGE 4 5 6 7 89 0 q w 1 POWER P.9 2 Disc tray P.9 3 f (Open/Close P.9 4 STANDBY/ON P.9 5 DISC-select P.10 6 Display panel P.8 7 Remote control sensor P.3 8 t/e (Skip/Search P.11 9 r/y (Skip/Search P.11 0 w/d (Play/Pause P.10 q a (Stop P.10 w PLAYXCHANGE P.10 6 En
Front Panel CONTROLS AND FUNCTIONS 1 POWER ON OFF NATURAL SOUND COMPACT DISC PLAYER CDC-697 STANDBY /ON DISC 1 2 3 4 5 2 3 PLAYXCHANGE 4 5 6 7 89 0 q w 1 POWER P.9 2 Disc tray P.9 3 f (Open/Close P.9 4 STANDBY/ON P.9 5 DISC-select P.10 6 Display panel P.8 7 Remote control sensor P.3 8 t/e (Skip/Search P.11 9 r/y (Skip/Search P.11 0 w/d (Play/Pause P.10 q a (Stop P.10 w PLAYXCHANGE P.10 6 En

Owner's Manual
Page 12
.... 6 Shows the level of signals output into an amplifier adjusted by using the DISC SKIP buttons when this unit is CD TEXT compatible, the disc title, artist name, and track name are selected. 3 Shows the selected track number. 4 Shows the time displays. (For details, refer to "Selecting time displays and the text data" on the selected disc. After closing the disc tray by pressing the OPEN/CLOSE button or selecting any of this...
.... 6 Shows the level of signals output into an amplifier adjusted by using the DISC SKIP buttons when this unit is CD TEXT compatible, the disc title, artist name, and track name are selected. 3 Shows the selected track number. 4 Shows the time displays. (For details, refer to "Selecting time displays and the text data" on the selected disc. After closing the disc tray by pressing the OPEN/CLOSE button or selecting any of this...
Owner's Manual
Page 13
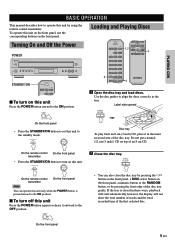
... MODE - POWER ON OFF On the front panel 2 Close the disc tray. OPEN/ CLOSE • You can operate this unit only when the POWER button is closed in the inner recessed area of the first selected disc. STANDBY/ON STANDBY /ON Disc tray To play back an 8 cm (3 inch) CD, place it outward to the OFF position. Turning On and Off the Power POWER POWER ON OFF NATURAL SOUND COMPACT DISC PLAYER CDC-697 STANDBY...
... MODE - POWER ON OFF On the front panel 2 Close the disc tray. OPEN/ CLOSE • You can operate this unit only when the POWER button is closed in the inner recessed area of the first selected disc. STANDBY/ON STANDBY /ON Disc tray To play back an 8 cm (3 inch) CD, place it outward to the OFF position. Turning On and Off the Power POWER POWER ON OFF NATURAL SOUND COMPACT DISC PLAYER CDC-697 STANDBY...

Owner's Manual
Page 14
... replace discs on the tray in the display. On the remote control transmitter On the front panel 10 En "1DISC" mode: The unit will hear no effect. If, during disc scan. Every time the playback of a disc is finished, the corresponding tray number is being played back has a long blank space between tracks, you can open the disc tray by using the DISC SKIP buttons, or a DISC-select button...
... replace discs on the tray in the display. On the remote control transmitter On the front panel 10 En "1DISC" mode: The unit will hear no effect. If, during disc scan. Every time the playback of a disc is finished, the corresponding tray number is being played back has a long blank space between tracks, you can open the disc tray by using the DISC SKIP buttons, or a DISC-select button...
Owner's Manual
Page 15
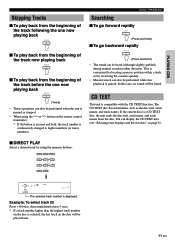
... 8). ■ DIRECT PLAY Select a desired track by using the t or y button on the remote control transmitter: * If the button is pressed and held, the track number is paused or stopped. • When using the numeric buttons. 1 2 3 4 5 6 7 8 9 0 - -10 1 2 3 4 5 1DISC REP RNDM SAVE BEST EDIT FILE 5DISCS S F PROG CD- English 11 En You can be heard (although slightly garbled) during manual search in either direction. BASIC OPERATION Searching...
... 8). ■ DIRECT PLAY Select a desired track by using the t or y button on the remote control transmitter: * If the button is pressed and held, the track number is paused or stopped. • When using the numeric buttons. 1 2 3 4 5 6 7 8 9 0 - -10 1 2 3 4 5 1DISC REP RNDM SAVE BEST EDIT FILE 5DISCS S F PROG CD- English 11 En You can be heard (although slightly garbled) during manual search in either direction. BASIC OPERATION Searching...

Owner's Manual
Page 16
... be played back. OUTPUT LEVEL + 3 DISC SCAN DISC SKIP REPEAT RANDOM CDC8 WH26170 1 Load one or more discs. VARIOUS FUNCTIONS Random Sequence Play You can play back the tracks on one or more discs in the display. ■ To cancel random-sequence play Press the a button or RANDOM button once again, or open the disc tray by using the DISC SKIP buttons on the remote control transmitter or a DISC-select button on the front panel...
... be played back. OUTPUT LEVEL + 3 DISC SCAN DISC SKIP REPEAT RANDOM CDC8 WH26170 1 Load one or more discs. VARIOUS FUNCTIONS Random Sequence Play You can play back the tracks on one or more discs in the display. ■ To cancel random-sequence play Press the a button or RANDOM button once again, or open the disc tray by using the DISC SKIP buttons on the remote control transmitter or a DISC-select button on the front panel...

Owner's Manual
Page 17
... DISC SKIP OPEN/ SYNCHRO DIMMER CLOSE TEXT/ TIME PEAK REPEAT RANDOM 7 TAPE CLEAR PROG 3 1 1 2 3 4 5 6 5 7 8 9 0 +10 INDEX MODE - PROG 1DISC REP RNDM SAVE BEST EDIT 5 5DISCS S F PROG CD- You can enjoy listening to program more discs in turn. * Without this unit display the total recorded time of each disc to be used by pressing the DISC SKIP buttons in any desired order by programming tracks. OUTPUT LEVEL + DISC...
... DISC SKIP OPEN/ SYNCHRO DIMMER CLOSE TEXT/ TIME PEAK REPEAT RANDOM 7 TAPE CLEAR PROG 3 1 1 2 3 4 5 6 5 7 8 9 0 +10 INDEX MODE - PROG 1DISC REP RNDM SAVE BEST EDIT 5 5DISCS S F PROG CD- You can enjoy listening to program more discs in turn. * Without this unit display the total recorded time of each disc to be used by pressing the DISC SKIP buttons in any desired order by programming tracks. OUTPUT LEVEL + DISC...

Owner's Manual
Page 18
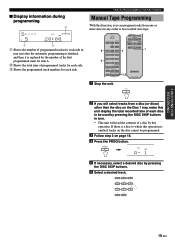
... STANDBY/ON button. • Switch off the power. ■ To check program data 1 During program play Press the a button. Once that time, "ALL" lights up in "To check program data". 2 Display the track number to be corrected by pressing the t button. ■ To correct program data 1 Follow the procedure described in the display. • The total time of the programmed tracks will not be displayed. VARIOUS FUNCTIONS ■ Display...
... STANDBY/ON button. • Switch off the power. ■ To check program data 1 During program play Press the a button. Once that time, "ALL" lights up in "To check program data". 2 Display the track number to be corrected by pressing the t button. ■ To correct program data 1 Follow the procedure described in the display. • The total time of the programmed tracks will not be displayed. VARIOUS FUNCTIONS ■ Display...
Owner's Manual
Page 20
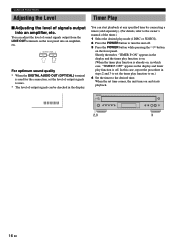
... turns on the front panel. In this case, repeat the procedure in the display and timer play function is used for the connection, set the timer play mode (1DISC or 5DISCS). 2 Press the POWER button to the desired time. VARIOUS FUNCTIONS Adjusting the Level Timer Play ■ Adjusting the level of signals output into an amplifier, etc. - For optimum sound quality * When the DIGITAL AUDIO OUT (OPTICAL) terminal is off . 3 Press the POWER button while pressing the w/d button...
... turns on the front panel. In this case, repeat the procedure in the display and timer play function is used for the connection, set the timer play mode (1DISC or 5DISCS). 2 Press the POWER button to the desired time. VARIOUS FUNCTIONS Adjusting the Level Timer Play ■ Adjusting the level of signals output into an amplifier, etc. - For optimum sound quality * When the DIGITAL AUDIO OUT (OPTICAL) terminal is off . 3 Press the POWER button while pressing the w/d button...
Owner's Manual
Page 21
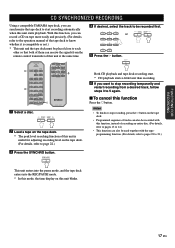
... can receive the signals from the remote control transmitter of this function Press the a button. OUTPUT LEVEL + DISC SCAN DISC SKIP 1 REPEAT RANDOM DISC SCAN DISC SKIP REPEAT RANDOM 5 CDC8 WH26170 1 Select a disc. English 17 En FUNCTIONS FOR RECORDING CD SYNCHRONIZED RECORDING Using a compatible YAMAHA tape deck, you want to stop recording, press the a button on the tape deck. • Programmed sequence of tracks can also be used together with this unit blinks.
... can receive the signals from the remote control transmitter of this function Press the a button. OUTPUT LEVEL + DISC SCAN DISC SKIP 1 REPEAT RANDOM DISC SCAN DISC SKIP REPEAT RANDOM 5 CDC8 WH26170 1 Select a disc. English 17 En FUNCTIONS FOR RECORDING CD SYNCHRONIZED RECORDING Using a compatible YAMAHA tape deck, you want to stop recording, press the a button on the tape deck. • Programmed sequence of tracks can also be used together with this unit blinks.
Owner's Manual
Page 22
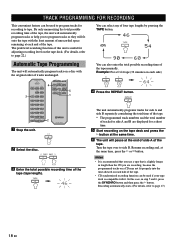
... will automatically program tracks or help you are displayed for adjusting recording level on the tape deck. (For details, refer to page 22.) You can select any of four tape lengths by pressing the TAPE button. (Off) TAPE Automatic Tape Programming The unit will automatically program tracks on each half of the tape. • CD synchronized recording function can be used if...
... will automatically program tracks or help you are displayed for adjusting recording level on the tape deck. (For details, refer to page 22.) You can select any of four tape lengths by pressing the TAPE button. (Off) TAPE Automatic Tape Programming The unit will automatically program tracks on each half of the tape. • CD synchronized recording function can be used if...
Owner's Manual
Page 23
... programming 3 1DISC REP RNDM SAVE BEST EDIT FILE 1 2 3 4 5 5DISCS S F PROG CD- OUTPUT LEVEL + DISC SCAN REPEAT DISC SKIP RANDOM 2,5 CDC8 WH26170 1 Stop the unit. 2 If you can program tracks from a disc (or discs) other than the disc on the Disc 1 tray, make this unit display the total recorded time of each disc to be used by pressing the DISC SKIP buttons in any order to which this operation. STANDBY/ON OPEN...
... programming 3 1DISC REP RNDM SAVE BEST EDIT FILE 1 2 3 4 5 5DISCS S F PROG CD- OUTPUT LEVEL + DISC SCAN REPEAT DISC SKIP RANDOM 2,5 CDC8 WH26170 1 Stop the unit. 2 If you can program tracks from a disc (or discs) other than the disc on the Disc 1 tray, make this unit display the total recorded time of each disc to be used by pressing the DISC SKIP buttons in any order to which this operation. STANDBY/ON OPEN...

Owner's Manual
Page 24
..." lights up in the display after the PROG button is no enough time remaining on the tape deck and press the w button at the same time. Notes • In steps 7 and 9, even if "ERROR" appears in the display, you can program it. • CD synchronized recording function can be used to program up and programmable track numbers among the unprogrammed ones blink. * If...
..." lights up in the display after the PROG button is no enough time remaining on the tape deck and press the w button at the same time. Notes • In steps 7 and 9, even if "ERROR" appears in the display, you can program it. • CD synchronized recording function can be used to program up and programmable track numbers among the unprogrammed ones blink. * If...
Owner's Manual
Page 27
... an incorrect operation was performed while using this remote control transmitter are too weak. Turn off and disconnect the AC power from a nearby tuner. The disc has been loaded upside down . There is dirty. replace it cannot, or if the problem is not listed in the SYMPTOM column, disconnect the unit's power cord and contact your authorized YAMAHA dealer or service center for help. Set the amplifier controls to...
... an incorrect operation was performed while using this remote control transmitter are too weak. Turn off and disconnect the AC power from a nearby tuner. The disc has been loaded upside down . There is dirty. replace it cannot, or if the problem is not listed in the SYMPTOM column, disconnect the unit's power cord and contact your authorized YAMAHA dealer or service center for help. Set the amplifier controls to...


