
Owners Manual
Page 3
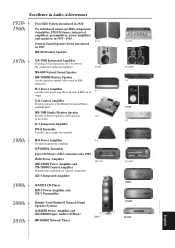
... innovative power amp that used vertical FETs in 1955 - 1965. NS-10M Studio Monitor Speaker Became of separate components. AX-1 Integrated Amplifier GT-CD1 CD Player MX-1 Power Amplifier and CX-1 Preamplifier Soavo-1 and Soavo-2 Natural Sound Speaker Systems A-S2000 Stereo Amplifier and CD-S2000 Super Audio CD Player Soavo-1 NP-S2000 Network Player NS-10M A-S2000 CD-S2000 NP-S2000 English NS-690 Natural Sound Speaker NS-1000M Monitor Speaker A truly legendary speaker still revered by HiFi enthusiasts. C-2 Control Amplifier Received...
... innovative power amp that used vertical FETs in 1955 - 1965. NS-10M Studio Monitor Speaker Became of separate components. AX-1 Integrated Amplifier GT-CD1 CD Player MX-1 Power Amplifier and CX-1 Preamplifier Soavo-1 and Soavo-2 Natural Sound Speaker Systems A-S2000 Stereo Amplifier and CD-S2000 Super Audio CD Player Soavo-1 NP-S2000 Network Player NS-10M A-S2000 CD-S2000 NP-S2000 English NS-690 Natural Sound Speaker NS-1000M Monitor Speaker A truly legendary speaker still revered by HiFi enthusiasts. C-2 Control Amplifier Received...

Owners Manual
Page 4
... Please check that you have received all of the following parts. • Power cable • Remote control • Batteries (AAA, R03, UM-4) (×2) • Stereo pin cable • SAFETY BROCHURE Contents Controls and functions...6 Connections...18 Playback of music files stored on a PC...22 Specifications ...26 Playable disc format...27 Troubleshooting...29 ■ About this manual • y indicates a tip for your operation. • The color of images...
... Please check that you have received all of the following parts. • Power cable • Remote control • Batteries (AAA, R03, UM-4) (×2) • Stereo pin cable • SAFETY BROCHURE Contents Controls and functions...6 Connections...18 Playback of music files stored on a PC...22 Specifications ...26 Playable disc format...27 Troubleshooting...29 ■ About this manual • y indicates a tip for your operation. • The color of images...

Owners Manual
Page 6
... STANDBY mode using the STANDBY/ON/OFF switch only. 6 En In this unit. Off: Shows that the power of the unit is turned off this condition, press the p CD key on the remote control to turn on the unit. Controls and functions ■ Front panel (pages 6 to 9) SA-CD HYBRID TRACK TOTAL REMAIN PROG SHUFFLE REP OFF S ALL A-B STANDBY/ON PURE DIRECT SOURCE LAYER OFF LAYER SA-CD CD DISC SOURCE USB OPTICAL COAXIAL...
... STANDBY mode using the STANDBY/ON/OFF switch only. 6 En In this unit. Off: Shows that the power of the unit is turned off this condition, press the p CD key on the remote control to turn on the unit. Controls and functions ■ Front panel (pages 6 to 9) SA-CD HYBRID TRACK TOTAL REMAIN PROG SHUFFLE REP OFF S ALL A-B STANDBY/ON PURE DIRECT SOURCE LAYER OFF LAYER SA-CD CD DISC SOURCE USB OPTICAL COAXIAL...

Owners Manual
Page 7
... SA-CD layer is retained even if you turn off this unit. 3 PURE DIRECT key Turns on the front panel display. y This setting is selected, audio signals are output only from the DIGITAL OUT (OPTICAL and COAXIAL) jacks on the rear panel (page 10). • The least indicators and messages appear on the PURE DIRECT mode to be played back. English 7 En Each time you press this key, the audio source is switched. (coaxial digital input) (optical digital input) y The audio source setting...
... SA-CD layer is retained even if you turn off this unit. 3 PURE DIRECT key Turns on the front panel display. y This setting is selected, audio signals are output only from the DIGITAL OUT (OPTICAL and COAXIAL) jacks on the rear panel (page 10). • The least indicators and messages appear on the PURE DIRECT mode to be played back. English 7 En Each time you press this key, the audio source is switched. (coaxial digital input) (optical digital input) y The audio source setting...

Owners Manual
Page 9
...) K Information display See page 28 for more information on the front panel of the disc E Remote control sensor Receives signals from the remote control. Approximately 6 m (20 ft) 30 30 English 9 En J Playback mode indicator Indicates the current playback mode. G (playback) / (pause) indicator Lights in the disc tray. I Time display mode indicator Indicates the time display mode of the disc in the playback/pause mode. H Disc type indicator Indicates the type (SA-CD/CD/HYBRID...
...) K Information display See page 28 for more information on the front panel of the disc E Remote control sensor Receives signals from the remote control. Approximately 6 m (20 ft) 30 30 English 9 En J Playback mode indicator Indicates the current playback mode. G (playback) / (pause) indicator Lights in the disc tray. I Time display mode indicator Indicates the time display mode of the disc in the playback/pause mode. H Disc type indicator Indicates the type (SA-CD/CD/HYBRID...

Owners Manual
Page 10
Controls and functions ■ Rear panel 1 2 3 45 BALANCED OUT ANALOG OUT GND 12 3 +HOT - Note While playing the Super Audio CD layer, the audio signals are output only from the BALANCED OUT and ANALOG OUT jacks. 10 En See page 20 for remote operation. For details on the connection, see page 21. 0 AC IN inlet Use this connector to connect a product testing device for servicing. 9 REMOTE IN/OUT jacks Use these jacks to plug in the supplied power cable. COLD...
Controls and functions ■ Rear panel 1 2 3 45 BALANCED OUT ANALOG OUT GND 12 3 +HOT - Note While playing the Super Audio CD layer, the audio signals are output only from the BALANCED OUT and ANALOG OUT jacks. 10 En See page 20 for remote operation. For details on the connection, see page 21. 0 AC IN inlet Use this connector to connect a product testing device for servicing. 9 REMOTE IN/OUT jacks Use these jacks to plug in the supplied power cable. COLD...

Owners Manual
Page 11
... the transport tape, then remove the magnet foot by rotating it . Use the magnet feet or appropriate supports when placing this unit on which this unit include built-in spikes, the spikes may scratch the shelf or floor on expensive furniture, etc. 67 OPTICAL COAXIAL DIGITAL OUT A A Foot The feet of vibrations on the set. Using the spikes...
... the transport tape, then remove the magnet foot by rotating it . Use the magnet feet or appropriate supports when placing this unit on which this unit include built-in spikes, the spikes may scratch the shelf or floor on expensive furniture, etc. 67 OPTICAL COAXIAL DIGITAL OUT A A Foot The feet of vibrations on the set. Using the spikes...
Owners Manual
Page 12
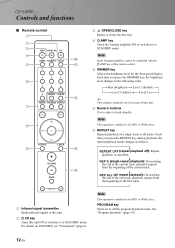
... time you turn off the program playback mode. INPUT 1 Infrared signal transmitter Sends infrared signals to this unit. 2 p CD key Turns this unit ON or switches it to STANDBY mode. Note This operation is ineffective for MP3 or WMA discs. For details on or off this remote control. 5 DIMMER key Selects the brightness level for the front panel display. Controls and functions ■ Remote control 1 2 3 AMP OPEN/CLOSE CD 4 @ DIMMER PURE DIRECT DISPLAY 5 A 1 2 3 4 5 6 6 7 8 9 0 ENTER CLEAR B REPEAT PROGRAM SHUFFLE 7 8 SOURCE 9 LAYER C VOLUME...
... time you turn off the program playback mode. INPUT 1 Infrared signal transmitter Sends infrared signals to this unit. 2 p CD key Turns this unit ON or switches it to STANDBY mode. Note This operation is ineffective for MP3 or WMA discs. For details on or off this remote control. 5 DIMMER key Selects the brightness level for the front panel display. Controls and functions ■ Remote control 1 2 3 AMP OPEN/CLOSE CD 4 @ DIMMER PURE DIRECT DISPLAY 5 A 1 2 3 4 5 6 6 7 8 9 0 ENTER CLEAR B REPEAT PROGRAM SHUFFLE 7 8 SOURCE 9 LAYER C VOLUME...
Owners Manual
Page 13
... DIRECT mode. • This setting is stopped. y • Press this key again to the owner's manual of your amplifier for more information on the front panel display. y To erase all programmed tracks, press the CLEAR key while programmed playback is retained even if you turn off this key, the audio source is switched. (coaxial digital input) (optical digital input) y The audio source setting is retained even if you are output only from the DIGITAL OUT (OPTICAL...
... DIRECT mode. • This setting is stopped. y • Press this key again to the owner's manual of your amplifier for more information on the front panel display. y To erase all programmed tracks, press the CLEAR key while programmed playback is retained even if you turn off this key, the audio source is switched. (coaxial digital input) (optical digital input) y The audio source setting is retained even if you are output only from the DIGITAL OUT (OPTICAL...

Owners Manual
Page 14
... display. 3 Select the DPLL bandwidth using the numeric buttons and press ENTER. 3 Repeat step 2 to STANDBY mode - when the disc is turned off or goes to program the next track. when this unit employs DPLL to generate accurate clock signals synchronized with the clock of a hybrid Super Audio CD is switched between SA-CD and CD 1 Press PROGRAM while playback is set to 24 tracks. 4 Press the p (Play...
... display. 3 Select the DPLL bandwidth using the numeric buttons and press ENTER. 3 Repeat step 2 to STANDBY mode - when the disc is turned off or goes to program the next track. when this unit employs DPLL to generate accurate clock signals synchronized with the clock of a hybrid Super Audio CD is switched between SA-CD and CD 1 Press PROGRAM while playback is set to 24 tracks. 4 Press the p (Play...

Owners Manual
Page 15
... if you turn off this unit. "NO DISC" appears on the information display. 4 Press and hold the (Stop) key or (Play) key on the front panel for 3 seconds, then the unit resumes to 3 if "NO DISC" appears on the information display. Skip step 1 to normal mode. The setting value flashes for about 2 seconds to switch the setting. (Stop) key: The AUTO POWER STANDBY function switches to ON...
... if you turn off this unit. "NO DISC" appears on the information display. 4 Press and hold the (Stop) key or (Play) key on the front panel for 3 seconds, then the unit resumes to 3 if "NO DISC" appears on the information display. Skip step 1 to normal mode. The setting value flashes for about 2 seconds to switch the setting. (Stop) key: The AUTO POWER STANDBY function switches to ON...

Owners Manual
Page 18
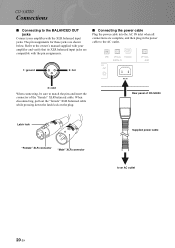
When the SA-CD layer is equipped with XLR balanced input jacks, we recommend balanced connection for optimum audio performance. Amplifier 18 En Connections BALANCED OUT ANALOG OUT GND 12 3 +HOT - COLD BALANCED OUT USB SYSTEM CONNECTOR REMOTE IN OUT OPTICAL COAXIAL DIGITAL IN AC IN Stereo pin cable XLR balanced cable If your amplifier is played, the audio signals are output only from the BALANCED OUT and ANALOG OUT jacks.
When the SA-CD layer is equipped with XLR balanced input jacks, we recommend balanced connection for optimum audio performance. Amplifier 18 En Connections BALANCED OUT ANALOG OUT GND 12 3 +HOT - COLD BALANCED OUT USB SYSTEM CONNECTOR REMOTE IN OUT OPTICAL COAXIAL DIGITAL IN AC IN Stereo pin cable XLR balanced cable If your amplifier is played, the audio signals are output only from the BALANCED OUT and ANALOG OUT jacks.
Owners Manual
Page 20
... the latch lock on the plug. Refer to the owner's manual supplied with your amplifier with the pin assignments. 1: ground 2: hot ■ Connecting the power cable Plug the power cable into the AC IN inlet when all connections are shown below. USB TE OUT OPTICAL COAXIAL DIGITAL IN OPTICAL DIGIT AC IN 3: cold When connecting, be sure to an AC outlet 20 En Rear panel of CD-S3000 Latch lock "Female" XLR...
... the latch lock on the plug. Refer to the owner's manual supplied with your amplifier with the pin assignments. 1: ground 2: hot ■ Connecting the power cable Plug the power cable into the AC IN inlet when all connections are shown below. USB TE OUT OPTICAL COAXIAL DIGITAL IN OPTICAL DIGIT AC IN 3: cold When connecting, be sure to an AC outlet 20 En Rear panel of CD-S3000 Latch lock "Female" XLR...
Owners Manual
Page 21
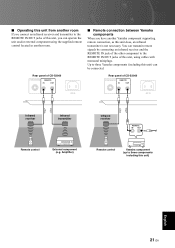
... another Yamaha component supporting remote connection, as this unit does, an infrared transmitter is not necessary. Rear panel of CD-S3000 SYSTEM CONNECTOR REMOTE IN OUT Rear panel of this unit, you can operate the unit and/or external component using cables with monaural miniplugs. Up to the REMOTE IN/OUT jacks of CD-S3000 SYSTEM CONNECTOR REMOTE IN OUT AC IN AC IN Infrared receiver Infrared transmitter Infrared receiver REMOTE IN OUT Remote control External component (e.g.
... another Yamaha component supporting remote connection, as this unit does, an infrared transmitter is not necessary. Rear panel of CD-S3000 SYSTEM CONNECTOR REMOTE IN OUT Rear panel of this unit, you can operate the unit and/or external component using cables with monaural miniplugs. Up to the REMOTE IN/OUT jacks of CD-S3000 SYSTEM CONNECTOR REMOTE IN OUT AC IN AC IN Infrared receiver Infrared transmitter Infrared receiver REMOTE IN OUT Remote control External component (e.g.
Owners Manual
Page 22
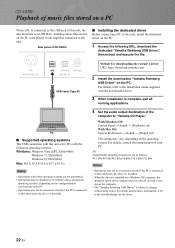
...; Sound → [Output] tab The setting may not be reduced. y Transmittable sampling frequencies are as a USB DAC, enabling music files stored on the PC to be played via an amplifier connected to this unit, install the dedicated driver on the PC. Rear panel of CD-S3000 ■ Installing the dedicated driver Before connecting a PC to the download page for downloading the exclusive driver URL: http://download.yamaha.com/ 2 Install the downloaded "Yamaha Steinberg USB Driver" on...
...; Sound → [Output] tab The setting may not be reduced. y Transmittable sampling frequencies are as a USB DAC, enabling music files stored on the PC to be played via an amplifier connected to this unit, install the dedicated driver on the PC. Rear panel of CD-S3000 ■ Installing the dedicated driver Before connecting a PC to the download page for downloading the exclusive driver URL: http://download.yamaha.com/ 2 Install the downloaded "Yamaha Steinberg USB Driver" on...

Owners Manual
Page 23
... 1 Connect the PC to this unit, using the SOURCE key of this unit. 5 Set the audio output destination of the PC during music playback, change the input with the SOURCE key while playback on the operating system. Operate them on the front panel. 4 Select "USB," using a USB cable. 2 Turn on the PC. 3 Turn this unit on by pressing the STANDBY/ ON/OFF switch on the PC. 6 Operate the PC to "Yamaha CD Player." English...
... 1 Connect the PC to this unit, using the SOURCE key of this unit. 5 Set the audio output destination of the PC during music playback, change the input with the SOURCE key while playback on the operating system. Operate them on the front panel. 4 Select "USB," using a USB cable. 2 Turn on the PC. 3 Turn this unit on by pressing the STANDBY/ ON/OFF switch on the PC. 6 Operate the PC to "Yamaha CD Player." English...
Owners Manual
Page 26
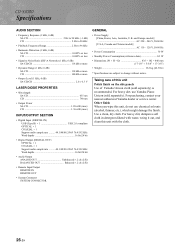
...) OPTICAL × 1 COAXIAL × 1 Support audio sample rate ......... 44.1/48/88.2/96/176.4/192 kHz Word depths 16 bit/24 bit • Audio Output ANALOG OUT Unbalanced × 2 ch (L/R) BALANCED OUT Balanced × 2 ch (L/R) • Remote Input/Output REMOTE IN REMOTE OUT • System Connector SYSTEM CONNECTOR GENERAL • Power Supply [China, Korea, Asia, Australia, U.K. Taking care of this unit Polish finish on the side panels Use...
...) OPTICAL × 1 COAXIAL × 1 Support audio sample rate ......... 44.1/48/88.2/96/176.4/192 kHz Word depths 16 bit/24 bit • Audio Output ANALOG OUT Unbalanced × 2 ch (L/R) BALANCED OUT Balanced × 2 ch (L/R) • Remote Input/Output REMOTE IN REMOTE OUT • System Connector SYSTEM CONNECTOR GENERAL • Power Supply [China, Korea, Asia, Australia, U.K. Taking care of this unit Polish finish on the side panels Use...

Owners Manual
Page 28
..., the original level of sound quality is preserved during playback, but even so they were recorded. • This unit is compatible with a sampling frequency of 44.1 kHz. • This unit is not supported. • The disc must be ISO9660 compatible. • Copyright-protected WMA files cannot be kept clean. WMA WMA (Windows Media Audio) is being used, remove...
..., the original level of sound quality is preserved during playback, but even so they were recorded. • This unit is compatible with a sampling frequency of 44.1 kHz. • This unit is not supported. • The disc must be ISO9660 compatible. • Copyright-protected WMA files cannot be kept clean. WMA WMA (Windows Media Audio) is being used, remove...
Owners Manual
Page 29
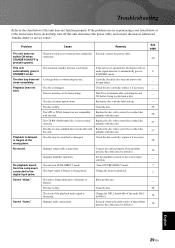
... disc. Connect the cables properly. No playback sound from the component connected to the correct input selection. The unit is dirty. If the problem persists, the cables may be defective. Set the amplifier controls to the digital input jacks. If the problem persists, the cables may be scratched or damaged. The disc is in PURE DIRECT mode. Turn off this unit. replace it if necessary. Playback does not start. Reload the disc with no audio signal...
... disc. Connect the cables properly. No playback sound from the component connected to the correct input selection. The unit is dirty. If the problem persists, the cables may be defective. Set the amplifier controls to the digital input jacks. If the problem persists, the cables may be scratched or damaged. The disc is in PURE DIRECT mode. Turn off this unit. replace it if necessary. Playback does not start. Reload the disc with no audio signal...

Owners Manual
Page 30
Troubleshooting Problem Cause Remedy Noise from the component connected to the DIGITAL IN (OPTICAL or COAXIAL) jack. Replace the disc. The batteries of the connected component to "PCM." Use within 6 m and 60° radius. Noisy playback. Another application is launched on the connected component is not "PCM." Do not launch other applications during playback. The dedicated "Yamaha Steinberg USB Driver" Install the "Yamaha Steinberg USB Driver" has not been installed correctly. See page 22...
Troubleshooting Problem Cause Remedy Noise from the component connected to the DIGITAL IN (OPTICAL or COAXIAL) jack. Replace the disc. The batteries of the connected component to "PCM." Use within 6 m and 60° radius. Noisy playback. Another application is launched on the connected component is not "PCM." Do not launch other applications during playback. The dedicated "Yamaha Steinberg USB Driver" Install the "Yamaha Steinberg USB Driver" has not been installed correctly. See page 22...


