
Owners Manual
Page 3
... volume levels to other property. Then have the device inspected by qualified Yamaha service personnel. • Do not use the device or headphones for all devices, set all volume controls to disassemble the internal parts or modify them in any gaps or openings on the device. • ... weight on the device or place heavy objects on it, and avoid use excessive force on the buttons, switches or connectors. (5)-10 1/2 AUDIOGRAM 3 Owner's Manual 3 WARNING Always follow the basic precautions listed below to avoid the possibility of physical injury to you experience any way.
... volume levels to other property. Then have the device inspected by qualified Yamaha service personnel. • Do not use the device or headphones for all devices, set all volume controls to disassemble the internal parts or modify them in any gaps or openings on the device. • ... weight on the device or place heavy objects on it, and avoid use excessive force on the buttons, switches or connectors. (5)-10 1/2 AUDIOGRAM 3 Owner's Manual 3 WARNING Always follow the basic precautions listed below to avoid the possibility of physical injury to you experience any way.

Owners Manual
Page 5
...of a high-performance computer recording system that you for years to the AUDIOGRAM interface 8 3. The AUDIOGRAM 3 includes a USB audio interface for digital audio data transfer, and... elements of your interface's superlative features and enjoy trouble-free operation for choosing a Yamaha AUDIOGRAM 3 Computer Recording System. Installing Cubase AI 8 2. Contents Introduction 5 Contents 5 ... 128 Dimensional Diagrams 128 Block Diagram and Level Diagram 129 About the accessory disk 130 AUDIOGRAM 3 Owner's Manual 5 After reading the manual, please store it in a safe ...
...of a high-performance computer recording system that you for years to the AUDIOGRAM interface 8 3. The AUDIOGRAM 3 includes a USB audio interface for digital audio data transfer, and... elements of your interface's superlative features and enjoy trouble-free operation for choosing a Yamaha AUDIOGRAM 3 Computer Recording System. Installing Cubase AI 8 2. Contents Introduction 5 Contents 5 ... 128 Dimensional Diagrams 128 Block Diagram and Level Diagram 129 About the accessory disk 130 AUDIOGRAM 3 Owner's Manual 5 After reading the manual, please store it in a safe ...

Owners Manual
Page 8
... to have continuous use this section you will be connected to the AUDIOGRAM off or to standby mode (except the computer), and set the LEVEL controls and OUT LEVEL control to their minimum settings. 2 Connect microphones and/or instruments. "*" indicates where the version number... appears in all gear that is connected. 8 AUDIOGRAM 3 Owner's Manual Select MIC ( ) if a microphone is connected...
... to have continuous use this section you will be connected to the AUDIOGRAM off or to standby mode (except the computer), and set the LEVEL controls and OUT LEVEL control to their minimum settings. 2 Connect microphones and/or instruments. "*" indicates where the version number... appears in all gear that is connected. 8 AUDIOGRAM 3 Owner's Manual Select MIC ( ) if a microphone is connected...

Owners Manual
Page 9
...that you connect to the computer's USB connector, or change the connection to the MIC/INST input jack. Failure to the computer's USB interface. AUDIOGRAM 3 Owner's Manual 9 If the instrument or computer does hang up, restart the application or computer. CAUTION NOTE When connecting or disconnecting the ... the computer before proceeding. 4 Turn the power to turn the OUT LEVEL control all the way down. The first time you set the OUT LEVEL control to the minimum position before turning this switch to avoid the risk of loud noises that only a condenser microphone is...
...that you connect to the computer's USB connector, or change the connection to the MIC/INST input jack. Failure to the computer's USB interface. AUDIOGRAM 3 Owner's Manual 9 If the instrument or computer does hang up, restart the application or computer. CAUTION NOTE When connecting or disconnecting the ... the computer before proceeding. 4 Turn the power to turn the OUT LEVEL control all the way down. The first time you set the OUT LEVEL control to the minimum position before turning this switch to avoid the risk of loud noises that only a condenser microphone is...

Owners Manual
Page 10
... "The recorded sound is used for recording to the maximum level. For details on how to make the setting refer to the PDF manual provided with the OUT LEVEL control while monitoring via the AUDIOGRAM interface. Mac: Double-click the [Application] → [Cubase AI *]. ("*" indicates where the version number appears in the...
... "The recorded sound is used for recording to the maximum level. For details on how to make the setting refer to the PDF manual provided with the OUT LEVEL control while monitoring via the AUDIOGRAM interface. Mac: Double-click the [Application] → [Cubase AI *]. ("*" indicates where the version number appears in the...

Owners Manual
Page 12
... the Device Setup window, and click [Control Panel] on the right side of the [Input/Output Configuration] field. Mac: The [CoreAudio Device Settings] dialog window appears. Click [OK] to close the window. Windows: The ASIO Direct Sound Full Duplex Setup dialog box will be displayed. Quick Guide 5 Select... and output port [USB Audio CODEC] checkbox, and then click [OK] to close and restart the Cubase AI, then open the Device Setup window. 12 AUDIOGRAM 3 Owner's Manual
... the Device Setup window, and click [Control Panel] on the right side of the [Input/Output Configuration] field. Mac: The [CoreAudio Device Settings] dialog window appears. Click [OK] to close the window. Windows: The ASIO Direct Sound Full Duplex Setup dialog box will be displayed. Quick Guide 5 Select... and output port [USB Audio CODEC] checkbox, and then click [OK] to close and restart the Cubase AI, then open the Device Setup window. 12 AUDIOGRAM 3 Owner's Manual
Owners Manual
Page 13
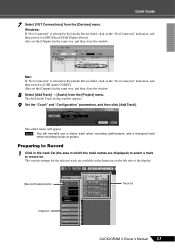
...eld, click on the left side of the display. [Record Enable] button Track list Inspector AUDIOGRAM 3 Owner's Manual 13 Preparing to [ASIO DirectX Full Duplex Driver]. The Add Audio Track dialog window appears. 9 Set the "Count" and "Configuration" parameters, and then click [Add Track]. Quick...selected in the same way, and then close the window. 8 Select [Add Track] → [Audio] from the [Devices] menu. The various settings for the selected track are displayed) to select a track to record on the "Not Connected" indication, and then switch to Record 1 Click in...
...eld, click on the left side of the display. [Record Enable] button Track list Inspector AUDIOGRAM 3 Owner's Manual 13 Preparing to [ASIO DirectX Full Duplex Driver]. The Add Audio Track dialog window appears. 9 Set the "Count" and "Configuration" parameters, and then click [Add Track]. Quick...selected in the same way, and then close the window. 8 Select [Add Track] → [Audio] from the [Devices] menu. The various settings for the selected track are displayed) to select a track to record on the "Not Connected" indication, and then switch to Record 1 Click in...

Owners Manual
Page 15
... select [Save] from the [Devices] menu to Cubase AI for recording using the AUDIOGRAM level indicators while the Cubase monitoring button ( ) is set as high as possible without clipping. Monitoring button AUDIOGRAM 3 Owner's Manual 15 Save your project frequently to insure against losing large amounts of... flash only occasionally on a different track, select a new track and repeat the record procedure. The playback level will be set to record further material on the same track. 7 To record additional material on the highest input transients. NOTE To hear the playback...
... select [Save] from the [Devices] menu to Cubase AI for recording using the AUDIOGRAM level indicators while the Cubase monitoring button ( ) is set as high as possible without clipping. Monitoring button AUDIOGRAM 3 Owner's Manual 15 Save your project frequently to insure against losing large amounts of... flash only occasionally on a different track, select a new track and repeat the record procedure. The playback level will be set to record further material on the same track. 7 To record additional material on the highest input transients. NOTE To hear the playback...

Owners Manual
Page 16
Quick Guide 6 Step Mixing with the Cubase AI software. Click the [Edit] button ( ) on the left and right to set the stereo position of the channel strip to the pdf manual provided with Cubase AI In this point you can begin to use EQ to ... idea to stereo, and creating an audio file. Mixes can be recorded to audio CDs. 1 Launch Cubase AI and open the VST audio channel settings window. NOTE For further details refer to open a project file. 2 Click the [Start] button on the top of the channel strips left side of...
Quick Guide 6 Step Mixing with the Cubase AI software. Click the [Edit] button ( ) on the left and right to set the stereo position of the channel strip to the pdf manual provided with Cubase AI In this point you can begin to use EQ to ... idea to stereo, and creating an audio file. Mixes can be recorded to audio CDs. 1 Launch Cubase AI and open the VST audio channel settings window. NOTE For further details refer to open a project file. 2 Click the [Start] button on the top of the channel strips left side of...

Owners Manual
Page 18
... jacks 0. NOTE If a device is not connected to the MIC/INST jack, set the switch on ( ), the AUDIOGRAM supplies phantom power to the type of the channel signal. Other devices may occur. 18 AUDIOGRAM 3 Owner's Manual e t yr 3 LEVEL Controls Adjusts the level of device connected... This indicator lights when power is connected to adjust the overall volume without changing the relative volume balance among the channels. NOTE Yamaha recommends that may damage your equipment, your computer via the supplied USB cable. This allows you do not need phantom CAUTION power...
... jacks 0. NOTE If a device is not connected to the MIC/INST jack, set the switch on ( ), the AUDIOGRAM supplies phantom power to the type of the channel signal. Other devices may occur. 18 AUDIOGRAM 3 Owner's Manual e t yr 3 LEVEL Controls Adjusts the level of device connected... This indicator lights when power is connected to adjust the overall volume without changing the relative volume balance among the channels. NOTE Yamaha recommends that may damage your equipment, your computer via the supplied USB cable. This allows you do not need phantom CAUTION power...

Owners Manual
Page 19
...using the OUT LEVEL control. If both jacks are used, the signal is input. Input 3 LEVEL Record controls Playback 6 OUT LEVEL control Cubase AI Output AUDIOGRAM 3 Owner's Manual 19 Phone-type Pin-type NOTE You can directly connect an electric guitar or bass without the need for a separate DI (Direct Injection... either the phone jacks or pin jacks but not both phone and pin jacks, only the signal from the device connected to this jack. Set the MIC/INST switch 2 to MIC or INST according to the type of headphones to the phone jacks is only output from channels 1 and...
...using the OUT LEVEL control. If both jacks are used, the signal is input. Input 3 LEVEL Record controls Playback 6 OUT LEVEL control Cubase AI Output AUDIOGRAM 3 Owner's Manual 19 Phone-type Pin-type NOTE You can directly connect an electric guitar or bass without the need for a separate DI (Direct Injection... either the phone jacks or pin jacks but not both phone and pin jacks, only the signal from the device connected to this jack. Set the MIC/INST switch 2 to MIC or INST according to the type of headphones to the phone jacks is only output from channels 1 and...

Owners Manual
Page 20
...the interface and a computer? Windows 7/Vista: 1. Click [OK]. 20 AUDIOGRAM 3 Owner's Manual Click the "Recording" tab, right-click the "USB Audio CODEC" icon and select "Properties." 3. ing system, etc., set at appropriate levels? ❑ Is the output of your computer operating system ...muted? ❑ Do you using other device(s) and connecting only the Yamaha USB device. If so, try connecting the AUDIOGRAM interface directly to quit all necessary ...
...the interface and a computer? Windows 7/Vista: 1. Click [OK]. 20 AUDIOGRAM 3 Owner's Manual Click the "Recording" tab, right-click the "USB Audio CODEC" icon and select "Properties." 3. ing system, etc., set at appropriate levels? ❑ Is the output of your computer operating system ...muted? ❑ Do you using other device(s) and connecting only the Yamaha USB device. If so, try connecting the AUDIOGRAM interface directly to quit all necessary ...

Owners Manual
Page 21
... the "USB Audio CODEC" icon and select "Properties". 3. Select "No sound" in the "Sound Scheme." mum level. ❑ Have you set the volume slider to its maximum level. 3. Check and raise the output level if necessary. Troubleshooting Mac: 1. Close the "Properties" dialog window....Audio CODEC". 3. Windows XP: 1. Click the "Sound Effect" tab and set the volume slider at the bottom of the Cubase AI application assigned properly? AUDIOGRAM 3 Owner's Manual 21 Click the "Output" tab and set the volume slider of the Quick Guide. Click the "Volume" tab. ...
... the "USB Audio CODEC" icon and select "Properties". 3. Select "No sound" in the "Sound Scheme." mum level. ❑ Have you set the volume slider to its maximum level. 3. Check and raise the output level if necessary. Troubleshooting Mac: 1. Close the "Properties" dialog window....Audio CODEC". 3. Windows XP: 1. Click the "Sound Effect" tab and set the volume slider at the bottom of the Cubase AI application assigned properly? AUDIOGRAM 3 Owner's Manual 21 Click the "Output" tab and set the volume slider of the Quick Guide. Click the "Volume" tab. ...

Owners Manual
Page 22
You may experience intermittent playback if you exceed your computer's owner's manual for the latest information. 22 AUDIOGRAM 3 Owner's Manual Click the "Performance" tab. sion quality" to your computer's support center or support page on a number of factors ... time will open the "Sounds and Audio Devices Properties" dialog window. 2. The "Advanced Audio Properties" dialog window will depend on installing and setting up extra memory. Refer to your computer's capabilities. ❑ Are you recording or playing long continuous sections of audio? The number of tracks...
You may experience intermittent playback if you exceed your computer's owner's manual for the latest information. 22 AUDIOGRAM 3 Owner's Manual Click the "Performance" tab. sion quality" to your computer's support center or support page on a number of factors ... time will open the "Sounds and Audio Devices Properties" dialog window. 2. The "Advanced Audio Properties" dialog window will depend on installing and setting up extra memory. Refer to your computer's capabilities. ❑ Are you recording or playing long continuous sections of audio? The number of tracks...


