
Installation Guide
Page 2
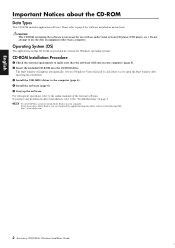
... files, you can download the application from the Adobe website at the following URL: http://www.adobe.com 2 Accessory CD-ROM for software installation instructions. 2 English Important Notices about the CD-ROM Data Types This CD-ROM includes application software.
... files, you can download the application from the Adobe website at the following URL: http://www.adobe.com 2 Accessory CD-ROM for software installation instructions. 2 English Important Notices about the CD-ROM Data Types This CD-ROM includes application software.
Installation Guide
Page 3
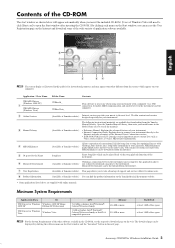
... which appear on a compatible instrument or tone generator. Utilizing a connection between the instrument and the computer. (Available at Yamaha website.) The following instructional materials are supplied with enhanced realism and expression. Musicsoft Downloader can find the product information on the...or more 512 MB or more Hard Disk at least 3 MB of free space at Yamaha website.) you to the instrument. We offer content and services designed especially for instructional purposes, and may appear somewhat different from the Internet. Accessory CD-ROM for Windows ...
... which appear on a compatible instrument or tone generator. Utilizing a connection between the instrument and the computer. (Available at Yamaha website.) The following instructional materials are supplied with enhanced realism and expression. Musicsoft Downloader can find the product information on the...or more 512 MB or more Hard Disk at least 3 MB of free space at Yamaha website.) you to the instrument. We offer content and services designed especially for instructional purposes, and may appear somewhat different from the Internet. Accessory CD-ROM for Windows ...
Installation Guide
Page 4
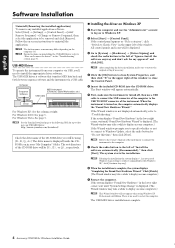
...my approval" and click [OK]. If the Wizard window is no need to "How can I remove the driver?" Follow the on-screen instructions to Classic View" in the lower right corner, wait until "Found New Hardware Wizard" is displayed. (The Wizard window may take a while...to the computer. 7 Check the radio button to Windows Update, select the radio button for Windows Installation Guide n See the Yamaha Download page at right. For instructions on , the computer automatically displays the "Found New Hardware Wizard." When the instrument is complete. 4 Accessory CD-ROM for "...
...my approval" and click [OK]. If the Wizard window is no need to "How can I remove the driver?" Follow the on-screen instructions to Classic View" in the lower right corner, wait until "Found New Hardware Wizard" is displayed. (The Wizard window may take a while...to the computer. 7 Check the radio button to Windows Update, select the radio button for Windows Installation Guide n See the Yamaha Download page at right. For instructions on , the computer automatically displays the "Found New Hardware Wizard." When the instrument is complete. 4 Accessory CD-ROM for "...
Installation Guide
Page 7
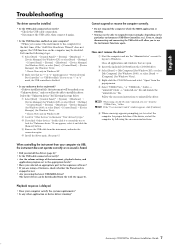
... simply disconnecting and connecting the USB cable will not be downloaded from the "USBdrvVista_" folder. Perform the following the on -screen instructions to uninstall the driver. or "x" marks appear at "Universal Serial Bus Controller" or "USB Root Hub." Delete the "Unknown device...select [My Computer] (for Windows 2000), or select [Start] → [Computer] (for Windows Installation Guide 7 Follow the on -screen instructions. Close all applications and windows that no sound is delayed. • Does your computer? →When you connect the instrument to the computer...
... simply disconnecting and connecting the USB cable will not be downloaded from the "USBdrvVista_" folder. Perform the following the on -screen instructions to uninstall the driver. or "x" marks appear at "Universal Serial Bus Controller" or "USB Root Hub." Delete the "Unknown device...select [My Computer] (for Windows 2000), or select [Start] → [Computer] (for Windows Installation Guide 7 Follow the on -screen instructions. Close all applications and windows that no sound is delayed. • Does your computer? →When you connect the instrument to the computer...
Internet Connection Guide (version 1.0)
Page 1
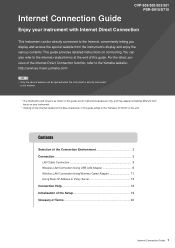
...the end of this guide are for instructional purposes only, and may appear somewhat different from the instrument's display and enjoy the various contents. For the latest services of the Internet Direct Connection function, refer to the Yamaha website: http://services.music.yamaha.com/ NOTE • Only the ... 14 Connection Help 18 Initialization of the Setup 19 Glossary of Terms 20 Internet Connection Guide 1 Internet Connection Guide CVP-509/505/503/501 PSR-S910/S710 Enjoy your instrument. * Clicking on the Internet-related terms (blue characters) in this guide. This guide ...
...the end of this guide are for instructional purposes only, and may appear somewhat different from the instrument's display and enjoy the various contents. For the latest services of the Internet Direct Connection function, refer to the Yamaha website: http://services.music.yamaha.com/ NOTE • Only the ... 14 Connection Help 18 Initialization of the Setup 19 Glossary of Terms 20 Internet Connection Guide 1 Internet Connection Guide CVP-509/505/503/501 PSR-S910/S710 Enjoy your instrument. * Clicking on the Internet-related terms (blue characters) in this guide. This guide ...
Internet Connection Guide (version 1.10)
Page 1
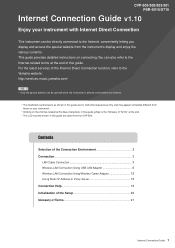
... and enjoy the various contents. For the latest services of the Internet Direct Connection function, refer to the Yamaha website: http://services.music.yamaha.com/ NOTE • Only the special website can be directly connected to the Internet, conveniently letting you ...505/503/501 PSR-S910/S710 Internet Connection Guide v1.10 Enjoy your instrument with Internet Direct Connection This instrument can be opened when the instrument is directly connected to the Internet. * The illustrations and screens as shown in this guide are taken from the CVP-509. This guide provides detailed instructions...
... and enjoy the various contents. For the latest services of the Internet Direct Connection function, refer to the Yamaha website: http://services.music.yamaha.com/ NOTE • Only the special website can be directly connected to the Internet, conveniently letting you ...505/503/501 PSR-S910/S710 Internet Connection Guide v1.10 Enjoy your instrument with Internet Direct Connection This instrument can be opened when the instrument is directly connected to the Internet. * The illustrations and screens as shown in this guide are taken from the CVP-509. This guide provides detailed instructions...
Owner's Manual
Page 1
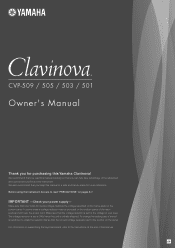
For information on assembling the keyboard stand, refer to the instructions at 240V when the unit is initially shipped. CVP-509 / 505 / 503 / 501 Owner's Manual Thank you for purchasing this manual in a safe and handy place for the voltage in your power supply- IMPORTANT -Check your ...may be sure to the pointer on pages 6-7. To change the setting use a "minus" screwdriver to rotate the selector dial so that you keep this Yamaha Clavinova! We recommend that you read "PRECAUTIONS" on the panel. Make sure that your local AC mains voltage matches the voltage specified on the name...
For information on assembling the keyboard stand, refer to the instructions at 240V when the unit is initially shipped. CVP-509 / 505 / 503 / 501 Owner's Manual Thank you for purchasing this manual in a safe and handy place for the voltage in your power supply- IMPORTANT -Check your ...may be sure to the pointer on pages 6-7. To change the setting use a "minus" screwdriver to rotate the selector dial so that you keep this Yamaha Clavinova! We recommend that you read "PRECAUTIONS" on the panel. Make sure that your local AC mains voltage matches the voltage specified on the name...
Owner's Manual
Page 2
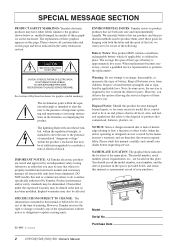
... by an independent safety testing laboratory in order that you . Purchase Date 2 CVP-509/505/503/501 Owner's Manual Implied warranties may also be diminished. IMPORTANT NOTICE: All Yamaha electronic products are both the letter and the spirit of the law, we want you do... notice or obligation to update existing units. 92-469- ➀ (bottom) ENVIRONMENTAL ISSUES: Yamaha strives to produce products that our products and the production methods used in the safety instruction section. You should record the model number, serial number, and the date of purchase in ...
... by an independent safety testing laboratory in order that you . Purchase Date 2 CVP-509/505/503/501 Owner's Manual Implied warranties may also be diminished. IMPORTANT NOTICE: All Yamaha electronic products are both the letter and the spirit of the law, we want you do... notice or obligation to update existing units. 92-469- ➀ (bottom) ENVIRONMENTAL ISSUES: Yamaha strives to produce products that our products and the production methods used in the safety instruction section. You should record the model number, serial number, and the date of purchase in ...
Owner's Manual
Page 3
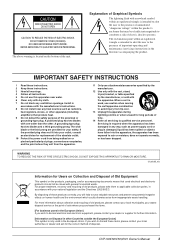
...is intended to alert the user to applicable collection points, in accordance with the manufacturer's instructions. 8 Do not install near water. 6 Clean only with your safety. CVP-509/505/503/501 Owner's Manual 3 REFER SERVICING TO QUALIFIED SERVICE PERSONNEL. The wide blade or...ers) that used , use caution when moving the cart/apparatus combination to qualified service personnel. IMPORTANT SAFETY INSTRUCTIONS 1 Read these instructions. 2 Keep these instructions. 3 Heed all warnings. 4 Follow all servicing to avoid injury from tip-over. 13 Unplug this apparatus near ...
...is intended to alert the user to applicable collection points, in accordance with the manufacturer's instructions. 8 Do not install near water. 6 Clean only with your safety. CVP-509/505/503/501 Owner's Manual 3 REFER SERVICING TO QUALIFIED SERVICE PERSONNEL. The wide blade or...ers) that used , use caution when moving the cart/apparatus combination to qualified service personnel. IMPORTANT SAFETY INSTRUCTIONS 1 Read these instructions. 2 Keep these instructions. 3 Heed all warnings. 4 Follow all servicing to avoid injury from tip-over. 13 Unplug this apparatus near ...
Owner's Manual
Page 10
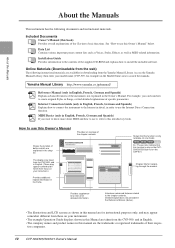
... the Owner's Manual. For example, you want to know more about MIDI and how to search the manuals. CVP-509 CVP-505 CVP-503 CVP-501 Ex.: These icons indicate that this function is only available on the CVP-501. Provides supplementary notes and ...the Reference Manual (above). • The illustrations and LCD screens as MIDI-related information. Chapter title for instructional purposes only, and may appear somewhat different from the Yamaha Manual Library. Detailed explanations are the trademarks or registered trademarks of the instrument, not explained in this Manual...
... the Owner's Manual. For example, you want to know more about MIDI and how to search the manuals. CVP-509 CVP-505 CVP-503 CVP-501 Ex.: These icons indicate that this function is only available on the CVP-501. Provides supplementary notes and ...the Reference Manual (above). • The illustrations and LCD screens as MIDI-related information. Chapter title for instructional purposes only, and may appear somewhat different from the Yamaha Manual Library. Detailed explanations are the trademarks or registered trademarks of the instrument, not explained in this Manual...
Owner's Manual
Page 17
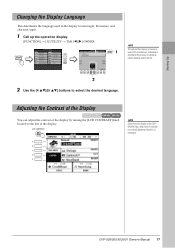
... Throughout this manual, arrows are used in the instructions, indicating in shorthand the process of calling up certain displays and functions. 2 2 Use the [4 ▲▼]/[5 ▲▼] buttons to the left of the display. Adjusting the Contrast of the Display CVP-509 CVP-505 CVP-503 CVP-501 You can adjust the...
... Throughout this manual, arrows are used in the instructions, indicating in shorthand the process of calling up certain displays and functions. 2 2 Use the [4 ▲▼]/[5 ▲▼] buttons to the left of the display. Adjusting the Contrast of the Display CVP-509 CVP-505 CVP-503 CVP-501 You can adjust the...
Owner's Manual
Page 26
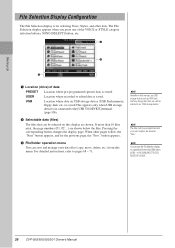
... previous page, the "Prev." If more than 10 files exist, the page numbers (P1, P2 ...) are shown. NOTE Hereafter in this menu. For detailed instructions, refer to as "USB storage device." Pressing the corresponding button changes the display page. When other data. NOTE The data, both pre-programmed and your... data files (copy, move, delete, etc.) from the [USB] button. [USB] → [A] SONG/[B] STYLE/[C] REGIST/[F] VOICE. 26 CVP-509/505/503/501 Owner's Manual USER Location where recorded or edited data is stored.
... previous page, the "Prev." If more than 10 files exist, the page numbers (P1, P2 ...) are shown. NOTE Hereafter in this menu. For detailed instructions, refer to as "USB storage device." Pressing the corresponding button changes the display page. When other data. NOTE The data, both pre-programmed and your... data files (copy, move, delete, etc.) from the [USB] button. [USB] → [A] SONG/[B] STYLE/[C] REGIST/[F] VOICE. 26 CVP-509/505/503/501 Owner's Manual USER Location where recorded or edited data is stored.
Owner's Manual
Page 27
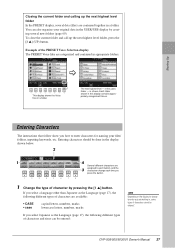
... next highest level folder In the PRESET display, several new folders (page 69). Example of characters cannot be entered." CVP-509/505/503/501 Owner's Manual 27 Entering Characters The instructions that follow show you are categorized and contained in appropriate folders. Closing the current folder and calling up the next highest...
... next highest level folder In the PRESET display, several new folders (page 69). Example of characters cannot be entered." CVP-509/505/503/501 Owner's Manual 27 Entering Characters The instructions that follow show you are categorized and contained in appropriate folders. Closing the current folder and calling up the next highest...
Owner's Manual
Page 36
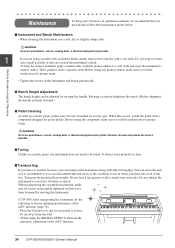
... adjustment of the instrument and bench periodically. You can disassemble the unit down to read the instructions for proper usage. • Tighten the screws of the iAFC function. 36 CVP-509/505/503/501 Owner's Manual CAUTION Do not use paint thinners, solvents, cleaning fluids, ...■ Transporting If you first took it . Maintenance To keep the surface polished, apply commercially available piano polisher to read the instructions for proper usage. Perform the piano songs by Clavinova ■ Bench Height Adjustment The bench height can be tuned. CAUTION Do not use...
... adjustment of the instrument and bench periodically. You can disassemble the unit down to read the instructions for proper usage. • Tighten the screws of the iAFC function. 36 CVP-509/505/503/501 Owner's Manual CAUTION Do not use paint thinners, solvents, cleaning fluids, ...■ Transporting If you first took it . Maintenance To keep the surface polished, apply commercially available piano polisher to read the instructions for proper usage. Perform the piano songs by Clavinova ■ Bench Height Adjustment The bench height can be tuned. CAUTION Do not use...
Owner's Manual
Page 54
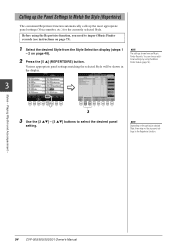
... appropriate panel settings matching the selected Style will be any panel settings in the display. Playing Rhythm and Accompaniment - 54 CVP-509/505/503/501 Owner's Manual Calling up the most appropriate panel settings (Voice number, etc.) for the currently selected Style. You can choose... additional settings by using the Repertoire function, you need to import Music Finder records (see instructions on page 73). 1 Select the desired Style from the Style Selection display (steps 1 - 2 on the particular selected Style, there may not...
... appropriate panel settings matching the selected Style will be any panel settings in the display. Playing Rhythm and Accompaniment - 54 CVP-509/505/503/501 Owner's Manual Calling up the most appropriate panel settings (Voice number, etc.) for the currently selected Style. You can choose... additional settings by using the Repertoire function, you need to import Music Finder records (see instructions on page 73). 1 Select the desired Style from the Style Selection display (steps 1 - 2 on the particular selected Style, there may not...
Owner's Manual
Page 59
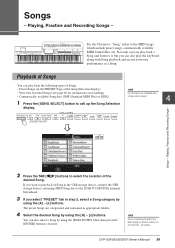
... or ESEQ formats, refer to page 9. 4 1 Press the [SONG SELECT] button to the Main display by using the [A] - [J] buttons. CVP-509/505/503/501 Owner's Manual 59 Playing, Practice and Recording Songs - Playing, Practice and Recording Songs - 2 Press the TAB [E][F] buttons to the MIDI songs which..., "Song" refers to select the location of the Song Selection display) NOTE • Your own recorded Songs (see page 66 for instructions on recording) For information on one of Songs You can instantly jump back to call up the Song Selection display. You can also play...
... or ESEQ formats, refer to page 9. 4 1 Press the [SONG SELECT] button to the Main display by using the [A] - [J] buttons. CVP-509/505/503/501 Owner's Manual 59 Playing, Practice and Recording Songs - Playing, Practice and Recording Songs - 2 Press the TAB [E][F] buttons to the MIDI songs which..., "Song" refers to select the location of the Song Selection display) NOTE • Your own recorded Songs (see page 66 for instructions on recording) For information on one of Songs You can instantly jump back to call up the Song Selection display. You can also play...
Owner's Manual
Page 67
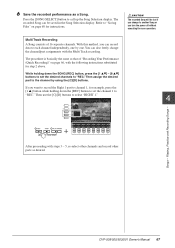
... and record other parts as a Song. Then assign the desired part to the channel by one by using the [C]/[D] buttons. CVP-509/505/503/501 Owner's Manual 67 Press the [SONG SELECT] button to "REC." The recorded Song can record data to select "RIGHT 1." ...press the [1 ▲▼] - [8 ▲▼] buttons to set the channel 1 to "Saving Files" on page 66, with the following instructions substituted for instructions. Refer to "REC." If you turn the power off without executing the save operation. Songs - Playing, Practice and Recording Songs - 6 Save the ...
... and record other parts as a Song. Then assign the desired part to the channel by one by using the [C]/[D] buttons. CVP-509/505/503/501 Owner's Manual 67 Press the [SONG SELECT] button to "REC." The recorded Song can record data to select "RIGHT 1." ...press the [1 ▲▼] - [8 ▲▼] buttons to set the channel 1 to "Saving Files" on page 66, with the following instructions substituted for instructions. Refer to "REC." If you turn the power off without executing the save operation. Songs - Playing, Practice and Recording Songs - 6 Save the ...
Owner's Manual
Page 71
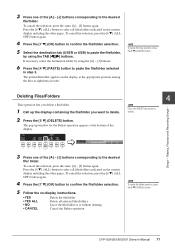
To cancel the selection, press the same [A] - [J] button again. NOTE Files in step 3. CVP-509/505/503/501 Owner's Manual 71 To cancel the selection, press the [6 ▼] (ALL OFF) button again. 4 Press the [7 ▼] (OK) button to confirm... window for the Delete operation appears at the appropriate position among the files in alphabetical order. The pasted file/folder appears on -display instructions. • YES • YES ALL • NO • CANCEL Delete the file/folder Delete all files/folders indicated on the current display ...
To cancel the selection, press the same [A] - [J] button again. NOTE Files in step 3. CVP-509/505/503/501 Owner's Manual 71 To cancel the selection, press the [6 ▼] (ALL OFF) button again. 4 Press the [7 ▼] (OK) button to confirm... window for the Delete operation appears at the appropriate position among the files in alphabetical order. The pasted file/folder appears on -display instructions. • YES • YES ALL • NO • CANCEL Delete the file/folder Delete all files/folders indicated on the current display ...
Owner's Manual
Page 73
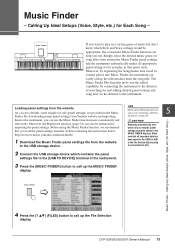
...Music Finder function can use the Music Finder function more conveniently and effectively. http://services.music.yamaha.com/musicfinder/ 1 Download the Music Finder panel settings file from the website...up the MUSIC FINDER display. Music Finder - By downloading many panel settings from the website following the instructions below. If you the added capability, by importing the panel settings. Before using a USB storage device,...as described at left). 5 Music Finder - CVP-509/505/503/501 Owner's Manual 73 The Music Finder Plus function gives you want to play in the...
...Music Finder function can use the Music Finder function more conveniently and effectively. http://services.music.yamaha.com/musicfinder/ 1 Download the Music Finder panel settings file from the website...up the MUSIC FINDER display. Music Finder - By downloading many panel settings from the website following the instructions below. If you the added capability, by importing the panel settings. Before using a USB storage device,...as described at left). 5 Music Finder - CVP-509/505/503/501 Owner's Manual 73 The Music Finder Plus function gives you want to play in the...
Owner's Manual
Page 80
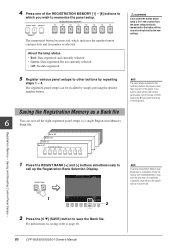
...REGISTRATION MEMORY [1] - [8] buttons to which indicates the number button contains data and its number is compatible among the models CVP-509/505/503/501. For instructions on saving, refer to other buttons by simply pressing the desired number button. Saving the Registration Memory as a single Registration Memory Bank... to the button will be erased and replaced by the new settings. 5 Register various panel setups to page 68. 80 CVP-509/505/503/501 Owner's Manual Bank 04 Bank 03 Bank 02 Bank 01 Registration Memory - The registered panel setups can save the Bank fi...
...REGISTRATION MEMORY [1] - [8] buttons to which indicates the number button contains data and its number is compatible among the models CVP-509/505/503/501. For instructions on saving, refer to other buttons by simply pressing the desired number button. Saving the Registration Memory as a single Registration Memory Bank... to the button will be erased and replaced by the new settings. 5 Register various panel setups to page 68. 80 CVP-509/505/503/501 Owner's Manual Bank 04 Bank 03 Bank 02 Bank 01 Registration Memory - The registered panel setups can save the Bank fi...
