User Guide
Page 3
WorkCentre Status Bar 1-9 2. Table of Contents USER GUIDE 1. BASIC INFORMATION M940 - M950 WorkCentre Components 1-6 Software Components 1-7 Xerox ControlCentre 2.0 - COPYING Copying 2-1 Copying 2-2 Using the Set Document Feeder (M950 only) 2-3 Copy Color 2-3 Copy Quality 2-3 Paper Setup 2-4 Lighten/Darken 2-5 Reduce/Enlarge 2-6 Select Button 2-8 Menu/Exit 2-8 Copy Quantity Buttons 2-8 User Guide iii M950 WorkCentre Components 1-1 Connections 1-2 Control Panel 1-3 M940 -
WorkCentre Status Bar 1-9 2. Table of Contents USER GUIDE 1. BASIC INFORMATION M940 - M950 WorkCentre Components 1-6 Software Components 1-7 Xerox ControlCentre 2.0 - COPYING Copying 2-1 Copying 2-2 Using the Set Document Feeder (M950 only) 2-3 Copy Color 2-3 Copy Quality 2-3 Paper Setup 2-4 Lighten/Darken 2-5 Reduce/Enlarge 2-6 Select Button 2-8 Menu/Exit 2-8 Copy Quantity Buttons 2-8 User Guide iii M950 WorkCentre Components 1-1 Connections 1-2 Control Panel 1-3 M940 -

User Guide
Page 4
... 4-3 Selecting Program Timeout 4-3 Selecting Sleep Mode Setting 4-4 Learning How to Customize Print Features on Your PC 4-4 Customizing Scan Features 4-5 Setting a Preset for Email 4-6 5. CUSTOMIZING YOUR WORKCENTRE Customizing your PC 6-1 User Guide iv SCANNING Scanning 5-1 Scan Using Preset 1 5-2 Sending a Scan through Email 5-3 Scanning Using ControlCentre - PRINTING Printing 3-1 Printing Documents 3-2 Printing Cards 3-3 Printing...
... 4-3 Selecting Program Timeout 4-3 Selecting Sleep Mode Setting 4-4 Learning How to Customize Print Features on Your PC 4-4 Customizing Scan Features 4-5 Setting a Preset for Email 4-6 5. CUSTOMIZING YOUR WORKCENTRE Customizing your PC 6-1 User Guide iv SCANNING Scanning 5-1 Scan Using Preset 1 5-2 Sending a Scan through Email 5-3 Scanning Using ControlCentre - PRINTING Printing 3-1 Printing Documents 3-2 Printing Cards 3-3 Printing...
User Guide
Page 5
MAINTENANCE Maintaining Your WorkCentre 7-1 Changing an Ink Cartridge 7-2 Cleaning the Print Head 7-5 Aligning the Print Head 7-6 Changing the Print Head 7-7 8. General Information General Information 9-1 Service and Support 9-2 Ordering Supplies 9-3 ...
MAINTENANCE Maintaining Your WorkCentre 7-1 Changing an Ink Cartridge 7-2 Cleaning the Print Head 7-5 Aligning the Print Head 7-6 Changing the Print Head 7-7 8. General Information General Information 9-1 Service and Support 9-2 Ordering Supplies 9-3 ...
User Guide
Page 7
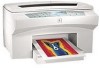
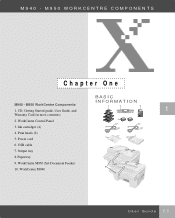
... 1. CD, Getting Started guide, User Guide, and Warranty Card (in most countries) 2. Power cord 7 8 6. Paper tray 9. WorkCentre M940 U s e r G u i d e 1.1 Ink cartridges (4) 5 6 4. M940 - Print heads (2) 5. Output tray 8. M950 WORKCENTRE COMPONENTS C h a p t e r O n e 1z M940 - WorkCentre Control Panel BASIC INFORMATION 1 2 3 - + 4 Y104 Black Magenta Yellow Cyan DOCU PRINT M Series WORK CENTRE M Series Ink Cartridges Catouche d'Encre Tintenpatrone Cartuccia inhiostro Inkt Cartridge Cartucho...
... 1. CD, Getting Started guide, User Guide, and Warranty Card (in most countries) 2. Power cord 7 8 6. Paper tray 9. WorkCentre M940 U s e r G u i d e 1.1 Ink cartridges (4) 5 6 4. M940 - Print heads (2) 5. Output tray 8. M950 WORKCENTRE COMPONENTS C h a p t e r O n e 1z M940 - WorkCentre Control Panel BASIC INFORMATION 1 2 3 - + 4 Y104 Black Magenta Yellow Cyan DOCU PRINT M Series WORK CENTRE M Series Ink Cartridges Catouche d'Encre Tintenpatrone Cartuccia inhiostro Inkt Cartridge Cartucho...

User Guide
Page 8
... or card stock. 1 2 Paper Thickness Knob The paper thickness knob allows you to prevent the ink in the nozzles from the wall outlet, as the WorkCentre requires a small amount of power to choose envelope or paper printing. Paper printing 2. Envelope/card stock printing 1.2 U s e r G u i d e Do not disconnect the power cord from drying...
... or card stock. 1 2 Paper Thickness Knob The paper thickness knob allows you to prevent the ink in the nozzles from the wall outlet, as the WorkCentre requires a small amount of power to choose envelope or paper printing. Paper printing 2. Envelope/card stock printing 1.2 U s e r G u i d e Do not disconnect the power cord from drying...

User Guide
Page 10
Navigator Control: Move between selections 11. Reduce/Enlarge: Adjust the size copy desired 9. Select button: Select options 13. Error light: Lights when error occurs 12. Copy Quantity: Select copy quantity 14. CONTROL PANEL 8. Scan Mode: Enter Scan Mode 10. Start: Starts scanning or copying 15. Power: Turns WorkCentre on and off, however, a residual amount of power is always on, as the WorkCentre requires a small amount of power to prevent the ink in the nozzles from drying. 1.4 U s e r G u i d e
Navigator Control: Move between selections 11. Reduce/Enlarge: Adjust the size copy desired 9. Select button: Select options 13. Error light: Lights when error occurs 12. Copy Quantity: Select copy quantity 14. CONTROL PANEL 8. Scan Mode: Enter Scan Mode 10. Start: Starts scanning or copying 15. Power: Turns WorkCentre on and off, however, a residual amount of power is always on, as the WorkCentre requires a small amount of power to prevent the ink in the nozzles from drying. 1.4 U s e r G u i d e

User Guide
Page 11
U s e r G u i d e 1.5 Output Tray The output tray rests on top of the paper tray and slides into the lower portion of the WorkCentre. CONTROL PANEL Paper Tray The paper tray is inserted into the WorkCentre. 1 Output Tray Extension The output tray extension pulls out and flips up.
U s e r G u i d e 1.5 Output Tray The output tray rests on top of the paper tray and slides into the lower portion of the WorkCentre. CONTROL PANEL Paper Tray The paper tray is inserted into the WorkCentre. 1 Output Tray Extension The output tray extension pulls out and flips up.
User Guide
Page 12
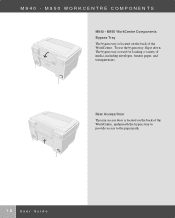
Rear Access Door The rear access door is located on the back of the WorkCentre. The bypass tray is located on the back of media, including envelopes, banner paper, and transparencies. To use the bypass tray, flip it down. M950 WorkCentre Components Bypass Tray The bypass tray is used for loading a variety of the WorkCentre, underneath the bypass tray to provide access to the paper path. 1.6 U s e r G u i d e M950 WORKCENTRE COMPONENTS M940 - M940 -
Rear Access Door The rear access door is located on the back of the WorkCentre. The bypass tray is located on the back of media, including envelopes, banner paper, and transparencies. To use the bypass tray, flip it down. M950 WorkCentre Components Bypass Tray The bypass tray is used for loading a variety of the WorkCentre, underneath the bypass tray to provide access to the paper path. 1.6 U s e r G u i d e M950 WORKCENTRE COMPONENTS M940 - M940 -
User Guide
Page 14
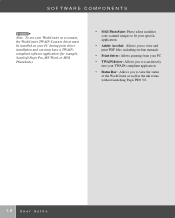
SOFTWARE COMPONENTS Note: To use your WorkCentre as a scanner, the WorkCentre TWAIN Scanner driver must be installed on your PC during print driver installation and you must have a TWAINcompliant software application (for example, ScanSoft Pagis Pro, ... PC. • TWAIN driver: Allows you to scan directly into your TWAIN-compliant application. • Status Bar: Allows you to view the status of the WorkCentre as well as the ink status without launching Pagis PRO 3.0. 1.8 U s e r G u i d e
SOFTWARE COMPONENTS Note: To use your WorkCentre as a scanner, the WorkCentre TWAIN Scanner driver must be installed on your PC during print driver installation and you must have a TWAINcompliant software application (for example, ScanSoft Pagis Pro, ... PC. • TWAIN driver: Allows you to scan directly into your TWAIN-compliant application. • Status Bar: Allows you to view the status of the WorkCentre as well as the ink status without launching Pagis PRO 3.0. 1.8 U s e r G u i d e
User Guide
Page 15
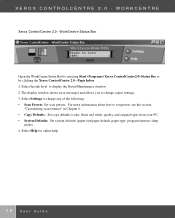
... Open the WorkCentre Status Bar by selecting Start>Programs>Xerox ControlCentre2.0>Status Bar or by clicking the Xerox ControlCentre 2.0 - The display window shows error messages and allows you to set presets, see the section, "Customizing scan features" in Chapter 4. • Copy Defaults: Set copy defaults (color, black and white, quality, and ... presets. Select Settings to display the Status/Maintenance window. 2. Select Help for online help. 1.9 U s e r G u i d e Select the ink level to change copier settings. 3. XEROX CONTROLCENTRE 2.0 - WORKCENTRE Xerox ControlCentre 2.0 -
... Open the WorkCentre Status Bar by selecting Start>Programs>Xerox ControlCentre2.0>Status Bar or by clicking the Xerox ControlCentre 2.0 - The display window shows error messages and allows you to set presets, see the section, "Customizing scan features" in Chapter 4. • Copy Defaults: Set copy defaults (color, black and white, quality, and ... presets. Select Settings to display the Status/Maintenance window. 2. Select Help for online help. 1.9 U s e r G u i d e Select the ink level to change copier settings. 3. XEROX CONTROLCENTRE 2.0 - WORKCENTRE Xerox ControlCentre 2.0 -
User Guide
Page 20
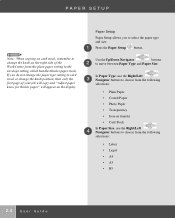
... setting, which handles thicker paper stock. Paper Setup Paper Setup allows you do not change the knob position, then only the first page of the WorkCentre from the following selections: • Letter • Legal • A4 • A5 • B5 2.4 U s e r G u i d e
... setting, which handles thicker paper stock. Paper Setup Paper Setup allows you do not change the knob position, then only the first page of the WorkCentre from the following selections: • Letter • Legal • A4 • A5 • B5 2.4 U s e r G u i d e

User Guide
Page 22
..., Poster, Repeat Image, Mirror, or Custom). REDUCE/ENLARGE Note: The Left/Right Navigator buttons will reduce or enlarge by 1% when using the Set Document Feeder (WorkCentre M950). - + Use the Up/Down Navigator 2 buttons to scroll through the options.
..., Poster, Repeat Image, Mirror, or Custom). REDUCE/ENLARGE Note: The Left/Right Navigator buttons will reduce or enlarge by 1% when using the Set Document Feeder (WorkCentre M950). - + Use the Up/Down Navigator 2 buttons to scroll through the options.

User Guide
Page 23
...%) Repeat Image (100%) Fits many smaller identical images on the page. Legal size paper can only be copied using the Set Document Feeder on the WorkCentre M950. Poster (400%) Poster (400%) Prescans the image, then divides and prints image in 1% increments when you press the Left/Right Navigator buttons. Double Size...
...%) Repeat Image (100%) Fits many smaller identical images on the page. Legal size paper can only be copied using the Set Document Feeder on the WorkCentre M950. Poster (400%) Poster (400%) Prescans the image, then divides and prints image in 1% increments when you press the Left/Right Navigator buttons. Double Size...

User Guide
Page 27
... Knob to print index cards, postcards, and birthday cards. Choose any other card sizes not found in the Paper Size Selection menu or use the WorkCentre to envelope. (The envelope 3 setting allows you can use the Custom selection to print on the Properties button, then the 4 Paper/Output tab, then select...
... Knob to print index cards, postcards, and birthday cards. Choose any other card sizes not found in the Paper Size Selection menu or use the WorkCentre to envelope. (The envelope 3 setting allows you can use the Custom selection to print on the Properties button, then the 4 Paper/Output tab, then select...

User Guide
Page 31
... Properties button, then the 4 Paper/Output tab, then select Plain paper in the Paper Type list box. If not, make the required adjustments in your WorkCentre to the light then check that are specifically designed for ink jet machines.
... Properties button, then the 4 Paper/Output tab, then select Plain paper in the Paper Type list box. If not, make the required adjustments in your WorkCentre to the light then check that are specifically designed for ink jet machines.

User Guide
Page 35
CUSTOMIZING YOUR WORKCENTRE C h a p t e r F o u r 433 Customizing your WorkCentre This chapter contains the following information: • Customizing copier features • Selecting WorkCentre display window language • Selecting paper default • Selecting program timeout • Selecting sleep mode • Customizing print features on your PC • Customizing scan features • Setting a preset for email CUSTOMIZING YOUR WORKCENTRE 4 U s e r G u i d e 4.1
CUSTOMIZING YOUR WORKCENTRE C h a p t e r F o u r 433 Customizing your WorkCentre This chapter contains the following information: • Customizing copier features • Selecting WorkCentre display window language • Selecting paper default • Selecting program timeout • Selecting sleep mode • Customizing print features on your PC • Customizing scan features • Setting a preset for email CUSTOMIZING YOUR WORKCENTRE 4 U s e r G u i d e 4.1

User Guide
Page 36
... i d e Customizing Copier Features You can also customize some copier features from the ControlCentre on your PC, by selecting Start>Programs>Xerox ControlCentre>Status Bar and clicking the Settings>System Defaults button. button until option "9. CUSTOMIZING COPIER FEATURES - + Tip: You can customize... and save the following copier features: Selecting WorkCentre Display Window Language Press the Menu/Exit 1 button. - + Press the down Navigator button 2 until Press the Select button...
... i d e Customizing Copier Features You can also customize some copier features from the ControlCentre on your PC, by selecting Start>Programs>Xerox ControlCentre>Status Bar and clicking the Settings>System Defaults button. button until option "9. CUSTOMIZING COPIER FEATURES - + Tip: You can customize... and save the following copier features: Selecting WorkCentre Display Window Language Press the Menu/Exit 1 button. - + Press the down Navigator button 2 until Press the Select button...

User Guide
Page 37
... the down Navigator button until the required paper size displays. 3 Press the Select button. 4 Selecting Program Timeout You can select the amount of time the WorkCentre delays before returing to set 3 displays. Program Timeout" displays. 2 - + Press the right Navigator button until option "5.
... the down Navigator button until the required paper size displays. 3 Press the Select button. 4 Selecting Program Timeout You can select the amount of time the WorkCentre delays before returing to set 3 displays. Program Timeout" displays. 2 - + Press the right Navigator button until option "5.
User Guide
Page 38
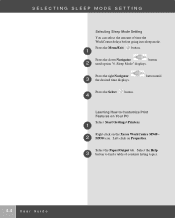
... Mode Setting You can select the amount of contents listing topics. 4.4 U s e r G u i d e Learning How to find a table of time the WorkCentre delays before going into sleep mode. Select the Help 3 button to Customize Print Features on Your PC Select Start>Settings>Printers. 1 Right-click on Properties.... Press the right Navigator 3 the desired time displays. + button until option "6. Left-click on the Xerox WorkCentre M940 - 2 M950 icon. Press the Menu/Exit 1 button. - + Press the down Navigator button 2 until Press the Select 4 button.
... Mode Setting You can select the amount of contents listing topics. 4.4 U s e r G u i d e Learning How to find a table of time the WorkCentre delays before going into sleep mode. Select the Help 3 button to Customize Print Features on Your PC Select Start>Settings>Printers. 1 Right-click on Properties.... Press the right Navigator 3 the desired time displays. + button until option "6. Left-click on the Xerox WorkCentre M940 - 2 M950 icon. Press the Menu/Exit 1 button. - + Press the down Navigator button 2 until Press the Select 4 button.
User Guide
Page 39
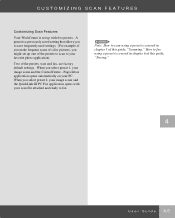
... scans and the ControlCentre - A preset is a previously saved setting that allows you to save frequently used settings. (For example, if you make frequent scans of color pictures, you might set up one of the presets to scan to your favorite photo application). How to fax using a preset is covered in chapter... using a preset is covered in chapter 5 of this guide, "Faxing." 4 U s e r G u i d e 4.5 Pagis Inbox application opens automatically on your PC. CUSTOMIZING SCAN FEATURES Customizing Scan Features Your WorkCentre is set up with your scan file attached and ready to fax.
... scans and the ControlCentre - A preset is a previously saved setting that allows you to save frequently used settings. (For example, if you make frequent scans of color pictures, you might set up one of the presets to scan to your favorite photo application). How to fax using a preset is covered in chapter... using a preset is covered in chapter 5 of this guide, "Faxing." 4 U s e r G u i d e 4.5 Pagis Inbox application opens automatically on your PC. CUSTOMIZING SCAN FEATURES Customizing Scan Features Your WorkCentre is set up with your scan file attached and ready to fax.


