
User Guide
Page 1
User's Guide XR6 Series LCD Monitor Downloaded from www.Manualslib.com manuals search engine
User's Guide XR6 Series LCD Monitor Downloaded from www.Manualslib.com manuals search engine
User Guide
Page 3
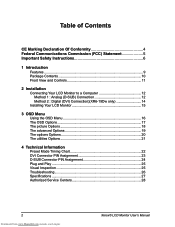
... Safety Instructions 6 1 Introduction Features ...9 Package Contents 10 Front View and Controls 11 2 Installation Connecting Your LCD Monitor to a Computer 12 Method 1 : Analog (D-SUB) Connection 12 Method 2 : Digital (DVI) Connection)(XR6-19Dw only 14 Installing Your LCD Monitor 15 3 OSD Menu Using the OSD Menu 16 The OSD Options 17 The picture Options 18 The... Plug and Play 25 Visual Inspection 25 Troubleshooting 26 Specifications 27 Authorized Service Centers 28 2 Downloaded from www.Manualslib.com manuals search engine Xerox© LCD Monitor User's Manual
... Safety Instructions 6 1 Introduction Features ...9 Package Contents 10 Front View and Controls 11 2 Installation Connecting Your LCD Monitor to a Computer 12 Method 1 : Analog (D-SUB) Connection 12 Method 2 : Digital (DVI) Connection)(XR6-19Dw only 14 Installing Your LCD Monitor 15 3 OSD Menu Using the OSD Menu 16 The OSD Options 17 The picture Options 18 The... Plug and Play 25 Visual Inspection 25 Troubleshooting 26 Specifications 27 Authorized Service Centers 28 2 Downloaded from www.Manualslib.com manuals search engine Xerox© LCD Monitor User's Manual

User Guide
Page 4
...Mr. Dennis Chang Tel: +86-755-2526-1512 Fax: +86-755-2526-1565 Email:[email protected] AMERICA When disposing of Xerox Branded Monitors in Asia, please contact the following location to make arrangements for recycling. Proview International (UK) Limited 30 The Avenue, Watford, Hertfordshire ... Tel: +32-2-702-6011 Fax: +32-2-725-2513 Email: [email protected] [email protected] ASIA When disposing of Xerox Branded Monitors in America, please call the following location to make arrangements for recycling. North Block 21, 23# Shatoukok Free Trade Zone, ShenZhen, China...
...Mr. Dennis Chang Tel: +86-755-2526-1512 Fax: +86-755-2526-1565 Email:[email protected] AMERICA When disposing of Xerox Branded Monitors in Asia, please contact the following location to make arrangements for recycling. Proview International (UK) Limited 30 The Avenue, Watford, Hertfordshire ... Tel: +32-2-702-6011 Fax: +32-2-725-2513 Email: [email protected] [email protected] ASIA When disposing of Xerox Branded Monitors in America, please call the following location to make arrangements for recycling. North Block 21, 23# Shatoukok Free Trade Zone, ShenZhen, China...
User Guide
Page 5
... enterprises, inside as well as amended by their connection to the public low voltage power supply system. 4 Downloaded from www.Manualslib.com manuals search engine Xerox© LCD Monitor User's Manual All places of operation are characterized by Directive 93/68/EEC. FCC/CE CE Marking Declaration Of Conformity This LCD...
... enterprises, inside as well as amended by their connection to the public low voltage power supply system. 4 Downloaded from www.Manualslib.com manuals search engine Xerox© LCD Monitor User's Manual All places of operation are characterized by Directive 93/68/EEC. FCC/CE CE Marking Declaration Of Conformity This LCD...
User Guide
Page 6
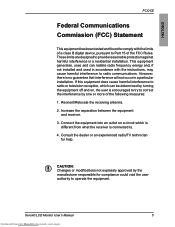
..., which is connected to. 4. Consult the dealer or an experienced radio/TV technician for compliance could void the user authority to operate the equipment. Xerox© LCD Monitor User's Manual 5 Downloaded from what the receiver is different from www.Manualslib.com manuals search engine Increase the separation between the equipment and receiver...
..., which is connected to. 4. Consult the dealer or an experienced radio/TV technician for compliance could void the user authority to operate the equipment. Xerox© LCD Monitor User's Manual 5 Downloaded from what the receiver is different from www.Manualslib.com manuals search engine Increase the separation between the equipment and receiver...
User Guide
Page 7
...; Never overload wall outlets and extensions. • Use and handle the power cord with a wet hand. 6 Downloaded from www.Manualslib.com manuals search engine Xerox© LCD Monitor User's Manual Before operating this equipment, please read this manual completely, and keep it nearby for future reference. • Do not place the equipment...
...; Never overload wall outlets and extensions. • Use and handle the power cord with a wet hand. 6 Downloaded from www.Manualslib.com manuals search engine Xerox© LCD Monitor User's Manual Before operating this equipment, please read this manual completely, and keep it nearby for future reference. • Do not place the equipment...
User Guide
Page 8
... heat. • Do not block any other similar surfaces; Leave an open space around the equipment. • Never place the equipment :on the equipment. Xerox© LCD Monitor User's Manual Downloaded from the wall outlet if the equipment will not be used for a long period of the above is spilled into the...
... heat. • Do not block any other similar surfaces; Leave an open space around the equipment. • Never place the equipment :on the equipment. Xerox© LCD Monitor User's Manual Downloaded from the wall outlet if the equipment will not be used for a long period of the above is spilled into the...
User Guide
Page 9
... be disposed of the following conditions occur, unplug the power cord from the outlet and request service from www.Manualslib.com manuals search engine Xerox© LCD Monitor User's Manual The recycling and separate collection of fice or household waste collection service. 8 Downloaded from qualified personnel. If you do...
... be disposed of the following conditions occur, unplug the power cord from the outlet and request service from www.Manualslib.com manuals search engine Xerox© LCD Monitor User's Manual The recycling and separate collection of fice or household waste collection service. 8 Downloaded from qualified personnel. If you do...
User Guide
Page 10
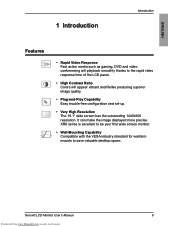
XR6 series is excellent to be your first wide screen monitor. • Wall-Mounting Capability Compatible with the VESA industry standard for wall/arm mounts to the rapid video response time of the LCD panel. • High Contrast Ratio Colors will playback smoothly thanks to save valuable desktop space. Xerox© LCD Monitor User...
XR6 series is excellent to be your first wide screen monitor. • Wall-Mounting Capability Compatible with the VESA industry standard for wall/arm mounts to the rapid video response time of the LCD panel. • High Contrast Ratio Colors will playback smoothly thanks to save valuable desktop space. Xerox© LCD Monitor User...

User Guide
Page 11
Introduction Package Contents Make sure all packing material for future transport of the following contents are included in the box. LCD Monitor D-SUB Cable AC Power Cord Quick Guide Warranty Card CD-ROM (Driver/Manual) CAUTION: Be sure to the original place of purchase. If any items are missing, please return this product to save original box and all of monitor. 10 Downloaded from www.Manualslib.com manuals search engine Xerox© LCD Monitor User's Manual
Introduction Package Contents Make sure all packing material for future transport of the following contents are included in the box. LCD Monitor D-SUB Cable AC Power Cord Quick Guide Warranty Card CD-ROM (Driver/Manual) CAUTION: Be sure to the original place of purchase. If any items are missing, please return this product to save original box and all of monitor. 10 Downloaded from www.Manualslib.com manuals search engine Xerox© LCD Monitor User's Manual

User Guide
Page 12
Xerox© LCD Monitor User's Manual 11 Downloaded from www.Manualslib.com manuals search engine And press again to activate the desired setting. 2 ▼▲ In OSD mode, press the ▲/▼ buttons to select the desired menu. 3 Turns the LCD monitor on and off. 4 LED The LED light indicates when the LCD monitor is...
Xerox© LCD Monitor User's Manual 11 Downloaded from www.Manualslib.com manuals search engine And press again to activate the desired setting. 2 ▼▲ In OSD mode, press the ▲/▼ buttons to select the desired menu. 3 Turns the LCD monitor on and off. 4 LED The LED light indicates when the LCD monitor is...
User Guide
Page 13
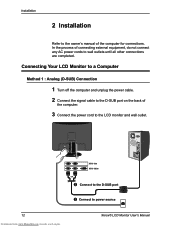
...D-SUB port on the back of the computer. 3 Connect the power cord to the LCD monitor and wall outlet. 12 Downloaded from www.Manualslib.com manuals search engine XR6-19w XR6-19Dw 2 Connect to the D-SUB port 3 Connect to wall outlets until all other connections are ...completed. In the process of the computer for connections. Installation 2 Installation Refer to the owner's manual of connecting external equipment, do not connect any AC power cords to power source Xerox© LCD Monitor...
...D-SUB port on the back of the computer. 3 Connect the power cord to the LCD monitor and wall outlet. 12 Downloaded from www.Manualslib.com manuals search engine XR6-19w XR6-19Dw 2 Connect to the D-SUB port 3 Connect to wall outlets until all other connections are ...completed. In the process of the computer for connections. Installation 2 Installation Refer to the owner's manual of connecting external equipment, do not connect any AC power cords to power source Xerox© LCD Monitor...

User Guide
Page 14
...NOTE: The button is blue when the monitor operates normally and will turn the computer on and off , the LED turns dark. Xerox© LCD Monitor User's Manual 13 Downloaded from the socket. If the monitor displays an image, the monitor is displayed, check all connections. NOTE:... The LED indicator is used for switching the LCD monitor on . If no image is successfully installed...
...NOTE: The button is blue when the monitor operates normally and will turn the computer on and off , the LED turns dark. Xerox© LCD Monitor User's Manual 13 Downloaded from the socket. If the monitor displays an image, the monitor is displayed, check all connections. NOTE:... The LED indicator is used for switching the LCD monitor on . If no image is successfully installed...

User Guide
Page 15
...main unit to switch between the VGA mode and DVI mode. 14 Downloaded from www.Manualslib.com manuals search engine Xerox© LCD Monitor User's Manual Installation Method 2: Digital (DVI) Connection (XR6-19Dw only) 1 Turn off the computer and unplug the power cable. 2 Connect the signal cable (DVI) to the... DVI port on the back of the computer. 3 Connect the power cord to the LCD monitor and wall outlet. 4 Press the button, located on . If the monitor displays an image...
...main unit to switch between the VGA mode and DVI mode. 14 Downloaded from www.Manualslib.com manuals search engine Xerox© LCD Monitor User's Manual Installation Method 2: Digital (DVI) Connection (XR6-19Dw only) 1 Turn off the computer and unplug the power cable. 2 Connect the signal cable (DVI) to the... DVI port on the back of the computer. 3 Connect the power cord to the LCD monitor and wall outlet. 4 Press the button, located on . If the monitor displays an image...
User Guide
Page 16
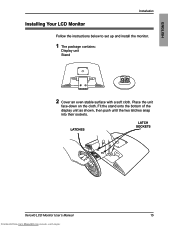
Place the unit face-down on the cloth. LATCHES LATCH SOCKETS Xerox© LCD Monitor User's Manual 15 Downloaded from www.Manualslib.com manuals search engine ENGLISH Installation Installing Your LCD Monitor Follow the instructions below to set up and install the monitor. 1 The package contains: Display unit Stand 2 Cover an even stable surface with a soft cloth. Fit the stand onto the bottom of the display unit as shown, then push until the two latches snap into their sockets.
Place the unit face-down on the cloth. LATCHES LATCH SOCKETS Xerox© LCD Monitor User's Manual 15 Downloaded from www.Manualslib.com manuals search engine ENGLISH Installation Installing Your LCD Monitor Follow the instructions below to set up and install the monitor. 1 The package contains: Display unit Stand 2 Cover an even stable surface with a soft cloth. Fit the stand onto the bottom of the display unit as shown, then push until the two latches snap into their sockets.
User Guide
Page 17
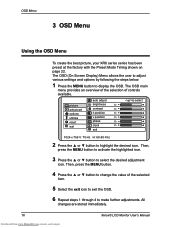
.... 1 Press the MENU button to select the desired adjustment icon. All changes are stored immediately. 16 Downloaded from www.Manualslib.com manuals search engine Xerox© LCD Monitor User's Manual Then, press the MENU button to activate the highlighted icon. 3 Press the ▲ or ▼ button to display the OSD. Then, press... exit the OSD. 6 Repeat steps 1 through 4 to highlight the desired icon. OSD Menu 3 OSD Menu Using the OSD Menu To create the best picture, your XR6 series series has been preset at the factory with the Preset Mode Timing shown on page 22.
.... 1 Press the MENU button to select the desired adjustment icon. All changes are stored immediately. 16 Downloaded from www.Manualslib.com manuals search engine Xerox© LCD Monitor User's Manual Then, press the MENU button to activate the highlighted icon. 3 Press the ▲ or ▼ button to display the OSD. Then, press... exit the OSD. 6 Repeat steps 1 through 4 to highlight the desired icon. OSD Menu 3 OSD Menu Using the OSD Menu To create the best picture, your XR6 series series has been preset at the factory with the Preset Mode Timing shown on page 22.
User Guide
Page 18
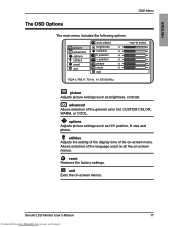
options Adjusts picture settings such as brightness, contrast. Allows selection of the language used on all the on -screen menu. Xerox© LCD Monitor User's Manual 17 Downloaded from www.Manualslib.com manuals search engine ENGLISH OSD Menu The OSD Options The main menu includes the following options: picture ...
options Adjusts picture settings such as brightness, contrast. Allows selection of the language used on all the on -screen menu. Xerox© LCD Monitor User's Manual 17 Downloaded from www.Manualslib.com manuals search engine ENGLISH OSD Menu The OSD Options The main menu includes the following options: picture ...

User Guide
Page 19
... right in the window. position Adjusts the position of the picture. exit Exits the picture menu. 18 Downloaded from www.Manualslib.com manuals search engine Xerox© LCD Monitor User's Manual brightness Controls the overall brightness. phase Adjusts signal phase, which can improve focus clarity and image stability.
... right in the window. position Adjusts the position of the picture. exit Exits the picture menu. 18 Downloaded from www.Manualslib.com manuals search engine Xerox© LCD Monitor User's Manual brightness Controls the overall brightness. phase Adjusts signal phase, which can improve focus clarity and image stability.

User Guide
Page 20
... at factory settings; they cannot be independently adjusted. exit Exits the advanced menu. Fixes the red, green and blue component levels at factory settings; Xerox© LCD Monitor User's Manual 19 Downloaded from www.Manualslib.com manuals search engine they cannot be independently adjusted. Fixes the red, green and blue component levels...
... at factory settings; they cannot be independently adjusted. exit Exits the advanced menu. Fixes the red, green and blue component levels at factory settings; Xerox© LCD Monitor User's Manual 19 Downloaded from www.Manualslib.com manuals search engine they cannot be independently adjusted. Fixes the red, green and blue component levels...

User Guide
Page 21
position Moves the OSD up and down in the window. osd v. position Moves the OSD left and right in the window. exit Exits the OSD menu. 20 Downloaded from www.Manualslib.com manuals search engine Xerox© LCD Monitor User's Manual OSD Menu The options Menu 1 The options menu provides access to the following menus: picture advanced options utilities reset exit osd h position osd v position exit 2 The options menu includes the following options: ON DESCRIPTION osd h.
position Moves the OSD up and down in the window. osd v. position Moves the OSD left and right in the window. exit Exits the OSD menu. 20 Downloaded from www.Manualslib.com manuals search engine Xerox© LCD Monitor User's Manual OSD Menu The options Menu 1 The options menu provides access to the following menus: picture advanced options utilities reset exit osd h position osd v position exit 2 The options menu includes the following options: ON DESCRIPTION osd h.

