User Guide
Page 3
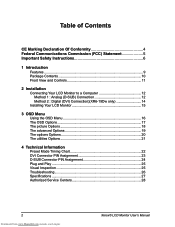
... LCD Monitor to a Computer 12 Method 1 : Analog (D-SUB) Connection 12 Method 2 : Digital (DVI) Connection)(XR6-19Dw only 14 Installing Your LCD Monitor 15 3 OSD Menu Using the OSD Menu 16 The OSD Options 17 The picture Options 18 The advanced Options 19 The options Options 20 The utilities Options 21 4 Technical Information Preset Mode Timing Chart 22 DVI Connector PIN Assignment 23 D-SUB Connector PIN Assignment 24 Plug and Play 25 Visual Inspection 25 Troubleshooting...
... LCD Monitor to a Computer 12 Method 1 : Analog (D-SUB) Connection 12 Method 2 : Digital (DVI) Connection)(XR6-19Dw only 14 Installing Your LCD Monitor 15 3 OSD Menu Using the OSD Menu 16 The OSD Options 17 The picture Options 18 The advanced Options 19 The options Options 20 The utilities Options 21 4 Technical Information Preset Mode Timing Chart 22 DVI Connector PIN Assignment 23 D-SUB Connector PIN Assignment 24 Plug and Play 25 Visual Inspection 25 Troubleshooting...
User Guide
Page 5
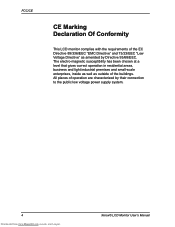
... gives correct operation in residential areas, business and light industrial premises and small-scale enterprises, inside as well as amended by their connection to the public low voltage power supply system. 4 Downloaded from www.Manualslib.com manuals search engine Xerox© LCD Monitor User's Manual FCC/CE CE Marking Declaration Of Conformity This LCD monitor complies with the requirements of the EC Directive...
... gives correct operation in residential areas, business and light industrial premises and small-scale enterprises, inside as well as amended by their connection to the public low voltage power supply system. 4 Downloaded from www.Manualslib.com manuals search engine Xerox© LCD Monitor User's Manual FCC/CE CE Marking Declaration Of Conformity This LCD monitor complies with the requirements of the EC Directive...
User Guide
Page 6
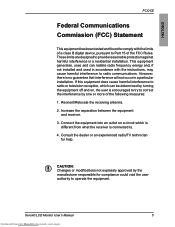
... radiate radio frequency energy and, if not installed and used in accordance with the limits of a class B digital device, pursuant to Part 15 of the following measures: 1. Increase the separation between the equipment and receiver. 3. Connect the equipment into an outlet on , the user is no guarantee that interference will not occur in a residential installation. Xerox© LCD Monitor User's Manual 5 Downloaded from what...
... radiate radio frequency energy and, if not installed and used in accordance with the limits of a class B digital device, pursuant to Part 15 of the following measures: 1. Increase the separation between the equipment and receiver. 3. Connect the equipment into an outlet on , the user is no guarantee that interference will not occur in a residential installation. Xerox© LCD Monitor User's Manual 5 Downloaded from what...
User Guide
Page 7
... not place any heavy objects on the rear of the serial/model plate. • Never overload wall outlets and extensions. • Use and handle the power cord with a wet hand. 6 Downloaded from www.Manualslib.com manuals search engine Xerox© LCD Monitor User's Manual Before operating this equipment, please read this manual completely, and keep it nearby for future reference. • Do not place the...
... not place any heavy objects on the rear of the serial/model plate. • Never overload wall outlets and extensions. • Use and handle the power cord with a wet hand. 6 Downloaded from www.Manualslib.com manuals search engine Xerox© LCD Monitor User's Manual Before operating this equipment, please read this manual completely, and keep it nearby for future reference. • Do not place the...
User Guide
Page 8
... other similar surfaces; ENGLISH Important Safety Instructions • Do not touch the power cord and antenna cable during lightning. • Remove the plug from the wall outlet if the equipment will not be used for a long period of the above is spilled into the equipment. • Do not attempt to service the equipment yourself. • Opening and removing the covers may expose you to...
... other similar surfaces; ENGLISH Important Safety Instructions • Do not touch the power cord and antenna cable during lightning. • Remove the plug from the wall outlet if the equipment will not be used for a long period of the above is spilled into the equipment. • Do not attempt to service the equipment yourself. • Opening and removing the covers may expose you to...
User Guide
Page 10
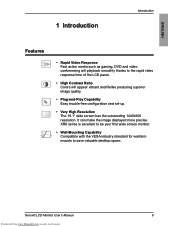
It can make the image displayed more precise. Xerox© LCD Monitor User's Manual 9 Downloaded from www.Manualslib.com manuals search engine ENGLISH 1 Introduction Introduction Features • Rapid Video Response Fast action media such as gaming, DVD and video conferencing will playback smoothly thanks to save valuable desktop space. XR6 series is excellent to be your first wide screen monitor. • Wall-Mounting Capability Compatible with the VESA industry standard for wall/arm mounts to...
It can make the image displayed more precise. Xerox© LCD Monitor User's Manual 9 Downloaded from www.Manualslib.com manuals search engine ENGLISH 1 Introduction Introduction Features • Rapid Video Response Fast action media such as gaming, DVD and video conferencing will playback smoothly thanks to save valuable desktop space. XR6 series is excellent to be your first wide screen monitor. • Wall-Mounting Capability Compatible with the VESA industry standard for wall/arm mounts to...

User Guide
Page 11
If any items are missing, please return this product to save original box and all of the following contents are included in the box. LCD Monitor D-SUB Cable AC Power Cord Quick Guide Warranty Card CD-ROM (Driver/Manual) CAUTION: Be sure to the original place of purchase. Introduction Package Contents Make sure all packing material for future transport of monitor. 10 Downloaded from www.Manualslib.com manuals search engine Xerox© LCD Monitor User's Manual
If any items are missing, please return this product to save original box and all of the following contents are included in the box. LCD Monitor D-SUB Cable AC Power Cord Quick Guide Warranty Card CD-ROM (Driver/Manual) CAUTION: Be sure to the original place of purchase. Introduction Package Contents Make sure all packing material for future transport of monitor. 10 Downloaded from www.Manualslib.com manuals search engine Xerox© LCD Monitor User's Manual

User Guide
Page 12
...;▲ In OSD mode, press the ▲/▼ buttons to select the desired menu. 3 Turns the LCD monitor on and off. 4 LED The LED light indicates when the LCD monitor is activated (blue light indicates power on and amber light indicates power saving). 5 AUTO Press to automatically adjust the display settings to display the OSD (On Screen Display). Xerox© LCD Monitor User's Manual 11 Downloaded from www.Manualslib.com manuals search engine Front View and Controls Introduction ENGLISH 1 3 4 2 5 1 MENU Press once to optimize performance based on the D-SUB signal.
...;▲ In OSD mode, press the ▲/▼ buttons to select the desired menu. 3 Turns the LCD monitor on and off. 4 LED The LED light indicates when the LCD monitor is activated (blue light indicates power on and amber light indicates power saving). 5 AUTO Press to automatically adjust the display settings to display the OSD (On Screen Display). Xerox© LCD Monitor User's Manual 11 Downloaded from www.Manualslib.com manuals search engine Front View and Controls Introduction ENGLISH 1 3 4 2 5 1 MENU Press once to optimize performance based on the D-SUB signal.
User Guide
Page 13
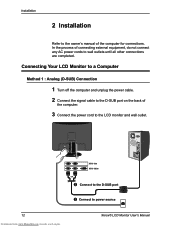
... not connect any AC power cords to power source Xerox© LCD Monitor User's Manual Connecting Your LCD Monitor to a Computer Method 1 : Analog (D-SUB) Connection 1 Turn off the computer and unplug the power cable. 2 Connect the signal cable to the D-SUB port on the back of the computer for connections. Installation 2 Installation Refer to the owner's manual of the computer. 3 Connect the power cord to the LCD monitor and wall outlet. 12 Downloaded from www.Manualslib.com manuals search engine XR6-19w XR6-19Dw 2 Connect to the D-SUB port 3 Connect to wall...
... not connect any AC power cords to power source Xerox© LCD Monitor User's Manual Connecting Your LCD Monitor to a Computer Method 1 : Analog (D-SUB) Connection 1 Turn off the computer and unplug the power cable. 2 Connect the signal cable to the D-SUB port on the back of the computer for connections. Installation 2 Installation Refer to the owner's manual of the computer. 3 Connect the power cord to the LCD monitor and wall outlet. 12 Downloaded from www.Manualslib.com manuals search engine XR6-19w XR6-19Dw 2 Connect to the D-SUB port 3 Connect to wall...

User Guide
Page 14
...: The LED indicator is successfully installed. If the monitor displays an image, the monitor is blue when the monitor operates normally and will turn the computer on and off , the LED turns dark. If no image is used for switching the LCD monitor on . ENGLISH Installation 4 Press the button, located on the bottom side of the main unit to turn the monitor on, then turn to amber when in power saving mode. Xerox© LCD Monitor User's Manual 13 Downloaded from...
...: The LED indicator is successfully installed. If the monitor displays an image, the monitor is blue when the monitor operates normally and will turn the computer on and off , the LED turns dark. If no image is used for switching the LCD monitor on . ENGLISH Installation 4 Press the button, located on the bottom side of the main unit to turn the monitor on, then turn to amber when in power saving mode. Xerox© LCD Monitor User's Manual 13 Downloaded from...

User Guide
Page 15
... the monitor displays an image, the monitor is displayed, check all connections. Installation Method 2: Digital (DVI) Connection (XR6-19Dw only) 1 Turn off the computer and unplug the power cable. 2 Connect the signal cable (DVI) to the DVI port on the back of the computer. 3 Connect the power cord to the LCD monitor and wall outlet. 4 Press the button, located on the bottom side of the main unit to switch between the VGA mode and DVI mode. 14 Downloaded from www.Manualslib.com manuals search engine Xerox© LCD Monitor User's Manual
... the monitor displays an image, the monitor is displayed, check all connections. Installation Method 2: Digital (DVI) Connection (XR6-19Dw only) 1 Turn off the computer and unplug the power cable. 2 Connect the signal cable (DVI) to the DVI port on the back of the computer. 3 Connect the power cord to the LCD monitor and wall outlet. 4 Press the button, located on the bottom side of the main unit to switch between the VGA mode and DVI mode. 14 Downloaded from www.Manualslib.com manuals search engine Xerox© LCD Monitor User's Manual
User Guide
Page 16
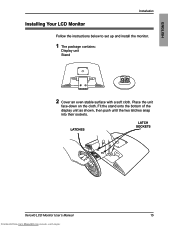
Fit the stand onto the bottom of the display unit as shown, then push until the two latches snap into their sockets. Place the unit face-down on the cloth. LATCHES LATCH SOCKETS Xerox© LCD Monitor User's Manual 15 Downloaded from www.Manualslib.com manuals search engine ENGLISH Installation Installing Your LCD Monitor Follow the instructions below to set up and install the monitor. 1 The package contains: Display unit Stand 2 Cover an even stable surface with a soft cloth.
Fit the stand onto the bottom of the display unit as shown, then push until the two latches snap into their sockets. Place the unit face-down on the cloth. LATCHES LATCH SOCKETS Xerox© LCD Monitor User's Manual 15 Downloaded from www.Manualslib.com manuals search engine ENGLISH Installation Installing Your LCD Monitor Follow the instructions below to set up and install the monitor. 1 The package contains: Display unit Stand 2 Cover an even stable surface with a soft cloth.
User Guide
Page 17
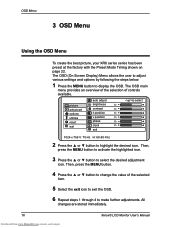
... ▲ or ▼ button to display the OSD. OSD Menu 3 OSD Menu Using the OSD Menu To create the best picture, your XR6 series series has been preset at the factory with the Preset Mode Timing shown on page 22. The OSD (On Screen Display) Menu allows the user to adjust various settings and options by following the steps below. 1 Press the MENU button to select the desired adjustment icon. picture advanced options utilities reset exit auto adjust brightness contrast h position v position phase clock exit...
... ▲ or ▼ button to display the OSD. OSD Menu 3 OSD Menu Using the OSD Menu To create the best picture, your XR6 series series has been preset at the factory with the Preset Mode Timing shown on page 22. The OSD (On Screen Display) Menu allows the user to adjust various settings and options by following the steps below. 1 Press the MENU button to select the desired adjustment icon. picture advanced options utilities reset exit auto adjust brightness contrast h position v position phase clock exit...
User Guide
Page 18
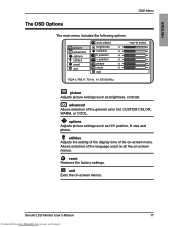
reset Restores the factory settings. exit Exits the on -screen menus. ENGLISH OSD Menu The OSD Options The main menu includes the following options: picture advanced options utilities reset exit auto adjust brightness contrast h position v position phase clock exit to select picture Adjusts picture settings such as H/V position, H size and phase. Allows selection of the language used on all the on -screen menus. advanced Allows selection of the on-screen menu. Xerox© LCD Monitor User's Manual 17 Downloaded from www.Manualslib.com manuals search engine...
reset Restores the factory settings. exit Exits the on -screen menus. ENGLISH OSD Menu The OSD Options The main menu includes the following options: picture advanced options utilities reset exit auto adjust brightness contrast h position v position phase clock exit to select picture Adjusts picture settings such as H/V position, H size and phase. Allows selection of the language used on all the on -screen menus. advanced Allows selection of the on-screen menu. Xerox© LCD Monitor User's Manual 17 Downloaded from www.Manualslib.com manuals search engine...

User Guide
Page 19
... overall brightness. contrast Controls the difference between the brightest and darkest regions of the picture up and down in the window. h. position Adjusts the position of the picture. OSD Menu The picture Menu 1 The picture menu provides access to the following menus: picture advanced options utilities reset exit auto adjust brightness contrast h position v position phase clock exit to select 2 The picture menu includes the following options: ON DESCRIPTION auto adjust Automatically adjust the display settings to optimize performance based on the D-SUB signal.
... overall brightness. contrast Controls the difference between the brightest and darkest regions of the picture up and down in the window. h. position Adjusts the position of the picture. OSD Menu The picture Menu 1 The picture menu provides access to the following menus: picture advanced options utilities reset exit auto adjust brightness contrast h position v position phase clock exit to select 2 The picture menu includes the following options: ON DESCRIPTION auto adjust Automatically adjust the display settings to optimize performance based on the D-SUB signal.

User Guide
Page 20
... blue component levels at factory settings; Xerox© LCD Monitor User's Manual 19 Downloaded from www.Manualslib.com manuals search engine user Allows the user to see crisp edges in the picture; Fixes the red, green and blue component levels at factory settings; they cannot be independently adjusted. they cannot be independently adjusted. natural Inclines colors toward the natural end of the general color tint: user, natural, warm, or cool. exit Exits the advanced menu...
... blue component levels at factory settings; Xerox© LCD Monitor User's Manual 19 Downloaded from www.Manualslib.com manuals search engine user Allows the user to see crisp edges in the picture; Fixes the red, green and blue component levels at factory settings; they cannot be independently adjusted. they cannot be independently adjusted. natural Inclines colors toward the natural end of the general color tint: user, natural, warm, or cool. exit Exits the advanced menu...

User Guide
Page 24
... Plug Detect 3 TMDS Data 2/4 shield 17 TMDS Data 0- 4 18 TMDS Data 0+ 5 19 TMDS Data 0/5 shield 6 DDC Clock 20 7 DDC Data 21 8 Analog Vertical Sync 22 Clock shield 9 TMDS Data 1- 23 Clock + 10 TMDS Data 1+ 24 Clock - 11 TMDS Data 1/3 shield C1 Analog red 12 C2 Analog green 13 C3 Analog blue 14 +5V Power C4 Analog Xerox© LCD Monitor User's Manual 23 Downloaded from www.Manualslib.com manuals...
... Plug Detect 3 TMDS Data 2/4 shield 17 TMDS Data 0- 4 18 TMDS Data 0+ 5 19 TMDS Data 0/5 shield 6 DDC Clock 20 7 DDC Data 21 8 Analog Vertical Sync 22 Clock shield 9 TMDS Data 1- 23 Clock + 10 TMDS Data 1+ 24 Clock - 11 TMDS Data 1/3 shield C1 Analog red 12 C2 Analog green 13 C3 Analog blue 14 +5V Power C4 Analog Xerox© LCD Monitor User's Manual 23 Downloaded from www.Manualslib.com manuals...

User Guide
Page 26
.... Example: A 17" flat-screen monitor with a DDC compatible video card, the monitor is stipulated in total. Xerox© LCD Monitor User's Manual 25 Downloaded from www.Manualslib.com manuals search engine The maximum permitted number of 1280 x 1024 has 1280 x 1024 = 1310720 pixels. e. Each pixel consists of its scanning frequencies, capabilities and characteristics. ENGLISH Technical Information Plug and Play This monitor conforms to the VESA DDC (Display Data Channel) standard, which...
.... Example: A 17" flat-screen monitor with a DDC compatible video card, the monitor is stipulated in total. Xerox© LCD Monitor User's Manual 25 Downloaded from www.Manualslib.com manuals search engine The maximum permitted number of 1280 x 1024 has 1280 x 1024 = 1310720 pixels. e. Each pixel consists of its scanning frequencies, capabilities and characteristics. ENGLISH Technical Information Plug and Play This monitor conforms to the VESA DDC (Display Data Channel) standard, which...

User Guide
Page 27
... Downloaded from www.Manualslib.com manuals search engine Xerox© LCD Monitor User's Manual once Windows detects the problem, a dialog will not turn on the front panel of the monitor, to automatically adjust the display mode. Monitor will appear allowing you to manually set up the video mode according to the preset mode timing chart (refer to the trouble you are experiencing. No picture • Make sure the power cord is plugged in . • Check the signal cable connecting the LCD monitor and...
... Downloaded from www.Manualslib.com manuals search engine Xerox© LCD Monitor User's Manual once Windows detects the problem, a dialog will not turn on the front panel of the monitor, to automatically adjust the display mode. Monitor will appear allowing you to manually set up the video mode according to the preset mode timing chart (refer to the trouble you are experiencing. No picture • Make sure the power cord is plugged in . • Check the signal cable connecting the LCD monitor and...
User Guide
Page 28
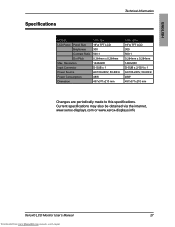
... Technical Information MODEL LCD Panel Panel Size Brightness Contrast Ratio Dot Pitch Max. Current specifications may also be obtained via the internet, www.xerox-displays.com or www.xerox-displays.info Xerox© LCD Monitor User's Manual 27 Downloaded from www.Manualslib.com manuals search engine Resolution Input Connector Power Source Power Consumption Dimension XR6-19w 19"w TFT LCD 300 500:1 0.284mm x 0.284mm 1440x900 D-SUB x 1 AC100-240V, 50-60Hz 48W 457x371x210 mm XR6-19Dw 19"w TFT LCD 300 500...
... Technical Information MODEL LCD Panel Panel Size Brightness Contrast Ratio Dot Pitch Max. Current specifications may also be obtained via the internet, www.xerox-displays.com or www.xerox-displays.info Xerox© LCD Monitor User's Manual 27 Downloaded from www.Manualslib.com manuals search engine Resolution Input Connector Power Source Power Consumption Dimension XR6-19w 19"w TFT LCD 300 500:1 0.284mm x 0.284mm 1440x900 D-SUB x 1 AC100-240V, 50-60Hz 48W 457x371x210 mm XR6-19Dw 19"w TFT LCD 300 500...

