

User Guide
Page 1
User's Guide XR6 Series LCD Monitor Downloaded from www.Manualslib.com manuals search engine
User's Guide XR6 Series LCD Monitor Downloaded from www.Manualslib.com manuals search engine
User Guide
Page 3
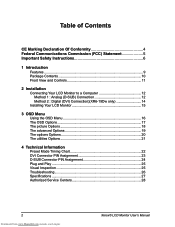
... 5 Important Safety Instructions 6 1 Introduction Features ...9 Package Contents 10 Front View and Controls 11 2 Installation Connecting Your LCD Monitor to a Computer 12 Method 1 : Analog (D-SUB) Connection 12 Method 2 : Digital (DVI) Connection)(XR6-19Dw only 14 Installing Your LCD Monitor 15 3 OSD Menu Using the OSD Menu 16 The OSD Options 17 The picture Options 18... Plug and Play 25 Visual Inspection 25 Troubleshooting 26 Specifications 27 Authorized Service Centers 28 2 Downloaded from www.Manualslib.com manuals search engine Xerox© LCD Monitor User's Manual
... 5 Important Safety Instructions 6 1 Introduction Features ...9 Package Contents 10 Front View and Controls 11 2 Installation Connecting Your LCD Monitor to a Computer 12 Method 1 : Analog (D-SUB) Connection 12 Method 2 : Digital (DVI) Connection)(XR6-19Dw only 14 Installing Your LCD Monitor 15 3 OSD Menu Using the OSD Menu 16 The OSD Options 17 The picture Options 18... Plug and Play 25 Visual Inspection 25 Troubleshooting 26 Specifications 27 Authorized Service Centers 28 2 Downloaded from www.Manualslib.com manuals search engine Xerox© LCD Monitor User's Manual

User Guide
Page 4
... AN ELECTRIC DEVICE WHICH MAY CONTAIN HAZARDOUS MATERIALS AND COMPONENTS, AND WHICH MUST BE DISPOSED OF AT END OF LIFE ACCORDING TO THE PROPER PROCEDURE" Xerox© LCD Monitor User's Manual 3 Downloaded from www.Manualslib.com manuals search engine North Block 21, 23# Shatoukok Free Trade Zone, ShenZhen, China. Mr. Dennis Chang...
... AN ELECTRIC DEVICE WHICH MAY CONTAIN HAZARDOUS MATERIALS AND COMPONENTS, AND WHICH MUST BE DISPOSED OF AT END OF LIFE ACCORDING TO THE PROPER PROCEDURE" Xerox© LCD Monitor User's Manual 3 Downloaded from www.Manualslib.com manuals search engine North Block 21, 23# Shatoukok Free Trade Zone, ShenZhen, China. Mr. Dennis Chang...
User Guide
Page 5
... to the public low voltage power supply system. 4 Downloaded from www.Manualslib.com manuals search engine Xerox© LCD Monitor User's Manual All places of the buildings. FCC/CE CE Marking Declaration Of Conformity This LCD monitor complies with the requirements of the EC Directive 89/336/EEC "EMC Directive" and 73/23...
... to the public low voltage power supply system. 4 Downloaded from www.Manualslib.com manuals search engine Xerox© LCD Monitor User's Manual All places of the buildings. FCC/CE CE Marking Declaration Of Conformity This LCD monitor complies with the requirements of the EC Directive 89/336/EEC "EMC Directive" and 73/23...
User Guide
Page 6
... CAUTION: Changes or modifications not expressly approved by one or more of the FCC Rules. Increase the separation between the equipment and receiver. 3. Xerox© LCD Monitor User's Manual 5 Downloaded from what the receiver is connected to. 4. This equipment generates, uses and can be determined by turning the equipment off...
... CAUTION: Changes or modifications not expressly approved by one or more of the FCC Rules. Increase the separation between the equipment and receiver. 3. Xerox© LCD Monitor User's Manual 5 Downloaded from what the receiver is connected to. 4. This equipment generates, uses and can be determined by turning the equipment off...
User Guide
Page 7
... plug into the electrical outlet, contact an electrician to install a grounding outlet. • Always operate this equipment from www.Manualslib.com manuals search engine Xerox© LCD Monitor User's Manual Removing the grounding pin will increase the risk of this equipment. Before operating this equipment, please read this manual completely, and keep...
... plug into the electrical outlet, contact an electrician to install a grounding outlet. • Always operate this equipment from www.Manualslib.com manuals search engine Xerox© LCD Monitor User's Manual Removing the grounding pin will increase the risk of this equipment. Before operating this equipment, please read this manual completely, and keep...
User Guide
Page 8
... any other similar surfaces; Seek qualified service if any of time. • Do not place, use liquid or aerosol cleaners on the equipment. Xerox© LCD Monitor User's Manual Downloaded from the outlet before cleaning the equipment. • Never use or handle this equipment near water. • Never expose the...
... any other similar surfaces; Seek qualified service if any of time. • Do not place, use liquid or aerosol cleaners on the equipment. Xerox© LCD Monitor User's Manual Downloaded from the outlet before cleaning the equipment. • Never use or handle this equipment near water. • Never expose the...
User Guide
Page 9
... not be disposed of the following conditions occur, unplug the power cord from the outlet and request service from www.Manualslib.com manuals search engine Xerox© LCD Monitor User's Manual b.
... not be disposed of the following conditions occur, unplug the power cord from the outlet and request service from www.Manualslib.com manuals search engine Xerox© LCD Monitor User's Manual b.
User Guide
Page 10
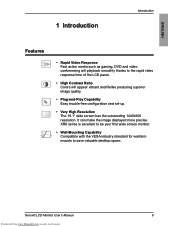
...Introduction Features • Rapid Video Response Fast action media such as gaming, DVD and video conferencing will playback smoothly thanks to save valuable desktop space. XR6 series is excellent to be your first wide screen monitor. • Wall-Mounting Capability Compatible with the VESA industry standard for wall/arm ...guration and set-up. • Very High Resolution The 19.1" wide screen has the outstanding 1440x900 resolution. It can make the image displayed more precise. Xerox© LCD Monitor User's Manual 9 Downloaded from www.Manualslib.com manuals search engine
...Introduction Features • Rapid Video Response Fast action media such as gaming, DVD and video conferencing will playback smoothly thanks to save valuable desktop space. XR6 series is excellent to be your first wide screen monitor. • Wall-Mounting Capability Compatible with the VESA industry standard for wall/arm ...guration and set-up. • Very High Resolution The 19.1" wide screen has the outstanding 1440x900 resolution. It can make the image displayed more precise. Xerox© LCD Monitor User's Manual 9 Downloaded from www.Manualslib.com manuals search engine

User Guide
Page 11
If any items are missing, please return this product to save original box and all of the following contents are included in the box. LCD Monitor D-SUB Cable AC Power Cord Quick Guide Warranty Card CD-ROM (Driver/Manual) CAUTION: Be sure to the original place of purchase. Introduction Package Contents Make sure all packing material for future transport of monitor. 10 Downloaded from www.Manualslib.com manuals search engine Xerox© LCD Monitor User's Manual
If any items are missing, please return this product to save original box and all of the following contents are included in the box. LCD Monitor D-SUB Cable AC Power Cord Quick Guide Warranty Card CD-ROM (Driver/Manual) CAUTION: Be sure to the original place of purchase. Introduction Package Contents Make sure all packing material for future transport of monitor. 10 Downloaded from www.Manualslib.com manuals search engine Xerox© LCD Monitor User's Manual

User Guide
Page 12
Xerox© LCD Monitor User's Manual 11 Downloaded from www.Manualslib.com manuals search engine And press again to activate the desired setting. 2 ▼▲ In OSD mode, press the ▲/▼ buttons to select the desired menu. 3 Turns the LCD monitor on and off. 4 LED The LED light indicates when the LCD monitor is...
Xerox© LCD Monitor User's Manual 11 Downloaded from www.Manualslib.com manuals search engine And press again to activate the desired setting. 2 ▼▲ In OSD mode, press the ▲/▼ buttons to select the desired menu. 3 Turns the LCD monitor on and off. 4 LED The LED light indicates when the LCD monitor is...
User Guide
Page 13
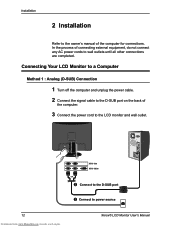
... the D-SUB port on the back of the computer. 3 Connect the power cord to the LCD monitor and wall outlet. 12 Downloaded from www.Manualslib.com manuals search engine XR6-19w XR6-19Dw 2 Connect to the D-SUB port 3 Connect to the owner's manual of connecting external equipment,... do not connect any AC power cords to wall outlets until all other connections are completed. Installation 2 Installation Refer to power source Xerox© LCD Monitor User's Manual...
... the D-SUB port on the back of the computer. 3 Connect the power cord to the LCD monitor and wall outlet. 12 Downloaded from www.Manualslib.com manuals search engine XR6-19w XR6-19Dw 2 Connect to the D-SUB port 3 Connect to the owner's manual of connecting external equipment,... do not connect any AC power cords to wall outlets until all other connections are completed. Installation 2 Installation Refer to power source Xerox© LCD Monitor User's Manual...

User Guide
Page 14
... the button, located on the bottom side of the main unit to avoid electric shock or damage. NOTE: The button is successfully installed. Xerox© LCD Monitor User's Manual 13 Downloaded from the socket. To completely disconnect the main voltage, please remove the power plug from www.Manualslib.com manuals... search engine If the monitor displays an image, the monitor is used for switching the LCD monitor on and off , the LED turns dark. If no image is off , it does not disconnect the device from the main voltage....
... the button, located on the bottom side of the main unit to avoid electric shock or damage. NOTE: The button is successfully installed. Xerox© LCD Monitor User's Manual 13 Downloaded from the socket. To completely disconnect the main voltage, please remove the power plug from www.Manualslib.com manuals... search engine If the monitor displays an image, the monitor is used for switching the LCD monitor on and off , the LED turns dark. If no image is off , it does not disconnect the device from the main voltage....

User Guide
Page 15
... DVI port on the back of the computer. 3 Connect the power cord to the LCD monitor and wall outlet. 4 Press the button, located on . If the monitor displays an image, the monitor is displayed, check all connections. XR6-19Dw 2 Connect to the DVI port 3 Connect to power source NOTE: When the DVI and... the bottom side of the main unit to switch between the VGA mode and DVI mode. 14 Downloaded from www.Manualslib.com manuals search engine Xerox© LCD Monitor User's Manual If no image is successfully installed.
... DVI port on the back of the computer. 3 Connect the power cord to the LCD monitor and wall outlet. 4 Press the button, located on . If the monitor displays an image, the monitor is displayed, check all connections. XR6-19Dw 2 Connect to the DVI port 3 Connect to power source NOTE: When the DVI and... the bottom side of the main unit to switch between the VGA mode and DVI mode. 14 Downloaded from www.Manualslib.com manuals search engine Xerox© LCD Monitor User's Manual If no image is successfully installed.
User Guide
Page 16
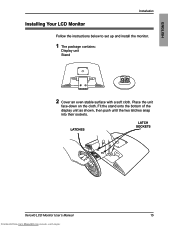
LATCHES LATCH SOCKETS Xerox© LCD Monitor User's Manual 15 Downloaded from www.Manualslib.com manuals search engine Fit the stand onto the bottom of the display unit as shown, then push until the two latches snap into their sockets. Place the unit face-down on the cloth. ENGLISH Installation Installing Your LCD Monitor Follow the instructions below to set up and install the monitor. 1 The package contains: Display unit Stand 2 Cover an even stable surface with a soft cloth.
LATCHES LATCH SOCKETS Xerox© LCD Monitor User's Manual 15 Downloaded from www.Manualslib.com manuals search engine Fit the stand onto the bottom of the display unit as shown, then push until the two latches snap into their sockets. Place the unit face-down on the cloth. ENGLISH Installation Installing Your LCD Monitor Follow the instructions below to set up and install the monitor. 1 The package contains: Display unit Stand 2 Cover an even stable surface with a soft cloth.
User Guide
Page 17
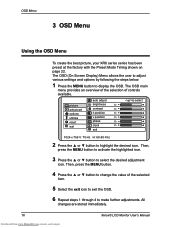
...9650; or ▼ button to select the desired adjustment icon. All changes are stored immediately. 16 Downloaded from www.Manualslib.com manuals search engine Xerox© LCD Monitor User's Manual Then, press the MENU button to activate the highlighted icon. 3 Press the ▲ or ▼ button to highlight the... desired icon. OSD Menu 3 OSD Menu Using the OSD Menu To create the best picture, your XR6 series series has been preset at the ...
...9650; or ▼ button to select the desired adjustment icon. All changes are stored immediately. 16 Downloaded from www.Manualslib.com manuals search engine Xerox© LCD Monitor User's Manual Then, press the MENU button to activate the highlighted icon. 3 Press the ▲ or ▼ button to highlight the... desired icon. OSD Menu 3 OSD Menu Using the OSD Menu To create the best picture, your XR6 series series has been preset at the ...
User Guide
Page 18
exit Exits the on -screen menu. Xerox© LCD Monitor User's Manual 17 Downloaded from www.Manualslib.com manuals search engine advanced Allows selection of the language used on all the on-screen menus. ...
exit Exits the on -screen menu. Xerox© LCD Monitor User's Manual 17 Downloaded from www.Manualslib.com manuals search engine advanced Allows selection of the language used on all the on-screen menus. ...

User Guide
Page 19
... Adjusts signal phase, which can improve focus clarity and image stability. h. exit Exits the picture menu. 18 Downloaded from www.Manualslib.com manuals search engine Xerox© LCD Monitor User's Manual
... Adjusts signal phase, which can improve focus clarity and image stability. h. exit Exits the picture menu. 18 Downloaded from www.Manualslib.com manuals search engine Xerox© LCD Monitor User's Manual

User Guide
Page 20
... component levels at factory settings; they cannot be independently adjusted. exit Exits the advanced menu. decrease for soft edges. they cannot be independently adjusted. Xerox© LCD Monitor User's Manual 19 Downloaded from www.Manualslib.com manuals search engine user Allows the user to see crisp edges in the picture; Fixes the...
... component levels at factory settings; they cannot be independently adjusted. exit Exits the advanced menu. decrease for soft edges. they cannot be independently adjusted. Xerox© LCD Monitor User's Manual 19 Downloaded from www.Manualslib.com manuals search engine user Allows the user to see crisp edges in the picture; Fixes the...

User Guide
Page 21
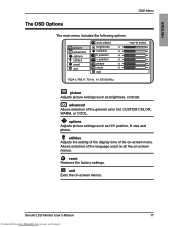
OSD Menu The options Menu 1 The options menu provides access to the following menus: picture advanced options utilities reset exit osd h position osd v position exit 2 The options menu includes the following options: ON DESCRIPTION osd h. position Moves the OSD left and right in the window. exit Exits the OSD menu. 20 Downloaded from www.Manualslib.com manuals search engine Xerox© LCD Monitor User's Manual osd v. position Moves the OSD up and down in the window.
OSD Menu The options Menu 1 The options menu provides access to the following menus: picture advanced options utilities reset exit osd h position osd v position exit 2 The options menu includes the following options: ON DESCRIPTION osd h. position Moves the OSD left and right in the window. exit Exits the OSD menu. 20 Downloaded from www.Manualslib.com manuals search engine Xerox© LCD Monitor User's Manual osd v. position Moves the OSD up and down in the window.