
Service Manual
Page 3
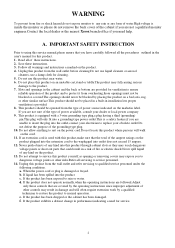
... liquid cleaners or aerosol cleaners, use a damp cloth for cleaning. 5. WARNING To prevent from fire or shock hazard,do not expose monitor to any rain or any form of water.High voltage is inside the monitor so please do not remove the back cover of the cabinet if you are not a qualified... monitor engineer.Contact the local dealer or the nearest Xerox branch office if you need for service. A. If the product does not operate normally,when the operating instructions are followed.Adjust only those openings must ...
... liquid cleaners or aerosol cleaners, use a damp cloth for cleaning. 5. WARNING To prevent from fire or shock hazard,do not expose monitor to any rain or any form of water.High voltage is inside the monitor so please do not remove the back cover of the cabinet if you are not a qualified... monitor engineer.Contact the local dealer or the nearest Xerox branch office if you need for service. A. If the product does not operate normally,when the operating instructions are followed.Adjust only those openings must ...
Service Manual
Page 4
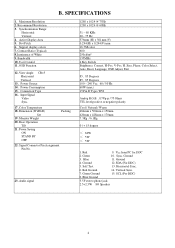
... CR=5 Horizontal Vertical 13. Color Temperature 18. Base Operation Tilt 21. SDA (For DDC) 5. Horizontal Sync. 6. Contrast Ratio (Typical) 8.Luminance of White 9. OSD Function 12. Monitor Weight 20. Vertical Sync. 7. Red 9. B.
... CR=5 Horizontal Vertical 13. Color Temperature 18. Base Operation Tilt 21. SDA (For DDC) 5. Horizontal Sync. 6. Contrast Ratio (Typical) 8.Luminance of White 9. OSD Function 12. Monitor Weight 20. Vertical Sync. 7. Red 9. B.
Service Manual
Page 7
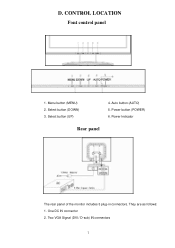
Select button (UP) 4. One DC IN connector 2. They are as follows: 1. Menu button (MENU) 2. D. Power button (POWER) 6. CONTROL LOCATION Font control panel 1. Auto button (AUTO) 5. Two VGA Signal (DVI / D-sub) IN connectors Select button (DOWN) 3. Power Indicator Rear panel The rear panel of the monitor includes 3 plug-in connectors.
Select button (UP) 4. One DC IN connector 2. They are as follows: 1. Menu button (MENU) 2. D. Power button (POWER) 6. CONTROL LOCATION Font control panel 1. Auto button (AUTO) 5. Two VGA Signal (DVI / D-sub) IN connectors Select button (DOWN) 3. Power Indicator Rear panel The rear panel of the monitor includes 3 plug-in connectors.
Service Manual
Page 11
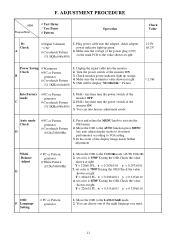
...313±0.01 y = 0.329±0.01 OSD F Language Setting PC or Pattern generator 1. Hold ‹ key,then turn the power switch of the monitor OFF. 2. Move the OSD to the COLOR mode (AUTO COLOR). 2. Into Factory mode C PC or Pattern generator Crosshatch Pattern (31.5KHz,640x480) 1....the OSD to the LANGUAGE mode. 2. B+ Check A Test Meter Test Point Pattern Operation Check Value Digital Voltmeter CN7 Crosshatch Pattern (31.5KHz,640x480) 1. Check monitor power indicator light up green. 2. Y = 220±0.1FL x = 0.283±0.01 y = 0.297±0.01 3. set color is 6500° using...
...313±0.01 y = 0.329±0.01 OSD F Language Setting PC or Pattern generator 1. Hold ‹ key,then turn the power switch of the monitor OFF. 2. Move the OSD to the COLOR mode (AUTO COLOR). 2. Into Factory mode C PC or Pattern generator Crosshatch Pattern (31.5KHz,640x480) 1....the OSD to the LANGUAGE mode. 2. B+ Check A Test Meter Test Point Pattern Operation Check Value Digital Voltmeter CN7 Crosshatch Pattern (31.5KHz,640x480) 1. Check monitor power indicator light up green. 2. Y = 220±0.1FL x = 0.283±0.01 y = 0.297±0.01 3. set color is 6500° using...

