User Guide
Page 3
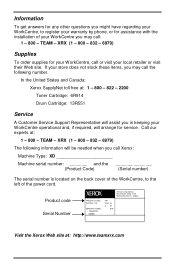
If your WorkCentre operational and, if required, will arrange for service. In the United States and Canada: Xerox SupplyNet toll free at: 1 - 800 - 822 - 2200 Toner Cartridge: 6R914 Drum Cartridge: 13R551 Service A Customer Service Support Representative will be needed when you call the following ...items, you may call: 1 - 800 - XRX (1 - 800 - 832 - 6979) Supplies To order supplies for your WorkCentre, call or visit your WorkCentre you may call Xerox: Machine Type: XD Machine serial number: __ __ __ and the (Product Code) (Serial number) The serial number is located...
If your WorkCentre operational and, if required, will arrange for service. In the United States and Canada: Xerox SupplyNet toll free at: 1 - 800 - 822 - 2200 Toner Cartridge: 6R914 Drum Cartridge: 13R551 Service A Customer Service Support Representative will be needed when you call the following ...items, you may call: 1 - 800 - XRX (1 - 800 - 832 - 6979) Supplies To order supplies for your WorkCentre, call or visit your WorkCentre you may call Xerox: Machine Type: XD Machine serial number: __ __ __ and the (Product Code) (Serial number) The serial number is located...
User Guide
Page 6
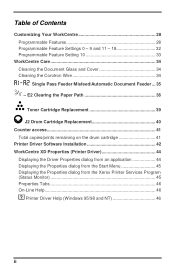
E2 Clearing the Paper Path 36 Toner Cartridge Replacement 39 J2 Drum Cartridge Replacement 40 Counter access 41 Total copies/prints remaining on the drum cartridge 41 Printer Driver Software Installation 42 WorkCentre XD Properties (Printer Driver 44 Displaying the Driver Properties dialog from... Properties dialog from the Start Menu 45 Displaying the Properties dialog from the Xerox Printer Services Program (Status Monitor 45 Properties Tabs 46 On-Line Help 46 ? Table of Contents Customizing Your WorkCentre 28 Programmable Features 28 Programmable Feature Settings 0 - 9 and 11 - ...
E2 Clearing the Paper Path 36 Toner Cartridge Replacement 39 J2 Drum Cartridge Replacement 40 Counter access 41 Total copies/prints remaining on the drum cartridge 41 Printer Driver Software Installation 42 WorkCentre XD Properties (Printer Driver 44 Displaying the Driver Properties dialog from... Properties dialog from the Start Menu 45 Displaying the Properties dialog from the Xerox Printer Services Program (Status Monitor 45 Properties Tabs 46 On-Line Help 46 ? Table of Contents Customizing Your WorkCentre 28 Programmable Features 28 Programmable Feature Settings 0 - 9 and 11 - ...
User Guide
Page 8
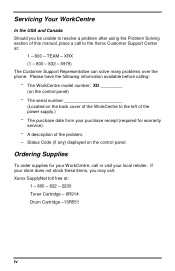
...to the Xerox Customer Support Center at : 1 - 800 - 822 - 2200 Toner Cartridge - 6R914 Drum Cartridge -13R551 iv XRX (1 - 800 - 832 - 6979) The Customer Support Representative can solve many problems over the phone. The serial number Located on the back cover of the WorkCentre to ... Solving section of the power supply.) - If your local retailer. Please have the following information available before calling: - TEAM - The WorkCentre model number: XD _________ (on the control panel. Ordering Supplies To order supplies for warranty service). - Status Code (if any) displayed...
...to the Xerox Customer Support Center at : 1 - 800 - 822 - 2200 Toner Cartridge - 6R914 Drum Cartridge -13R551 iv XRX (1 - 800 - 832 - 6979) The Customer Support Representative can solve many problems over the phone. The serial number Located on the back cover of the WorkCentre to ... Solving section of the power supply.) - If your local retailer. Please have the following information available before calling: - TEAM - The WorkCentre model number: XD _________ (on the control panel. Ordering Supplies To order supplies for warranty service). - Status Code (if any) displayed...
User Guide
Page 14
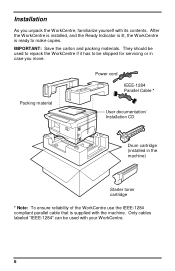
Only cables labeled "IEEE-1284" can be used to repack the WorkCentre if it has to make copies. They should be shipped for servicing or in the machine) Starter toner cartridge * Note: To ensure reliability of the WorkCentre use the IEEE-1284 compliant parallel cable that is ready to be... used with the machine. Installation As you move. After the WorkCentre is installed, and the Ready Indicator is lit, ...
Only cables labeled "IEEE-1284" can be used to repack the WorkCentre if it has to make copies. They should be shipped for servicing or in the machine) Starter toner cartridge * Note: To ensure reliability of the WorkCentre use the IEEE-1284 compliant parallel cable that is ready to be... used with the machine. Installation As you move. After the WorkCentre is installed, and the Ready Indicator is lit, ...
User Guide
Page 17
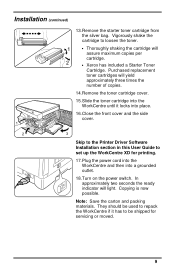
... indicator will assure maximum copies per cartridge. • Xerox has included a Starter Toner Cartridge. They should be shipped for printing. 17.Plug the power cord into the WorkCentre and then into place. 16.Close the front cover and the side cover. 1 2 3 Skip to the Printer Driver Software Installation section in this User Guide to...
... indicator will assure maximum copies per cartridge. • Xerox has included a Starter Toner Cartridge. They should be shipped for printing. 17.Plug the power cord into the WorkCentre and then into place. 16.Close the front cover and the side cover. 1 2 3 Skip to the Printer Driver Software Installation section in this User Guide to...
User Guide
Page 18
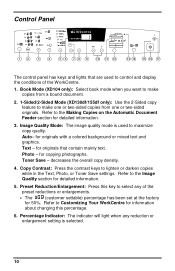
... you want to make copies from a bound document. 2. 1-Sided/2-Sided Mode (XD130df/155df only): Use the 2-Sided copy feature to lighten or darken copies while in the Text, Photo, or Toner Save settings. Text - Refer to the Image Quality section for information about changing ...this key to maximize copy quality. Percentage Indicator: The indicator will light when any of the WorkCentre. 1. decreases the overall copy density. 4. ...
... you want to make copies from a bound document. 2. 1-Sided/2-Sided Mode (XD130df/155df only): Use the 2-Sided copy feature to lighten or darken copies while in the Text, Photo, or Toner Save settings. Text - Refer to the Image Quality section for information about changing ...this key to maximize copy quality. Percentage Indicator: The indicator will light when any of the WorkCentre. 1. decreases the overall copy density. 4. ...
User Guide
Page 24
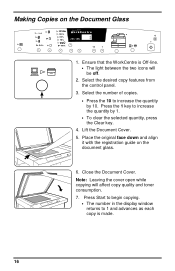
... the document glass. 6. Press Start to begin copying. • The number in the display window returns to increase the quantity by 10. Ensure that the WorkCentre is made. 16 Lift the Document Cover. 5. Close the Document Cover. Press the 1 key to 1 and advances as each copy is Off-line. • The...
... the document glass. 6. Press Start to begin copying. • The number in the display window returns to increase the quantity by 10. Ensure that the WorkCentre is made. 16 Lift the Document Cover. 5. Close the Document Cover. Press the 1 key to 1 and advances as each copy is Off-line. • The...

User Guide
Page 29
Copy Contrast You can be used when making draft copies. Darkest, normal and lightest settings are of poor quality. Toner Save: Toner Save mode lowers overall copy density on each page. Text: Use Text to lighten or darken copies while in successive order. This ... settings are lit, the copy contrast will change the indicators in the Text, Photo, or Toner Save settings. Press the copy contrast key to copy documents containing mostly text. Toner Save Photo Text Auto Auto Auto: Use Auto when copying from originals with a colored background or mixed text and graphics....
Copy Contrast You can be used when making draft copies. Darkest, normal and lightest settings are of poor quality. Toner Save: Toner Save mode lowers overall copy density on each page. Text: Use Text to lighten or darken copies while in successive order. This ... settings are lit, the copy contrast will change the indicators in the Text, Photo, or Toner Save settings. Press the copy contrast key to copy documents containing mostly text. Toner Save Photo Text Auto Auto Auto: Use Auto when copying from originals with a colored background or mixed text and graphics....
User Guide
Page 40
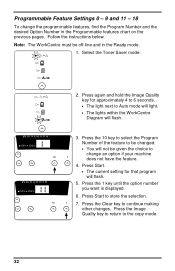
... Number in the Ready mode. 1. Press Start to the copy mode. 32 Select the Toner Saver mode. 2. Press the 1 key until the option number you want is displayed. 6. Follow the instructions below. WorkCentre 50% 200% 10 WorkCentre 50% 200% 10 3. Programmable Feature Settings 0 - 9 and 11 - 18 To ...change an option if your machine 1 does not have the feature. 4. Note: The WorkCentre must be given the choice to Auto mode will light. • The lights within the WorkCentre Diagram will flash. 5. Press the 10 key to select the Program Number of the feature to continue ...
... Number in the Ready mode. 1. Press Start to the copy mode. 32 Select the Toner Saver mode. 2. Press the 1 key until the option number you want is displayed. 6. Follow the instructions below. WorkCentre 50% 200% 10 WorkCentre 50% 200% 10 3. Programmable Feature Settings 0 - 9 and 11 - 18 To ...change an option if your machine 1 does not have the feature. 4. Note: The WorkCentre must be given the choice to Auto mode will light. • The lights within the WorkCentre Diagram will flash. 5. Press the 10 key to select the Program Number of the feature to continue ...
User Guide
Page 41
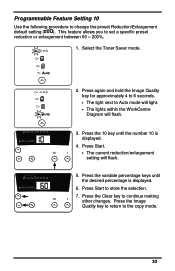
... Quality key for approximately 4 to 6 seconds. • The light next to continue making 1 other changes. WorkCentre 50% 200% 10 3. DOCUMENT WorkCentre 50% 200% 10 5. Press the variable percentage keys until the number 10 is displayed. 6. Select the Toner Saver mode. 2. Press the Clear key to Auto mode will light. • The lights within...
... Quality key for approximately 4 to 6 seconds. • The light next to continue making 1 other changes. WorkCentre 50% 200% 10 3. DOCUMENT WorkCentre 50% 200% 10 5. Press the variable percentage keys until the number 10 is displayed. 6. Select the Toner Saver mode. 2. Press the Clear key to Auto mode will light. • The lights within...
User Guide
Page 44
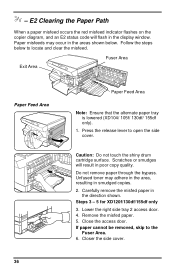
Remove the misfed paper. 5. Unfused toner may occur in the areas shown below to locate and clear the misfeed. Close the access door. Closer the side cover. Steps 3 - 5 for XD120f/130df/...
Remove the misfed paper. 5. Unfused toner may occur in the areas shown below to locate and clear the misfeed. Close the access door. Closer the side cover. Steps 3 - 5 for XD120f/130df/...

User Guide
Page 45
... the alternate paper tray is not seen in this area skip to open the side cover. 2. Press the release lever to the Exit Area. Unfused toner may adhere in the area, resulting in the direction shown. 4. Push up through the fusing unit. E2 Clearing the Paper Path (continued) Fuser Area Warning...
... the alternate paper tray is not seen in this area skip to open the side cover. 2. Press the release lever to the Exit Area. Unfused toner may adhere in the area, resulting in the direction shown. 4. Push up through the fusing unit. E2 Clearing the Paper Path (continued) Fuser Area Warning...
User Guide
Page 47
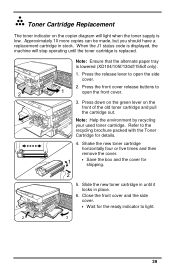
...the recycling brochure packed with the Toner Cartridge for details. 4. Slide the new toner cartridge in until the toner cartridge is lowered (XD104/105f/130df/155df only). 1. Toner Cartridge Replacement The toner indicator on the front of the old toner cartridge and pull the cartridge ... 2. Close the front cover and the side cover. 1 • Wait for shipping. 2 5. Note: Help the environment by recycling your used toner cartridge. Approximately 10 more copies can be made, but you should have a replacement cartridge in place. 6. Press the front cover release buttons to ...
...the recycling brochure packed with the Toner Cartridge for details. 4. Slide the new toner cartridge in until the toner cartridge is lowered (XD104/105f/130df/155df only). 1. Toner Cartridge Replacement The toner indicator on the front of the old toner cartridge and pull the cartridge ... 2. Close the front cover and the side cover. 1 • Wait for shipping. 2 5. Note: Help the environment by recycling your used toner cartridge. Approximately 10 more copies can be made, but you should have a replacement cartridge in place. 6. Press the front cover release buttons to ...
User Guide
Page 48
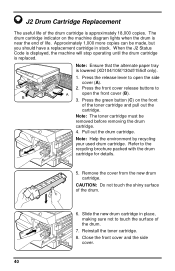
... cartridge indicator on the front of the drum. 6. Note: Ensure that the alternate paper tray is near the end of life. Note: The toner cartridge must be made, but you should have a replacement cartridge in place, making sure not to the recycling brochure packed with the drum cartridge ...displayed, the machine will stop operating until the drum cartridge is approximately 18,000 copies. CAUTION: Do not touch the shiny surface of the toner cartridge and pull out the cartridge. Press the green button (C) on the machine diagram lights when the drum is lowered (XD104/105f/130df/155df...
... cartridge indicator on the front of the drum. 6. Note: Ensure that the alternate paper tray is near the end of life. Note: The toner cartridge must be made, but you should have a replacement cartridge in place, making sure not to the recycling brochure packed with the drum cartridge ...displayed, the machine will stop operating until the drum cartridge is approximately 18,000 copies. CAUTION: Do not touch the shiny surface of the toner cartridge and pull out the cartridge. Press the green button (C) on the machine diagram lights when the drum is lowered (XD104/105f/130df/155df...

User Guide
Page 49
... will be displayed as a sequence of copies/prints remaining on the drum cartridge This counter displays the total number of 23 digit values. Select the Toner Saver mode. 2. C 3. Press again and hold the Clear key for approximately 4 to 6 seconds. • The light next to Auto mode will light. • The lights...
... will be displayed as a sequence of copies/prints remaining on the drum cartridge This counter displays the total number of 23 digit values. Select the Toner Saver mode. 2. C 3. Press again and hold the Clear key for approximately 4 to 6 seconds. • The light next to Auto mode will light. • The lights...
User Guide
Page 58
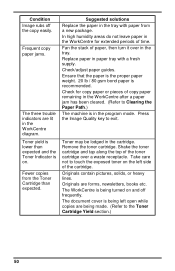
...for extended periods of copy paper remaining in the tray. In high humidity areas do not leave paper in the WorkCentre for copy paper or pieces of time. Shake the toner cartridge and tap along the top of paper, then turn it over a waste receptacle. Remove the... in the program mode. Toner may be lodged in the WorkCentre diagram. Press the Image Quality key to the Toner Cartridge Yield section.) 50 Originals contain pictures, solids, or heavy lines. The WorkCentre is recommended. Fan the stack of the toner cartridge over in the WorkCentre after a paper jam has...
...for extended periods of copy paper remaining in the tray. In high humidity areas do not leave paper in the WorkCentre for copy paper or pieces of time. Shake the toner cartridge and tap along the top of paper, then turn it over a waste receptacle. Remove the... in the program mode. Toner may be lodged in the WorkCentre diagram. Press the Image Quality key to the Toner Cartridge Yield section.) 50 Originals contain pictures, solids, or heavy lines. The WorkCentre is recommended. Fan the stack of the toner cartridge over in the WorkCentre after a paper jam has...

User Guide
Page 59
... on the machine diagram lights when the drum is low. The drum cartridge indicator on the copier diagram will light when the toner supply is near the end of life. If the status code continues, call for detailed instructions. H4 L3 - When the J1 status code is displayed, ... Paper Tray is paper in stock. L5 U2 - Approximately 1,000 more copies can be made , but you should have fed all the way into the WorkCentre. (Refer to Loading Paper and Flashing P.) Copy paper has misfed. (Refer to A1 - When the J2 status code is displayed, the machine will stop operating...
... on the machine diagram lights when the drum is low. The drum cartridge indicator on the copier diagram will light when the toner supply is near the end of life. If the status code continues, call for detailed instructions. H4 L3 - When the J1 status code is displayed, ... Paper Tray is paper in stock. L5 U2 - Approximately 1,000 more copies can be made , but you should have fed all the way into the WorkCentre. (Refer to Loading Paper and Flashing P.) Copy paper has misfed. (Refer to A1 - When the J2 status code is displayed, the machine will stop operating...

User Guide
Page 60
.... 52 Check the cable with an IEEE-1284 compliant cable. Check the printer settings in the computer. Install more RAM in the Windows Control Panel to make sure that the toner and cartridges are not installed drum cartridges are installed properly. Install more RAM....) The toner and drum Check that the print job is not connected does not print properly. properly. The IEEE-1284 parallel cable is incorrect. Check the cable connection. The port setting is defective. The page orientation may not Reinstall the WorkCentre be incorrect. The printer driver may...
.... 52 Check the cable with an IEEE-1284 compliant cable. Check the printer settings in the computer. Install more RAM in the Windows Control Panel to make sure that the toner and cartridges are not installed drum cartridges are installed properly. Install more RAM....) The toner and drum Check that the print job is not connected does not print properly. properly. The IEEE-1284 parallel cable is incorrect. Check the cable connection. The port setting is defective. The page orientation may not Reinstall the WorkCentre be incorrect. The printer driver may...

User Guide
Page 61
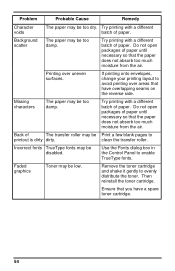
Point to evenly distribute the toner. Click the Xerox Document WorkCentre XD with an ECP parallel port, enable this mode of problem. Irregular faded There is equipped with the right mouse button. print Use only paper that meets the specifications required by the printer. Remove the toner cartridge and shake it gently to the Start Task...
Point to evenly distribute the toner. Click the Xerox Document WorkCentre XD with an ECP parallel port, enable this mode of problem. Irregular faded There is equipped with the right mouse button. print Use only paper that meets the specifications required by the printer. Remove the toner cartridge and shake it gently to the Start Task...
User Guide
Page 62
...the paper does not absorb too much moisture from the air. Use the Fonts dialog box in the Control Panel to evenly distribute the toner. Then reinstall the toner cartridge. Try printing with a different batch of The transfer roller may be too damp. Do not open packages of paper until necessary... printing over uneven surfaces. Try printing with a different batch of paper. Do not open packages of paper until necessary so that have a spare toner cartridge. 54 Back of paper. Ensure that the paper does not absorb too much moisture from the air. Remove the...
...the paper does not absorb too much moisture from the air. Use the Fonts dialog box in the Control Panel to evenly distribute the toner. Then reinstall the toner cartridge. Try printing with a different batch of The transfer roller may be too damp. Do not open packages of paper until necessary... printing over uneven surfaces. Try printing with a different batch of paper. Do not open packages of paper until necessary so that have a spare toner cartridge. 54 Back of paper. Ensure that the paper does not absorb too much moisture from the air. Remove the...


