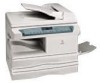
User Guide
Page 6
...and NT 46 ii E2 Clearing the Paper Path 36 Toner Cartridge Replacement 39 J2 Drum Cartridge Replacement 40 Counter access 41 Total copies/prints remaining on the drum cartridge 41 Printer Driver Software Installation 42 WorkCentre XD Properties (Printer Driver 44 Displaying the... Driver Properties dialog from an application 44 Displaying the Properties dialog from the Start Menu 45 Displaying the Properties dialog from the Xerox Printer Services Program (Status ...
...and NT 46 ii E2 Clearing the Paper Path 36 Toner Cartridge Replacement 39 J2 Drum Cartridge Replacement 40 Counter access 41 Total copies/prints remaining on the drum cartridge 41 Printer Driver Software Installation 42 WorkCentre XD Properties (Printer Driver 44 Displaying the... Driver Properties dialog from an application 44 Displaying the Properties dialog from the Start Menu 45 Displaying the Properties dialog from the Xerox Printer Services Program (Status ...
User Guide
Page 44
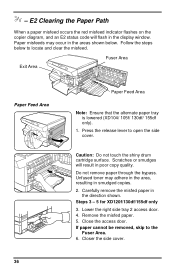
...: Ensure that the alternate paper tray is lowered (XD104/ 105f/ 130df/ 155df only). 1. Paper misfeeds may adhere in the area, resulting in poor copy quality. E2 Clearing the Paper Path When a paper misfeed occurs the red misfeed indicator flashes on the copier diagram, and an... E2 status code will result in smudged copies. 2. Steps 3 - 5 for XD120f/130df/155df only 3. If paper cannot be removed, skip to open the side cover. Caution: ...
...: Ensure that the alternate paper tray is lowered (XD104/ 105f/ 130df/ 155df only). 1. Paper misfeeds may adhere in the area, resulting in poor copy quality. E2 Clearing the Paper Path When a paper misfeed occurs the red misfeed indicator flashes on the copier diagram, and an... E2 status code will result in smudged copies. 2. Steps 3 - 5 for XD120f/130df/155df only 3. If paper cannot be removed, skip to open the side cover. Caution: ...

User Guide
Page 45
... on the paper. - Press the release lever to the Exit Area. Note: Ensure that the alternate paper tray is hot. Close the side cover. 37 E2 Clearing the Paper Path (continued) Fuser Area Warning: The fuser area is lowered (XD104 105f/ 130df/ 155df only). 1. paper is not seen in this area...
... on the paper. - Press the release lever to the Exit Area. Note: Ensure that the alternate paper tray is hot. Close the side cover. 37 E2 Clearing the Paper Path (continued) Fuser Area Warning: The fuser area is lowered (XD104 105f/ 130df/ 155df only). 1. paper is not seen in this area...

User Guide
Page 46
- E2 Clearing the Paper Path (continued) Exit Area 2 Note: Ensure that the alternate paper tray is lowered (XD104/105f/130df/155df only). 1. Press the front cover release buttons to 1 open the side cover. 2. Pull down on the fuser lever. • This will release pressure on the fuser lever. 7. Gently pull the paper out through the exit area. 6. Press the release lever to the exit area. 5. Turn the knob in the direction of the arrow to move the paper to open the front cover. 3. Close the front cover and side cover. 38 Push up on the paper. 4.
- E2 Clearing the Paper Path (continued) Exit Area 2 Note: Ensure that the alternate paper tray is lowered (XD104/105f/130df/155df only). 1. Press the front cover release buttons to 1 open the side cover. 2. Pull down on the fuser lever. • This will release pressure on the fuser lever. 7. Gently pull the paper out through the exit area. 6. Press the release lever to the exit area. 5. Turn the knob in the direction of the arrow to move the paper to open the front cover. 3. Close the front cover and side cover. 38 Push up on the paper. 4.

User Guide
Page 59
...Feeder Misfeed/Automatic Document Feeder for service. 51 Wait approximately 5 seconds. Switch ON the Main Power. Problem Solving Status Code Chart Status Code E2 Suggested Solution Ensure that there is near the end of life. A2 L1 E7 H2 - U5 The toner indicator on the machine diagram ...continues, call for detailed instructions. L5 U2 - Approximately 1,000 more copies can be made , but you should have fed all the way into the WorkCentre. (Refer to Loading Paper and Flashing P.) Copy paper has misfed. (Refer to A1 - Switch OFF the Main Power. Remove misfed paper from ...
...Feeder Misfeed/Automatic Document Feeder for service. 51 Wait approximately 5 seconds. Switch ON the Main Power. Problem Solving Status Code Chart Status Code E2 Suggested Solution Ensure that there is near the end of life. A2 L1 E7 H2 - U5 The toner indicator on the machine diagram ...continues, call for detailed instructions. L5 U2 - Approximately 1,000 more copies can be made , but you should have fed all the way into the WorkCentre. (Refer to Loading Paper and Flashing P.) Copy paper has misfed. (Refer to A1 - Switch OFF the Main Power. Remove misfed paper from ...
