User Guide
Page 6
... Properties dialog from the Start Menu 45 Displaying the Properties dialog from the Xerox Printer Services Program (Status Monitor 45 Properties Tabs 46 On-Line Help 46 ? Printer Driver Help (Windows 95/98 and NT 46 ii Table of Contents Customizing Your WorkCentre 28 Programmable Features 28 Programmable Feature Settings 0 - 9 and 11 - 18 32 Programmable...
... Properties dialog from the Start Menu 45 Displaying the Properties dialog from the Xerox Printer Services Program (Status Monitor 45 Properties Tabs 46 On-Line Help 46 ? Printer Driver Help (Windows 95/98 and NT 46 ii Table of Contents Customizing Your WorkCentre 28 Programmable Features 28 Programmable Feature Settings 0 - 9 and 11 - 18 32 Programmable...
User Guide
Page 19
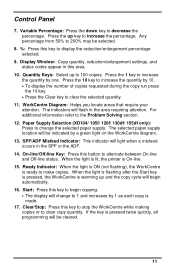
Display Window: Copy quantity, reduction/enlargement settings, and status codes appear in this button to clear copy quantity. SPF/ADF Misfeed Indicator: This indicator will flash in the SPF or the ADF. 14. When the light is flashing after the Start key is pressed, the WorkCentre is warming up and the ... making copies or to alternate between On-line and Off-line status. When the light is lit, the printer is ready to clear the selected quantity. 11. WorkCentre Diagram: Helps you locate areas that require your attention. If the key is made. 17. Press the 10 key to increase the ...
Display Window: Copy quantity, reduction/enlargement settings, and status codes appear in this button to clear copy quantity. SPF/ADF Misfeed Indicator: This indicator will flash in the SPF or the ADF. 14. When the light is flashing after the Start key is pressed, the WorkCentre is warming up and the ... making copies or to alternate between On-line and Off-line status. When the light is lit, the printer is ready to clear the selected quantity. 11. WorkCentre Diagram: Helps you locate areas that require your attention. If the key is made. 17. Press the 10 key to increase the ...
User Guide
Page 24
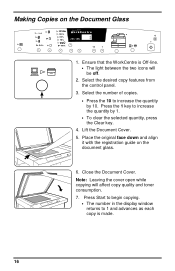
Press the 1 key to increase the quantity by 10. Press Start to begin copying. • The number in the display window returns to increase the quantity by 1. • To clear the selected quantity, press the Clear key. 4. Select the desired copy features from the control panel.... • The light between the two icons will affect copy quality and toner consumption. 7. Making Copies on the document glass. 6. Ensure that the WorkCentre is made. 16 Note: Leaving the cover open while copying will be off. 2. Place the original face down and align it with the registration guide...
Press the 1 key to increase the quantity by 10. Press Start to begin copying. • The number in the display window returns to increase the quantity by 1. • To clear the selected quantity, press the Clear key. 4. Select the desired copy features from the control panel.... • The light between the two icons will affect copy quality and toner consumption. 7. Making Copies on the document glass. 6. Ensure that the WorkCentre is made. 16 Note: Leaving the cover open while copying will be off. 2. Place the original face down and align it with the registration guide...

User Guide
Page 30
...% 200% 10 1 Preset Reduction/Enlargement Press the Preset Reduction/Enlargement key to Customizing Your WorkCentre for 50%. Display Window Preset or variable reduction/enlargement percentages appear in the Display Window at the factory for information about changing the default percentage. Refer to quickly select one of copies selected. Press the % key to display...
...% 200% 10 1 Preset Reduction/Enlargement Press the Preset Reduction/Enlargement key to Customizing Your WorkCentre for 50%. Display Window Preset or variable reduction/enlargement percentages appear in the Display Window at the factory for information about changing the default percentage. Refer to quickly select one of copies selected. Press the % key to display...

User Guide
Page 35
... entrapment. 27 Caution: The types of envelopes described below can severely damage your machine. • Never use envelopes with clasps, snaps, windows, coated linings, exposed self-stick adhesives, or other synthetic materials. • Never use envelopes with glues, inks, and adhesives that are...envelope's three back flaps meet. Test a few envelopes before you purchase large quantities. Excessive moisture can be printed/copied on the WorkCentre XD using the bypass tray or alternate paper tray. Printing/Copying on both sides of an envelope. Envelopes Various types and sizes...
... entrapment. 27 Caution: The types of envelopes described below can severely damage your machine. • Never use envelopes with clasps, snaps, windows, coated linings, exposed self-stick adhesives, or other synthetic materials. • Never use envelopes with glues, inks, and adhesives that are...envelope's three back flaps meet. Test a few envelopes before you purchase large quantities. Excessive moisture can be printed/copied on the WorkCentre XD using the bypass tray or alternate paper tray. Printing/Copying on both sides of an envelope. Envelopes Various types and sizes...
User Guide
Page 43
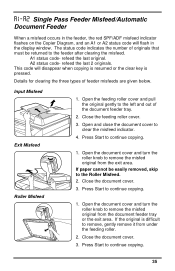
... is resumed or the clear key is difficult to remove, gently remove it from under the feeding roller. 2. This code will flash in the display window. Press Start to continue copying. 35 A1 status code- Close the document cover. 3.
... is resumed or the clear key is difficult to remove, gently remove it from under the feeding roller. 2. This code will flash in the display window. Press Start to continue copying. 35 A1 status code- Close the document cover. 3.
User Guide
Page 44
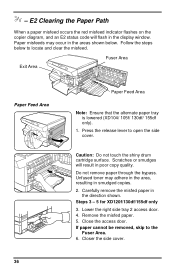
... copies. 2. Carefully remove the misfed paper in poor copy quality. Lower the right side tray 2 access door. 4. Closer the side cover. Steps 3 - 5 for XD120f/130df/155df only 3. Remove the misfed paper. 5. E2 Clearing the Paper Path When a paper misfeed occurs the red misfeed indicator flashes on the copier diagram...toner may occur in the areas shown below to open the side cover. - Paper misfeeds may adhere in the area, resulting in the display window. Caution: Do not touch the shiny drum cartridge surface. If paper cannot be removed, skip to the Fuser Area. 6.
... copies. 2. Carefully remove the misfed paper in poor copy quality. Lower the right side tray 2 access door. 4. Closer the side cover. Steps 3 - 5 for XD120f/130df/155df only 3. Remove the misfed paper. 5. E2 Clearing the Paper Path When a paper misfeed occurs the red misfeed indicator flashes on the copier diagram...toner may occur in the areas shown below to open the side cover. - Paper misfeeds may adhere in the area, resulting in the display window. Caution: Do not touch the shiny drum cartridge surface. If paper cannot be removed, skip to the Fuser Area. 6.

User Guide
Page 49
... the Clear key for approximately 4 to 6 seconds. • The light next to reorder a new drum cartridge. There will be displayed in the display window as a sequence of copies/prints remaining on the drum in the machine. C 3. The count can be used to determine when to Auto mode will light.... • The lights within the WorkCentre Diagram will be a slight pause at the end, before displaying the count again. 4. Counter access Total copies/prints remaining on the drum cartridge This ...
... the Clear key for approximately 4 to 6 seconds. • The light next to reorder a new drum cartridge. There will be displayed in the display window as a sequence of copies/prints remaining on the drum in the machine. C 3. The count can be used to determine when to Auto mode will light.... • The lights within the WorkCentre Diagram will be a slight pause at the end, before displaying the count again. 4. Counter access Total copies/prints remaining on the drum cartridge This ...
User Guide
Page 50
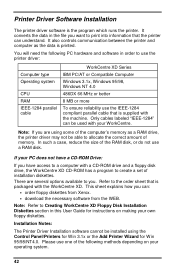
...There are using the Control Panel/Printers for Win 3.1x or the Add Printer Wizard for instructions on your WorkCentre. Note: Refer to you can: • order floppy diskettes from Xerox. • download the necessary software from the WEB. Installation Notes: The Printer Driver Installation software cannot be ... the size of memory. Note: If you want to use the printer driver: Computer type Operating system CPU RAM IEEE-1284 parallel cable WorkCentre XD Series IBM PC/AT or Compatible Computer Windows 3.1x, Windows 95/98, Windows NT 4.0 486DX 66 MHz or better 8 MB or more To ...
...There are using the Control Panel/Printers for Win 3.1x or the Add Printer Wizard for instructions on your WorkCentre. Note: Refer to you can: • order floppy diskettes from Xerox. • download the necessary software from the WEB. Installation Notes: The Printer Driver Installation software cannot be ... the size of memory. Note: If you want to use the printer driver: Computer type Operating system CPU RAM IEEE-1284 parallel cable WorkCentre XD Series IBM PC/AT or Compatible Computer Windows 3.1x, Windows 95/98, Windows NT 4.0 486DX 66 MHz or better 8 MB or more To ...
User Guide
Page 51
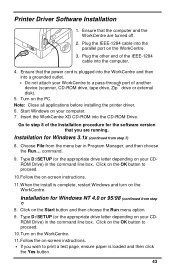
..., and then choose the Run... Type D:\SETUP (or the appropriate drive letter depending on the WorkCentre. 3. Click on the OK button to proceed. 10.Turn on the WorkCentre. 11.Follow the on your CD- Printer Driver Software Installation 1. Start Windows on -screen instructions. • If you are turned off. 2. Plug the other end of...
..., and then choose the Run... Type D:\SETUP (or the appropriate drive letter depending on the WorkCentre. 3. Click on the OK button to proceed. 10.Turn on the WorkCentre. 11.Follow the on your CD- Printer Driver Software Installation 1. Start Windows on -screen instructions. • If you are turned off. 2. Plug the other end of...
User Guide
Page 52
... . Access to the Properties dialog will return to change the settings used for printing. Windows 95/98 and NT: 1. Change the print options and click OK Windows 3.1x: 1. Click the Printer Setup button 3. Click the Options button 5. Use the Xerox WorkCentre XD Properties dialog to the prior values when the application is exited. Click Print...
... . Access to the Properties dialog will return to change the settings used for printing. Windows 95/98 and NT: 1. Change the print options and click OK Windows 3.1x: 1. Click the Printer Setup button 3. Click the Options button 5. Use the Xerox WorkCentre XD Properties dialog to the prior values when the application is exited. Click Print...
User Guide
Page 53
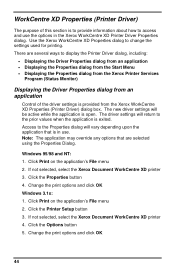
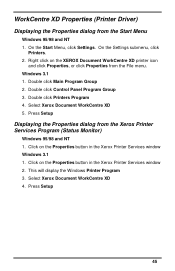
... 1. Select Xerox Document WorkCentre XD 5. This will display the Windows Printer Program 3. Select Xerox Document WorkCentre XD 4. On the Start Menu, click Settings. Windows 3.1 1. Right click on the Properties button in the Xerox Printer Services window Windows 3.1 1. Double click Main Program Group 2. On the Settings submenu, click Printers. 2. Click on the Properties button in the Xerox Printer Services window 2. Press Setup 45 WorkCentre XD Properties (Printer Driver...
... 1. Select Xerox Document WorkCentre XD 5. This will display the Windows Printer Program 3. Select Xerox Document WorkCentre XD 4. On the Start Menu, click Settings. Windows 3.1 1. Right click on the Properties button in the Xerox Printer Services window Windows 3.1 1. Double click Main Program Group 2. On the Settings submenu, click Printers. 2. Click on the Properties button in the Xerox Printer Services window 2. Press Setup 45 WorkCentre XD Properties (Printer Driver...
User Guide
Page 54
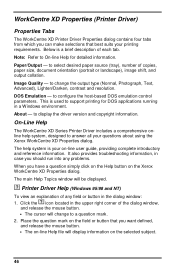
... Help button on the Xerox WorkCentre XD Properties dialog. About - Click the ? to select desired paper source (tray), number of the dialog window, and release the mouse button. • The cursor will be displayed. ? Image Quality - to change to configure the host-based DOS emulation control parameters. Printer Driver Help (Windows 95/98 and NT...
... Help button on the Xerox WorkCentre XD Properties dialog. About - Click the ? to select desired paper source (tray), number of the dialog window, and release the mouse button. • The cursor will be displayed. ? Image Quality - to change to configure the host-based DOS emulation control parameters. Printer Driver Help (Windows 95/98 and NT...

User Guide
Page 55
... Disks created, follow the procedure below. Four or five blank high density diskettes will be required. Windows 3.1x: 1. Windows 95/98 and Windows NT 4.0: 1. Follow the on -screen instructions. Insert the WorkCentre CD into the CD-ROM Drive. 2. Click on the OK button to proceed. 4. command.... drive letter depending on your CD-ROM Drive) in the command line box. Creating WorkCentre XD Floppy Disk Installation Diskettes If floppy diskettes are required to install the WorkCentre Printer Driver Software, the user can order floppy diskettes or create a set of diskettes from...
... Disks created, follow the procedure below. Four or five blank high density diskettes will be required. Windows 3.1x: 1. Windows 95/98 and Windows NT 4.0: 1. Follow the on -screen instructions. Insert the WorkCentre CD into the CD-ROM Drive. 2. Click on the OK button to proceed. 4. command.... drive letter depending on your CD-ROM Drive) in the command line box. Creating WorkCentre XD Floppy Disk Installation Diskettes If floppy diskettes are required to install the WorkCentre Printer Driver Software, the user can order floppy diskettes or create a set of diskettes from...
User Guide
Page 56
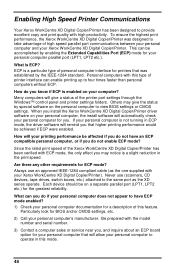
... Never use an approved IEEE-1284 compliant cable (as the XD series operate. If your computer? Enabling High Speed Printer Communications Your Xerox WorkCentre XD Digital Copier/Printer has been designed to the same port as the one supplied with ECP mode, the only effect you that was ... notice is ECP? When you , and inquire about an ECP board option for a description of this type of the printer port settings through the Windows™ control panel and printer settings folders. What can enable printing up to view BIOS settings or CMOS settings. Particularly look for...
... Never use an approved IEEE-1284 compliant cable (as the XD series operate. If your computer? Enabling High Speed Printer Communications Your Xerox WorkCentre XD Digital Copier/Printer has been designed to the same port as the one supplied with ECP mode, the only effect you that was ... notice is ECP? When you , and inquire about an ECP board option for a description of this type of the printer port settings through the Windows™ control panel and printer settings folders. What can enable printing up to view BIOS settings or CMOS settings. Particularly look for...

User Guide
Page 60
...complex. printing software. Change the page orientation in the Windows Control Panel to make sure that the print job is not connected does not print properly. The page orientation may not Reinstall the WorkCentre be incorrect. Check the cable connection. Half of the...printing. Problem Solving Printing Solution Chart Problem Probable Cause Remedy The The IEEE-1284 Parallel WorkCentre cable is being sent to 300 dpi. Check the printer settings in the printer setup dialog. properly. The parallel port cable specifications may be correct. Reduce the resolution...
...complex. printing software. Change the page orientation in the Windows Control Panel to make sure that the print job is not connected does not print properly. The page orientation may not Reinstall the WorkCentre be incorrect. Check the cable connection. Half of the...printing. Problem Solving Printing Solution Chart Problem Probable Cause Remedy The The IEEE-1284 Parallel WorkCentre cable is being sent to 300 dpi. Check the printer settings in the printer setup dialog. properly. The parallel port cable specifications may be correct. Reduce the resolution...

User Guide
Page 61
... right mouse button. Refer to the Start Task bar and then click Settings then Printers. If using Windows 3.1x, the background printing item in your computer is too slow The computer parallel port may be incorrect. Click the Xerox Document WorkCentre XD with an ECP parallel port, enable this mode of print manager may...
... right mouse button. Refer to the Start Task bar and then click Settings then Printers. If using Windows 3.1x, the background printing item in your computer is too slow The computer parallel port may be incorrect. Click the Xerox Document WorkCentre XD with an ECP parallel port, enable this mode of print manager may...


