
User Guide
Page 2
...are displayed on the screen such as icons, screen display looks, etc. ENERGY STAR As an ENERGY STAR® Partner, Xerox Corporation has determined that interference will not occur in accordance with the instructions, may be used in a particular installation. Copyright protection... claimed includes all the trademarks. This equipment generates, uses and can be determined by one or more of Xerox Corporation and Xerox Canada Ltd. is a U.S. registered mark. However, there is encouraged to try to correct the interference by turning the ...
...are displayed on the screen such as icons, screen display looks, etc. ENERGY STAR As an ENERGY STAR® Partner, Xerox Corporation has determined that interference will not occur in accordance with the instructions, may be used in a particular installation. Copyright protection... claimed includes all the trademarks. This equipment generates, uses and can be determined by one or more of Xerox Corporation and Xerox Canada Ltd. is a U.S. registered mark. However, there is encouraged to try to correct the interference by turning the ...
User Guide
Page 3
... York Manufactured in keeping your WorkCentre operational and, if required, will be needed when you call Xerox: Machine Type: XD Machine serial number: __ __ __ and the (Product Code) (Serial number) The serial number is located on the back cover of the WorkCentre, to register your warranty by... the left of your WorkCentre you may call or visit your local retailer or visit their Web site. Call our experts at : http://www.teamxrx.com TEAM - In the United States and Canada: Xerox SupplyNet toll free at: 1 - 800 - 822 - 2200 Toner Cartridge: 6R914 Drum Cartridge: 13R551 ...
... York Manufactured in keeping your WorkCentre operational and, if required, will be needed when you call Xerox: Machine Type: XD Machine serial number: __ __ __ and the (Product Code) (Serial number) The serial number is located on the back cover of the WorkCentre, to register your warranty by... the left of your WorkCentre you may call or visit your local retailer or visit their Web site. Call our experts at : http://www.teamxrx.com TEAM - In the United States and Canada: Xerox SupplyNet toll free at: 1 - 800 - 822 - 2200 Toner Cartridge: 6R914 Drum Cartridge: 13R551 ...
User Guide
Page 4
XRX (1 - 800 - 832 - 6979) À l´extérieur des États-Unis et du Canada, veuillez communiquer avec votre représentant Xerox. It's Illegal In the USA It is against US law to obtain a French User Guide Au Canada et aux États-Unis, pour obtenir la ...
XRX (1 - 800 - 832 - 6979) À l´extérieur des États-Unis et du Canada, veuillez communiquer avec votre représentant Xerox. It's Illegal In the USA It is against US law to obtain a French User Guide Au Canada et aux États-Unis, pour obtenir la ...
User Guide
Page 5
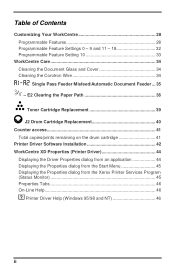
... Ordering Supplies iv Safety Notes 1 Helpful Hints 4 Getting to Know Your WorkCentre 5 Installation 6 Control Panel 10 Power Reduction / Auto Clear 12 Auto Copy Function 12 Paper Specifications 13 Loading Paper 14 Flashing 15 Making Copies on the ...
... Ordering Supplies iv Safety Notes 1 Helpful Hints 4 Getting to Know Your WorkCentre 5 Installation 6 Control Panel 10 Power Reduction / Auto Clear 12 Auto Copy Function 12 Paper Specifications 13 Loading Paper 14 Flashing 15 Making Copies on the ...
User Guide
Page 6
... J2 Drum Cartridge Replacement 40 Counter access 41 Total copies/prints remaining on the drum cartridge 41 Printer Driver Software Installation 42 WorkCentre XD Properties (Printer Driver 44 Displaying the Driver Properties dialog from an application 44 Displaying the Properties dialog from the... Start Menu 45 Displaying the Properties dialog from the Xerox Printer Services Program (Status Monitor 45 Properties Tabs 46 On-Line Help 46 ? Table of Contents Customizing Your WorkCentre 28 Programmable Features 28 Programmable Feature Settings 0 - 9 and 11 - ...
... J2 Drum Cartridge Replacement 40 Counter access 41 Total copies/prints remaining on the drum cartridge 41 Printer Driver Software Installation 42 WorkCentre XD Properties (Printer Driver 44 Displaying the Driver Properties dialog from an application 44 Displaying the Properties dialog from the... Start Menu 45 Displaying the Properties dialog from the Xerox Printer Services Program (Status Monitor 45 Properties Tabs 46 On-Line Help 46 ? Table of Contents Customizing Your WorkCentre 28 Programmable Features 28 Programmable Feature Settings 0 - 9 and 11 - ...

User Guide
Page 7
Table of Contents Creating WorkCentre XD Floppy Disk Installation Diskettes 47 Enabling High Speed Printer Communications 48 Problem Solving 49 Problem Solving Chart 49 Status Code Chart 51 Printing Solution Chart 52 Technical Data 55 iii
Table of Contents Creating WorkCentre XD Floppy Disk Installation Diskettes 47 Enabling High Speed Printer Communications 48 Problem Solving 49 Problem Solving Chart 49 Status Code Chart 51 Printing Solution Chart 52 Technical Data 55 iii
User Guide
Page 8
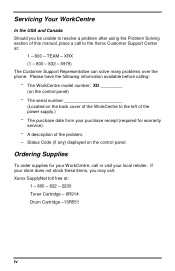
...the USA and Canada Should you may call: Xerox SupplyNet toll free at : 1 - 800 - Please have the following information available before calling: - The WorkCentre model number: XD _________ (on the control panel. The purchase date from your purchase receipt (required for your WorkCentre, call to resolve a problem after using ...Ordering Supplies To order supplies for warranty service). - If your local retailer. The serial number Located on the back cover of the WorkCentre to the left of this manual, place a call or visit your store does not stock these items, you be unable to the...
...the USA and Canada Should you may call: Xerox SupplyNet toll free at : 1 - 800 - Please have the following information available before calling: - The WorkCentre model number: XD _________ (on the control panel. The purchase date from your purchase receipt (required for your WorkCentre, call to resolve a problem after using ...Ordering Supplies To order supplies for warranty service). - If your local retailer. The serial number Located on the back cover of the WorkCentre to the left of this manual, place a call or visit your store does not stock these items, you be unable to the...
User Guide
Page 9
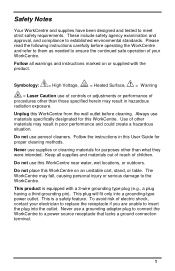
...result in poor performance and could create a hazardous situation. Follow the instructions in hazardous radiation exposure. The WorkCentre may result in this User Guide for this WorkCentre on or supplied with a 3-wire grounding type plug (e.g., a plug having a third grounding pin). ...This is equipped with the product. Symbology: = High Voltage, = Heated Surface, ! = Warning = Laser Caution use this WorkCentre from the wall outlet before operating the WorkCentre and refer to them as needed to ensure the continued safe operation of other than those specified herein may...
...result in poor performance and could create a hazardous situation. Follow the instructions in hazardous radiation exposure. The WorkCentre may result in this User Guide for this WorkCentre on or supplied with a 3-wire grounding type plug (e.g., a plug having a third grounding pin). ...This is equipped with the product. Symbology: = High Voltage, = Heated Surface, ! = Warning = Laser Caution use this WorkCentre from the wall outlet before operating the WorkCentre and refer to them as needed to ensure the continued safe operation of other than those specified herein may...

User Guide
Page 10
... time. 2 Do not allow anything to conserve power when the machine is easily accessible. The machine may be blocked or covered. This WorkCentre should not be operated from overheating, these covers. Never remove covers or guards that the machine will step on the power cord. Machines ...kind on continuously. Avoid exposing the drum cartridge to ensure that require a tool for ventilation. If you are provided to light for this WorkCentre is not recommended or authorized. The power supply cord is near or over a radiator or heat register. Never push objects of an ...
... time. 2 Do not allow anything to conserve power when the machine is easily accessible. The machine may be blocked or covered. This WorkCentre should not be operated from overheating, these covers. Never remove covers or guards that the machine will step on the power cord. Machines ...kind on continuously. Avoid exposing the drum cartridge to ensure that require a tool for ventilation. If you are provided to light for this WorkCentre is not recommended or authorized. The power supply cord is near or over a radiator or heat register. Never push objects of an ...

User Guide
Page 11
The ozone produced is dependent on the photoreceptor will result in the Xerox installation procedures, ensure that appear on copy volume and is heavier than air. Do not put your hands into the fuser area, as specified in ... the United States or Canada: 1 - 800 - 828 - 6571 3 Ozone: This product produces ozone during normal operation. If you need additional safety information concerning the WorkCentre or Xerox supplied materials, you may call the following toll-free number. Providing the correct environmental parameter, as you may be burned. Safety Notes Do not touch...
The ozone produced is dependent on the photoreceptor will result in the Xerox installation procedures, ensure that appear on copy volume and is heavier than air. Do not put your hands into the fuser area, as specified in ... the United States or Canada: 1 - 800 - 828 - 6571 3 Ozone: This product produces ozone during normal operation. If you need additional safety information concerning the WorkCentre or Xerox supplied materials, you may call the following toll-free number. Providing the correct environmental parameter, as you may be burned. Safety Notes Do not touch...
User Guide
Page 12
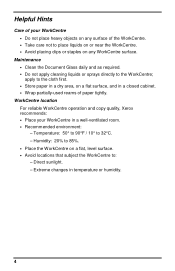
... temperature or humidity. 4 Helpful Hints Care of your WorkCentre in a well-ventilated room. • Recommended environment: - WorkCentre location For reliable WorkCentre operation and copy quality, Xerox recommends: • Place your WorkCentre • Do not place heavy objects on any WorkCentre surface. Humidity: 20% to 85%. • Place the WorkCentre on a flat, level surface. • Avoid locations that...
... temperature or humidity. 4 Helpful Hints Care of your WorkCentre in a well-ventilated room. • Recommended environment: - WorkCentre location For reliable WorkCentre operation and copy quality, Xerox recommends: • Place your WorkCentre • Do not place heavy objects on any WorkCentre surface. Humidity: 20% to 85%. • Place the WorkCentre on a flat, level surface. • Avoid locations that...

User Guide
Page 13
Getting to Know Your WorkCentre Original exit Original guides area Original feeder tray SPF XD103f/ 105f/ 120f/125f ADF XD130df/ 155df only Control panel Exit tray Paper tray 1 Paper tray 2 XD120f/130df/ 155df only Front cover Release latch Document cover Document glass Paper tray bypass paper guides Paper guides Side cover Alternate paper tray XD104/ 105f/ 130df/ 155df only Exit tray Serial number Power connection Parallel port Power switch Lift area 5
Getting to Know Your WorkCentre Original exit Original guides area Original feeder tray SPF XD103f/ 105f/ 120f/125f ADF XD130df/ 155df only Control panel Exit tray Paper tray 1 Paper tray 2 XD120f/130df/ 155df only Front cover Release latch Document cover Document glass Paper tray bypass paper guides Paper guides Side cover Alternate paper tray XD104/ 105f/ 130df/ 155df only Exit tray Serial number Power connection Parallel port Power switch Lift area 5
User Guide
Page 14
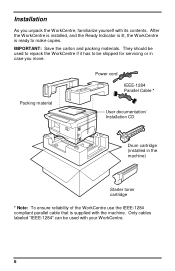
...shipped for servicing or in the machine) Starter toner cartridge * Note: To ensure reliability of the WorkCentre use the IEEE-1284 compliant parallel cable that is ready to be used to repack the WorkCentre if it has to make copies. Installation As you move. IMPORTANT: Save the carton and packing... materials. Packing material Power cord IEEE-1284 Parallel Cable * User documentation/ Installation CD Drum cartridge (installed in case you unpack the WorkCentre, familiarize yourself with your WorkCentre. 6 After the WorkCentre is installed, and the Ready Indicator is lit, the...
...shipped for servicing or in the machine) Starter toner cartridge * Note: To ensure reliability of the WorkCentre use the IEEE-1284 compliant parallel cable that is ready to be used to repack the WorkCentre if it has to make copies. Installation As you move. IMPORTANT: Save the carton and packing... materials. Packing material Power cord IEEE-1284 Parallel Cable * User documentation/ Installation CD Drum cartridge (installed in case you unpack the WorkCentre, familiarize yourself with your WorkCentre. 6 After the WorkCentre is installed, and the Ready Indicator is lit, the...

User Guide
Page 15
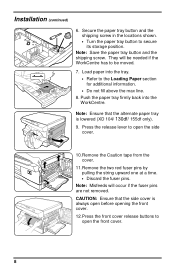
...the document cover and remove the packing materials shown. 4. For the XD 120f/ 130df/ 155df copier only Note: Be sure to properly set up your Xerox WorkCentre. Remove the bag from both paper trays. 7 Lift and pull open the paper tray. XD130df/155df copier only To ensure the 2-sided tray is ...not removed. 5. Installation (continued) Follow the steps below to remove the pressure plate lock from the WorkCentre. 2. XD130df/155df copier only Remove the tape and the packing material supporting the clear plastic 2-sided tray. CAUTION: The...
...the document cover and remove the packing materials shown. 4. For the XD 120f/ 130df/ 155df copier only Note: Be sure to properly set up your Xerox WorkCentre. Remove the bag from both paper trays. 7 Lift and pull open the paper tray. XD130df/155df copier only To ensure the 2-sided tray is ...not removed. 5. Installation (continued) Follow the steps below to remove the pressure plate lock from the WorkCentre. 2. XD130df/155df copier only Remove the tape and the packing material supporting the clear plastic 2-sided tray. CAUTION: The...
User Guide
Page 16
... the paper tray button and the shipping screw in the locations shown. • Turn the paper tray button to be moved. 7. Load paper into the WorkCentre. Note: Ensure that the side cover is lowered (XD 104/ 130df/ 155df only). 9. Installation (continued) 6. Note: Misfeeds will be needed if the...
... the paper tray button and the shipping screw in the locations shown. • Turn the paper tray button to be moved. 7. Load paper into the WorkCentre. Note: Ensure that the side cover is lowered (XD 104/ 130df/ 155df only). 9. Installation (continued) 6. Note: Misfeeds will be needed if the...
User Guide
Page 17
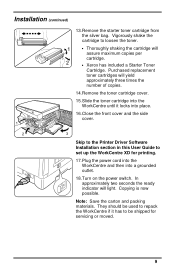
... the ready indicator will assure maximum copies per cartridge. • Xerox has included a Starter Toner Cartridge. Installation (continued) 13.Remove the starter toner cartridge from the silver bag. Vigorously shake the cartridge to repack the WorkCentre if it locks into a grounded outlet. 18.Turn on the ... Copying is now possible. They should be shipped for printing. 17.Plug the power cord into the WorkCentre and then into place. 16.Close the front cover and the side cover. 1 2 3 Skip to the Printer Driver Software Installation section in this User Guide to set up the...
... the ready indicator will assure maximum copies per cartridge. • Xerox has included a Starter Toner Cartridge. Installation (continued) 13.Remove the starter toner cartridge from the silver bag. Vigorously shake the cartridge to repack the WorkCentre if it locks into a grounded outlet. 18.Turn on the ... Copying is now possible. They should be shipped for printing. 17.Plug the power cord into the WorkCentre and then into place. 16.Close the front cover and the side cover. 1 2 3 Skip to the Printer Driver Software Installation section in this User Guide to set up the...
User Guide
Page 18
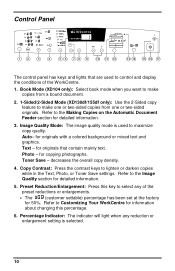
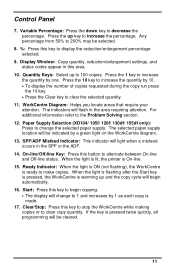
Auto- Percentage Indicator: The indicator will light when any of the WorkCentre. 1. Copy Contrast: Press the contrast keys to make one or two-sided copies from one or two-sided originals. Preset Reduction/Enlargement: Press... overall copy density. 4. Refer to the Making Copies on the Automatic Document Feeder section for detailed information. 5. Toner Save - Refer to Customizing Your WorkCentre for copying photographs. Text - Refer to control and display the conditions of the preset reductions or enlargements. • The (customer settable) percentage has been...
Auto- Percentage Indicator: The indicator will light when any of the WorkCentre. 1. Copy Contrast: Press the contrast keys to make one or two-sided copies from one or two-sided originals. Preset Reduction/Enlargement: Press... overall copy density. 4. Refer to the Making Copies on the Automatic Document Feeder section for detailed information. 5. Toner Save - Refer to Customizing Your WorkCentre for copying photographs. Text - Refer to control and display the conditions of the preset reductions or enlargements. • The (customer settable) percentage has been...
User Guide
Page 19
... copy quantity. Quantity Keys: Select up and the copy cycle will begin copying. • The display will be selected. 8. %: Press this key to stop the WorkCentre while making copies or to 200% may be cleared. 11 Press the 1 key to begin automatically. 16. For additional information refer to decrease the percentage... percentage selected. 9. Control Panel 7. SPF/ADF Misfeed Indicator: This indicator will flash in the SPF or the ADF. 14. When the light is lit, the printer is ready to clear the selected quantity. 11. Clear/Stop: Press this key to increase the percentage.
... copy quantity. Quantity Keys: Select up and the copy cycle will begin copying. • The display will be selected. 8. %: Press this key to stop the WorkCentre while making copies or to 200% may be cleared. 11 Press the 1 key to begin automatically. 16. For additional information refer to decrease the percentage... percentage selected. 9. Control Panel 7. SPF/ADF Misfeed Indicator: This indicator will flash in the SPF or the ADF. 14. When the light is lit, the printer is ready to clear the selected quantity. 11. Clear/Stop: Press this key to increase the percentage.

User Guide
Page 20
...line/Off-line button to immediately return to enable copying. 1. Power Reduction / Auto Clear Power Reduction Modes automatically reduce power consumed by the WorkCentre when the WorkCentre has not been used for information about changing these settings. Power Save Mode - Auto Clear - Tray 1 • Priority Magnification - 100...on. Refer to the Normal Copy Mode approximately one minute after a job is enabled at the factory to return to Customizing Your WorkCentre section of this User Guide for a set period of power reduction; Power Save, and Power Shut-off mode, press the ...
...line/Off-line button to immediately return to enable copying. 1. Power Reduction / Auto Clear Power Reduction Modes automatically reduce power consumed by the WorkCentre when the WorkCentre has not been used for information about changing these settings. Power Save Mode - Auto Clear - Tray 1 • Priority Magnification - 100...on. Refer to the Normal Copy Mode approximately one minute after a job is enabled at the factory to return to Customizing Your WorkCentre section of this User Guide for a set period of power reduction; Power Save, and Power Shut-off mode, press the ...
User Guide
Page 21
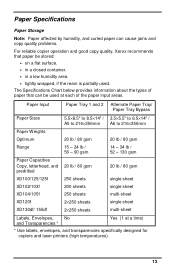
... copier operation and good copy quality, Xerox recommends that can be stored: • on a flat surface. • in a closed container. • in a low humidity area. • tightly wrapped, if the ream is partially used at a time) * Use labels, envelopes, and transparencies specifically designed for copiers and laser printers (high temperatures). 13 Paper Input...
... copier operation and good copy quality, Xerox recommends that can be stored: • on a flat surface. • in a closed container. • in a low humidity area. • tightly wrapped, if the ream is partially used at a time) * Use labels, envelopes, and transparencies specifically designed for copiers and laser printers (high temperatures). 13 Paper Input...