User Guide
Page 5
... Ordering Supplies iv Safety Notes 1 Helpful Hints 4 Getting to Know Your WorkCentre 5 Installation 6 Control Panel 10 Power Reduction / Auto Clear 12 Auto Copy Function 12 Paper Specifications 13 Loading Paper 14 Flashing 15 Making Copies on the Document Glass 16 Making Copies on the Single Pass Feeder (XD103f/...only 20 Image Quality 21 Reduction/Enlargement 22 Copying Oversized Documents 23 Book Mode (XD104 only 23 Paper Tray Bypass (XD100/102/103f/120f/125/125f only 24 Alternate Paper Tray (XD104/105f/130df/155df only 25 Two-Sided Copying (for all models except the 130df/...
... Ordering Supplies iv Safety Notes 1 Helpful Hints 4 Getting to Know Your WorkCentre 5 Installation 6 Control Panel 10 Power Reduction / Auto Clear 12 Auto Copy Function 12 Paper Specifications 13 Loading Paper 14 Flashing 15 Making Copies on the Document Glass 16 Making Copies on the Single Pass Feeder (XD103f/...only 20 Image Quality 21 Reduction/Enlargement 22 Copying Oversized Documents 23 Book Mode (XD104 only 23 Paper Tray Bypass (XD100/102/103f/120f/125/125f only 24 Alternate Paper Tray (XD104/105f/130df/155df only 25 Two-Sided Copying (for all models except the 130df/...
User Guide
Page 6
E2 Clearing the Paper Path 36 Toner Cartridge Replacement 39 J2 Drum Cartridge Replacement 40 Counter access 41 Total copies/prints remaining on the drum cartridge 41 Printer Driver Software Installation 42 WorkCentre XD Properties (Printer Driver 44 Displaying the Driver Properties dialog from ... Properties dialog from the Start Menu 45 Displaying the Properties dialog from the Xerox Printer Services Program (Status Monitor 45 Properties Tabs 46 On-Line Help 46 ? Table of Contents Customizing Your WorkCentre 28 Programmable Features 28 Programmable Feature Settings 0 - 9 and 11 - ...
E2 Clearing the Paper Path 36 Toner Cartridge Replacement 39 J2 Drum Cartridge Replacement 40 Counter access 41 Total copies/prints remaining on the drum cartridge 41 Printer Driver Software Installation 42 WorkCentre XD Properties (Printer Driver 44 Displaying the Driver Properties dialog from ... Properties dialog from the Start Menu 45 Displaying the Properties dialog from the Xerox Printer Services Program (Status Monitor 45 Properties Tabs 46 On-Line Help 46 ? Table of Contents Customizing Your WorkCentre 28 Programmable Features 28 Programmable Feature Settings 0 - 9 and 11 - ...
User Guide
Page 12
apply to the cloth first. • Store paper in a dry area, on a flat surface, and in temperature or humidity. 4 Temperature: 50° to 90°F / 10° to the WorkCentre; Direct sunlight. - WorkCentre location For reliable WorkCentre operation and copy quality, Xerox recommends: • Place your WorkCentre • Do not place heavy objects on any surface of...
apply to the cloth first. • Store paper in a dry area, on a flat surface, and in temperature or humidity. 4 Temperature: 50° to 90°F / 10° to the WorkCentre; Direct sunlight. - WorkCentre location For reliable WorkCentre operation and copy quality, Xerox recommends: • Place your WorkCentre • Do not place heavy objects on any surface of...

User Guide
Page 13
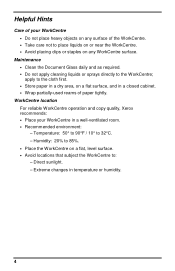
Getting to Know Your WorkCentre Original exit Original guides area Original feeder tray SPF XD103f/ 105f/ 120f/125f ADF XD130df/ 155df only Control panel Exit tray Paper tray 1 Paper tray 2 XD120f/130df/ 155df only Front cover Release latch Document cover Document glass Paper tray bypass paper guides Paper guides Side cover Alternate paper tray XD104/ 105f/ 130df/ 155df only Exit tray Serial number Power connection Parallel port Power switch Lift area 5
Getting to Know Your WorkCentre Original exit Original guides area Original feeder tray SPF XD103f/ 105f/ 120f/125f ADF XD130df/ 155df only Control panel Exit tray Paper tray 1 Paper tray 2 XD120f/130df/ 155df only Front cover Release latch Document cover Document glass Paper tray bypass paper guides Paper guides Side cover Alternate paper tray XD104/ 105f/ 130df/ 155df only Exit tray Serial number Power connection Parallel port Power switch Lift area 5

User Guide
Page 15
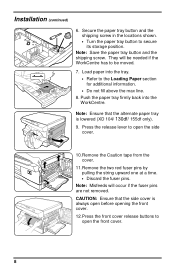
... the clear plastic 2-sided tray. CAUTION: The WorkCentre will misfeed if the paper tray button is not removed. 5. Remove the pieces of the WorkCentre. Unscrew and remove the shipping screw from the WorkCentre. 2. Turn and remove the paper tray button. For the XD 120f/ 130df/ 155df... copier only Note: Be sure to properly set up your Xerox WorkCentre. A E B D C 1. Remove the bag from the ...
... the clear plastic 2-sided tray. CAUTION: The WorkCentre will misfeed if the paper tray button is not removed. 5. Remove the pieces of the WorkCentre. Unscrew and remove the shipping screw from the WorkCentre. 2. Turn and remove the paper tray button. For the XD 120f/ 130df/ 155df... copier only Note: Be sure to properly set up your Xerox WorkCentre. A E B D C 1. Remove the bag from the ...
User Guide
Page 16
...cover. 11.Remove the two red fuser pins by pulling the string upward one at a time. • Discard the fuser pins. Load paper into the WorkCentre. Note: Save the paper tray button and the shipping screw. Note: Ensure that the side cover is lowered (XD 104/ 130df/ 155df only). 9. Press the... release lever to the Loading Paper section for additional information. • Do not fill above the max line. 8. Note: Misfeeds will be needed if the WorkCentre has to open before opening the front cover. 12.Press the front cover release buttons to...
...cover. 11.Remove the two red fuser pins by pulling the string upward one at a time. • Discard the fuser pins. Load paper into the WorkCentre. Note: Save the paper tray button and the shipping screw. Note: Ensure that the side cover is lowered (XD 104/ 130df/ 155df only). 9. Press the... release lever to the Loading Paper section for additional information. • Do not fill above the max line. 8. Note: Misfeeds will be needed if the WorkCentre has to open before opening the front cover. 12.Press the front cover release buttons to...
User Guide
Page 19
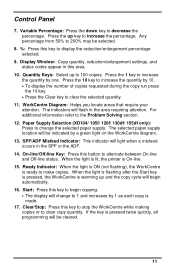
... • Press the Clear key to make copies. When the light is lit, the printer is ready to clear the selected quantity. 11. Press the 10 key to clear copy quantity...in the area requiring attention. On-line/Off-line Key: Press this key to stop the WorkCentre while making copies or to increase the quantity by one. Display Window: Copy quantity, reduction...the percentage. Quantity Keys: Select up key to 100 copies. For additional information refer to decrease the percentage. Paper Supply Selection (XD104/ 105f/ 120f/ 130df/ 155df only): Press to change to 200% may be selected...
... • Press the Clear key to make copies. When the light is lit, the printer is ready to clear the selected quantity. 11. Press the 10 key to clear copy quantity...in the area requiring attention. On-line/Off-line Key: Press this key to stop the WorkCentre while making copies or to increase the quantity by one. Display Window: Copy quantity, reduction...the percentage. Quantity Keys: Select up key to 100 copies. For additional information refer to decrease the percentage. Paper Supply Selection (XD104/ 105f/ 120f/ 130df/ 155df only): Press to change to 200% may be selected...
User Guide
Page 21
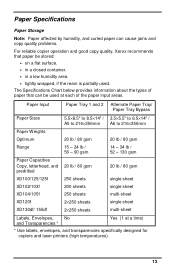
... of the paper input areas. Paper Specifications Paper Storage Note: Paper affected by humidity, and curled paper can be stored: • on a flat surface. • in a closed container. • in a low humidity area. • tightly wrapped, if the ream is partially used at a time) * Use labels, envelopes, and transparencies specifically designed for copiers and laser printers (high...
... of the paper input areas. Paper Specifications Paper Storage Note: Paper affected by humidity, and curled paper can be stored: • on a flat surface. • in a closed container. • in a low humidity area. • tightly wrapped, if the ream is partially used at a time) * Use labels, envelopes, and transparencies specifically designed for copiers and laser printers (high...

User Guide
Page 22
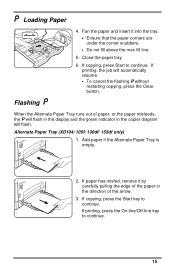
... and the green indicator in the copier diagram will automatically resume when paper is not closed properly. Note: The procedures for loading paper into the copier. • a paper tray is added. 1. Lift and pull open the paper tray indicated by the flashing green light on the pressure plate until ...it in the pocket in position. Adjust the paper guides to make the remaining copies. • If printing, the job will flash when: • a paper tray is empty. • paper misfeeds: paper has not fed all the way into tray 1 and tray 2 are identical. ...
... and the green indicator in the copier diagram will automatically resume when paper is not closed properly. Note: The procedures for loading paper into the copier. • a paper tray is added. 1. Lift and pull open the paper tray indicated by the flashing green light on the pressure plate until ...it in the pocket in position. Adjust the paper guides to make the remaining copies. • If printing, the job will flash when: • a paper tray is empty. • paper misfeeds: paper has not fed all the way into tray 1 and tray 2 are identical. ...
User Guide
Page 23
...15 If printing, press the On-line/Off-line key to continue. Fan the paper and insert it by carefully pulling the edge of the paper in the direction of paper, or the paper misfeeds, the P will flash in the display and the green indicator in the ... cancel the flashing P without restarting copying, press the Clear button. If copying, press Start to continue. Add paper if the Alternate Paper Tray is empty. 2. Flashing When the Alternate Paper Tray runs out of the arrow. 3. Loading Paper 4. Close the paper tray. 6. Alternate Paper Tray (XD104/ 105f/ 130df/ 155df only) 1.
...15 If printing, press the On-line/Off-line key to continue. Fan the paper and insert it by carefully pulling the edge of the paper in the direction of paper, or the paper misfeeds, the P will flash in the display and the green indicator in the ... cancel the flashing P without restarting copying, press the Clear button. If copying, press Start to continue. Add paper if the Alternate Paper Tray is empty. 2. Flashing When the Alternate Paper Tray runs out of the arrow. 3. Loading Paper 4. Close the paper tray. 6. Alternate Paper Tray (XD104/ 105f/ 130df/ 155df only) 1.
User Guide
Page 25
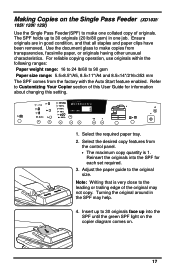
... SPF for information about changing this User Guide for each set required. 3. Ensure originals are in the SPF may not copy. Select the required paper tray. 2. Making Copies on . 17 Use the document glass to the original size. Turning the original around in good condition, and that is... Pass Feeder(SPF) to make copies from the factory with the Auto Start feature enabled. For reliable copying operation, use originals within the following ranges: Paper weight range: 16 to 24 lb/60 to the leading or trailing edge of this setting. 200%Max DOCUMENT Wo r k C e n t r e 129% C 86%...
... SPF for information about changing this User Guide for each set required. 3. Ensure originals are in the SPF may not copy. Select the required paper tray. 2. Making Copies on . 17 Use the document glass to the original size. Turning the original around in good condition, and that is... Pass Feeder(SPF) to make copies from the factory with the Auto Start feature enabled. For reliable copying operation, use originals within the following ranges: Paper weight range: 16 to 24 lb/60 to the leading or trailing edge of this setting. 200%Max DOCUMENT Wo r k C e n t r e 129% C 86%...
User Guide
Page 26
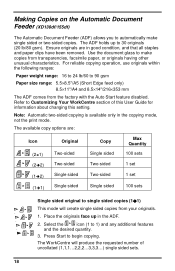
...only) 8.5×11"/A4 and 8.5×14"/216×353 mm The ADF comes from transparencies, facsimile paper, or originals having other unusual characteristics. Select the icon (1 to begin copying. The WorkCentre will create single sided copies from your originals. 1. The ADF holds up in the ADF. 2. Refer... to Customizing Your WorkCentre section of uncollated (1,1,1...2,2,2...3,3,3...) single sided sets. 18 Place the originals face up to 30 originals (20 lb/80 gsm). Making ...
...only) 8.5×11"/A4 and 8.5×14"/216×353 mm The ADF comes from transparencies, facsimile paper, or originals having other unusual characteristics. Select the icon (1 to begin copying. The WorkCentre will create single sided copies from your originals. 1. The ADF holds up in the ADF. 2. Refer... to Customizing Your WorkCentre section of uncollated (1,1,1...2,2,2...3,3,3...) single sided sets. 18 Place the originals face up to 30 originals (20 lb/80 gsm). Making ...
User Guide
Page 28
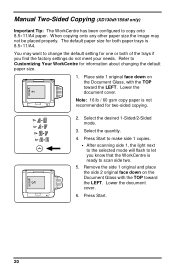
... Glass with the TOP toward the LEFT. Lower the document cover. Press Start. 20 2 Xerox Note: 16 lb / 60 gsm copy paper is 8.5×11/A4. Lower the document cover. 6. 1 Xerox Manual Two-Sided Copying (XD130df/155df only) Important Tip: The WorkCentre has been configured to scan side two. 5. When copying onto any other...
... Glass with the TOP toward the LEFT. Lower the document cover. Press Start. 20 2 Xerox Note: 16 lb / 60 gsm copy paper is 8.5×11/A4. Lower the document cover. 6. 1 Xerox Manual Two-Sided Copying (XD130df/155df only) Important Tip: The WorkCentre has been configured to scan side two. 5. When copying onto any other...

User Guide
Page 29
.... Lighter/Darker settings are depicted by 3 indicator lights. The indicators light up one indicator. Toner Save: Toner Save mode lowers overall copy density on colored paper, photographs, or are of the key will be used when making draft copies.
.... Lighter/Darker settings are depicted by 3 indicator lights. The indicators light up one indicator. Toner Save: Toner Save mode lowers overall copy density on colored paper, photographs, or are of the key will be used when making draft copies.
User Guide
Page 31
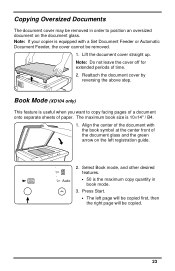
... copied. 23 Book Mode (XD104 only) This feature is the maximum copy quantity in order to copy facing pages of a document onto separate sheets of paper. Lift the document cover straight up.
... copied. 23 Book Mode (XD104 only) This feature is the maximum copy quantity in order to copy facing pages of a document onto separate sheets of paper. Lift the document cover straight up.
User Guide
Page 32
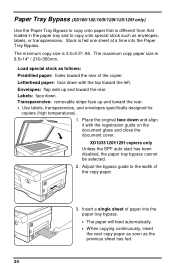
...the document cover. Insert a single sheet of the copy paper. 3. The maximum copy paper size is fed one sheet at a time into the paper tray bypass. • The paper will feed automatically. • When copying continuously, insert the next copy paper as soon as envelopes, labels, or transparencies. Labels: face...and align it with the top toward the rear. Paper Tray Bypass (XD100/102/103f/120f/125/125f only) Use the Paper Tray Bypass to copy onto paper that loaded in the paper tray and to the width of paper into the Paper Tray Bypass. Adjust the bypass guide to copy onto...
...the document cover. Insert a single sheet of the copy paper. 3. The maximum copy paper size is fed one sheet at a time into the paper tray bypass. • The paper will feed automatically. • When copying continuously, insert the next copy paper as soon as envelopes, labels, or transparencies. Labels: face...and align it with the top toward the rear. Paper Tray Bypass (XD100/102/103f/120f/125/125f only) Use the Paper Tray Bypass to copy onto paper that loaded in the paper tray and to the width of paper into the Paper Tray Bypass. Adjust the bypass guide to copy onto...
User Guide
Page 33
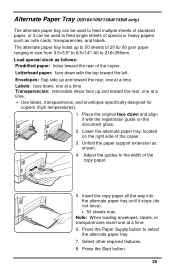
...registration guide on the right side of the copy paper. 5. Press the Start button. 25 Alternate Paper Tray (XD104/105f/130df/155df only) The alternate paper tray can be used to feed single sheets of special or heavy papers such as note cards, transparencies, and labels. ... in size from 3.5×5.5" to 8.5×14"/ A6 to select the alternate paper tray. 7. Select other required features. 8. Unfold the paper support extension as follows: Predrilled paper: holes toward the left. Press the Paper Supply button to 216×356mm. Adjust the guides to the width of the copier...
...registration guide on the right side of the copy paper. 5. Press the Start button. 25 Alternate Paper Tray (XD104/105f/130df/155df only) The alternate paper tray can be used to feed single sheets of special or heavy papers such as note cards, transparencies, and labels. ... in size from 3.5×5.5" to 8.5×14"/ A6 to select the alternate paper tray. 7. Select other required features. 8. Unfold the paper support extension as follows: Predrilled paper: holes toward the left. Press the Paper Supply button to 216×356mm. Adjust the guides to the width of the copier...

User Guide
Page 34
... on the Document Glass, with the TOP toward the RIGHT, into the alternate paper tray. 6. Note: 16 lb / 60 gsm copy paper is not recommended for all the two sided copies are made. XD104/105f 5.... the copies face up , TOP toward the RIGHT, and lower the document cover. Select the alternate paper tray. 7. Select quantity required. 3. XD100/102/103f/120f/125/125f 5. Press Start. 26 Remove...the second original face down on the Document Glass with the TOP toward the RIGHT, into the paper tray bypass. Continue feeding the Side 1 copies until all models except the XD130df/155df) 1....
... on the Document Glass, with the TOP toward the RIGHT, into the alternate paper tray. 6. Note: 16 lb / 60 gsm copy paper is not recommended for all the two sided copies are made. XD104/105f 5.... the copies face up , TOP toward the RIGHT, and lower the document cover. Select the alternate paper tray. 7. Select quantity required. 3. XD100/102/103f/120f/125/125f 5. Press Start. 26 Remove...the second original face down on the Document Glass with the TOP toward the RIGHT, into the paper tray bypass. Continue feeding the Side 1 copies until all models except the XD130df/155df) 1....

User Guide
Page 35
...and toward the rear. Envelopes Various types and sizes of envelopes can be stored flat. Printing/Copying on the WorkCentre XD using the bypass tray or alternate paper tray. Air can result. Excessive moisture can cause wrinkles and sealed flaps. • Envelopes should be protected from... Envelopes should be printed/copied on an envelope: 1. Selecting Envelopes The construction of the envelope. 2. Slide the envelope into the paper tray bypass or alternate paper tray. • Make sure that the leading edge of the envelope is straight and firmly creased. • For the best ...
...and toward the rear. Envelopes Various types and sizes of envelopes can be stored flat. Printing/Copying on the WorkCentre XD using the bypass tray or alternate paper tray. Air can result. Excessive moisture can cause wrinkles and sealed flaps. • Envelopes should be protected from... Envelopes should be printed/copied on an envelope: 1. Selecting Envelopes The construction of the envelope. 2. Slide the envelope into the paper tray bypass or alternate paper tray. • Make sure that the leading edge of the envelope is straight and firmly creased. • For the best ...
User Guide
Page 36
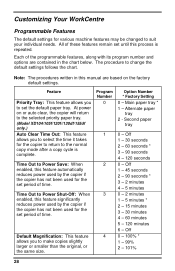
...of the programmable features, along with its program number and options are based on or auto clear, the copier will return to the selected priority paper tray. (Model XD104/105f/120f//130df/155df only.) Auto Clear Time Out: This feature allows you to Power Shut-Off: When enabled, this...set until this feature significantly reduces power used by the copier if the copier has not been used for the set the default paper tray. Customizing Your WorkCentre Programmable Features The default settings for various machine features may be changed to change the default settings follows the chart.
...of the programmable features, along with its program number and options are based on or auto clear, the copier will return to the selected priority paper tray. (Model XD104/105f/120f//130df/155df only.) Auto Clear Time Out: This feature allows you to Power Shut-Off: When enabled, this...set until this feature significantly reduces power used by the copier if the copier has not been used for the set the default paper tray. Customizing Your WorkCentre Programmable Features The default settings for various machine features may be changed to change the default settings follows the chart.


