User Guide
Page 6
...Clearing the Paper Path 36 Toner Cartridge Replacement 39 J2 Drum Cartridge Replacement 40 Counter access 41 Total copies/prints remaining on the drum cartridge 41 Printer Driver Software Installation 42 WorkCentre XD Properties (Printer Driver 44 Displaying the Driver Properties dialog from ...an application 44 Displaying the Properties dialog from the Start Menu 45 Displaying the Properties dialog from the Xerox Printer Services Program (...
...Clearing the Paper Path 36 Toner Cartridge Replacement 39 J2 Drum Cartridge Replacement 40 Counter access 41 Total copies/prints remaining on the drum cartridge 41 Printer Driver Software Installation 42 WorkCentre XD Properties (Printer Driver 44 Displaying the Driver Properties dialog from ...an application 44 Displaying the Properties dialog from the Start Menu 45 Displaying the Properties dialog from the Xerox Printer Services Program (...
User Guide
Page 48
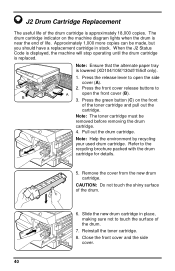
... 1,000 more copies can be removed before removing the drum cartridge. 4. Remove the cover from the new drum cartridge. When the J2 Status Code is displayed, the machine will stop operating until the drum cartridge is lowered (XD104/105f/130df/155df only). Press the release... on the machine diagram lights when the drum is approximately 18,000 copies. Refer to touch the surface of the drum. 7. C B 1. J2 Drum Cartridge Replacement The useful life of the toner cartridge and pull out the cartridge. Reinstall the toner cartridge. 8. Slide the new drum cartridge...
... 1,000 more copies can be removed before removing the drum cartridge. 4. Remove the cover from the new drum cartridge. When the J2 Status Code is displayed, the machine will stop operating until the drum cartridge is lowered (XD104/105f/130df/155df only). Press the release... on the machine diagram lights when the drum is approximately 18,000 copies. Refer to touch the surface of the drum. 7. C B 1. J2 Drum Cartridge Replacement The useful life of the toner cartridge and pull out the cartridge. Reinstall the toner cartridge. 8. Slide the new drum cartridge...

User Guide
Page 59
... code is displayed, the machine will stop operating until the toner cartridge is replaced. Close the cover. Refer to Clearing the Paper Path.) J1 J2 C1 CH A1 - The front or side cover is removed. Remove misfed paper from the Single Pass Feeder. Wait approximately 5 seconds. A2 L1... stop operating until the drum cartridge is replaced. Approximately 1,000 more copies can be made , but you should have fed all the way into the WorkCentre. (Refer to Loading Paper and Flashing P.) Copy paper has misfed. (Refer to A1 - L5 U2 - H4 L3 - Switch ON the Main Power. ...
... code is displayed, the machine will stop operating until the toner cartridge is replaced. Close the cover. Refer to Clearing the Paper Path.) J1 J2 C1 CH A1 - The front or side cover is removed. Remove misfed paper from the Single Pass Feeder. Wait approximately 5 seconds. A2 L1... stop operating until the drum cartridge is replaced. Approximately 1,000 more copies can be made , but you should have fed all the way into the WorkCentre. (Refer to Loading Paper and Flashing P.) Copy paper has misfed. (Refer to A1 - L5 U2 - H4 L3 - Switch ON the Main Power. ...
