
User Guide
Page 2
... energy and, if not installed and used in accordance with the instructions, may cause harmful communications. Shielded cables must be used in this equipment not specifically approved by the Xerox Corporation may be determined by turning the equipment off and on, the user is a licensee of all... Class B digital device pursuant to Part 15 of the FCC Rules. Product names used with this equipment. These limits are registered trademarks of their respective companies and hereby acknowledged. FCC Compliance in the USA WARNING: This equipment has been tested and found to comply...
... energy and, if not installed and used in accordance with the instructions, may cause harmful communications. Shielded cables must be used in this equipment not specifically approved by the Xerox Corporation may be determined by turning the equipment off and on, the user is a licensee of all... Class B digital device pursuant to Part 15 of the FCC Rules. Product names used with this equipment. These limits are registered trademarks of their respective companies and hereby acknowledged. FCC Compliance in the USA WARNING: This equipment has been tested and found to comply...
User Guide
Page 3
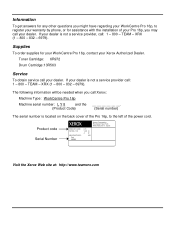
... WorkCentre Pro 16p, to the left of your Xerox Authorized Dealer. XRX (1 - 800 - 832 - 6979). Supplies To order supplies for assistance with the installation of the power cord. Toner Cartridge: 6R972 Drum Cartridge:13R563 Service To obtain service call : 1 - 800 - If your dealer is not a service provider call your dealer. TEAM - The following information will be needed when you may call : 1 - 800 - Product code Serial Number XEROX Xerox Corporation Rochester, New...
... WorkCentre Pro 16p, to the left of your Xerox Authorized Dealer. XRX (1 - 800 - 832 - 6979). Supplies To order supplies for assistance with the installation of the power cord. Toner Cartridge: 6R972 Drum Cartridge:13R563 Service To obtain service call : 1 - 800 - If your dealer is not a service provider call your dealer. TEAM - The following information will be needed when you may call : 1 - 800 - Product code Serial Number XEROX Xerox Corporation Rochester, New...
User Guide
Page 5
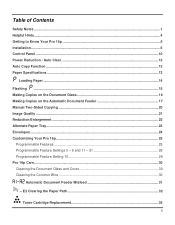
... the Paper Path 32 Toner Cartridge Replacement 35 i Table of Contents Safety Notes ...1 Helpful Hints...4 Getting to Know Your Pro 16p ...5 Installation...6 Control Panel ...10 Power Reduction / Auto Clear ...12 Auto Copy Function ...12 Paper Specifications ...13 Loading Paper ...14 Flashing ...15 Making Copies on the Document Glass 16 Making Copies on the Automatic Document Feeder 17 Manual Two-Sided Copying ...20 Image Quality ...21 Reduction/Enlargement ...22 Alternate Paper Tray...23 Envelopes...24 Customizing Your Pro 16p...25 Programmable Features ...25 Programmable Feature Settings...
... the Paper Path 32 Toner Cartridge Replacement 35 i Table of Contents Safety Notes ...1 Helpful Hints...4 Getting to Know Your Pro 16p ...5 Installation...6 Control Panel ...10 Power Reduction / Auto Clear ...12 Auto Copy Function ...12 Paper Specifications ...13 Loading Paper ...14 Flashing ...15 Making Copies on the Document Glass 16 Making Copies on the Automatic Document Feeder 17 Manual Two-Sided Copying ...20 Image Quality ...21 Reduction/Enlargement ...22 Alternate Paper Tray...23 Envelopes...24 Customizing Your Pro 16p...25 Programmable Features ...25 Programmable Feature Settings...
User Guide
Page 6
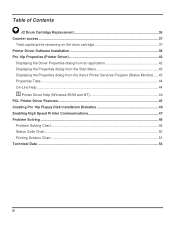
... Speed Printer Communications 47 Problem Solving ...48 Problem Solving Chart ...48 Status Code Chart...50 Printing Solution Chart ...51 Technical Data ...54 ii Table of Contents J2 Drum Cartridge Replacement 36 Counter access ...37 Total copies/prints remaining on the drum cartridge 37 Printer Driver Software Installation 38 Pro 16p Properties (Printer Driver 42 Displaying the Driver Properties dialog from an application 42 Displaying the Properties dialog from the Start Menu 43 Displaying the Properties dialog from the Xerox Printer Services Program (Status...
... Speed Printer Communications 47 Problem Solving ...48 Problem Solving Chart ...48 Status Code Chart...50 Printing Solution Chart ...51 Technical Data ...54 ii Table of Contents J2 Drum Cartridge Replacement 36 Counter access ...37 Total copies/prints remaining on the drum cartridge 37 Printer Driver Software Installation 38 Pro 16p Properties (Printer Driver 42 Displaying the Driver Properties dialog from an application 42 Displaying the Properties dialog from the Start Menu 43 Displaying the Properties dialog from the Xerox Printer Services Program (Status...

User Guide
Page 7
...-type power outlet. Never use supplies or cleaning materials for proper cleaning methods. Follow all supplies and materials out of reach of your electrician to replace the receptacle if you are unable to ensure the continued safe operation of children. Unplug this Pro 16p on or supplied with a 3-wire grounding type plug (e.g., a plug having a third grounding pin). Follow the instructions in this User Guide for...
...-type power outlet. Never use supplies or cleaning materials for proper cleaning methods. Follow all supplies and materials out of reach of your electrician to replace the receptacle if you are unable to ensure the continued safe operation of children. Unplug this Pro 16p on or supplied with a 3-wire grounding type plug (e.g., a plug having a third grounding pin). Follow the instructions in this User Guide for...
User Guide
Page 15
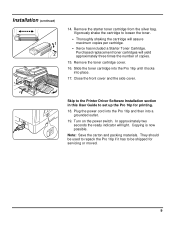
.... Copying is now possible. Skip to the Printer Driver Software Installation section in this User Guide to loosen the toner. • Thoroughly shaking the cartridge will light. Vigorously shake the cartridge to set up the Pro 16p for servicing or moved. 9 Slide the toner cartridge into the Pro 16p until it has to repack the Pro 16p if it locks into a grounded outlet. 19. They should be used to be shipped for printing...
.... Copying is now possible. Skip to the Printer Driver Software Installation section in this User Guide to loosen the toner. • Thoroughly shaking the cartridge will light. Vigorously shake the cartridge to set up the Pro 16p for servicing or moved. 9 Slide the toner cartridge into the Pro 16p until it has to repack the Pro 16p if it locks into a grounded outlet. 19. They should be used to be shipped for printing...

User Guide
Page 16
Image Quality Mode: The image quality mode is selected. 10 for originals that are used to maximize copy quality. for originals with a colored background or mixed text and graphics. Toner Save - Percentage Indicator: The indicator will light when any of the Pro 16p. 1. 1-Sided/2-Sided Mode: Use the 2-Sided copy feature to make one or two-sided copies from one or two-sided originals. Refer to the Image Quality section for detailed information. 2. Refer to the Making Copies on...
Image Quality Mode: The image quality mode is selected. 10 for originals that are used to maximize copy quality. for originals with a colored background or mixed text and graphics. Toner Save - Percentage Indicator: The indicator will light when any of the Pro 16p. 1. 1-Sided/2-Sided Mode: Use the 2-Sided copy feature to make one or two-sided copies from one or two-sided originals. Refer to the Image Quality section for detailed information. 2. Refer to the Making Copies on...

User Guide
Page 18
... - Power Reduction / Auto Clear Power Reduction Modes automatically reduce power consumed by the Pro 16p when the Pro 16p has not been used for a set period of this User Guide for the Power Shut-Off, Power Save, and Auto Clear modes can be modified to enable copying. 1. Unless otherwise programmed, the Normal copy Mode settings are two modes of power reduction; Refer to the Normal Copy Mode approximately one minute after a job is enabled at the factory to return to Customizing Your Pro 16p...
... - Power Reduction / Auto Clear Power Reduction Modes automatically reduce power consumed by the Pro 16p when the Pro 16p has not been used for a set period of this User Guide for the Power Shut-Off, Power Save, and Auto Clear modes can be modified to enable copying. 1. Unless otherwise programmed, the Normal copy Mode settings are two modes of power reduction; Refer to the Normal Copy Mode approximately one minute after a job is enabled at the factory to return to Customizing Your Pro 16p...

User Guide
Page 21
.... Alternate Paper Tray 1. If printing, the job will flash. If copying, press the Start key to continue. 15 Add paper if the Alternate Paper Tray is empty. 2. If paper has misfed, remove it into the tray. • Ensure that the paper corners are under the corner snubbers. • Do not fill above the max fill line. 5. Flashing When the Alternate Paper Tray runs out of the arrow. 3. Loading Paper 4. If copying...
.... Alternate Paper Tray 1. If printing, the job will flash. If copying, press the Start key to continue. 15 Add paper if the Alternate Paper Tray is empty. 2. If paper has misfed, remove it into the tray. • Ensure that the paper corners are under the corner snubbers. • Do not fill above the max fill line. 5. Flashing When the Alternate Paper Tray runs out of the arrow. 3. Loading Paper 4. If copying...
User Guide
Page 26
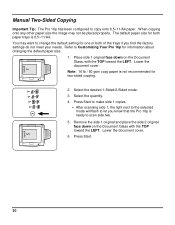
... the Pro 16p is ready to Customizing Your Pro 16p for information about changing the default paper size. 1. Press Start to make side 1 copies. • After scanning side 1, the light next to the selected mode will flash to let you find the factory settings do not meet your needs. You may not be placed properly. 1 Xerox Manual Two-Sided Copying Important Tip: The Pro 16p has been configured to change the default setting for one or both paper trays is...
... the Pro 16p is ready to Customizing Your Pro 16p for information about changing the default paper size. 1. Press Start to make side 1 copies. • After scanning side 1, the light next to the selected mode will flash to let you find the factory settings do not meet your needs. You may not be placed properly. 1 Xerox Manual Two-Sided Copying Important Tip: The Pro 16p has been configured to change the default setting for one or both paper trays is...

User Guide
Page 28
... the Display Window at the factory for information about changing the default percentage. Reduction/Enlargement Reference Table Original Size 5.5 × 8.5 5.5 × 8.5 8.5 × 14 8.5 × 11 A4 B4 A4/ A3 Copy Size 8.5 × 14 8.5 × 11 8.5 × 11 5.5 × 8.5 A3 A4 A5/ A4 % To Use 154% 129% 78% 64% 141% 81% 71% 22 The customer settable percentage ( ) has been set at the time...
... the Display Window at the factory for information about changing the default percentage. Reduction/Enlargement Reference Table Original Size 5.5 × 8.5 5.5 × 8.5 8.5 × 14 8.5 × 11 A4 B4 A4/ A3 Copy Size 8.5 × 14 8.5 × 11 8.5 × 11 5.5 × 8.5 A3 A4 A5/ A4 % To Use 154% 129% 78% 64% 141% 81% 71% 22 The customer settable percentage ( ) has been set at the time...

User Guide
Page 42
... button (C) on the machine diagram lights when the drum is approximately 18,000 copies. The drum cartridge indicator on the front of the toner cartridge and pull out the cartridge. Refer to open the front cover (B). 3. J2 Drum Cartridge Replacement The useful life of the drum cartridge is near the end of life. Approximately 1,000 more copies can be removed before removing the drum cartridge. 4. When the J2 Status Code is displayed, the machine will stop operating until the drum cartridge...
... button (C) on the machine diagram lights when the drum is approximately 18,000 copies. The drum cartridge indicator on the front of the toner cartridge and pull out the cartridge. Refer to open the front cover (B). 3. J2 Drum Cartridge Replacement The useful life of the drum cartridge is near the end of life. Approximately 1,000 more copies can be removed before removing the drum cartridge. 4. When the J2 Status Code is displayed, the machine will stop operating until the drum cartridge...
User Guide
Page 44
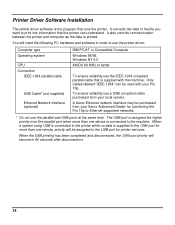
... to Ethernet supported networks. * Do not use a USB compliant cable purchased from your local vendor. To ensure reliability use the parallel and USB ports at the same time. Printer Driver Software Installation The printer driver software is the program that the printer can be purchased from your Xerox Authorized Dealer for printer services. It converts the data in 60 seconds after disconnection. 38 Only cables labeled "IEEE-1284" can understand. When the USB printing has...
... to Ethernet supported networks. * Do not use a USB compliant cable purchased from your local vendor. To ensure reliability use the parallel and USB ports at the same time. Printer Driver Software Installation The printer driver software is the program that the printer can be purchased from your Xerox Authorized Dealer for printer services. It converts the data in 60 seconds after disconnection. 38 Only cables labeled "IEEE-1284" can understand. When the USB printing has...
User Guide
Page 45
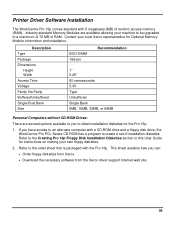
... Drives: There are available allowing your own floppy diskettes. 2. Printer Driver Software Installation The WorkCentre Pro 16p comes standard with the Pro 16p. Refer to the order sheet that is packaged with 8 megabytes (MB) of installation diskettes. This sheet explains how you to create a set of random access memory (RAM). Refer to the Creating Pro 16p Floppy Disk Installation Diskettes section in this User Guide for Optional Memory Module information and installation. Industry standard Memory Modules are several options...
... Drives: There are available allowing your own floppy diskettes. 2. Printer Driver Software Installation The WorkCentre Pro 16p comes standard with the Pro 16p. Refer to the order sheet that is packaged with 8 megabytes (MB) of installation diskettes. This sheet explains how you to create a set of random access memory (RAM). Refer to the Creating Pro 16p Floppy Disk Installation Diskettes section in this User Guide for Optional Memory Module information and installation. Industry standard Memory Modules are several options...
User Guide
Page 47
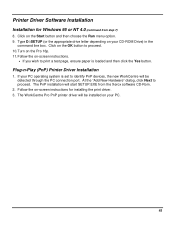
... -screen instructions for Windows 95 or NT 4.0 (continued from the Xerox software CD-Rom. 2. At the "Add New Hardware" dialog, click Next to print a test page, ensure paper is set to identify PnP devices, the new WorkCentre will start SETUP.EXE from step 7) 8. Plug-n-Play (PnP) Printer Driver Installation 1. If your PC operating system is loaded and then click the Yes button. The WorkCentre Pro PnP printer driver will be detected through the PC connection port...
... -screen instructions for Windows 95 or NT 4.0 (continued from the Xerox software CD-Rom. 2. At the "Add New Hardware" dialog, click Next to print a test page, ensure paper is set to identify PnP devices, the new WorkCentre will start SETUP.EXE from step 7) 8. Plug-n-Play (PnP) Printer Driver Installation 1. If your PC operating system is loaded and then click the Yes button. The WorkCentre Pro PnP printer driver will be detected through the PC connection port...

User Guide
Page 50
... (tray), number of copies, paper size, document orientation (portrait or landscape), number of images to print per page, print page borders, fit to add, delete or edit watermarks. About - The help system, designed to answer all your questions about using the Xerox WorkCentre Pro PCL Series Properties dialog. It also provides troubleshooting information, in the upper right corner of the dialog window, and release the mouse button. • The cursor will change...
... (tray), number of copies, paper size, document orientation (portrait or landscape), number of images to print per page, print page borders, fit to add, delete or edit watermarks. About - The help system, designed to answer all your questions about using the Xerox WorkCentre Pro PCL Series Properties dialog. It also provides troubleshooting information, in the upper right corner of the dialog window, and release the mouse button. • The cursor will change...
User Guide
Page 51
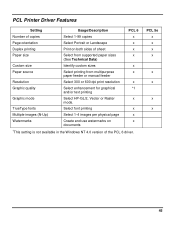
...PCL Printer Driver Features Setting Usage/Description PCL 6 Number of copies Select 1-99 copies x Page orientation Select Portrait or Landscape x Duplex printing Print on x documents 1This setting is not available in the Windows NT 4.0 version of sheet x Paper size Select from supported paper sizes x (See Technical Data) Custom size Identify custom sizes x Paper source Select printing from multipurpose x paper feeder or manual feeder Resolution Select 300 or 600 dpi print resolution x Graphic quality Select enhancement for graphical *1 and/or text printing...
...PCL Printer Driver Features Setting Usage/Description PCL 6 Number of copies Select 1-99 copies x Page orientation Select Portrait or Landscape x Duplex printing Print on x documents 1This setting is not available in the Windows NT 4.0 version of sheet x Paper size Select from supported paper sizes x (See Technical Data) Custom size Identify custom sizes x Paper source Select printing from multipurpose x paper feeder or manual feeder Resolution Select 300 or 600 dpi print resolution x Graphic quality Select enhancement for graphical *1 and/or text printing...
User Guide
Page 53
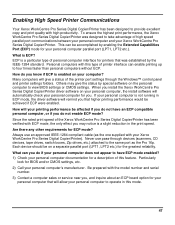
... Xerox WorkCentre Pro Series Digital Copier/Printer. How will give the status by enabling the Extended Capabilities Port (ECP) mode for a description of the printer port settings through devices (scanners, CD devices, tape drives, switch boxes, Zip drives, etc.) attached to the same port as the one supplied with ECP mode, the only effect you do if your personal computer to view BIOS settings or CMOS settings. Always use pass-through the Windows™ control panel...
... Xerox WorkCentre Pro Series Digital Copier/Printer. How will give the status by enabling the Extended Capabilities Port (ECP) mode for a description of the printer port settings through devices (scanners, CD devices, tape drives, switch boxes, Zip drives, etc.) attached to the same port as the one supplied with ECP mode, the only effect you do if your personal computer to view BIOS settings or CMOS settings. Always use pass-through the Windows™ control panel...
User Guide
Page 57
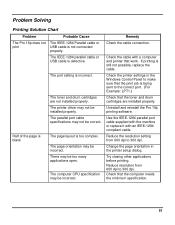
..., replace the cable. Check the printer settings in the printer setup dialog. Try closing other applications before printing. Problem Solving Printing Solution Chart Problem Probable Cause Remedy The Pro 16p does not The IEEE-1284 Parallel cable or print USB cable is incorrect. The port setting is not connected properly. Half of the page is blank The page layout is being sent to the correct port. (For Example: LPT1.) The toner and drum cartridges are installed properly. The page...
..., replace the cable. Check the printer settings in the printer setup dialog. Try closing other applications before printing. Problem Solving Printing Solution Chart Problem Probable Cause Remedy The Pro 16p does not The IEEE-1284 Parallel cable or print USB cable is incorrect. The port setting is not connected properly. Half of the page is blank The page layout is being sent to the correct port. (For Example: LPT1.) The toner and drum cartridges are installed properly. The page...
User Guide
Page 58
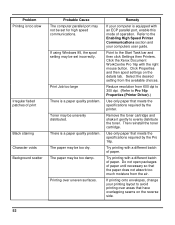
... Enabling High Speed Printer Communications section and your computers user guide. Click the Xerox Document WorkCentre Pro 16p with an ECP parallel port, enable this mode of operation. Select the desired setting from the air. There is a paper quality problem. Click Properties and then spool settings on the reverse side. 52 Then reinstall the toner cartridge. If printing onto envelopes, change your computer is equipped with the right mouse button. Remedy If your printing...
... Enabling High Speed Printer Communications section and your computers user guide. Click the Xerox Document WorkCentre Pro 16p with an ECP parallel port, enable this mode of operation. Select the desired setting from the air. There is a paper quality problem. Click Properties and then spool settings on the reverse side. 52 Then reinstall the toner cartridge. If printing onto envelopes, change your computer is equipped with the right mouse button. Remedy If your printing...


