
User Guide
Page 7
... Light Stripes 7-8 Predominate Light Stripes 7-10 Transparency Images Are Too Light or Too Dark 7-11 Colors Are Wrong 7-12 PANTONE Colors Do Not Match 7-13 8 Maintenance Maintenance and Cleaning 8-2 Routine Maintenance 8-2 Cleaning the Paper Release Blade 8-11 Cleaning the Maintenance Kit Wiper Blade 8-15 Cleaning the Outside of the Printer 8-18 Cleaning the Document Glass and Document... Jams 9-2 Jam at Exit Cover 9-2 Jam at Exit Path 9-8 Jam at Front Cover 9-11 Jam at Tray 2, 3, or 4 9-18 Jam at the Document Feeder 9-23 Phaser® 8560MFP/8860MFP Multifunction Printer v
... Light Stripes 7-8 Predominate Light Stripes 7-10 Transparency Images Are Too Light or Too Dark 7-11 Colors Are Wrong 7-12 PANTONE Colors Do Not Match 7-13 8 Maintenance Maintenance and Cleaning 8-2 Routine Maintenance 8-2 Cleaning the Paper Release Blade 8-11 Cleaning the Maintenance Kit Wiper Blade 8-15 Cleaning the Outside of the Printer 8-18 Cleaning the Document Glass and Document... Jams 9-2 Jam at Exit Cover 9-2 Jam at Exit Path 9-8 Jam at Front Cover 9-11 Jam at Tray 2, 3, or 4 9-18 Jam at the Document Feeder 9-23 Phaser® 8560MFP/8860MFP Multifunction Printer v

User Guide
Page 12
Side View 1 2 34 Parts of the Printer 1. Power switch 5 5. USB connection 7 7. RAM slots 3. Flash memory 1 8860mfp-135 Phaser® 8560MFP/8860MFP Multifunction Printer 1-4 Ethernet 10/100 Base-Tx connection Back View 8860mfp-002 1. RJ-11 fax modem connection 8 8. Waste tray 3. Scanner cable connection 6 6. Stabilizer 2 1 3 8860mfp-003 1. Configuration card 9 9. Hard drive 2. Power cord connection 4. Maintenance kit 2.
Side View 1 2 34 Parts of the Printer 1. Power switch 5 5. USB connection 7 7. RAM slots 3. Flash memory 1 8860mfp-135 Phaser® 8560MFP/8860MFP Multifunction Printer 1-4 Ethernet 10/100 Base-Tx connection Back View 8860mfp-002 1. RJ-11 fax modem connection 8 8. Waste tray 3. Scanner cable connection 6 6. Stabilizer 2 1 3 8860mfp-003 1. Configuration card 9 9. Hard drive 2. Power cord connection 4. Maintenance kit 2.
User Guide
Page 183
...Maintenance Kit Wiper Blade on the page. Select Paper Tips Page, and then press the OK button. 2. The system cleans the ink from appearing on the page: 1. Repeat Step 2 up to three times if the smears continue to appear. 3. c. Smudges or Smears Problem Smudges or smears appear on page 8-15 Phaser® 8560MFP/8860MFP...a. Select Troubleshooting, and then press the OK button. Replace the maintenance kit and close the door. Select the 2nd Side option on side two of the system and remove the maintenance kit. Select Information Pages, and then press the OK button. Select ...
...Maintenance Kit Wiper Blade on the page. Select Paper Tips Page, and then press the OK button. 2. The system cleans the ink from appearing on the page: 1. Repeat Step 2 up to three times if the smears continue to appear. 3. c. Smudges or Smears Problem Smudges or smears appear on page 8-15 Phaser® 8560MFP/8860MFP...a. Select Troubleshooting, and then press the OK button. Replace the maintenance kit and close the door. Select the 2nd Side option on side two of the system and remove the maintenance kit. Select Information Pages, and then press the OK button. Select ...

User Guide
Page 186
b. Open the door on the test page when all four color bars are missing. c. Replace the maintenance kit. Close the door. 4. b. If the problem continues, follow the steps for Random Light Stripes. Phaser® 8560MFP/8860MFP Multifunction Printer 7-10 Remove debris from appear on the page: 1. Close the exit cover. 3. d. Raise the lower paper ...prominently on the side of the system: a. Solution To prevent predominate light stripes from the paper-exit area. Open the exit cover: a. Remove the maintenance kit. Wipe the plastic wiper blade with a lint-free cloth. 2.
b. Open the door on the test page when all four color bars are missing. c. Replace the maintenance kit. Close the door. 4. b. If the problem continues, follow the steps for Random Light Stripes. Phaser® 8560MFP/8860MFP Multifunction Printer 7-10 Remove debris from appear on the page: 1. Close the exit cover. 3. d. Raise the lower paper ...prominently on the side of the system: a. Solution To prevent predominate light stripes from the paper-exit area. Open the exit cover: a. Remove the maintenance kit. Wipe the plastic wiper blade with a lint-free cloth. 2.

User Guide
Page 191
... tray, and replace the maintenance kit when needed to keep it . ■ Identify ink by number and shape, not color. ■ To avoid ink jams, never insert broken ink sticks into the ink-loading bins. Adding Ink You can load ink any time the system is idle, or when the control panel displays the Ink low or Ink out message. ■...
... tray, and replace the maintenance kit when needed to keep it . ■ Identify ink by number and shape, not color. ■ To avoid ink jams, never insert broken ink sticks into the ink-loading bins. Adding Ink You can load ink any time the system is idle, or when the control panel displays the Ink low or Ink out message. ■...

User Guide
Page 197
... may be hot. Do not touch the hot surfaces! To order a replacement maintenance kit, contact your printer: ■ www.xerox.com/office/8560MFPsupplies (Phaser 8560MFP printer) ■ www.xerox.com/office/8860MFPsupplies (Phaser 8860MFP printer) To replace the maintenance kit: 1. Phaser® 8560MFP/8860MFP Multifunction Printer 8-8 Order a new maintenance kit when the control panel displays a message that keeps the surface of the imaging...
... may be hot. Do not touch the hot surfaces! To order a replacement maintenance kit, contact your printer: ■ www.xerox.com/office/8560MFPsupplies (Phaser 8560MFP printer) ■ www.xerox.com/office/8860MFPsupplies (Phaser 8860MFP printer) To replace the maintenance kit: 1. Phaser® 8560MFP/8860MFP Multifunction Printer 8-8 Order a new maintenance kit when the control panel displays a message that keeps the surface of the imaging...

User Guide
Page 198
Follow the illustrated instructions included with the maintenance kit for full installation and disposal information. 8860mfp-061 Phaser® 8560MFP/8860MFP Multifunction Printer 8-9 Maintenance and Cleaning 2. Remove the maintenance kit (labeled A) from the maintenance kit slot. 8860mfp-060 3. Insert the replacement maintenance kit and push it completely into the maintenance kit slot.
Follow the illustrated instructions included with the maintenance kit for full installation and disposal information. 8860mfp-061 Phaser® 8560MFP/8860MFP Multifunction Printer 8-9 Maintenance and Cleaning 2. Remove the maintenance kit (labeled A) from the maintenance kit slot. 8860mfp-060 3. Insert the replacement maintenance kit and push it completely into the maintenance kit slot.

User Guide
Page 204
To clean the maintenance kit wiper blade: 1. Open the side door on the system. 8860mfp-055 2. Remove the maintenance kit (labeled A) from the maintenance kit slot. 8860mfp-060 Phaser® 8560MFP/8860MFP Multifunction Printer 8-15 Maintenance and Cleaning Cleaning the Maintenance Kit Wiper Blade The maintenance kit contains a wiper blade that removes excess ink.
To clean the maintenance kit wiper blade: 1. Open the side door on the system. 8860mfp-055 2. Remove the maintenance kit (labeled A) from the maintenance kit slot. 8860mfp-060 Phaser® 8560MFP/8860MFP Multifunction Printer 8-15 Maintenance and Cleaning Cleaning the Maintenance Kit Wiper Blade The maintenance kit contains a wiper blade that removes excess ink.

User Guide
Page 205
Insert the maintenance kit and push it completely into the maintenance kit slot. 8860mfp-061 Phaser® 8560MFP/8860MFP Multifunction Printer 8-16 Maintenance and Cleaning 3. Use a lint-free cloth to clean the top and upper edges of the flexible plastic wiper blade located next to the roller. 8860mfp-064 4.
Insert the maintenance kit and push it completely into the maintenance kit slot. 8860mfp-061 Phaser® 8560MFP/8860MFP Multifunction Printer 8-16 Maintenance and Cleaning 3. Use a lint-free cloth to clean the top and upper edges of the flexible plastic wiper blade located next to the roller. 8860mfp-064 4.

User Guide
Page 213
... for this system. The maintenance kit is important to the Xerox Supplies website for details. See also: Replacing the Maintenance Kit on page 8-8 When to your printer: ■ www.xerox.com/office/8560MFPsupplies (Phaser 8560MFP printer) ■ www.xerox.com/office/8860MFPsupplies (Phaser 8860MFP printer) To view information about the remaining life of the maintenance kit: 1. To order a replacement maintenance kit, contact your local...
... for this system. The maintenance kit is important to the Xerox Supplies website for details. See also: Replacing the Maintenance Kit on page 8-8 When to your printer: ■ www.xerox.com/office/8560MFPsupplies (Phaser 8560MFP printer) ■ www.xerox.com/office/8860MFPsupplies (Phaser 8860MFP printer) To view information about the remaining life of the maintenance kit: 1. To order a replacement maintenance kit, contact your local...

User Guide
Page 216
...the system. If you do not have all the original packaging, or are provided in the United States and Canada. Phaser® 8560MFP/8860MFP Multifunction Printer 8-27 Additional instructions for details. Coverage may vary outside these areas; please contact your local representative for ... 3. See Packing the Printer on page 8-28. 2. See Removing the Maintenance Kit and Waste Tray on page 8-34. Repack the system using the original packing material and boxes or a Xerox repackaging kit. The Total Satisfaction Guarantee is not covered by the warranty, service agreement,...
...the system. If you do not have all the original packaging, or are provided in the United States and Canada. Phaser® 8560MFP/8860MFP Multifunction Printer 8-27 Additional instructions for details. Coverage may vary outside these areas; please contact your local representative for ... 3. See Packing the Printer on page 8-28. 2. See Removing the Maintenance Kit and Waste Tray on page 8-34. Repack the system using the original packing material and boxes or a Xerox repackaging kit. The Total Satisfaction Guarantee is not covered by the warranty, service agreement,...

User Guide
Page 217
Moving and Repacking the Printer Removing the Maintenance Kit and Waste Tray Before turning off the system, remove the maintenance kit and waste tray. 1. Remove the maintenance kit (labeled A) and place it in a plastic bag for storage. 8860mfp-060 Phaser® 8560MFP/8860MFP Multifunction Printer 8-28 Open the side door on the system. 8860mfp-055 2.
Moving and Repacking the Printer Removing the Maintenance Kit and Waste Tray Before turning off the system, remove the maintenance kit and waste tray. 1. Remove the maintenance kit (labeled A) and place it in a plastic bag for storage. 8860mfp-060 Phaser® 8560MFP/8860MFP Multifunction Printer 8-28 Open the side door on the system. 8860mfp-055 2.

User Guide
Page 218
Phaser® 8560MFP/8860MFP Multifunction Printer 8-29 handle it carefully. 4. Empty the waste, and then place the tray in a plastic bag for storage. 8860mfp-057 Caution: Shipping the system with the maintenance kit and waste tray installed can damage the system. 5. Remove the waste tray (labeled B) from the waste tray slot. 8860mfp-056 Warning: The waste tray may be hot; Moving and Repacking the Printer 3. Close the system's door and covers.
Phaser® 8560MFP/8860MFP Multifunction Printer 8-29 handle it carefully. 4. Empty the waste, and then place the tray in a plastic bag for storage. 8860mfp-057 Caution: Shipping the system with the maintenance kit and waste tray installed can damage the system. 5. Remove the waste tray (labeled B) from the waste tray slot. 8860mfp-056 Warning: The waste tray may be hot; Moving and Repacking the Printer 3. Close the system's door and covers.
User Guide
Page 270
..., 6-5 inserting in names and numbers, 6-2 choosing a network connection, 2-3 cleaning maintenance kit wiper blade, 8-15 paper release blade, 8-11 the printer, 8-18 clearing faxes, 6-19 collating, 4-2 copies, 4-16 color adjust balance for copies, 4-11 adjusting, 7-4 adjusting for thin paper originals, 5-16...an image, 4-9 regulations, B-1 repeating images on a sheet, 4-14 selecting a tray to use, 4-3 selecting color or black and white copies, 4-4 selecting output quality modes, 4-6 setting default copy tray, 4-3 setting original size, 4-8 Phaser® 8560MFP/8860MFP Multifunction Printer Index-2
..., 6-5 inserting in names and numbers, 6-2 choosing a network connection, 2-3 cleaning maintenance kit wiper blade, 8-15 paper release blade, 8-11 the printer, 8-18 clearing faxes, 6-19 collating, 4-2 copies, 4-16 color adjust balance for copies, 4-11 adjusting, 7-4 adjusting for thin paper originals, 5-16...an image, 4-9 regulations, B-1 repeating images on a sheet, 4-14 selecting a tray to use, 4-3 selecting color or black and white copies, 4-4 selecting output quality modes, 4-6 setting default copy tray, 4-3 setting original size, 4-8 Phaser® 8560MFP/8860MFP Multifunction Printer Index-2

User Guide
Page 275
...14 selecting printing options for an individual job, 3-23 sending a fax from your computer, 6-4 Xerox Support Centre, 1-18 Macintosh OS X, version 10.3 and higher printer drivers, 2-12 maintaining your printer, 8-2 maintenance adding ink, 8-2 cleaning the maintenance kit wiper blade, 8-15 cleaning the paper release blade, 8-11 cleaning the printer, 8-18 consumables, ..., 2-2 TCP/IP and IP addresses, 2-5 network connection, 2-4 Ethernet, 2-3 numbers selecting using the alphanumeric keypad, 6-2 N-Up placing multiple images on a page, 4-13 Phaser® 8560MFP/8860MFP Multifunction Printer Index-7
...14 selecting printing options for an individual job, 3-23 sending a fax from your computer, 6-4 Xerox Support Centre, 1-18 Macintosh OS X, version 10.3 and higher printer drivers, 2-12 maintaining your printer, 8-2 maintenance adding ink, 8-2 cleaning the maintenance kit wiper blade, 8-15 cleaning the paper release blade, 8-11 cleaning the printer, 8-18 consumables, ..., 2-2 TCP/IP and IP addresses, 2-5 network connection, 2-4 Ethernet, 2-3 numbers selecting using the alphanumeric keypad, 6-2 N-Up placing multiple images on a page, 4-13 Phaser® 8560MFP/8860MFP Multifunction Printer Index-7
User Guide
Page 278
... an individual, 6-10 repacking the printer, 8-25 replacing the maintenance kit, 8-8 report activity report, 6-22 dial directory report, 6-22..., 5-9 scanned images placing in Windows or Macintosh applications, 5-12 retrieving, 5-7 retrieving with the Xerox Scan Utility, 5-9 using CentreWare IS to retrieve, 5-8 scanning 1-sided or 2-sided originals, 5-...to emails, 5-9 basics, 5-3 black and white images, 5-16 calibrating the scanner, 5-31 color images, 5-16 controlling policies, 5-27 creating a private folder, 5-30 creating a template, 5-... Phaser® 8560MFP/8860MFP Multifunction Printer Index-10
... an individual, 6-10 repacking the printer, 8-25 replacing the maintenance kit, 8-8 report activity report, 6-22 dial directory report, 6-22..., 5-9 scanned images placing in Windows or Macintosh applications, 5-12 retrieving, 5-7 retrieving with the Xerox Scan Utility, 5-9 using CentreWare IS to retrieve, 5-8 scanning 1-sided or 2-sided originals, 5-...to emails, 5-9 basics, 5-3 black and white images, 5-16 calibrating the scanner, 5-31 color images, 5-16 controlling policies, 5-27 creating a private folder, 5-30 creating a template, 5-... Phaser® 8560MFP/8860MFP Multifunction Printer Index-10
Statement of Volatility
Page 1
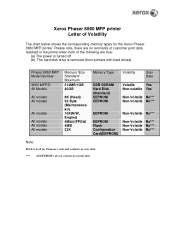
... drive is removed (from printers with hard drives) Phaser 8860 MFP Model Number 8860 MFP/D All Models Memory Size Standard/ Maximum 512MB/1GB 40GB All models All models All models All models All models All models 8K (Head) 32 Byte (Maintenance kit) 16K(N/W, Engine) 4Mbit/(FPGA) 4MB 32K Memory ...-Volatile No*** EEPROM Flash Configuration Card(EEPROM) Non-Volatile No*** Non-Volatile No*** Non-Volatile No*** Note: Flash is used for the Xerox Phaser 8860 MFP printer. Please note, there are no remnants of customer print data retained in the printer when both of Volatility The chart below ...
... drive is removed (from printers with hard drives) Phaser 8860 MFP Model Number 8860 MFP/D All Models Memory Size Standard/ Maximum 512MB/1GB 40GB All models All models All models All models All models All models 8K (Head) 32 Byte (Maintenance kit) 16K(N/W, Engine) 4Mbit/(FPGA) 4MB 32K Memory ...-Volatile No*** EEPROM Flash Configuration Card(EEPROM) Non-Volatile No*** Non-Volatile No*** Non-Volatile No*** Note: Flash is used for the Xerox Phaser 8860 MFP printer. Please note, there are no remnants of customer print data retained in the printer when both of Volatility The chart below ...

Advanced Features Guide
Page 58
... Info, and then press the OK button. 4. Using CentreWare IS To view supply status information using CentreWare IS: 1. Phaser® 8560MFP/8860MFP Multifunction Printer 4-8 Click Status, and then select one of the following options: ■ The printer's control panel ■... 2. Printer Settings Viewing Supply Usage Information The printer detects the status of certain supplies and consumables, such as ink, maintenance kit, and the number of pages printed. Select Maintenance Kit Life or Total Print Count, and then press the OK button to view information applicable to view...
... Info, and then press the OK button. 4. Using CentreWare IS To view supply status information using CentreWare IS: 1. Phaser® 8560MFP/8860MFP Multifunction Printer 4-8 Click Status, and then select one of the following options: ■ The printer's control panel ■... 2. Printer Settings Viewing Supply Usage Information The printer detects the status of certain supplies and consumables, such as ink, maintenance kit, and the number of pages printed. Select Maintenance Kit Life or Total Print Count, and then press the OK button to view information applicable to view...


