
User Guide
Page 7
Control panel 6. Front cover release 8. Interface cover 12. Ink loader/Top cover 10. Exit cover release 7. Standard 525-Sheet Tray 2 4. 100-Sheet Tray 1 5. Optional 525-Sheet Feeder (Tray 4) 2. Legal/A4 output tray extension 11. Side door 8560p-044 Phaser® 8560 Color Printer 1-2 Optional 525-Sheet Feeder (Tray 3) 3. Exit cover 9. Parts of the Printer This section includes: ■ Front-Right View on page 1-2 ■ Right Side View on page 1-3 ■ Rear View on page 1-3 Front-Right View Parts of the Printer 6 78 9 10 5 4 11 3 12 2 1 1.
Control panel 6. Front cover release 8. Interface cover 12. Ink loader/Top cover 10. Exit cover release 7. Standard 525-Sheet Tray 2 4. 100-Sheet Tray 1 5. Optional 525-Sheet Feeder (Tray 4) 2. Legal/A4 output tray extension 11. Side door 8560p-044 Phaser® 8560 Color Printer 1-2 Optional 525-Sheet Feeder (Tray 3) 3. Exit cover 9. Parts of the Printer This section includes: ■ Front-Right View on page 1-2 ■ Right Side View on page 1-3 ■ Rear View on page 1-3 Front-Right View Parts of the Printer 6 78 9 10 5 4 11 3 12 2 1 1.

User Guide
Page 43
Loading Paper ■ End-flap envelopes: Fold down the flaps before placing them in .) is recommended. Insert the envelopes with the flap side up and the flap entering the printer first. 8560p-091 ■ Pre-punched paper: Insert the side to be printed facedown with the holes toward the right side of 19 mm (0.75 in the tray. Printing over the holes may cause ink to accommodate the holes. A minimum margin of the tray. 8560p-111 Note: When using pre-punched paper, adjust the print margins to transfer onto subsequent pages. Phaser® 8560 Color Printer 3-13
Loading Paper ■ End-flap envelopes: Fold down the flaps before placing them in .) is recommended. Insert the envelopes with the flap side up and the flap entering the printer first. 8560p-091 ■ Pre-punched paper: Insert the side to be printed facedown with the holes toward the right side of 19 mm (0.75 in the tray. Printing over the holes may cause ink to accommodate the holes. A minimum margin of the tray. 8560p-111 Note: When using pre-punched paper, adjust the print margins to transfer onto subsequent pages. Phaser® 8560 Color Printer 3-13

User Guide
Page 49
Printing over the holes may cause ink to accommodate the holes. When properly positioned, the guide clicks into place. 8560p-107 Phaser® 8560 Color Printer 3-19 A minimum margin of 19 mm (0.75 in the tray (if necessary). ■ Length guide: Press the sides, then slide the guide until the arrow ...
Printing over the holes may cause ink to accommodate the holes. When properly positioned, the guide clicks into place. 8560p-107 Phaser® 8560 Color Printer 3-19 A minimum margin of 19 mm (0.75 in the tray (if necessary). ■ Length guide: Press the sides, then slide the guide until the arrow ...

User Guide
Page 96
... the maintenance kit. Select Print Quality Problems, and then press the OK button. The printer cleans the ink from appearing on the right side of paper through the printer: a. Repeat Step 2 up to three times if the smears continue to appear. 3.... Replace the maintenance kit and close the door. See also: Manual 2-Sided Printing on page 3-27 Cleaning the Maintenance Kit Wiper Blade on page 5-12 Phaser® 8560 Color Printer...
... the maintenance kit. Select Print Quality Problems, and then press the OK button. The printer cleans the ink from appearing on the right side of paper through the printer: a. Repeat Step 2 up to three times if the smears continue to appear. 3.... Replace the maintenance kit and close the door. See also: Manual 2-Sided Printing on page 3-27 Cleaning the Maintenance Kit Wiper Blade on page 5-12 Phaser® 8560 Color Printer...
User Guide
Page 102
... Maintenance Kit Wiper Blade on page 5-12 ■ Cleaning the Outside of the Printer on page 5-14 See also: User Safety on page A-1 Routine Maintenance Your system needs little maintenance to keep your printer functioning properly. Phaser® 8560 Color Printer 5-2 Add ink, empty the waste tray, and replace the maintenance kit when needed to keep...
... Maintenance Kit Wiper Blade on page 5-12 ■ Cleaning the Outside of the Printer on page 5-14 See also: User Safety on page A-1 Routine Maintenance Your system needs little maintenance to keep your printer functioning properly. Phaser® 8560 Color Printer 5-2 Add ink, empty the waste tray, and replace the maintenance kit when needed to keep...

User Guide
Page 103
Maintenance and Cleaning 2. A label above each bin indicates the ink stick color and shape for that is low. Phaser® 8560 Color Printer 5-3 To load ink: 1. Locate the ink-loading bin that bin. Remove paper from the output tray. Open the top cover. 8560p-097 8560p-019 3.
Maintenance and Cleaning 2. A label above each bin indicates the ink stick color and shape for that is low. Phaser® 8560 Color Printer 5-3 To load ink: 1. Locate the ink-loading bin that bin. Remove paper from the output tray. Open the top cover. 8560p-097 8560p-019 3.

User Guide
Page 104
... than Genuine Xerox Solid Ink may affect print quality and printer reliability. Caution: Use of the appropriate ink-loading bin. Close the top cover. Warming Up is ready for specific use with this printer. To order ink, contact your local reseller or go to fit into the correct ink-loading bin. 1 234 8560p-098 5. Phaser® 8560 Color Printer 5-4 Note: To...
... than Genuine Xerox Solid Ink may affect print quality and printer reliability. Caution: Use of the appropriate ink-loading bin. Close the top cover. Warming Up is ready for specific use with this printer. To order ink, contact your local reseller or go to fit into the correct ink-loading bin. 1 234 8560p-098 5. Phaser® 8560 Color Printer 5-4 Note: To...
User Guide
Page 105
... is cooling following the Eliminate Light Stripes troubleshooting routine. Warning: The printer's interior may be locked if the printer is in a warm-up cycle or if the ink is locked, close the door and wait 15 minutes before repeating Steps 1 and 2. Phaser® 8560 Color Printer 5-5 Open the side door. 8560p-034 2. handle it carefully. 8560p...
... is cooling following the Eliminate Light Stripes troubleshooting routine. Warning: The printer's interior may be locked if the printer is in a warm-up cycle or if the ink is locked, close the door and wait 15 minutes before repeating Steps 1 and 2. Phaser® 8560 Color Printer 5-5 Open the side door. 8560p-034 2. handle it carefully. 8560p...
User Guide
Page 106
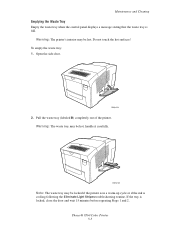
The ink is non-toxic and can be discarded as normal office waste. 8560p-036 Note: The waste tray must be out of the printer for more than five seconds or you will continue to receive a Waste Tray Full message on the control panel. 4. Empty the waste tray in a waste container. Insert the waste tray into the printer and push it completely into the waste tray slot. 8560p-068 Phaser® 8560 Color Printer 5-6 Maintenance and Cleaning 3.
The ink is non-toxic and can be discarded as normal office waste. 8560p-036 Note: The waste tray must be out of the printer for more than five seconds or you will continue to receive a Waste Tray Full message on the control panel. 4. Empty the waste tray in a waste container. Insert the waste tray into the printer and push it completely into the waste tray slot. 8560p-068 Phaser® 8560 Color Printer 5-6 Maintenance and Cleaning 3.

User Guide
Page 107
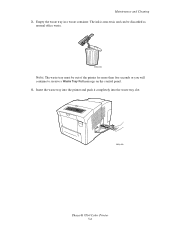
it can damage the printer. This damage is not covered under the printer warranty. Phaser® 8560 Color Printer 5-7 5. Close the side door. Maintenance and Cleaning 8560p-038 Caution: Do not attempt to reuse the waste ink in the printer;
it can damage the printer. This damage is not covered under the printer warranty. Phaser® 8560 Color Printer 5-7 5. Close the side door. Maintenance and Cleaning 8560p-038 Caution: Do not attempt to reuse the waste ink in the printer;

User Guide
Page 112
Maintenance and Cleaning Cleaning the Maintenance Kit Wiper Blade The maintenance kit contains a wiper blade that removes excess ink. Remove the maintenance kit (labeled A) from the maintenance kit slot. 8560p-032 Phaser® 8560 Color Printer 5-12 To clean the maintenance kit wiper blade: 1. Open the side door. 8560p-034 2.
Maintenance and Cleaning Cleaning the Maintenance Kit Wiper Blade The maintenance kit contains a wiper blade that removes excess ink. Remove the maintenance kit (labeled A) from the maintenance kit slot. 8560p-032 Phaser® 8560 Color Printer 5-12 To clean the maintenance kit wiper blade: 1. Open the side door. 8560p-034 2.

User Guide
Page 115
.... On the control panel, select Information, and then press the OK button. 2. Consumables Solid ink is the only ink designed and manufactured under strict quality controls by Xerox for the Phaser 8560 printer. To save ink, leave the printer turned on page 5-10 Phaser® 8560 Color Printer 5-15 See also: Adding Ink on page 5-2 Routine Maintenance Items Routine maintenance items are...
.... On the control panel, select Information, and then press the OK button. 2. Consumables Solid ink is the only ink designed and manufactured under strict quality controls by Xerox for the Phaser 8560 printer. To save ink, leave the printer turned on page 5-10 Phaser® 8560 Color Printer 5-15 See also: Adding Ink on page 5-2 Routine Maintenance Items Routine maintenance items are...
User Guide
Page 117
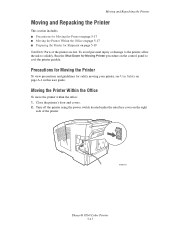
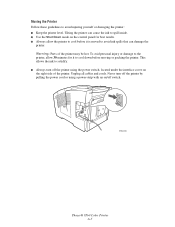
... personal injury or damage to the printer, allow the ink to cool the printer quickly. Turn off the printer using the power switch located under the interface cover on the right side of the printer are hot. Precautions for Moving the Printer To view precautions and guidelines for ...Shipment on the control panel to solidify. Run the Shut Down for Moving Printer procedure on page 5-19 Caution: Parts of the printer. 8560p-031 Phaser® 8560 Color Printer 5-17
... personal injury or damage to the printer, allow the ink to cool the printer quickly. Turn off the printer using the power switch located under the interface cover on the right side of the printer are hot. Precautions for Moving the Printer To view precautions and guidelines for ...Shipment on the control panel to solidify. Run the Shut Down for Moving Printer procedure on page 5-19 Caution: Parts of the printer. 8560p-031 Phaser® 8560 Color Printer 5-17
User Guide
Page 118
... hand holds on the control panel, the fan does not run, so you must wait longer for the printer to solidify. Phaser® 8560 Color Printer 5-18 Moving and Repacking the Printer 3. If the printhead is cool enough to solidify. Caution: If you receive a Power Down Error-Head not... Parked message at least 30 minutes for the ink to move. Within 10 seconds after the cool-down cycle is not ready...
... hand holds on the control panel, the fan does not run, so you must wait longer for the printer to solidify. Phaser® 8560 Color Printer 5-18 Moving and Repacking the Printer 3. If the printhead is cool enough to solidify. Caution: If you receive a Power Down Error-Head not... Parked message at least 30 minutes for the ink to move. Within 10 seconds after the cool-down cycle is not ready...
User Guide
Page 123
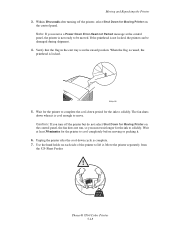
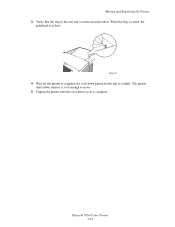
Verify that the flag in the exit tray is locked. 8560p-099 4. The printer shuts down when it is complete. Unplug the printer after the cool-down period for the ink to move. 5. Wait for the printer to complete the cool-down cycle is cool enough to solidify. Moving and Repacking the Printer 3. When the flag is raised, the printhead is in the raised position. Phaser® 8560 Color Printer 5-23
Verify that the flag in the exit tray is locked. 8560p-099 4. The printer shuts down when it is complete. Unplug the printer after the cool-down period for the ink to move. 5. Wait for the printer to complete the cool-down cycle is cool enough to solidify. Moving and Repacking the Printer 3. When the flag is raised, the printhead is in the raised position. Phaser® 8560 Color Printer 5-23
User Guide
Page 148
... damage to the printer, allow 30 minutes for best results. ■ Always allow the printer to avoid injuring yourself or damaging the printer: ■ Keep the printer level. Moving the Printer Follow these guidelines to cool before moving or packing the printer. Warning: Parts of the printer. Never turn off switch. 8560p-030 Phaser® 8560 Color Printer A-5 Unplug all...
... damage to the printer, allow 30 minutes for best results. ■ Always allow the printer to avoid injuring yourself or damaging the printer: ■ Keep the printer level. Moving the Printer Follow these guidelines to cool before moving or packing the printer. Warning: Parts of the printer. Never turn off switch. 8560p-030 Phaser® 8560 Color Printer A-5 Unplug all...

User Guide
Page 151
..., 3-25 automatic, 3-25 binding edge options, 3-26 manual, 3-27 selecting, 3-26 A adding ink, 5-2 adhesive strip envelopes, 3-4 adjusting color, 4-4 Advanced Features Guide, 1-10 AutoIP dynamically setting the printer's IP address, 2-6 manually setting the printer's IP address, 2-7 automatic color correction, 4-4 automatically setting the printer's IP address, 2-6 available printer drivers, 2-9 B basic printing, 3-2 binding edge printing options, 3-26 Black and White...
..., 3-25 automatic, 3-25 binding edge options, 3-26 manual, 3-27 selecting, 3-26 A adding ink, 5-2 adhesive strip envelopes, 3-4 adjusting color, 4-4 Advanced Features Guide, 1-10 AutoIP dynamically setting the printer's IP address, 2-6 manually setting the printer's IP address, 2-7 automatic color correction, 4-4 automatically setting the printer's IP address, 2-6 available printer drivers, 2-9 B basic printing, 3-2 binding edge printing options, 3-26 Black and White...
User Guide
Page 153
..., 6-19 Xerox web links, 1-10 High-Resolution/Photo print-quality mode, 4-2 I information about your printer, 1-10 web links, 1-10 information pages, 1-8, 1-10 CentreWare IS, 1-8 color sampler pages, 1-9 Configuration page, 1-8 Menu Map, 1-7 Paper Tips page, 3-5, 4-10 sample pages, 1-8 ink adding, 5-2 broken sticks, 5-2 jams, 5-2 minimizing usage, 5-15 packaging, 5-2 replacing, 5-2 ink loader, 1-2 ink low message, 5-2 ink out message, 5-2 ink-loading bins...
..., 6-19 Xerox web links, 1-10 High-Resolution/Photo print-quality mode, 4-2 I information about your printer, 1-10 web links, 1-10 information pages, 1-8, 1-10 CentreWare IS, 1-8 color sampler pages, 1-9 Configuration page, 1-8 Menu Map, 1-7 Paper Tips page, 3-5, 4-10 sample pages, 1-8 ink adding, 5-2 broken sticks, 5-2 jams, 5-2 minimizing usage, 5-15 packaging, 5-2 replacing, 5-2 ink loader, 1-2 ink low message, 5-2 ink out message, 5-2 ink-loading bins...
User Guide
Page 154
... selecting printing options for an individual job Macintosh, 3-23 Xerox Support Centre, 1-11 Macintosh OS X, version 10.2 and 10.3 printer drivers, 2-11 Macintosh OS X, version 10.4, 2-11 printer drivers, 2-11 maintenance and cleaning, 5-2 maintenance kit, ... PrintingScout, 6-18 metal clasp envelopes, 3-4 minimizing ink usage, 5-15 mode Enhanced, 4-2 Fast Color, 4-2 High-Resolution/Photo, 4-2 print quality, 4-2 Standard, 4-2 modifying the IP address using CentreWare IS, 2-8 moving the printer, A-5 precautions, 5-17 preparing for shipment, ... DNS server, 2-7 Phaser® 8560 Color Printer Index-4
... selecting printing options for an individual job Macintosh, 3-23 Xerox Support Centre, 1-11 Macintosh OS X, version 10.2 and 10.3 printer drivers, 2-11 Macintosh OS X, version 10.4, 2-11 printer drivers, 2-11 maintenance and cleaning, 5-2 maintenance kit, ... PrintingScout, 6-18 metal clasp envelopes, 3-4 minimizing ink usage, 5-15 mode Enhanced, 4-2 Fast Color, 4-2 High-Resolution/Photo, 4-2 print quality, 4-2 Standard, 4-2 modifying the IP address using CentreWare IS, 2-8 moving the printer, A-5 precautions, 5-17 preparing for shipment, ... DNS server, 2-7 Phaser® 8560 Color Printer Index-4
User Guide
Page 156
...color settings, 4-4 advanced features, 1-5 changing or modifying the IP address using CentreWare IS, 2-8 cleaning the outside, 5-14 clearance, A-3 configuration card, 1-3 Configuration page, 1-5 configurations, 1-4, 1-5 connection, 1-4 control panel, 1-2 features, 1-6 Ethernet connection, 1-3 exit cover, 1-2 exit cover release, 1-2 features, 1-4 fonts, 1-4 front cover release, 1-2 front-right view, 1-2 information resources, 1-10 ink...tab, 3-22 PCL, 2-9 PostScript, 2-9 Printer Features, 3-23 UNIX, 2-9 Windows 2000 or later, 2-10 Xerox Support Centre, 1-11 Phaser® 8560 Color Printer Index-6
...color settings, 4-4 advanced features, 1-5 changing or modifying the IP address using CentreWare IS, 2-8 cleaning the outside, 5-14 clearance, A-3 configuration card, 1-3 Configuration page, 1-5 configurations, 1-4, 1-5 connection, 1-4 control panel, 1-2 features, 1-6 Ethernet connection, 1-3 exit cover, 1-2 exit cover release, 1-2 features, 1-4 fonts, 1-4 front cover release, 1-2 front-right view, 1-2 information resources, 1-10 ink...tab, 3-22 PCL, 2-9 PostScript, 2-9 Printer Features, 3-23 UNIX, 2-9 Windows 2000 or later, 2-10 Xerox Support Centre, 1-11 Phaser® 8560 Color Printer Index-6
