User Guide
Page 6
... Adding ink 57 Emptying the waste tray 59 Replacing the Maintenance Kit 62 Cleaning the Rapid Release Guide 63 Cleaning the maintenance drawer wiper blade 66 Cleaning the exit rollers 67 Cleaning the paper-feed rollers 67 Moving and Shipping the Printer 69 Moving the printer within the office 69 Shipping the printer 70 Getting Help 72 Xerox...
... Adding ink 57 Emptying the waste tray 59 Replacing the Maintenance Kit 62 Cleaning the Rapid Release Guide 63 Cleaning the maintenance drawer wiper blade 66 Cleaning the exit rollers 67 Cleaning the paper-feed rollers 67 Moving and Shipping the Printer 69 Moving the printer within the office 69 Shipping the printer 70 Getting Help 72 Xerox...
User Guide
Page 16
...® 8200 Ink Sticks 5 Magenta ColorStix® 8200 Ink Sticks 5 Yellow ColorStix® 8200 Ink Sticks 5 Black ColorStix® 8200 Ink Sticks 2 Cyan ColorStix® 8200 Ink Sticks 2 Magenta ColorStix® 8200 Ink Sticks 2 Yellow ColorStix® 8200 Ink Sticks Customer-Replaceable Units (CRUs) Replacement and Cleaning Items Item Waste Tray for Maintenance Drawer Maintenance Drawer (includes Standard Capacity Maintenance Kit) Rapid...-2041-00 016-2042-00 016-2043-00 Part Number 436-0415-00 436-0414-00 650-4214-00 381-0497-00 016-1845-00 2 Phaser® 8200 Color Printer
...® 8200 Ink Sticks 5 Magenta ColorStix® 8200 Ink Sticks 5 Yellow ColorStix® 8200 Ink Sticks 5 Black ColorStix® 8200 Ink Sticks 2 Cyan ColorStix® 8200 Ink Sticks 2 Magenta ColorStix® 8200 Ink Sticks 2 Yellow ColorStix® 8200 Ink Sticks Customer-Replaceable Units (CRUs) Replacement and Cleaning Items Item Waste Tray for Maintenance Drawer Maintenance Drawer (includes Standard Capacity Maintenance Kit) Rapid...-2041-00 016-2042-00 016-2043-00 Part Number 436-0415-00 436-0414-00 650-4214-00 381-0497-00 016-1845-00 2 Phaser® 8200 Color Printer
User Guide
Page 59
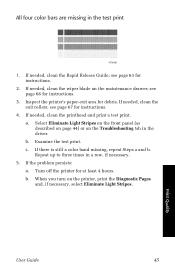
...78 79 80 81 82 83 84 85 86 87 88 0726-86 1. Turn off the printer for instructions. 4. a. Select Eliminate Light Stripes on the front panel (as described on page 44) or on the maintenance drawer; Examine the test print. see page 67 for at least 4 hours. If needed ,... clean the exit rollers; If the problem persists: a. If there is still a color band missing, repeat Steps a and b. When you turn on the printer, print the Diagnostic Pages and, if...
...78 79 80 81 82 83 84 85 86 87 88 0726-86 1. Turn off the printer for instructions. 4. a. Select Eliminate Light Stripes on the front panel (as described on page 44) or on the maintenance drawer; Examine the test print. see page 67 for at least 4 hours. If needed ,... clean the exit rollers; If the problem persists: a. If there is still a color band missing, repeat Steps a and b. When you turn on the printer, print the Diagnostic Pages and, if...
User Guide
Page 60
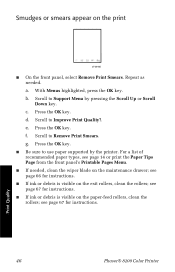
Repeat as needed , clean the wiper blade on the maintenance drawer; With Menus highlighted, press the OK key. c. Scroll to Improve Print Quality?. Press the OK key. see page 67 for instructions. see page 67 for ... Down key. For a list of recommended paper types, see page 66 for instructions. f. I Be sure to Support Menu by the printer. Print Quality 46 Phaser® 8200 Color Printer Smudges or smears appear on the print 0726-85 I If needed . I If ink or debris is visible on the paper-feed rollers, clean the rollers; I If...
Repeat as needed , clean the wiper blade on the maintenance drawer; With Menus highlighted, press the OK key. c. Scroll to Improve Print Quality?. Press the OK key. see page 67 for instructions. see page 67 for ... Down key. For a list of recommended paper types, see page 66 for instructions. f. I Be sure to Support Menu by the printer. Print Quality 46 Phaser® 8200 Color Printer Smudges or smears appear on the print 0726-85 I If needed . I If ink or debris is visible on the paper-feed rollers, clean the rollers; I If...

User Guide
Page 73
Do not touch the hot surfaces! 1. User Guide 0726-33 59 Maintenance 0726-23 2. Emptying the waste tray Empty the waste tray when the front panel displays a message stating that the waste tray is not locked. Caution The printer's interior may be hot. Pull out the maintenance drawer (labeled A), if it is full. Open the front cover. Note To minimize waste ink and optimize performance, leave the printer on all the time.
Do not touch the hot surfaces! 1. User Guide 0726-33 59 Maintenance 0726-23 2. Emptying the waste tray Empty the waste tray when the front panel displays a message stating that the waste tray is not locked. Caution The printer's interior may be hot. Pull out the maintenance drawer (labeled A), if it is full. Open the front cover. Note To minimize waste ink and optimize performance, leave the printer on all the time.

User Guide
Page 74
... minutes before repeating steps 1 and 2. 3. Re-insert the waste tray in the drawer. 0726-34 60 Phaser® 8200 Color Printer handle it on and while the ink cools after the Eliminate Light Stripes troubleshooting routine. Lift the waste tray (labeled B) from the maintenance drawer. Empty the waste tray by gently twisting the tray or tapping it...
... minutes before repeating steps 1 and 2. 3. Re-insert the waste tray in the drawer. 0726-34 60 Phaser® 8200 Color Printer handle it on and while the ink cools after the Eliminate Light Stripes troubleshooting routine. Lift the waste tray (labeled B) from the maintenance drawer. Empty the waste tray by gently twisting the tray or tapping it...

User Guide
Page 75
Caution Do not attempt to reuse the waste ink in the printer. 7. Re-insert the maintenance drawer in the printer; Close the front cover. 6. it may damage the printer. This damage is not covered under the printer warranty. Maintenance User Guide 61
Caution Do not attempt to reuse the waste ink in the printer. 7. Re-insert the maintenance drawer in the printer; Close the front cover. 6. it may damage the printer. This damage is not covered under the printer warranty. Maintenance User Guide 61

User Guide
Page 76
... in the maintenance drawer (labeled A), which is a consumable that the Maintenance Kit is low. Caution The printer's interior may be hot. The maintenance roller maintains the surface of the maintenance roller (labeled C1) and counter (labeled C2). Depending on your print volume and average ink coverage, order either the Standard Maintenance Kit or the Extended Maintenance Kit; Maintenance 0726-51...
... in the maintenance drawer (labeled A), which is a consumable that the Maintenance Kit is low. Caution The printer's interior may be hot. The maintenance roller maintains the surface of the maintenance roller (labeled C1) and counter (labeled C2). Depending on your print volume and average ink coverage, order either the Standard Maintenance Kit or the Extended Maintenance Kit; Maintenance 0726-51...
User Guide
Page 80
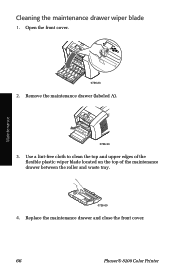
Remove the maintenance drawer (labeled A). 0726-33 3. Use a lint-free cloth to clean the top and upper edges of the flexible plastic wiper blade located on the top of the maintenance drawer between the roller and waste tray. 0726-60 4. Open the front cover. Replace the maintenance drawer and close the front cover. 66 Phaser® 8200 Color Printer Maintenance 0726-23 2. Cleaning the maintenance drawer wiper blade 1.
Remove the maintenance drawer (labeled A). 0726-33 3. Use a lint-free cloth to clean the top and upper edges of the flexible plastic wiper blade located on the top of the maintenance drawer between the roller and waste tray. 0726-60 4. Open the front cover. Replace the maintenance drawer and close the front cover. 66 Phaser® 8200 Color Printer Maintenance 0726-23 2. Cleaning the maintenance drawer wiper blade 1.

User Guide
Page 82
To turn the green thumbwheel. 1 2 3 0726-36 4. Maintenance 68 Phaser® 8200 Color Printer To clean the rollers in rows 1 and 3, turn the rollers in rows 1, 2, and 3, use a pre-soaked alcohol cloth (using 90percent isopropyl alcohol). 5. Replace the maintenance drawer and close the front cover. Clean any ink from the polished metal guide (located between rollers 1 and 2) using a pre-soaked alcohol cloth (using 90percent isopropyl alcohol). Remove the maintenance drawer (labeled A). 0726-33 3. 2.
To turn the green thumbwheel. 1 2 3 0726-36 4. Maintenance 68 Phaser® 8200 Color Printer To clean the rollers in rows 1 and 3, turn the rollers in rows 1, 2, and 3, use a pre-soaked alcohol cloth (using 90percent isopropyl alcohol). 5. Replace the maintenance drawer and close the front cover. Clean any ink from the polished metal guide (located between rollers 1 and 2) using a pre-soaked alcohol cloth (using 90percent isopropyl alcohol). Remove the maintenance drawer (labeled A). 0726-33 3. 2.

User Guide
Page 84
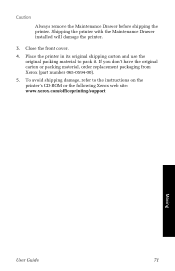
Remove the Maintenance Drawer (labeled A) and place it in a plastic bag for shipment, complete steps 1 through 5 starting on page 69, then: 1. Shipping the printer To prepare the printer for storage. 0726-33 70 Phaser® 8200 Color Printer Moving Open the front cover. 0726-23 2. 7. Have two people move the printer to the new location.
Remove the Maintenance Drawer (labeled A) and place it in a plastic bag for shipment, complete steps 1 through 5 starting on page 69, then: 1. Shipping the printer To prepare the printer for storage. 0726-33 70 Phaser® 8200 Color Printer Moving Open the front cover. 0726-23 2. 7. Have two people move the printer to the new location.
User Guide
Page 85
... shipping carton and use the original packing material to the instructions on the printer's CD-ROM or the following Xerox web site: www.xerox.com/officeprinting/support Supplies Moving User Guide 71 Shipping the printer with the Maintenance Drawer installed will damage the printer. 3. If you don't have the original carton or packing material, order replacement packaging...
... shipping carton and use the original packing material to the instructions on the printer's CD-ROM or the following Xerox web site: www.xerox.com/officeprinting/support Supplies Moving User Guide 71 Shipping the printer with the Maintenance Drawer installed will damage the printer. 3. If you don't have the original carton or packing material, order replacement packaging...
User Guide
Page 101
...information 1 adding ink 57 alcohol wipes material safety data sheet 82 Automatic color correction 12 B Back key 8 binding preference 40 Black and White color correction 12 business cards 15 part numbers 7 printing on 31 storing 31 C Cancel Print key 8 cart for printer part number ...3 carton for shipping 71 caution symbol xiv CD-ROM for printer 72 CentreWare IS 75 cleaning 57 exit rollers 67 paper-feed rollers 67 Rapid Release Guide 63 wiper blade in maintenance drawer...
...information 1 adding ink 57 alcohol wipes material safety data sheet 82 Automatic color correction 12 B Back key 8 binding preference 40 Black and White color correction 12 business cards 15 part numbers 7 printing on 31 storing 31 C Cancel Print key 8 cart for printer part number ...3 carton for shipping 71 caution symbol xiv CD-ROM for printer 72 CentreWare IS 75 cleaning 57 exit rollers 67 paper-feed rollers 67 Rapid Release Guide 63 wiper blade in maintenance drawer...
User Guide
Page 105
...printer xii, 70 light prints 47 loading high-capacity paper tray 20 high-capacity transparency/label tray 23 legal paper tray 24 standard paper/transparency tray 18 low supplies 9 lower tray clearing jam 55 M maintenance 57 Maintenance Drawer part number 2 maintenance drawer wiper blade cleaning 66 Maintenance... Kit life 1 part numbers 1 replacing 62 maintenance safety xi manual-feed slot 27 jam 56 manuals 72 margins envelopes ...
...printer xii, 70 light prints 47 loading high-capacity paper tray 20 high-capacity transparency/label tray 23 legal paper tray 24 standard paper/transparency tray 18 low supplies 9 lower tray clearing jam 55 M maintenance 57 Maintenance Drawer part number 2 maintenance drawer wiper blade cleaning 66 Maintenance... Kit life 1 part numbers 1 replacing 62 maintenance safety xi manual-feed slot 27 jam 56 manuals 72 margins envelopes ...
Troubleshooting Guide
Page 56
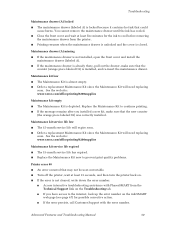
.... I If the error persists, call Customer Support with PhaserSMART from the printer. You cannot remove the maintenance drawer until the ink has cooled. Maintenance kit service life low I The 15-month service life has expired. See the web site: www.xerox.com/officeprinting/8200supplies Maintenance kit service life expired I The 15-month service life will expire soon...
.... I If the error persists, call Customer Support with PhaserSMART from the printer. You cannot remove the maintenance drawer until the ink has cooled. Maintenance kit service life low I The 15-month service life has expired. See the web site: www.xerox.com/officeprinting/8200supplies Maintenance kit service life expired I The 15-month service life will expire soon...
Troubleshooting Guide
Page 60
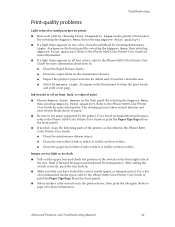
...then selecting Improve Print Quality?). Ink streaks or oil on front, back, or edges of the switch on the maintenance drawer. The cleaning process takes several minutes and uses several blank sheets of recommended media types, refer to the Phaser 8200 Color Printer User Guide or print the... the front panel). For a list of paper. I If a light stripe appears in the Phaser 8200 Color Printer User Guide: I Inspect the printer's paper-exit area for transparency. I Clean the maintenance drawer wiper. Push it forward for paper and backward for debris and, if needed , clean the ...
...then selecting Improve Print Quality?). Ink streaks or oil on front, back, or edges of the switch on the maintenance drawer. The cleaning process takes several minutes and uses several blank sheets of recommended media types, refer to the Phaser 8200 Color Printer User Guide or print the... the front panel). For a list of paper. I If a light stripe appears in the Phaser 8200 Color Printer User Guide: I Inspect the printer's paper-exit area for transparency. I Clean the maintenance drawer wiper. Push it forward for paper and backward for debris and, if needed , clean the ...