User Guide
Page 3
... and IP Addresses 2-5 Automatically Setting the Printer's IP Address (Windows Only 2-5 Dynamic Methods of Setting the Printer's IP Address 2-6 Manually Setting the Printer's IP Address 2-8 Installing the Printer Drivers 2-9 Available Drivers 2-9 Windows 98 SE or Later and Windows 2000 or Later 2-10 Macintosh OS 9.x 2-10 Macintosh OS X, Version 10.2 and Higher 2-11 Phaser® 7400 Color Printer i
... and IP Addresses 2-5 Automatically Setting the Printer's IP Address (Windows Only 2-5 Dynamic Methods of Setting the Printer's IP Address 2-6 Manually Setting the Printer's IP Address 2-8 Installing the Printer Drivers 2-9 Available Drivers 2-9 Windows 98 SE or Later and Windows 2000 or Later 2-10 Macintosh OS 9.x 2-10 Macintosh OS X, Version 10.2 and Higher 2-11 Phaser® 7400 Color Printer i

User Guide
Page 6
Printer Features This chapter includes: ■ Parts of the Printer on page 1-2 ■ Printer Configurations on page 1-6 ■ Control Panel on page 1-8 ■ More Information on page 1-12 Phaser® 7400 Color Printer 1-1
Printer Features This chapter includes: ■ Parts of the Printer on page 1-2 ■ Printer Configurations on page 1-6 ■ Control Panel on page 1-8 ■ More Information on page 1-12 Phaser® 7400 Color Printer 1-1

User Guide
Page 7
Top cover handle 2. Paper catcher 7. Door B 9 10 7400-001 Phaser® 7400 Color Printer 1-2 Tray 2 4. Top output tray (output delivered facedown) 8. Door A 9. Tray 2 paper level gauge 6. Tray 1 (Multi-Purpose Tray) 10. Parts of the Printer This section includes: ■ Front-Right View on page 1-2 ■ Rear-Left View on page 1-3 ■ Internal Components on page 1-4 ■ Options on page 1-5 Front-Right View Parts of the Printer 6 7 8 1 2 3 4 5 1. Control panel 3. Front door 5.
Top cover handle 2. Paper catcher 7. Door B 9 10 7400-001 Phaser® 7400 Color Printer 1-2 Tray 2 4. Top output tray (output delivered facedown) 8. Door A 9. Tray 2 paper level gauge 6. Tray 1 (Multi-Purpose Tray) 10. Parts of the Printer This section includes: ■ Front-Right View on page 1-2 ■ Rear-Left View on page 1-3 ■ Internal Components on page 1-4 ■ Options on page 1-5 Front-Right View Parts of the Printer 6 7 8 1 2 3 4 5 1. Control panel 3. Front door 5.
User Guide
Page 8
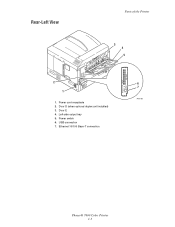
Power switch 6. USB connection 7. Rear-Left View Parts of the Printer 3 4 5 2 1 1. Door D (when optional duplex unit installed) 3. Door E 4. Ethernet 10/100 Base-T connection 6 7 7400-002 Phaser® 7400 Color Printer 1-3 Power cord receptacle 2. Left-side output tray 5.
Power switch 6. USB connection 7. Rear-Left View Parts of the Printer 3 4 5 2 1 1. Door D (when optional duplex unit installed) 3. Door E 4. Ethernet 10/100 Base-T connection 6 7 7400-002 Phaser® 7400 Color Printer 1-3 Power cord receptacle 2. Left-side output tray 5.

User Guide
Page 9
LED bars 4. Toner Cartridge 6. Transfer Unit 2 7400-004 Phaser® 7400 Color Printer 1-4 Imaging Unit basket (lifted) 2. Imaging Unit basket handle 2. Toner Cartridges and Imaging Units (Cyan, Magenta, Yellow, and Black) 5. Internal Components Parts of the Printer 3 2 4 5 1 6 7400-003 1. Fuser 3. Imaging Unit 1 1.
LED bars 4. Toner Cartridge 6. Transfer Unit 2 7400-004 Phaser® 7400 Color Printer 1-4 Imaging Unit basket (lifted) 2. Imaging Unit basket handle 2. Toner Cartridges and Imaging Units (Cyan, Magenta, Yellow, and Black) 5. Internal Components Parts of the Printer 3 2 4 5 1 6 7400-003 1. Fuser 3. Imaging Unit 1 1.

User Guide
Page 10
Door J (access to stapler) 4. Punch waste box 10. Finisher 2. Door H 9. Options 1 3 4 Parts of the Printer 7 8 9 10 11 2 5 12 6 13 7400-005 1. Door C, Trays 3-6 Phaser® 7400 Color Printer 1-5 Finisher lower output tray 5. Trays 4-6: 1650-Sheet High-Capacity Feeder 13. Tray 3: 550-Sheet Feeder 12. Door F 6. Door I 7. Finisher upper output tray (output delivered faceup or facedown) 8. Finisher base 3. Door G 11.
Door J (access to stapler) 4. Punch waste box 10. Finisher 2. Door H 9. Options 1 3 4 Parts of the Printer 7 8 9 10 11 2 5 12 6 13 7400-005 1. Door C, Trays 3-6 Phaser® 7400 Color Printer 1-5 Finisher lower output tray 5. Trays 4-6: 1650-Sheet High-Capacity Feeder 13. Tray 3: 550-Sheet Feeder 12. Door F 6. Door I 7. Finisher upper output tray (output delivered faceup or facedown) 8. Finisher base 3. Door G 11.

User Guide
Page 111
Press together the sides of the staple unit where it is labeled "Push", and then lift the part that was released. Phaser® 7400 Color Printer 5-7 Remove the empty staple cartridge. 7400-193 7400-196 7. Slide a new staple cartridge into the staple unit and pull the tab to release the packaging. Adding Staples 5. PUSH PUSH 6.
Press together the sides of the staple unit where it is labeled "Push", and then lift the part that was released. Phaser® 7400 Color Printer 5-7 Remove the empty staple cartridge. 7400-193 7400-196 7. Slide a new staple cartridge into the staple unit and pull the tab to release the packaging. Adding Staples 5. PUSH PUSH 6.

User Guide
Page 184
... hazardous if misused. ■ Do not place the printer in fire or electrical shock. Warning: Do not push objects into slots or openings on the power cord. ■ Do not block the ventilation openings. Phaser® 7400 Color Printer A-1 Make sure each end of providing the correct voltage... and power. Review the printer's electrical specification with a voltage point or shorting out a part could result in an area where people might step on the ...
... hazardous if misused. ■ Do not place the printer in fire or electrical shock. Warning: Do not push objects into slots or openings on the power cord. ■ Do not block the ventilation openings. Phaser® 7400 Color Printer A-1 Make sure each end of providing the correct voltage... and power. Review the printer's electrical specification with a voltage point or shorting out a part could result in an area where people might step on the ...

User Guide
Page 185
... performance; Phaser® 7400 Color Printer A-2 Disconnect the power cord from the electrical outlet. 3. Call an authorized service representative to www.xerox.com/gwa. If it does not pose a safety hazard. it is not specifically described in device at the back of the printer. Warning:... Do not attempt any consumables or routine maintenance items. For information on for user-installable options, there are no parts that is necessary to your printer. ■ Do not use of these conditions occur, do the following are not approved may cause poor performance and...
... performance; Phaser® 7400 Color Printer A-2 Disconnect the power cord from the electrical outlet. 3. Call an authorized service representative to www.xerox.com/gwa. If it does not pose a safety hazard. it is not specifically described in device at the back of the printer. Warning:... Do not attempt any consumables or routine maintenance items. For information on for user-installable options, there are no parts that is necessary to your printer. ■ Do not use of these conditions occur, do the following are not approved may cause poor performance and...

User Guide
Page 193
... 2-3 standalone, 2-4 O Office Color TekColor correction, 4-3 offsetting output, 3-52 operating systems printer drivers, 2-9 operational safety, ...printer, 6-3 preventing, 6-2 parts of the printer, 1-2 PCL fonts, 1-6 PhaserSMART, 1-12 Technical Support, 6-64, 6-65 photo print-quality mode, 4-2 PostScript fonts, 1-6 preparing the printer for shipment, 5-14 Press Match TekColor correction, 4-3 print adjusting color, 4-3 image is offset, 4-14 print job printing options (Macintosh), 3-27 selecting a print-quality mode, 4-2 selecting printing options (Windows), 3-25 Phaser® 7400 Color Printer...
... 2-3 standalone, 2-4 O Office Color TekColor correction, 4-3 offsetting output, 3-52 operating systems printer drivers, 2-9 operational safety, ...printer, 6-3 preventing, 6-2 parts of the printer, 1-2 PCL fonts, 1-6 PhaserSMART, 1-12 Technical Support, 6-64, 6-65 photo print-quality mode, 4-2 PostScript fonts, 1-6 preparing the printer for shipment, 5-14 Press Match TekColor correction, 4-3 print adjusting color, 4-3 image is offset, 4-14 print job printing options (Macintosh), 3-27 selecting a print-quality mode, 4-2 selecting printing options (Windows), 3-25 Phaser® 7400 Color Printer...
