2-Sided Printing
Page 1
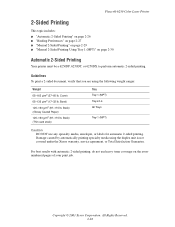
... Paper) 120-163 g/m2 (81-110 lb. Cover) 65-130 g/m2 (17-32 lb. Copyright © 2003 Xerox Corporation. Phaser® 6250 Color Laser Printer 2-Sided Printing This topic includes: ■ "Automatic 2-Sided Printing" on page 2-26 ■ "Binding Preferences" on page 2-27 ■ "Manual 2-Sided Printing" on page 2-29 ■ "Manual 2-Sided Printing Using Tray 1 (MPT)" on the evennumbered pages of your print job. For best results with automatic 2-sided printing, do not use any specialty media, envelopes, or labels...
... Paper) 120-163 g/m2 (81-110 lb. Cover) 65-130 g/m2 (17-32 lb. Copyright © 2003 Xerox Corporation. Phaser® 6250 Color Laser Printer 2-Sided Printing This topic includes: ■ "Automatic 2-Sided Printing" on page 2-26 ■ "Binding Preferences" on page 2-27 ■ "Manual 2-Sided Printing" on page 2-29 ■ "Manual 2-Sided Printing Using Tray 1 (MPT)" on the evennumbered pages of your print job. For best results with automatic 2-sided printing, do not use any specialty media, envelopes, or labels...
2-Sided Printing
Page 2
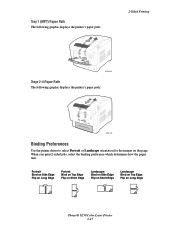
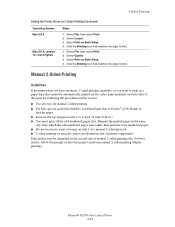
... Landscape Bind on Side Edge Flip on Short Edge Landscape Bind on Top Edge Flip on the page. Tray 1 (MPT) Paper Path The following graphic displays the printer's paper path: 2-Sided Printing 6250-092 Trays 2-4 Paper Path The following graphic displays the printer's paper path: 6250-091 Binding Preferences Use the printer driver to select Portrait or Landscape orientation for the images on Long Edge Phaser® 6250 Color Laser Printer 2-27
... Landscape Bind on Side Edge Flip on Short Edge Landscape Bind on Top Edge Flip on the page. Tray 1 (MPT) Paper Path The following graphic displays the printer's paper path: 2-Sided Printing 6250-092 Trays 2-4 Paper Path The following graphic displays the printer's paper path: 6250-091 Binding Preferences Use the printer driver to select Portrait or Landscape orientation for the images on Long Edge Phaser® 6250 Color Laser Printer 2-27
2-Sided Printing
Page 3
... the front panel. Select or deselect Bind On Top Edge. Windows 2000, Windows XP, or Windows Server 2003 1. Select File, then select Print. 2. Phaser® 6250 Color Laser Printer 2-28 2-Sided Printing To perform automatic 2-sided printing: 1. Select File, then select Print. 2. Select Setup, then select Print 2 Sides. 4. Click Properties. 3. Place the side to match the paper that you must change the paper type on the Page Setup tab. Setting the Printer Driver for 2-Sided Printing Operating System Steps Windows 98 or Windows Me...
... the front panel. Select or deselect Bind On Top Edge. Windows 2000, Windows XP, or Windows Server 2003 1. Select File, then select Print. 2. Phaser® 6250 Color Laser Printer 2-28 2-Sided Printing To perform automatic 2-sided printing: 1. Select File, then select Print. 2. Select Setup, then select Print 2 Sides. 4. Click Properties. 3. Place the side to match the paper that you must change the paper type on the Page Setup tab. Setting the Printer Driver for 2-Sided Printing Operating System Steps Windows 98 or Windows Me...
2-Sided Printing
Page 4
... bind. Print quality may be automatically printed on two sides, print manually on both sides of the paper by following the procedures in this section. ■ Use any tray for 2-Sided Printing (Continued) Operating System Mac OS 9 Mac OS X, version 10.1 (and higher) Steps 1. 2-Sided Printing Setting the Printer Driver for manual 2-sided printing. ■ For best opacity and feed reliability, use heavy toner coverage on side 1 of a manual 2-sided print job. ■ 2-sided printing on specialty paper can shorten the life of printer components...
... bind. Print quality may be automatically printed on two sides, print manually on both sides of the paper by following the procedures in this section. ■ Use any tray for 2-Sided Printing (Continued) Operating System Mac OS 9 Mac OS X, version 10.1 (and higher) Steps 1. 2-Sided Printing Setting the Printer Driver for manual 2-sided printing. ■ For best opacity and feed reliability, use heavy toner coverage on side 1 of a manual 2-sided print job. ■ 2-sided printing on specialty paper can shorten the life of printer components...
2-Sided Printing
Page 5
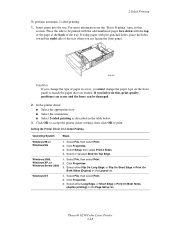
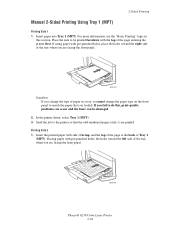
... a tray, you are printed. Printing Side 2 1. 2-Sided Printing Manual 2-Sided Printing Using Tray 1 (MPT) Printing Side 1 1. PHASER 6250 6250-056 Phaser® 6250 Color Laser Printer 2-30 Send the job to the printer so that you fail to do this section. Insert paper into Tray 1 (MPT). If you loaded. If using paper with the top of the tray when you must change the paper type on the front panel to be damaged. 2. Place the side to match the paper that the odd-numbered pages (side...
... a tray, you are printed. Printing Side 2 1. 2-Sided Printing Manual 2-Sided Printing Using Tray 1 (MPT) Printing Side 1 1. PHASER 6250 6250-056 Phaser® 6250 Color Laser Printer 2-30 Send the job to the printer so that you fail to do this section. Insert paper into Tray 1 (MPT). If you loaded. If using paper with the top of the tray when you must change the paper type on the front panel to be damaged. 2. Place the side to match the paper that the odd-numbered pages (side...

2-Sided Printing
Page 6
...-numbered pages (side 2) are printed. Place the side to the printer so that the even-numbered pages (side 2) are printed. If using paper with pre-punched holes, place the holes toward the right side of the tray. In the printer driver, select Tray 1 (MPT) as the paper source. 3. Send the job to the printer so that the odd-numbered pages (side 1) are facing the front panel. 6250-041 2. Phaser® 6250 Color Laser Printer 2-31 Printing Side 2 1. Insert paper into the tray...
...-numbered pages (side 2) are printed. Place the side to the printer so that the even-numbered pages (side 2) are printed. If using paper with pre-punched holes, place the holes toward the right side of the tray. In the printer driver, select Tray 1 (MPT) as the paper source. 3. Send the job to the printer so that the odd-numbered pages (side 1) are facing the front panel. 6250-041 2. Phaser® 6250 Color Laser Printer 2-31 Printing Side 2 1. Insert paper into the tray...
Print Quality Problems
Page 1
..., online support information, go to www.colorconnection.xerox.com. Copyright © 2003 Xerox Corporation. Phaser® 6250 Color Laser Printer Print-Quality Problems This topic includes: ■ "Paper Type" on page 4-12 ■ "Diagnosing Print-Quality Problems" on page 4-12 ■ "Color Settings" on page 4-16 ■ "Color Calibration" on page 4-16 ■ "Lighten/Darken Colors" on page 4-16 ■ "Balance Colors" on page 4-17 ■ "Calibrate Margins" on page 4-18 Your printer is not covered by using color, go to do this, print-quality problems...
..., online support information, go to www.colorconnection.xerox.com. Copyright © 2003 Xerox Corporation. Phaser® 6250 Color Laser Printer Print-Quality Problems This topic includes: ■ "Paper Type" on page 4-12 ■ "Diagnosing Print-Quality Problems" on page 4-12 ■ "Color Settings" on page 4-16 ■ "Color Calibration" on page 4-16 ■ "Lighten/Darken Colors" on page 4-16 ■ "Balance Colors" on page 4-17 ■ "Calibrate Margins" on page 4-18 Your printer is not covered by using color, go to do this, print-quality problems...
Print Quality Problems
Page 2
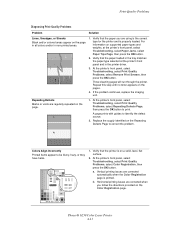
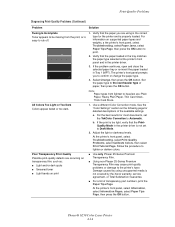
... printer is on supported paper types and weights, at the printer's front panel and in the printer driver. 3. Vertical printing issues are corrected automatically when the Color Registration page is properly loaded. If the problem continues, replace the imaging unit. Repeating Defects Marks or voids are using is the correct type for the printer and is printed. A page prints with guides to print. P6250 (2400 x 600dpi) P6250 (2400 x 600dpi) 1. STUVWXY&Z abcdefghi jklmnopqr stuvwxy&z Phaser® 6250 Color Laser Printer...
... printer is on supported paper types and weights, at the printer's front panel and in the printer driver. 3. Vertical printing issues are corrected automatically when the Color Registration page is properly loaded. If the problem continues, replace the imaging unit. Repeating Defects Marks or voids are using is the correct type for the printer and is printed. A page prints with guides to print. P6250 (2400 x 600dpi) P6250 (2400 x 600dpi) 1. STUVWXY&Z abcdefghi jklmnopqr stuvwxy&z Phaser® 6250 Color Laser Printer...
Print Quality Problems
Page 3
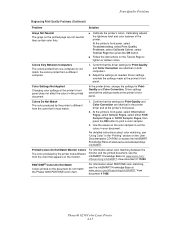
... using unsupported media is not covered by using is the correct type for detailed descriptions of the available settings. Phaser® 6250 Color Laser Printer 4-14 Select Change, then press the OK button. a. If the print is not set the TekColor Correction to Automatic. At the printer's front panel, select Troubleshooting, select Print Quality Problems, select Calibrate Colors, then select Print Tutorial Page. Verify that the PrintQuality Mode in Tray 1 (MPT). Damage caused by the Xerox...
... using unsupported media is not covered by using is the correct type for detailed descriptions of the available settings. Phaser® 6250 Color Laser Printer 4-14 Select Change, then press the OK button. a. If the print is not set the TekColor Correction to Automatic. At the printer's front panel, select Troubleshooting, select Print Quality Problems, select Calibrate Colors, then select Print Tutorial Page. Verify that the PrintQuality Mode in Tray 1 (MPT). Damage caused by the Xerox...
Print Quality Problems
Page 4
.... Use the values on the color sampler to print a color sampler. 3. Phaser® 6250 Color Laser Printer 4-15 At the printer's front panel, select Troubleshooting, select Print Quality Problems, select Calibrate Colors, select Tutorial Page then press the OK button. ■ Follow the instructions on the monitor. Driver settings override the settings made at the printer's front panel does not affect the colors in the "Printing" section on both computers. 2. In the printer driver, change the settings for Print-Quality and Color...
.... Use the values on the color sampler to print a color sampler. 3. Phaser® 6250 Color Laser Printer 4-15 At the printer's front panel, select Troubleshooting, select Print Quality Problems, select Calibrate Colors, select Tutorial Page then press the OK button. ■ Follow the instructions on the monitor. Driver settings override the settings made at the printer's front panel does not affect the colors in the "Printing" section on both computers. 2. In the printer driver, change the settings for Print-Quality and Color...
Print Quality Problems
Page 5
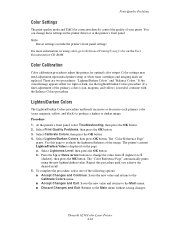
... "Color Reference Page" prints. a. Phaser® 6250 Color Laser Printer 4-16 Color Calibration Color calibration procedures adjust the printer for optimal color output. Select Calibrate Colors, then press the OK button. 4. Press the Up or Down Arrow buttons to change these settings in the printer driver or at the printer's front panel. If the overall image appears either too light or dark, use the Lighten/Darken Colors procedure. Color settings may need adjustment upon initial printer setup or when toner cartridges and imaging units are...
... "Color Reference Page" prints. a. Phaser® 6250 Color Laser Printer 4-16 Color Calibration Color calibration procedures adjust the printer for optimal color output. Select Calibrate Colors, then press the OK button. 4. Press the Up or Down Arrow buttons to change these settings in the printer driver or at the printer's front panel. If the overall image appears either too light or dark, use the Lighten/Darken Colors procedure. Color settings may need adjustment upon initial printer setup or when toner cartridges and imaging units are...
Print Quality Problems
Page 6
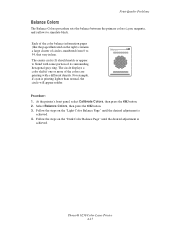
... Color Laser Printer 4-17 Follow the steps on the right) contains a large cluster of the color balance information pages (like the page illustrated on the "Dark Color Balance Page" until the desired adjustment is achieved. At the printer's front panel, select Calibrate Colors, then press the OK button. 2. Each of circles, numbered from 0 to 54, that vary in hue. Print-Quality Problems Balance Colors The Balance Colors procedure sets the...
... Color Laser Printer 4-17 Follow the steps on the right) contains a large cluster of the color balance information pages (like the page illustrated on the "Dark Color Balance Page" until the desired adjustment is achieved. At the printer's front panel, select Calibrate Colors, then press the OK button. 2. Each of circles, numbered from 0 to 54, that vary in hue. Print-Quality Problems Balance Colors The Balance Colors procedure sets the...
Print Quality Problems
Page 7
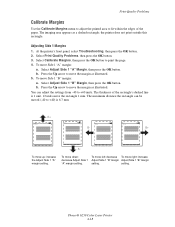
... left: decrease To move the margin as a dashed rectangle; Print-Quality Problems Calibrate Margins Use the Calibrate Margins menu to adjust the printed area to fit within the edges of the rectangle's dashed line is 6.7 mm. Select Print Quality Problems, then press the OK button. 3. Press the Up arrow to print the page. 4. Select Adjust Side 1 "B" Margin, then press the OK button. b. The thickness of the paper. Calibrate Margins A+ Phaser Calibrate Margins Phaser B- setting. Phaser® 6250 Color Laser Printer 4-18
... left: decrease To move the margin as a dashed rectangle; Print-Quality Problems Calibrate Margins Use the Calibrate Margins menu to adjust the printed area to fit within the edges of the rectangle's dashed line is 6.7 mm. Select Print Quality Problems, then press the OK button. 3. Press the Up arrow to print the page. 4. Select Adjust Side 1 "B" Margin, then press the OK button. b. The thickness of the paper. Calibrate Margins A+ Phaser Calibrate Margins Phaser B- setting. Phaser® 6250 Color Laser Printer 4-18
Print Quality Problems
Page 8
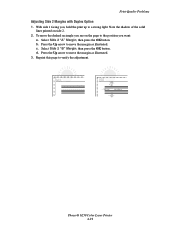
... the shadow of the solid lines printed on the page to the position you , hold the print up to move the margin as illustrated. 3. b. c. Press the Up arrow to a strong light. Press the Up arrow to verify the adjustment. + + A -B B -A Phaser® 6250 Color Laser Printer 4-19 Select Side 2 "A" Margin, then press the OK button. Print-Quality Problems Adjusting Side 2 Margins with Duplex Option 1. With side 1 facing you want: a. Select Side 2 "B" Margin, then press the OK...
... the shadow of the solid lines printed on the page to the position you , hold the print up to move the margin as illustrated. 3. b. c. Press the Up arrow to a strong light. Press the Up arrow to verify the adjustment. + + A -B B -A Phaser® 6250 Color Laser Printer 4-19 Select Side 2 "A" Margin, then press the OK button. Print-Quality Problems Adjusting Side 2 Margins with Duplex Option 1. With side 1 facing you want: a. Select Side 2 "B" Margin, then press the OK...


