
DocuTech 61xx - Operator HandyBook
Page 3
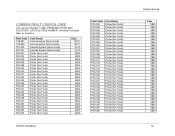
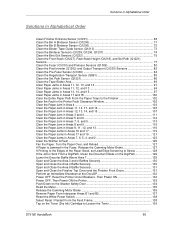
... ...48 Enable or Disable the Stitcher ...48 Modify the Bindexer Capacity Number 49 Modify the Lighter / Darker Setting 49 Stop a Job From Printing at the Printer 50 6. Problem Solving 51 COMMON FAULT CODES & CASE 52 PROBLEM LISTING AND SOLUTIONS, LISTED by CASE NUMBER 55 Solutions in Alphabetical Order 66 Clean Finisher...
... ...48 Enable or Disable the Stitcher ...48 Modify the Bindexer Capacity Number 49 Modify the Lighter / Darker Setting 49 Stop a Job From Printing at the Printer 50 6. Problem Solving 51 COMMON FAULT CODES & CASE 52 PROBLEM LISTING AND SOLUTIONS, LISTED by CASE NUMBER 55 Solutions in Alphabetical Order 66 Clean Finisher...
DocuTech 61xx - Operator HandyBook
Page 4
Perform Printer Functions 141 1. Check the Systems Queue Output Location and Finishing Selections 145 5. Add a Font to be Used as...17 and 18 100 Clear the Entire Paper Path From the Paper Trays to the Finisher 102 Clear the Fault in the Printer Fault Clearance Window 102 Clear the Paper Jam in Area 4 103 Clear the Paper Jam in Areas 11, 14, 17,... Doors 131 Perform an Immediate Shutdown at the DocuSP 132 Power OFF, Reset the Printer Circuit Breakers, Then Power ON 132 Power OFF, Then Power ON the Printer 133 Push Down on the Stacker Safety Door 134 Read the Meter...135 Release the...
Perform Printer Functions 141 1. Check the Systems Queue Output Location and Finishing Selections 145 5. Add a Font to be Used as...17 and 18 100 Clear the Entire Paper Path From the Paper Trays to the Finisher 102 Clear the Fault in the Printer Fault Clearance Window 102 Clear the Paper Jam in Area 4 103 Clear the Paper Jam in Areas 11, 14, 17,... Doors 131 Perform an Immediate Shutdown at the DocuSP 132 Power OFF, Reset the Printer Circuit Breakers, Then Power ON 132 Power OFF, Then Power ON the Printer 133 Push Down on the Stacker Safety Door 134 Read the Meter...135 Release the...
DocuTech 61xx - Operator HandyBook
Page 5
... 156 Program Tabs ...157 Program the PCL Paper Stock Sequences to Pull From a Specific Paper Tray at the Printer 158 Uncheck the Job Ticket in Job Forwarding 161 Setup Job Forwarding for Printer to Printer in DocuSP 162 9. Enable and Bring On-line an External Finisher 151 8. Sensor Maps 165 Paper Handling Module...
... 156 Program Tabs ...157 Program the PCL Paper Stock Sequences to Pull From a Specific Paper Tray at the Printer 158 Uncheck the Job Ticket in Job Forwarding 161 Setup Job Forwarding for Printer to Printer in DocuSP 162 9. Enable and Bring On-line an External Finisher 151 8. Sensor Maps 165 Paper Handling Module...
DocuTech 61xx - Operator HandyBook
Page 19
... Trays 1, 2 and 3. • Transparencies with a 13 mm (0.5 inch) white stripe should be loaded with the paper side up for DocuTech 2000 series 61XX screen, select [Printer Manager].
... Trays 1, 2 and 3. • Transparencies with a 13 mm (0.5 inch) white stripe should be loaded with the paper side up for DocuTech 2000 series 61XX screen, select [Printer Manager].
DocuTech 61xx - Operator HandyBook
Page 28
... Check and Fill Fuser Agent. See 4. Clean Dicorotron Shields (NOTE: Only perform this task if you power OFF the System and the printer. A menu will happen without a confirmation window. 3. Refer to print, they should be powered ON. Shut Down, Then Start Up the...button. 4. Allow the system to power OFF the machine. To power ON the printer: 1. In the Print Manager window, select [Printer] from the menu. Select [Printer On] from the toolbar. The printer that your eXcellerate training materials for details.) DT6180 HandyBook 28 Shift handoff communication between ...
... Check and Fill Fuser Agent. See 4. Clean Dicorotron Shields (NOTE: Only perform this task if you power OFF the System and the printer. A menu will happen without a confirmation window. 3. Refer to print, they should be powered ON. Shut Down, Then Start Up the...button. 4. Allow the system to power OFF the machine. To power ON the printer: 1. In the Print Manager window, select [Printer] from the menu. Select [Printer On] from the toolbar. The printer that your eXcellerate training materials for details.) DT6180 HandyBook 28 Shift handoff communication between ...
DocuTech 61xx - Operator HandyBook
Page 47
... procedure again as a System Administrator to perform this task. From the DocuSP for DocuTech 2000 Series for 61xx window, select [Printer Manager]. The status column will need to logon as needed. Select [Finishing] from the menu. Repeat these steps until all ...4. To enable the Binder using DocuTech software version 3.x and above : 1. From the DocuSP for DocuTech 2000 Series for 61xx window, select [Printer Manager]. The Printer Manager window will be displayed. 2. A menu will be displayed. 3. DT6180 HandyBook 47 A menu will be displayed. 4. If you are ...
... procedure again as a System Administrator to perform this task. From the DocuSP for DocuTech 2000 Series for 61xx window, select [Printer Manager]. The status column will need to logon as needed. Select [Finishing] from the menu. Repeat these steps until all ...4. To enable the Binder using DocuTech software version 3.x and above : 1. From the DocuSP for DocuTech 2000 Series for 61xx window, select [Printer Manager]. The Printer Manager window will be displayed. 2. A menu will be displayed. 3. DT6180 HandyBook 47 A menu will be displayed. 4. If you are ...
DocuTech 61xx - Operator HandyBook
Page 48
... now display the changed setting. To enable or disable the Stacker using DocuSP software version 2.x or below : 1. Select [Printer Manager]. The Printer Manager window will be displayed. 3. A menu will be displayed in the box if the Stitcher is enabled. Make sure ... To enable or disable the Stitcher using DocuSP software version 3.x: 1. Select the [Finishing] tab. 3. From the DocuSP Print Services window, select [Printer Manager]. To enable or disable the Stacker using DocuSP software version 3.x: 1. Right-click on the toolbar. Select [Options] on [Stacker] and select ...
... now display the changed setting. To enable or disable the Stacker using DocuSP software version 2.x or below : 1. Select [Printer Manager]. The Printer Manager window will be displayed. 3. A menu will be displayed in the box if the Stitcher is enabled. Make sure ... To enable or disable the Stitcher using DocuSP software version 3.x: 1. Select the [Finishing] tab. 3. From the DocuSP Print Services window, select [Printer Manager]. To enable or disable the Stacker using DocuSP software version 3.x: 1. Right-click on the toolbar. Select [Options] on [Stacker] and select ...
DocuTech 61xx - Operator HandyBook
Page 49
... be displayed. 2. Only Trusted Users or System Administrators have access to perform this task. The Print Manager window will be displayed. 2. The Printer Manager window will be displayed. 2. Under the Stacker Set Up section, use the [Up] and [Down] arrows to save the selection. ...To modify the Lighter / Darker Setting using software version 2.x and below : 1. Select [Printer Darkness]. 5. Select [Apply]. Make sure the Darkness Mode is displayed stating 'The change to Select New Bindexer Number. 6. The Setting for 61xx window,...
... be displayed. 2. Only Trusted Users or System Administrators have access to perform this task. The Print Manager window will be displayed. 2. The Printer Manager window will be displayed. 2. Under the Stacker Set Up section, use the [Up] and [Down] arrows to save the selection. ...To modify the Lighter / Darker Setting using software version 2.x and below : 1. Select [Printer Darkness]. 5. Select [Apply]. Make sure the Darkness Mode is displayed stating 'The change to Select New Bindexer Number. 6. The Setting for 61xx window,...
DocuTech 61xx - Operator HandyBook
Page 50
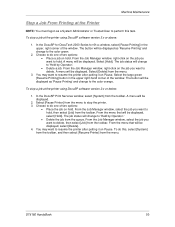
... will be displayed as 'Pause Printing' and change to do this task. The button will be displayed. Choose to the color green. 2. You may want to the color orange. From the Job Manager window, right-click on the job you want to 'Held by Operator.' • Delete the...displayed. 2. A menu will be displayed as 'Resume Printing' and change to hold . Select [Delete] from the toolbar. You may want to resume the printer after putting it on hold . Select the large green [Resume Printing] button in the upper, right corner of two options: • Place a job ...
... will be displayed as 'Pause Printing' and change to do this task. The button will be displayed. Choose to the color green. 2. You may want to the color orange. From the Job Manager window, right-click on the job you want to 'Held by Operator.' • Delete the...displayed. 2. A menu will be displayed as 'Resume Printing' and change to hold . Select [Delete] from the toolbar. You may want to resume the printer after putting it on hold . Select the large green [Resume Printing] button in the upper, right corner of two options: • Place a job ...
DocuTech 61xx - Operator HandyBook
Page 52
... Printer Run Faults Printer Run Faults Printer Run Faults Printer Run Faults Printer Run Faults Printer Run Faults Printer Run Faults Printer Run Faults Printer Run Faults Printer Run Faults Printer Run Faults Printer Run Faults Printer Run Faults Printer Run Faults Printer Run Faults Printer Run Faults Printer Run Faults Printer Run Faults Printer Run Faults Printer Run Faults Printer Run Faults Printer Run Faults Printer Run Faults Printer Run Faults Printer Run Faults Printer...
... Printer Run Faults Printer Run Faults Printer Run Faults Printer Run Faults Printer Run Faults Printer Run Faults Printer Run Faults Printer Run Faults Printer Run Faults Printer Run Faults Printer Run Faults Printer Run Faults Printer Run Faults Printer Run Faults Printer Run Faults Printer Run Faults Printer Run Faults Printer Run Faults Printer Run Faults Printer Run Faults Printer Run Faults Printer Run Faults Printer Run Faults Printer Run Faults Printer Run Faults Printer...
DocuTech 61xx - Operator HandyBook
Page 59
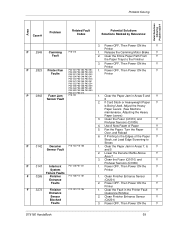
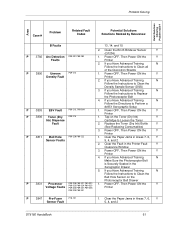
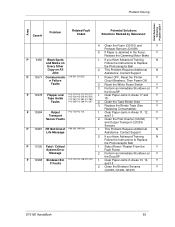
... P03-201 P03-203 P03-204 1. Power OFF, Then Power ON the Y Faults P03-205 P03-208 P03-230 P03-231 P03-232 P03-233 Printer P03-234 P03-240 P03-241 P03-242 P03-243 P03-246 P03-247 P03-250 P03-251 P03-252 P03-253 P03-254 P03... P03-300 P03-301 P03-302 P03-308 P03-309 P03-311 P03-313 P 2843 Fuser Jam P10-102 1. Clear the Paper Jam in the Printer Fault Y Clearance Window 2. Clean Finisher Entrance Sensor Y (Q1201) 3. Case # Problem Related Fault Codes Potential Solutions /Solutions Ranked by Relevance: P 2549 Camming P10-216 Fault 3. If...
... P03-201 P03-203 P03-204 1. Power OFF, Then Power ON the Y Faults P03-205 P03-208 P03-230 P03-231 P03-232 P03-233 Printer P03-234 P03-240 P03-241 P03-242 P03-243 P03-246 P03-247 P03-250 P03-251 P03-252 P03-253 P03-254 P03... P03-300 P03-301 P03-302 P03-308 P03-309 P03-311 P03-313 P 2843 Fuser Jam P10-102 1. Clear the Paper Jam in the Printer Fault Y Clearance Window 2. Clean Finisher Entrance Sensor Y (Q1201) 3. Case # Problem Related Fault Codes Potential Solutions /Solutions Ranked by Relevance: P 2549 Camming P10-216 Fault 3. If...
DocuTech 61xx - Operator HandyBook
Page 60
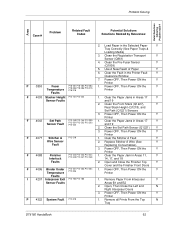
...P08-173 9 2. Open and Close the Area 4 Baffle Y Securely 3. Power OFF, Reset the Printer Y Circuit Breakers, Then Power ON P 3385 Laser Faults P06-203 P06-233 P06-237 1. Power OFF, Then Power ON the Y Printer 1. Clear the Paper Jam in Areas 12, Y 13, 14, and 15 2. Power OFF,... Then Power ON the Y Printer 1. Clean the Post Inverter (Q1202) Y and Output Transport (Q1203) Sensors...
...P08-173 9 2. Open and Close the Area 4 Baffle Y Securely 3. Power OFF, Reset the Printer Y Circuit Breakers, Then Power ON P 3385 Laser Faults P06-203 P06-233 P06-237 1. Power OFF, Then Power ON the Y Printer 1. Clear the Paper Jam in Areas 12, Y 13, 14, and 15 2. Power OFF,... Then Power ON the Y Printer 1. Clean the Post Inverter (Q1202) Y and Output Transport (Q1203) Sensors...
DocuTech 61xx - Operator HandyBook
Page 61
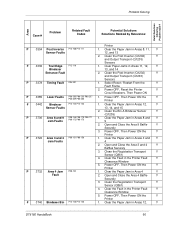
...(Dry P09-215 1. If you Have Advanced Training, N Follow the Instructions to Replace the Photoreceptor Belt 4. Power OFF, Then Power ON the Y Printer P 3811 Belt Hole P09-220 P09-222 1. Clear the Paper Jams in Areas 7, 6, Y 5, 4, and 2 DT6180 HandyBook 61 Tap on...Related Fault Codes Potential Solutions /Solutions Ranked by Relevance: B Faults 13, 14, and 15 2. Power OFF, Then Power ON the Y Density Fault Printer 2. If you Have Advanced Training, N Follow the Instructions to Clean the Belt Hole Sensor on the Toner (Dry Ink) Y Ink) Dispense Cartridge...
...(Dry P09-215 1. If you Have Advanced Training, N Follow the Instructions to Replace the Photoreceptor Belt 4. Power OFF, Then Power ON the Y Printer P 3811 Belt Hole P09-220 P09-222 1. Clear the Paper Jams in Areas 7, 6, Y 5, 4, and 2 DT6180 HandyBook 61 Tap on...Related Fault Codes Potential Solutions /Solutions Ranked by Relevance: B Faults 13, 14, and 15 2. Power OFF, Then Power ON the Y Density Fault Printer 2. If you Have Advanced Training, N Follow the Instructions to Clean the Belt Hole Sensor on the Toner (Dry Ink) Y Ink) Dispense Cartridge...
DocuTech 61xx - Operator HandyBook
Page 62
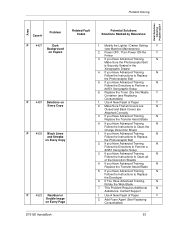
...245 P12-247 P12-248 14, 17, and 18 Faults 2. Power OFF, Then Power ON the Y Printer F 4043 Set Path P12-143 P12-144 P12-230 1. Power OFF, Then Power ON the Y Printer F 4088 Finisher P12-242 P12-243 P12-244 1. Open, Then Close the Left and N Right ... Rear Stack Height (Q1218), and Set Path (Q1221) Sensors 3. Power OFF, Then Power ON the Y Printer F 4077 Stitcher A P12-218 1. Clear the Stitcher A Fault Y Wire Sensor Fault 2. Power OFF, Then Power ON the Y Printer P 4322 System Fault P12-518 1. Clean the Pre-Fuser Sensor Y (Q1009) 5. Power OFF, Then ...
...245 P12-247 P12-248 14, 17, and 18 Faults 2. Power OFF, Then Power ON the Y Printer F 4043 Set Path P12-143 P12-144 P12-230 1. Power OFF, Then Power ON the Y Printer F 4088 Finisher P12-242 P12-243 P12-244 1. Open, Then Close the Left and N Right ... Rear Stack Height (Q1218), and Set Path (Q1221) Sensors 3. Power OFF, Then Power ON the Y Printer F 4077 Stitcher A P12-218 1. Clear the Stitcher A Fault Y Wire Sensor Fault 2. Power OFF, Then Power ON the Y Printer P 4322 System Fault P12-518 1. Clean the Pre-Fuser Sensor Y (Q1009) 5. Power OFF, Then ...
DocuTech 61xx - Operator HandyBook
Page 63
Power OFF, Then Power ON the Y Printer 3. Replace the Toner (Dry Ink) Waste Y Container (see Machine Maintenance) 2. Make Sure That all of Paper Y 2. Use A New Ream of the Dicorotron Shields 4. Modify the ...
Power OFF, Then Power ON the Y Printer 3. Replace the Toner (Dry Ink) Waste Y Container (see Machine Maintenance) 2. Make Sure That all of Paper Y 2. Use A New Ream of the Dicorotron Shields 4. Modify the ...
DocuTech 61xx - Operator HandyBook
Page 64
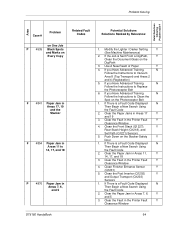
...Machine Maintenance) 2. If you Have Advanced Training, N Follow the Instructions to Replace the Photoreceptor Belt 6. Clear the Paper Jams in the Printer Fault Y Clearance Window DT6180 HandyBook 64 Clean the Post Inverter (Q1202) Y and Output Transport (Q1203) Sensors 1. If There is a ... Clean the Front Stack (Q1227), Y Rear Stack Height (Q1218), and Set Path (Q1221) Sensors 5. Clear the Paper Jam in the Printer Fault Y Clearance Window 4. Use A New Ream of Paper Y 4. Case # Problem Related Fault Codes Potential Solutions /Solutions Ranked by Relevance...
...Machine Maintenance) 2. If you Have Advanced Training, N Follow the Instructions to Replace the Photoreceptor Belt 6. Clear the Paper Jams in the Printer Fault Y Clearance Window DT6180 HandyBook 64 Clean the Post Inverter (Q1202) Y and Output Transport (Q1203) Sensors 1. If There is a ... Clean the Front Stack (Q1227), Y Rear Stack Height (Q1218), and Set Path (Q1221) Sensors 5. Clear the Paper Jam in the Printer Fault Y Clearance Window 4. Use A New Ream of Paper Y 4. Case # Problem Related Fault Codes Potential Solutions /Solutions Ranked by Relevance...
DocuTech 61xx - Operator HandyBook
Page 65
... Jams in the Fuser, Y Release the Camming Motor Brake P 9466 Black Spots and Marks on Every Other Copy on All Jobs 1. Power OFF, Reset the Printer Y Circuit Breakers, Then Power ON 2. This Problem Requires Additional N Assistance. Problem Solving Case # Problem Related Fault Codes Potential Solutions /Solutions Ranked by Relevance: 4. Contact Support...
... Jams in the Fuser, Y Release the Camming Motor Brake P 9466 Black Spots and Marks on Every Other Copy on All Jobs 1. Power OFF, Reset the Printer Y Circuit Breakers, Then Power ON 2. This Problem Requires Additional N Assistance. Problem Solving Case # Problem Related Fault Codes Potential Solutions /Solutions Ranked by Relevance: 4. Contact Support...
DocuTech 61xx - Operator HandyBook
Page 66
... Jams in Areas 17 and 18 100 Clear the Entire Paper Path From the Paper Trays to the Finisher 102 Clear the Fault in the Printer Fault Clearance Window 102 Clear the Paper Jam in Area 4 103 Clear the Paper Jam in Areas 11, 14, 17, and 18 103 Clear the... Cover and the Finisher Front Doors 131 Perform an Immediate Shutdown at the DocuSP 132 Power OFF, Reset the Printer Circuit Breakers, Then Power ON 132 Power OFF, Then Power ON the Printer 133 Push Down on the Stacker Safety Door 134 Read the Meter...135 Release the Camming Motor Brake 135...
... Jams in Areas 17 and 18 100 Clear the Entire Paper Path From the Paper Trays to the Finisher 102 Clear the Fault in the Printer Fault Clearance Window 102 Clear the Paper Jam in Area 4 103 Clear the Paper Jam in Areas 11, 14, 17, and 18 103 Clear the... Cover and the Finisher Front Doors 131 Perform an Immediate Shutdown at the DocuSP 132 Power OFF, Reset the Printer Circuit Breakers, Then Power ON 132 Power OFF, Then Power ON the Printer 133 Push Down on the Stacker Safety Door 134 Read the Meter...135 Release the Camming Motor Brake 135...
DocuTech 61xx - Operator HandyBook
Page 102
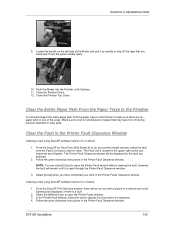
... or above: 1. From the DocuSP Print Services window, there will be displayed for DocuTech 2000 Series 61xx (or your work in the Printer Fault Clearance Window Clearing a fault using DocuSP software version 2.x or below the word System. Follow the given clearance instructions in Alphabetical Order ... 10. Push the Binder into the Finisher until it up quickly to snip off during previous attempts to look for clearance. 4. The Printer Fault Clearance window will remain until it latches. 11. Follow the given clearance instructions in the upper right corner just below : 1. ...
... or above: 1. From the DocuSP Print Services window, there will be displayed for DocuTech 2000 Series 61xx (or your work in the Printer Fault Clearance Window Clearing a fault using DocuSP software version 2.x or below the word System. Follow the given clearance instructions in Alphabetical Order ... 10. Push the Binder into the Finisher until it up quickly to snip off during previous attempts to look for clearance. 4. The Printer Fault Clearance window will remain until it latches. 11. Follow the given clearance instructions in the upper right corner just below : 1. ...
DocuTech 61xx - Operator HandyBook
Page 103
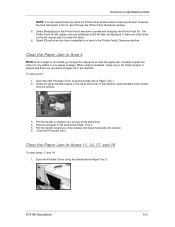
... Even if paper is reset through the sequence to clear the faults. 6. Pull the handle toward you have completed your work in the Printer Faults Clearance window. DT6180 HandyBook 103 Carefully inspect the rollers for any additional faults will then be displayed. Remove all paper in Areas 11... To clear areas 11 and 14: 1. Open the Finisher Doors using the handle above Paper Tray 3. The Printer Fault list will remain until it is not visible, go through the Printer Fault Clearance window. 5. Select [Redisplay] on the list, repeat step 4 to clear the paper jam. Grasp...
... Even if paper is reset through the sequence to clear the faults. 6. Pull the handle toward you have completed your work in the Printer Faults Clearance window. DT6180 HandyBook 103 Carefully inspect the rollers for any additional faults will then be displayed. Remove all paper in Areas 11... To clear areas 11 and 14: 1. Open the Finisher Doors using the handle above Paper Tray 3. The Printer Fault list will remain until it is not visible, go through the Printer Fault Clearance window. 5. Select [Redisplay] on the list, repeat step 4 to clear the paper jam. Grasp...


