User Guide
Page 21
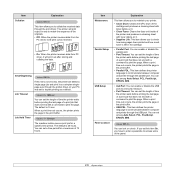
... you have printed and how much toner is set to On, the printer will detect a single page job and print it as a simplex-singlepage even though the printer driver on your printer. • Clean Drum: Cleans the OPC drum of the cartridge and produces a cleaning sheet with toner debris on it.... • Clean Fuser: Cleans the fuser unit inside of the printer and produces a cleaning sheet with toner debris ...
... you have printed and how much toner is set to On, the printer will detect a single page job and print it as a simplex-singlepage even though the printer driver on your printer. • Clean Drum: Cleans the OPC drum of the cartridge and produces a cleaning sheet with toner debris on it.... • Clean Fuser: Cleans the fuser unit inside of the printer and produces a cleaning sheet with toner debris ...

User Guide
Page 43
... scan quality problems. 4 Locate the long strip of glass of LSU (Laser Scanning Unit) inside of the display and press OK. 3 Press the Up/down arrow buttons until Maintenance appears and press OK. 4 When Clean Drum appears, press OK. Caution While cleaning the inside the top of the... print cartridge. • Fuser Cleaning sheet: cleans the fuser unit inside the printer. 1 Make sure that the printer is turned on with dust or toner particles on it. ...
... scan quality problems. 4 Locate the long strip of glass of LSU (Laser Scanning Unit) inside of the display and press OK. 3 Press the Up/down arrow buttons until Maintenance appears and press OK. 4 When Clean Drum appears, press OK. Caution While cleaning the inside the top of the... print cartridge. • Fuser Cleaning sheet: cleans the fuser unit inside the printer. 1 Make sure that the printer is turned on with dust or toner particles on it. ...
User Guide
Page 45
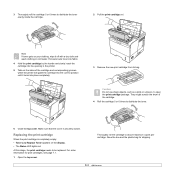
They might scratch the drum of the cartridge and corresponding grooves within the printer will guide the cartridge into the correct position until it off with a dry cloth and wash clothing in the printer. 5 Tabs on the sides of the cartridge. 4 Roll the cartridge 5 or 6 times to distribute the toner. 6 Close the top cover...
They might scratch the drum of the cartridge and corresponding grooves within the printer will guide the cartridge into the correct position until it off with a dry cloth and wash clothing in the printer. 5 Tabs on the sides of the cartridge. 4 Roll the cartridge 5 or 6 times to distribute the toner. 6 Close the top cover...
User Guide
Page 61
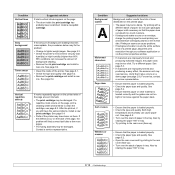
... still have overlapping seams on seams can cause problems. • If background scatter covers the entire surface area of the printer. Condition Background scatter A Misformed characters Page skew AAAAaAaaaBaBBBbBbbbCbCCCCccccc Curl or wave Suggested solutions Background scatter results from bits of toner ...distributed on the page: • The drum inside of a printed page, adjust the print resolution through your software application or via the printer properties window. • If characters are improperly formed and producing a wavy effect...
... still have overlapping seams on seams can cause problems. • If background scatter covers the entire surface area of the printer. Condition Background scatter A Misformed characters Page skew AAAAaAaaaBaBBBbBbbbCbCCCCccccc Curl or wave Suggested solutions Background scatter results from bits of toner ...distributed on the page: • The drum inside of a printed page, adjust the print resolution through your software application or via the printer properties window. • If characters are improperly formed and producing a wavy effect...
User Guide
Page 68
...outside 8.1 cleaning sheet, print 8.2 component location 1.2 control panel menus 2.1 status LED 9.7 D demo page, print 2.9 DIMM, install 10.1 display language, change control panel 2.9 drum, clean 8.2 E error messages 9.8 H high altitude 9.15 I installing accessories memory 10.1 J jam, clear 9.1 L loading paper multi-purpose tray 5.6 tray 2/optional tray 3... 9.15 Q quality problems 9.13 R rear cover, use 5.9 replacement parts 8.6 replacing, print cartridge 8.4, 8.5 S special print media, guidelines 5.3 specification, printer 11.1 status LED 9.7 supplies checking life 8.3 order information 7.1
...outside 8.1 cleaning sheet, print 8.2 component location 1.2 control panel menus 2.1 status LED 9.7 D demo page, print 2.9 DIMM, install 10.1 display language, change control panel 2.9 drum, clean 8.2 E error messages 9.8 H high altitude 9.15 I installing accessories memory 10.1 J jam, clear 9.1 L loading paper multi-purpose tray 5.6 tray 2/optional tray 3... 9.15 Q quality problems 9.13 R rear cover, use 5.9 replacement parts 8.6 replacing, print cartridge 8.4, 8.5 S special print media, guidelines 5.3 specification, printer 11.1 status LED 9.7 supplies checking life 8.3 order information 7.1


