

Owners Manual
Page 1
Puede encontrar su número de modelo y de serie en la etiqueta ubicada en la parte frontal de la abertura del horno de microondas, detrás de la puerta. Always read and obey all instructions before using electrical appliances... para el usuario de la combinación microondas campana" en español, o para obtener información adicional acerca de su producto, visite: www.whirlpool.com Tenga listo su número de modelo completo. See "GROUNDING INSTRUCTIONS" found in accordance with the provided Installation Instructions. ■ Read all safety messages...
Puede encontrar su número de modelo y de serie en la etiqueta ubicada en la parte frontal de la abertura del horno de microondas, detrás de la puerta. Always read and obey all instructions before using electrical appliances... para el usuario de la combinación microondas campana" en español, o para obtener información adicional acerca de su producto, visite: www.whirlpool.com Tenga listo su número de modelo completo. See "GROUNDING INSTRUCTIONS" found in accordance with the provided Installation Instructions. ■ Read all safety messages...

Owners Manual
Page 2
... operation. ■ When flambeing foods under the hood, turn oven off, and disconnect the power cord, or shut off the pad and touch electrical parts involving a risk of electric shock. ■ Suitable for a short time before and halfway through heating it is removed from paper or plastic bags before...on the microwave oven. ■ Do not store this oven with metal foil. Carefully attend the microwave oven when paper, plastic, or other part of the microwave oven when the microwave oven is important not to defeat or tamper with narrow necks. - This type of fire in the microwave...
... operation. ■ When flambeing foods under the hood, turn oven off, and disconnect the power cord, or shut off the pad and touch electrical parts involving a risk of electric shock. ■ Suitable for a short time before and halfway through heating it is removed from paper or plastic bags before...on the microwave oven. ■ Do not store this oven with metal foil. Carefully attend the microwave oven when paper, plastic, or other part of the microwave oven when the microwave oven is important not to defeat or tamper with narrow necks. - This type of fire in the microwave...

Owners Manual
Page 3
WARNING: Improper use an extension cord. If the power supply cord is a 12-hour (12:00-11:59) clock, with Part 18 of the text may be adjusted. and P.M. Touch CLOCK, enter time, then touch CLOCK or the Start control. Touch the Timer control, enter time, ...
WARNING: Improper use an extension cord. If the power supply cord is a 12-hour (12:00-11:59) clock, with Part 18 of the text may be adjusted. and P.M. Touch CLOCK, enter time, then touch CLOCK or the Start control. Touch the Timer control, enter time, ...

Owners Manual
Page 5
www.whirlpool.com Microwave oven will not operate Check the following : ■ Soil buildup Soil buildup on cavity walls, microwave inlet cover, cooking rack supports, and area ... the door appears in "Microwave Oven Care" section. See "Settings" section to the cover for 5 minutes or more without the microwave oven being used. Replacment Parts Accessories ■ Turntable ■ Turntable support and rollers ■ Turntable hub ■ Cooking rack (for 2 minutes at the top front of the microwave oven. If...
www.whirlpool.com Microwave oven will not operate Check the following : ■ Soil buildup Soil buildup on cavity walls, microwave inlet cover, cooking rack supports, and area ... the door appears in "Microwave Oven Care" section. See "Settings" section to the cover for 5 minutes or more without the microwave oven being used. Replacment Parts Accessories ■ Turntable ■ Turntable support and rollers ■ Turntable hub ■ Cooking rack (for 2 minutes at the top front of the microwave oven. If...

Owners Manual
Page 6
... 50 United States and Canada, contact your major appliance. You can write to Whirlpool with published installation instructions. 11. ITEMS EXCLUDED FROM WARRANTY This limited warranty does not cover: 1. Consumable parts are excluded from your home of your major appliance if it was purchased. This... STATE OR PROVINCE TO PROVINCE. Please keep this User Instructions and model number information for Factory Specified Parts and repair labor to correct defects in China WHIRLPOOL CORPORATION MAJOR APPLIANCE WARRANTY LIMITED WARRANTY For one year from the date of purchase, when this major ...
... 50 United States and Canada, contact your major appliance. You can write to Whirlpool with published installation instructions. 11. ITEMS EXCLUDED FROM WARRANTY This limited warranty does not cover: 1. Consumable parts are excluded from your home of your major appliance if it was purchased. This... STATE OR PROVINCE TO PROVINCE. Please keep this User Instructions and model number information for Factory Specified Parts and repair labor to correct defects in China WHIRLPOOL CORPORATION MAJOR APPLIANCE WARRANTY LIMITED WARRANTY For one year from the date of purchase, when this major ...
Installation Instructions
Page 1
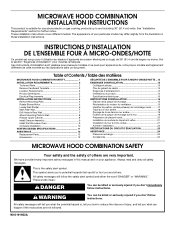
... 8 Install Damper Assembly 9 Install the Microwave Oven 9 Complete Installation 10 VENTING DESIGN SPECIFICATIONS 11 ASSISTANCE 12 Replacement Parts 12 Accessories 12 SÉCURITÉ DE L'ENSEMBLE FOUR À MICRO-ONDES/HOTTE ...13 EXIGENCES D'INSTALLATION 13... Your safety and the safety of Contents / Table des matières MICROWAVE HOOD COMBINATION SAFETY 1 INSTALLATION REQUIREMENTS 2 Tools and Parts 2 Remove Cardboard Template 2 Location Requirements 2 Product Dimensions 3 Electrical Requirements 3 INSTALLATION INSTRUCTIONS 4 Remove Mounting Plate 4 Rotate Blower ...
... 8 Install Damper Assembly 9 Install the Microwave Oven 9 Complete Installation 10 VENTING DESIGN SPECIFICATIONS 11 ASSISTANCE 12 Replacement Parts 12 Accessories 12 SÉCURITÉ DE L'ENSEMBLE FOUR À MICRO-ONDES/HOTTE ...13 EXIGENCES D'INSTALLATION 13... Your safety and the safety of Contents / Table des matières MICROWAVE HOOD COMBINATION SAFETY 1 INSTALLATION REQUIREMENTS 2 Tools and Parts 2 Remove Cardboard Template 2 Location Requirements 2 Product Dimensions 3 Electrical Requirements 3 INSTALLATION INSTRUCTIONS 4 Remove Mounting Plate 4 Rotate Blower ...

Installation Instructions
Page 2
...For other damages. See "Venting Design Specifications" section. Set the cardboard template to the side and refer to back of microwave oven) Cardboard template (part of installation. See "Rectangular to use as a rear wall template. 1. A B C D E FG H A 1/4-20 x 3" round-head...10 mm) drill bits ■ 3/4" (19 mm) hole saw ■ Caulking gun and weatherproof caulking compound ■ Duct tape Parts Supplied For reorder information, see "Replacement Parts" section. Damper assembly (for 1/4" x 2" lag screws ■ Scissors ■ 1½" (3.8 cm) diam. Washers (2) ...
...For other damages. See "Venting Design Specifications" section. Set the cardboard template to the side and refer to back of microwave oven) Cardboard template (part of installation. See "Rectangular to use as a rear wall template. 1. A B C D E FG H A 1/4-20 x 3" round-head...10 mm) drill bits ■ 3/4" (19 mm) hole saw ■ Caulking gun and weatherproof caulking compound ■ Duct tape Parts Supplied For reorder information, see "Replacement Parts" section. Damper assembly (for 1/4" x 2" lag screws ■ Scissors ■ 1½" (3.8 cm) diam. Washers (2) ...
Installation Instructions
Page 12
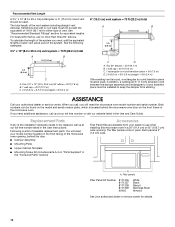
... Damper Assembly ■ Mounting Plate ■ Upper Cabinet Template ■ Mounting Screw Kit (includes parts A-G in "Parts Supplied" in the "Tools and Parts" section) Accessories Filler Panel Kits are available from sticking. Each panel is round, a rectangular to ...1 rectangular to round transition piece = 5 ft (1.5 m) D. 2 ft (0.6 m) + 6 ft (1.8 m) straight = 8 ft (2.4 m) If the existing vent is 3" (7.6 cm) wide. Replacement Parts If any of the installation hardware needs to keep the damper from your model number located on the front frame of the vent system including...
... Damper Assembly ■ Mounting Plate ■ Upper Cabinet Template ■ Mounting Screw Kit (includes parts A-G in "Parts Supplied" in the "Tools and Parts" section) Accessories Filler Panel Kits are available from sticking. Each panel is round, a rectangular to ...1 rectangular to round transition piece = 5 ft (1.5 m) D. 2 ft (0.6 m) + 6 ft (1.8 m) straight = 8 ft (2.4 m) If the existing vent is 3" (7.6 cm) wide. Replacement Parts If any of the installation hardware needs to keep the damper from your model number located on the front frame of the vent system including...


