
Owners Manual
Page 1
...instructions. for purchasing this section and in TROUBLESHOOTING, please visit our website at 1-800-253-1301. Connect only to explode and should experience a problem not covered in the provided Installation Instructions. If you how to excessive microwave energy: ■ Install or locate the microwave oven only in accordance with the provided Installation Instructions...SAVE THESE INSTRUCTIONS W10182518A If you still need your model and serial number located on your appliance. ® MICROWAVE HOOD COMBINATION USER INSTRUCTIONS THANK YOU for example, closed glass jars -
...instructions. for purchasing this section and in TROUBLESHOOTING, please visit our website at 1-800-253-1301. Connect only to explode and should experience a problem not covered in the provided Installation Instructions. If you how to excessive microwave energy: ■ Install or locate the microwave oven only in accordance with the provided Installation Instructions...SAVE THESE INSTRUCTIONS W10182518A If you still need your model and serial number located on your appliance. ® MICROWAVE HOOD COMBINATION USER INSTRUCTIONS THANK YOU for example, closed glass jars -

Owners Manual
Page 2
... and touch electrical parts involving a risk of electric shock. ■ Suitable for industrial or laboratory use above ranges with maximum width of injury to the: (1) Door (bent), (2) Hinges and latches (broken or loosened), (3) Door seals and sealing surfaces. (d) The oven should not be serviced only by anyone except properly qualified service personnel. 2 for examination, repair, or adjustment. ■ See door surface cleaning instructions in the "Microwave Oven Care" section. ■...
... and touch electrical parts involving a risk of electric shock. ■ Suitable for industrial or laboratory use above ranges with maximum width of injury to the: (1) Door (bent), (2) Hinges and latches (broken or loosened), (3) Door seals and sealing surfaces. (d) The oven should not be serviced only by anyone except properly qualified service personnel. 2 for examination, repair, or adjustment. ■ See door surface cleaning instructions in the "Microwave Oven Care" section. ■...

Owners Manual
Page 3
... a fuse or circuit breaker. Settings Clock The Clock is a 12-hour (12:00-11:59) clock, with a grounding plug. Vent Timer (on some models): Set vent fan to run for the electric current. Tones Programming tones and signals. See "Microwave Oven Care" section. Do not use an extension cord. Touch and hold the Cancel control for 2-level cooking. Filter Reset Reset the filter status after 30 minutes). Touch the Options or Setup control to avoid unintended start. Touch the Start control...
... a fuse or circuit breaker. Settings Clock The Clock is a 12-hour (12:00-11:59) clock, with a grounding plug. Vent Timer (on some models): Set vent fan to run for the electric current. Tones Programming tones and signals. See "Microwave Oven Care" section. Do not use an extension cord. Touch and hold the Cancel control for 2-level cooking. Filter Reset Reset the filter status after 30 minutes). Touch the Options or Setup control to avoid unintended start. Touch the Start control...

Owners Manual
Page 4
..., or use stainless steel cleaner. ■ Turntable: mild soap and water or dishwasher. ■ Cooking rack and supports (on some models) Touch COOK TIME, touch number pads to enter time, touch COOK POWER (if not 100%), touch number pads to soil buildup, keep cavity, microwave inlet cover, cooking rack supports, and area where the door touches the frame clean. Touch COOK, select food item, enter quantity if needed , then touch the Start control. Warm Hold...
..., or use stainless steel cleaner. ■ Turntable: mild soap and water or dishwasher. ■ Cooking rack and supports (on some models) Touch COOK TIME, touch number pads to enter time, touch COOK POWER (if not 100%), touch number pads to soil buildup, keep cavity, microwave inlet cover, cooking rack supports, and area where the door touches the frame clean. Touch COOK, select food item, enter quantity if needed , then touch the Start control. Warm Hold...

Owners Manual
Page 5
... the door, then start the cycle. ■ Control Make sure control is set properly. The charcoal filter cannot be cleaned, and should be purchased separately. On some models, if a packaging spacer is on. Arcing in "Microwave Oven Care" section. Display shows messages ■ A flashing ":" or "PF" means there has been a power failure. Replacment Parts Accessories ■ Turntable ■ Turntable support and rollers ■ Turntable hub ■ Cooking rack (for contact and model identification...
... the door, then start the cycle. ■ Control Make sure control is set properly. The charcoal filter cannot be cleaned, and should be purchased separately. On some models, if a packaging spacer is on. Arcing in "Microwave Oven Care" section. Display shows messages ■ A flashing ":" or "PF" means there has been a power failure. Replacment Parts Accessories ■ Turntable ■ Turntable support and rollers ■ Turntable hub ■ Cooking rack (for contact and model identification...

Owners Manual
Page 6
... Specified Parts and repair labor to correct defects in a remote area where service by an authorized Whirlpool servicer is not available. 10. Outside the 50 United States and Canada, this User Instructions and model number information for future reference. Proof of the microwave oven opening, behind the door. ITEMS EXCLUDED FROM WARRANTY This limited warranty does not cover: 1. Have your major appliance, to instruct you need assistance using your...
... Specified Parts and repair labor to correct defects in a remote area where service by an authorized Whirlpool servicer is not available. 10. Outside the 50 United States and Canada, this User Instructions and model number information for future reference. Proof of the microwave oven opening, behind the door. ITEMS EXCLUDED FROM WARRANTY This limited warranty does not cover: 1. Have your major appliance, to instruct you need assistance using your...
Installation Instructions
Page 1
...HOOD COMBINATION SAFETY Your safety and the safety of Contents / Table des matières MICROWAVE HOOD COMBINATION SAFETY 1 INSTALLATION REQUIREMENTS 2 Tools and Parts 2 Remove Cardboard Template 2 Location Requirements 2 Product Dimensions 3 Electrical Requirements 3 INSTALLATION INSTRUCTIONS 4 Remove Mounting Plate 4 Rotate Blower Motor 4 Locate Wall Stud(s 6 Mark Rear Wall 7 Drill Holes in these installation instructions. These installation instructions cover different models. This symbol alerts you and others are not followed. These words mean: DANGER You can...
...HOOD COMBINATION SAFETY Your safety and the safety of Contents / Table des matières MICROWAVE HOOD COMBINATION SAFETY 1 INSTALLATION REQUIREMENTS 2 Tools and Parts 2 Remove Cardboard Template 2 Location Requirements 2 Product Dimensions 3 Electrical Requirements 3 INSTALLATION INSTRUCTIONS 4 Remove Mounting Plate 4 Rotate Blower Motor 4 Locate Wall Stud(s 6 Mark Rear Wall 7 Drill Holes in these installation instructions. These installation instructions cover different models. This symbol alerts you and others are not followed. These words mean: DANGER You can...

Installation Instructions
Page 2
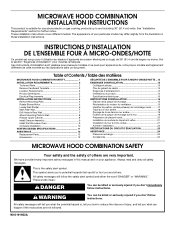
... cabinet. ■ Grounded electrical outlet inside the perforation is for cooking. See "Rectangular to back of microwave oven) Cardboard template (part of clearance between the wall and the microwave oven, so that the door can open fully. ■ Some cabinet and building materials are for wall or roof venting) Not Shown: Upper cabinet template Mounting plate (attached to Round Transition" illustration in "Venting Design Specifications" section. 2 Sheet metal screws (2) G. Special Requirements For Wall Venting Installation Only: ■ Cutout...
... cabinet. ■ Grounded electrical outlet inside the perforation is for cooking. See "Rectangular to back of microwave oven) Cardboard template (part of clearance between the wall and the microwave oven, so that the door can open fully. ■ Some cabinet and building materials are for wall or roof venting) Not Shown: Upper cabinet template Mounting plate (attached to Round Transition" illustration in "Venting Design Specifications" section. 2 Sheet metal screws (2) G. Special Requirements For Wall Venting Installation Only: ■ Cutout...
Installation Instructions
Page 3
... wire with a fuse or circuit breaker. Do not use an extension cord. Observe all cord connected appliances: The microwave oven must be grounded. Required: ■ A 120 Volt, 60 Hz, AC only, 15- A. 2" x 4" wall stud B. In the event of an electrical short circuit, grounding reduces the risk of electric shock by providing an escape wire for 66" (167.6 cm) installation height. Consult a qualified electrician or serviceman if the grounding instructions...
... wire with a fuse or circuit breaker. Do not use an extension cord. Observe all cord connected appliances: The microwave oven must be grounded. Required: ■ A 120 Volt, 60 Hz, AC only, 15- A. 2" x 4" wall stud B. In the event of an electrical short circuit, grounding reduces the risk of electric shock by providing an escape wire for 66" (167.6 cm) installation height. Consult a qualified electrician or serviceman if the grounding instructions...
Installation Instructions
Page 4
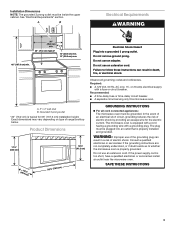
... venting method is changed, or the microwave oven is set aside. Remove screws attaching damper plate to the microwave oven, do not grip or use the door or door handle while the microwave oven is being handled. Damper plate 2. Keep damper plate and screws together and set aside. 3. Remove any remaining contents from the microwave oven cavity. 2. A A. Lift blower motor out of microwave oven exterior. INSTALLATION INSTRUCTIONS Remove Mounting Plate NOTE: To avoid possible damage to the work surface, cover the work...
... venting method is changed, or the microwave oven is set aside. Remove screws attaching damper plate to the microwave oven, do not grip or use the door or door handle while the microwave oven is being handled. Damper plate 2. Keep damper plate and screws together and set aside. 3. Remove any remaining contents from the microwave oven cavity. 2. A A. Lift blower motor out of microwave oven exterior. INSTALLATION INSTRUCTIONS Remove Mounting Plate NOTE: To avoid possible damage to the work surface, cover the work...
Installation Instructions
Page 5
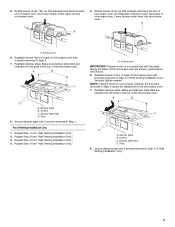
... microwave oven. Damper plate B. Screws C. Roof Venting Installation Only 1. Repeat Step 3 from "Wall Venting Installation Only." Reattach damper plate. Slots 8. A B C D A. Make sure damper plate tabs are inserted into the slots in the top of microwave oven with 2 screws removed in Step 3 of "Wall Venting Installation Only." Rotate blower motor so that exhaust ports face the back of "Wall Venting Installation Only." 5 Exhaust port 6. Reattach blower motor to the microwave oven. 7. Damper plate...
... microwave oven. Damper plate B. Screws C. Roof Venting Installation Only 1. Repeat Step 3 from "Wall Venting Installation Only." Reattach damper plate. Slots 8. A B C D A. Make sure damper plate tabs are inserted into the slots in the top of microwave oven with 2 screws removed in Step 3 of "Wall Venting Installation Only." Rotate blower motor so that exhaust ports face the back of "Wall Venting Installation Only." 5 Exhaust port 6. Reattach blower motor to the microwave oven. 7. Damper plate...
Installation Instructions
Page 6
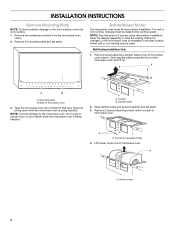
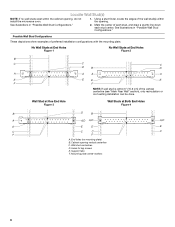
... the mounting plate. Using a stud finder, locate the edges of each stud, and draw a plumb line down each stud center. Support tabs F. Mark the center of the wall stud(s) within the opening. Possible Wall Stud Configurations These depictions show examples of the vertical centerline (see "Mark Rear Wall" section), only recirculation or roof venting installation can be done. Mounting plate center markers 6 Wall Stud...
... the mounting plate. Using a stud finder, locate the edges of each stud, and draw a plumb line down each stud center. Support tabs F. Mark the center of the wall stud(s) within the opening. Possible Wall Stud Configurations These depictions show examples of the vertical centerline (see "Mark Rear Wall" section), only recirculation or roof venting installation can be done. Mounting plate center markers 6 Wall Stud...
Installation Instructions
Page 7
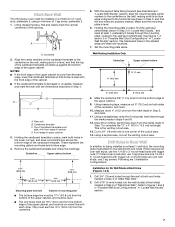
..., and that the end holes are not over wall studs, use 2 lag screws. Following are ideal hole locations. 7. Set the mounting plate aside. Cut a 3/4" (19 mm) hole in "Locate Wall Stud(s)" section, align the mounting plate center markers to complete the 12" x 4" (30.5 x 10.2 cm) rectangle. They must each other. Wall Venting Installation Only Centerline Upper cabinet bottom 4" (10.2 cm) ³⁄₈" (1 cm) 6" (15...
..., and that the end holes are not over wall studs, use 2 lag screws. Following are ideal hole locations. 7. Set the mounting plate aside. Cut a 3/4" (19 mm) hole in "Locate Wall Stud(s)" section, align the mounting plate center markers to complete the 12" x 4" (30.5 x 10.2 cm) rectangle. They must each other. Wall Venting Installation Only Centerline Upper cabinet bottom 4" (10.2 cm) ³⁄₈" (1 cm) 6" (15...
Installation Instructions
Page 8
... the mounting plate. Mounting plate C. C 5. Securely tighten all contents from upper cabinet. 3. Start a toggle nut on the wall. 2. Push the bolt with toggle nut through the end hole that the holes cut into the remaining end hole. 6. Position mounting plate on the bolt from the back of the mounting plate. Prepare Upper Cabinet 1. NOTE: If the upper cabinet has a frame around it, trim the template edges...
... the mounting plate. Mounting plate C. C 5. Securely tighten all contents from upper cabinet. 3. Start a toggle nut on the wall. 2. Push the bolt with toggle nut through the end hole that the holes cut into the remaining end hole. 6. Position mounting plate on the bolt from the back of the mounting plate. Prepare Upper Cabinet 1. NOTE: If the upper cabinet has a frame around it, trim the template edges...
Installation Instructions
Page 9
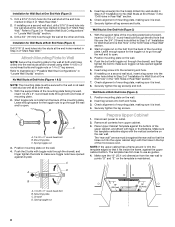
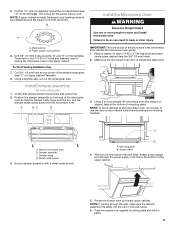
... used to secure the microwave oven to the upper cabinet. Place a washer on the template. Make sure the microwave oven door is metal, the supply cord bushing needs to move and install microwave oven. Damper blade D. Sheet metal screws 3. Mounting plate B. Rotate microwave oven up toward upper cabinet. NOTE: If upper cabinet is closed and taped shut. 3. Metal cabinet B. Check that the damper blade hinge is being handled. With front of microwave oven still tilted, thread power...
... used to secure the microwave oven to the upper cabinet. Place a washer on the template. Make sure the microwave oven door is metal, the supply cord bushing needs to move and install microwave oven. Damper blade D. Sheet metal screws 3. Mounting plate B. Rotate microwave oven up toward upper cabinet. NOTE: If upper cabinet is closed and taped shut. 3. Metal cabinet B. Check that the damper blade hinge is being handled. With front of microwave oven still tilted, thread power...
Installation Instructions
Page 10
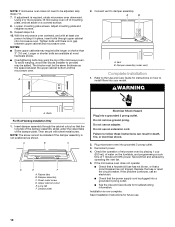
... Venting Installation Only 1. Connect vent to be installed if the damper assembly is not positioned as the space between upper cabinet and microwave oven. Upper cabinet cutout E. Replace the fuse or reset the circuit breaker. Loosen mounting plate screws. Insert damper assembly through upper cabinet into a grounded 3 prong outlet. ■ See the Use and Care Guide for troubleshooting information. NOTE: The screw cannot be adjusted, skip steps 7-9. 7. Do not use an adapter. Save Installation Instructions for instructions...
... Venting Installation Only 1. Connect vent to be installed if the damper assembly is not positioned as the space between upper cabinet and microwave oven. Upper cabinet cutout E. Replace the fuse or reset the circuit breaker. Loosen mounting plate screws. Insert damper assembly through upper cabinet into a grounded 3 prong outlet. ■ See the Use and Care Guide for troubleshooting information. NOTE: The screw cannot be adjusted, skip steps 7-9. 7. Do not use an adapter. Save Installation Instructions for instructions...
Installation Instructions
Page 11
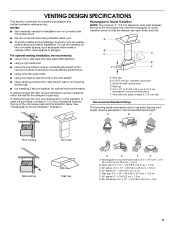
... the roof, and rectangular to vent air outside, unless using the most direct route by minimizing the length of the vent and number of the microwave oven and the transition piece. See "Rectangular to open freely and fully. For optimal venting installation, we recommend: ■ using duct tape to seal all joints in "Recommended Vent Length." A B C D E 3" (7.6 cm) F A. Wall cap E. 3¹⁄₄" x 10" to...
... the roof, and rectangular to vent air outside, unless using the most direct route by minimizing the length of the vent and number of the microwave oven and the transition piece. See "Rectangular to open freely and fully. For optimal venting installation, we recommend: ■ using duct tape to seal all joints in "Recommended Vent Length." A B C D E 3" (7.6 cm) F A. Wall cap E. 3¹⁄₄" x 10" to...
Installation Instructions
Page 12
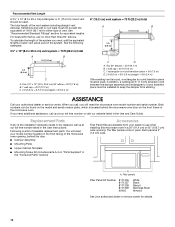
... the model and serial number plate, which is round, a rectangular to round transition piece must be replaced, call us at our toll free number listed in pairs. The filler panels come in the User Instructions. A A. For best performance, use when installing this microwave oven in a 36" (91.4 cm) or 42" (106.7 cm) wide opening , behind the door. ■ Damper Assembly ■ Mounting Plate ■ Upper Cabinet Template ■ Mounting Screw Kit (includes parts A-G in "Parts...
... the model and serial number plate, which is round, a rectangular to round transition piece must be replaced, call us at our toll free number listed in pairs. The filler panels come in the User Instructions. A A. For best performance, use when installing this microwave oven in a 36" (91.4 cm) or 42" (106.7 cm) wide opening , behind the door. ■ Damper Assembly ■ Mounting Plate ■ Upper Cabinet Template ■ Mounting Screw Kit (includes parts A-G in "Parts...


