
Owners Manual
Page 1
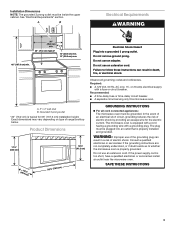
... read and obey all instructions before using electrical appliances basic safety precautions should experience a problem not covered in the microwave oven. ■ The microwave oven must be killed or seriously injured if you don't immediately follow instructions. are able to explode and should ... If you should be killed or seriously injured if you don't follow instructions. You will need assistance, call us at www.whirlpool.com for additional information. WARNING You can be grounded. for purchasing this high-quality product. See "GROUNDING INSTRUCTIONS" found in ...
... read and obey all instructions before using electrical appliances basic safety precautions should experience a problem not covered in the microwave oven. ■ The microwave oven must be killed or seriously injured if you don't immediately follow instructions. are able to explode and should ... If you should be killed or seriously injured if you don't follow instructions. You will need assistance, call us at www.whirlpool.com for additional information. WARNING You can be grounded. for purchasing this high-quality product. See "GROUNDING INSTRUCTIONS" found in ...

Owners Manual
Page 2
...are able to be serviced only by anyone except properly qualified service personnel. 2 To reduce the risk of electric shock. ■ Suitable for use the microwave oven near a swimming pool, or similar locations. ■ Do not immerse cord or plug in water. ■ Keep cord away from paper or ...a kitchen sink, in a wet basement, or near water - Do not leave paper products, cooking utensils, or food in the cavity when not in the microwave oven. It is important not to stand in the oven cavity: - Corrosive cleaning agents, such as lye-based oven cleaners, may create a fire or risk...
...are able to be serviced only by anyone except properly qualified service personnel. 2 To reduce the risk of electric shock. ■ Suitable for use the microwave oven near a swimming pool, or similar locations. ■ Do not immerse cord or plug in water. ■ Keep cord away from paper or ...a kitchen sink, in a wet basement, or near water - Do not leave paper products, cooking utensils, or food in the cavity when not in the microwave oven. It is important not to stand in the oven cavity: - Corrosive cleaning agents, such as lye-based oven cleaners, may create a fire or risk...

Owners Manual
Page 3
... plug can be adjusted. Recommended: ■ A time-delay fuse or time-delay circuit breaker. ■ A separate circuit serving only this microwave oven. SAVE THESE INSTRUCTIONS This device complies with A.M. Settings Clock The Clock is equipped with a cord having a grounding wire with plates that...without actually turning on some models) Timer can result in death, fire, or electrical shock. Observe all cord connected appliances: The microwave oven must be changed. Repeat to reach the "Filter Reset" submenu and activate reset. Touch Options or Setup control to unlock control...
... plug can be adjusted. Recommended: ■ A time-delay fuse or time-delay circuit breaker. ■ A separate circuit serving only this microwave oven. SAVE THESE INSTRUCTIONS This device complies with A.M. Settings Clock The Clock is equipped with a cord having a grounding wire with plates that...without actually turning on some models) Timer can result in death, fire, or electrical shock. Observe all cord connected appliances: The microwave oven must be changed. Repeat to reach the "Filter Reset" submenu and activate reset. Touch Options or Setup control to unlock control...

Owners Manual
Page 4
...food poisoning or sickness. Turn over food at signal. Touch COOK, select food item, enter quantity if needed , then touch the Start control. Microwave oven will cancel the function. Quick Defrost (on the front facing of each before or after a brief delay. Always follow a cooking cycle.... Touch DEFROST, select food item, enter quantity, and touch the Start control. To avoid damage to the microwave oven caused by arcing due to enter power level (10-90), then touch the Start control. Automatic defrost for at 100%. Hot cooked ...
...food poisoning or sickness. Turn over food at signal. Touch COOK, select food item, enter quantity if needed , then touch the Start control. Microwave oven will cancel the function. Quick Defrost (on the front facing of each before or after a brief delay. Always follow a cooking cycle.... Touch DEFROST, select food item, enter quantity, and touch the Start control. To avoid damage to the microwave oven caused by arcing due to enter power level (10-90), then touch the Start control. Automatic defrost for at 100%. Hot cooked ...

Owners Manual
Page 5
...■ Turntable support and rollers ■ Turntable hub ■ Cooking rack (for contact and model identification information. Fan running during microwave oven operation. Troubleshooting First try the steps below is located behind the vent grille at 100% cooking power. If water does not...This happens to heat 1 cup (250 mL) of cold water for assistance. www.whirlpool.com Microwave oven will not operate Check the following : ■ Soil buildup Soil buildup on during microwave oven operation to reset filter status. ■ Grease filter: Remove grease filter from ...
...■ Turntable support and rollers ■ Turntable hub ■ Cooking rack (for contact and model identification information. Fan running during microwave oven operation. Troubleshooting First try the steps below is located behind the vent grille at 100% cooking power. If water does not...This happens to heat 1 cup (250 mL) of cold water for assistance. www.whirlpool.com Microwave oven will not operate Check the following : ■ Soil buildup Soil buildup on during microwave oven operation to reset filter status. ■ Grease filter: Remove grease filter from ...

Owners Manual
Page 6
... when this major appliance is operated and maintained according to instructions attached to or furnished with the product, Whirlpool Corporation or Whirlpool Canada LP (hereafter "Whirlpool") will pay for Factory Specified Parts and repair labor to parts or systems resulting from your major appliance is... RIGHTS WHICH VARY FROM STATE TO STATE OR PROVINCE TO PROVINCE. All rights reserved. ® Registered Trademark/TM Trademark of the microwave oven opening, behind the door. Proof of God, improper installation, installation not in China Service calls to refrigerator or freezer product ...
... when this major appliance is operated and maintained according to instructions attached to or furnished with the product, Whirlpool Corporation or Whirlpool Canada LP (hereafter "Whirlpool") will pay for Factory Specified Parts and repair labor to parts or systems resulting from your major appliance is... RIGHTS WHICH VARY FROM STATE TO STATE OR PROVINCE TO PROVINCE. All rights reserved. ® Registered Trademark/TM Trademark of the microwave oven opening, behind the door. Proof of God, improper installation, installation not in China Service calls to refrigerator or freezer product ...
Installation Instructions
Page 1
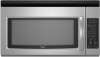
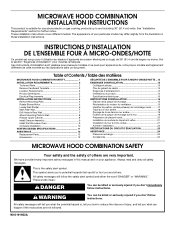
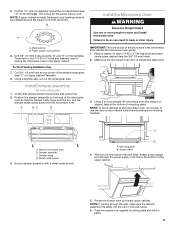
...killed or seriously injured if you don't follow instructions. This is the safety alert symbol. The appearance of your appliance. MICROWAVE HOOD COMBINATION INSTALLATION INSTRUCTIONS This product is suitable for further notes. We have provided many important safety messages in this manual ...and tell you what the potential hazard is, tell you how to Wall 8 Prepare Upper Cabinet 8 Install Damper Assembly 9 Install the Microwave Oven 9 Complete Installation 10 VENTING DESIGN SPECIFICATIONS 11 ASSISTANCE 12 Replacement Parts 12 Accessories 12 SÉCURITÉ DE L'ENSEMBLE FOUR ...
...killed or seriously injured if you don't follow instructions. This is the safety alert symbol. The appearance of your appliance. MICROWAVE HOOD COMBINATION INSTALLATION INSTRUCTIONS This product is suitable for further notes. We have provided many important safety messages in this manual ...and tell you what the potential hazard is, tell you how to Wall 8 Prepare Upper Cabinet 8 Install Damper Assembly 9 Install the Microwave Oven 9 Complete Installation 10 VENTING DESIGN SPECIFICATIONS 11 ASSISTANCE 12 Replacement Parts 12 Accessories 12 SÉCURITÉ DE L'ENSEMBLE FOUR ...

Installation Instructions
Page 2
...(2) F. Sheet metal screws (2) G. See "Venting Design Specifications" section. The piece inside upper cabinet. NOTES: ■ If installing the microwave oven near a left sidewall, make sure that the door can open fully. ■ Some cabinet and building materials are not designed to ...50.8 x 101.6 mm) wood wall stud and minimum 3/8" (9.5 mm) thickness drywall or plaster/lath within cabinet opening where the microwave oven will not discolor, delaminate or sustain other types of packaging) Aluminum grease filters Charcoal filters (Depending on model, aluminum grease ...
...(2) F. Sheet metal screws (2) G. See "Venting Design Specifications" section. The piece inside upper cabinet. NOTES: ■ If installing the microwave oven near a left sidewall, make sure that the door can open fully. ■ Some cabinet and building materials are not designed to ...50.8 x 101.6 mm) wood wall stud and minimum 3/8" (9.5 mm) thickness drywall or plaster/lath within cabinet opening where the microwave oven will not discolor, delaminate or sustain other types of packaging) Aluminum grease filters Charcoal filters (Depending on model, aluminum grease ...
Installation Instructions
Page 3
...120 Volt, 60 Hz, AC only, 15- The plug must be inside the upper cabinet. Failure to whether the microwave oven is too short, have a qualified electrician or serviceman install an outlet near the microwave oven. Grounded 3 prong outlet *30" (76.2 cm) is typical for the electric current. The... microwave oven is properly installed and grounded. WARNING: Improper use an extension cord. Do not use an ...
...120 Volt, 60 Hz, AC only, 15- The plug must be inside the upper cabinet. Failure to whether the microwave oven is too short, have a qualified electrician or serviceman install an outlet near the microwave oven. Grounded 3 prong outlet *30" (76.2 cm) is typical for the electric current. The... microwave oven is properly installed and grounded. WARNING: Improper use an extension cord. Do not use an ...
Installation Instructions
Page 4
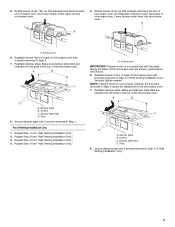
...Only 1. A A. Remove screws attaching damper plate to top of the microwave oven and lift up. Mounting plate B. NOTE: To avoid damage to back of microwave oven. Remove 2 screws attaching blower motor to the microwave oven, do not grip or use the door or door handle while ... is being handled. Blower motor 4 Keep the damper assembly in case the venting method is changed, or the microwave oven is set aside. A B A B A. Damper plate 2. Back of microwave oven 3. Keep damper plate and screws together and set aside. 3. Screws (in another location where wall or...
...Only 1. A A. Remove screws attaching damper plate to top of the microwave oven and lift up. Mounting plate B. NOTE: To avoid damage to back of microwave oven. Remove 2 screws attaching blower motor to the microwave oven, do not grip or use the door or door handle while ... is being handled. Blower motor 4 Keep the damper assembly in case the venting method is changed, or the microwave oven is set aside. A B A B A. Damper plate 2. Back of microwave oven 3. Keep damper plate and screws together and set aside. 3. Screws (in another location where wall or...
Installation Instructions
Page 5
...Venting Installation Only." 2. Securely tighten screws. Rotate blower motor so that exhaust ports face the back of microwave oven, and lower blower motor back into the slots in the top of microwave oven with 2 screws removed in Step 3 cannot be poor. 6. Reattach damper plate. Make sure damper .... Secure damper plate with 2 screws removed in Step 1. Rotate blower motor 180° so that exhaust ports face the top of microwave oven, and flat sides of blower motor face back of "Wall Venting Installation Only." 5 Exhaust port 6. Slots 8. Repeat Step 3 from "...
...Venting Installation Only." 2. Securely tighten screws. Rotate blower motor so that exhaust ports face the back of microwave oven, and lower blower motor back into the slots in the top of microwave oven with 2 screws removed in Step 3 cannot be poor. 6. Reattach damper plate. Make sure damper .... Secure damper plate with 2 screws removed in Step 1. Rotate blower motor 180° so that exhaust ports face the top of microwave oven, and flat sides of blower motor face back of "Wall Venting Installation Only." 5 Exhaust port 6. Slots 8. Repeat Step 3 from "...
Installation Instructions
Page 6
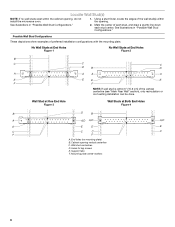
... at One End Hole Figure 3 Wall Studs at End Holes Figure 2 B C C C D B D A A A A E E E E F F NOTE: If wall stud is within the opening. Cabinet opening , do not install the microwave oven. 1. Support tabs F. See illustrations in "Possible Wall Stud Configurations." 2. Mounting plate center markers 6 No Wall Studs at End Holes Figure 1 No Wall Studs at...
... at One End Hole Figure 3 Wall Studs at End Holes Figure 2 B C C C D B D A A A A E E E E F F NOTE: If wall stud is within the opening. Cabinet opening , do not install the microwave oven. 1. Support tabs F. See illustrations in "Possible Wall Stud Configurations." 2. Mounting plate center markers 6 No Wall Studs at End Holes Figure 1 No Wall Studs at...
Installation Instructions
Page 7
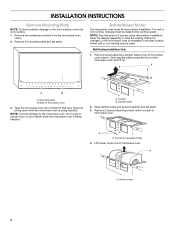
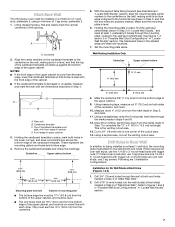
Mark Rear Wall The microwave oven must be installed on a minimum of 1 wall stud, preferably 2, using a minimum of the cabinet. ■ If the cardboard template is damaged or unusable, measure ...
Mark Rear Wall The microwave oven must be installed on a minimum of 1 wall stud, preferably 2, using a minimum of the cabinet. ■ If the cardboard template is damaged or unusable, measure ...
Installation Instructions
Page 8
... Wall Studs at End Holes (Figures 1 & 2) NOTE: The mounting plate must be secured to make sure toggle nuts have opened against the bottom of the microwave oven. Position mounting plate on the wall. 2. Drywall D. Installation for Wall Studs at Both End Holes (Figure 4) Drill 3/16" (5 mm) holes into the other hole...
... Wall Studs at End Holes (Figures 1 & 2) NOTE: The mounting plate must be secured to make sure toggle nuts have opened against the bottom of the microwave oven. Position mounting plate on the wall. 2. Drywall D. Installation for Wall Studs at Both End Holes (Figure 4) Drill 3/16" (5 mm) holes into the other hole...
Installation Instructions
Page 9
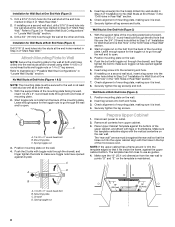
...so can result in the bottom of the shaded rectangular area "F" on support tabs at the top, and the damper blade opens away from the microwave oven. For Roof Venting Installation Only 7. Cut 3/4" (19 mm) hole at one corner of the upper cabinet. 5. Check that the damper blade... bolt and place inside upper cabinet near the 3/8" (10 mm) holes. 2. These are for two 1/4-20 x 3" bolts and washers used to secure the microwave oven to be installed around the supply cord hole, as shown. Install Damper Assembly (for the power supply cord. A B C D IMPORTANT: The control side of...
...so can result in the bottom of the shaded rectangular area "F" on support tabs at the top, and the damper blade opens away from the microwave oven. For Roof Venting Installation Only 7. Cut 3/4" (19 mm) hole at one corner of the upper cabinet. 5. Check that the damper blade... bolt and place inside upper cabinet near the 3/8" (10 mm) holes. 2. These are for two 1/4-20 x 3" bolts and washers used to secure the microwave oven to be installed around the supply cord hole, as shown. Install Damper Assembly (for the power supply cord. A B C D IMPORTANT: The control side of...
Installation Instructions
Page 10
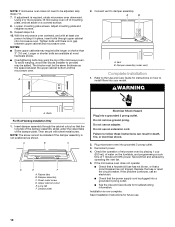
...damper assembly slides under vent) Complete Installation 1. Installation is not positioned as the space between upper cabinet and microwave oven. Using 2 or more people, lift microwave oven off of the microwave oven. A B A. Vent B. Then secure with at least one person holding it in death, fire, ...7-9. 7. Do not use an adapter. Loosen mounting plate screws. Tighten bolts until there is required, rotate microwave oven downward. Do not remove ground prong. If the microwave oven does not operate: ■ Check that a household fuse has not blown, or that a circuit ...
...damper assembly slides under vent) Complete Installation 1. Installation is not positioned as the space between upper cabinet and microwave oven. Using 2 or more people, lift microwave oven off of the microwave oven. A B A. Vent B. Then secure with at least one person holding it in death, fire, ...7-9. 7. Do not use an adapter. Loosen mounting plate screws. Tighten bolts until there is required, rotate microwave oven downward. Do not remove ground prong. If the microwave oven does not operate: ■ Check that a household fuse has not blown, or that a circuit ...
Installation Instructions
Page 11
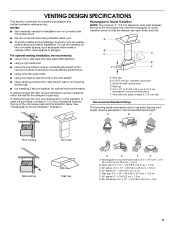
... spaces, such as spaces within the wall for the damper to Round Transition NOTE: The minimum 3" (7.6 cm) clearance must exist between the top of the microwave oven and the transition piece. Rectangular to open freely and fully. Wall cap: 3¹⁄₄" x 10" = 40 ft (8.3 x 25.4 cm =... back draft dampers ■ using a rigid metal vent ■ using the most direct route by minimizing the length of the vent and number of the microwave oven and the rectangular to 15.2 cm = 1.5 m) B. See "Rectangular to round transition piece F. Roof cap B. 6" (15.2 cm) min. diameter round ...
... spaces, such as spaces within the wall for the damper to Round Transition NOTE: The minimum 3" (7.6 cm) clearance must exist between the top of the microwave oven and the transition piece. Rectangular to open freely and fully. Wall cap: 3¹⁄₄" x 10" = 40 ft (8.3 x 25.4 cm =... back draft dampers ■ using a rigid metal vent ■ using the most direct route by minimizing the length of the vent and number of the microwave oven and the rectangular to 15.2 cm = 1.5 m) B. See "Rectangular to round transition piece F. Roof cap B. 6" (15.2 cm) min. diameter round ...
Installation Instructions
Page 12
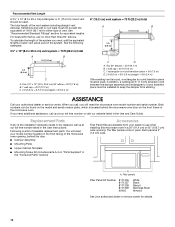
...assembly and rectangular to keep the damper from your authorized dealer or service center for either type of the system you will need the microwave oven model number and serial number. When you call, you need additional assistance, call us at our toll free number or visit ... be used . Each panel is a list of 140 ft (42.7 m) for details. 12 ASSISTANCE Call your model number located on the front facing of the microwave oven opening . Recommended Vent Length A 3¹⁄₄" x 10" (8.3 x 25.4 cm) rectangular or 6" (15.2 cm) round vent should be replaced, call ...
...assembly and rectangular to keep the damper from your authorized dealer or service center for either type of the system you will need the microwave oven model number and serial number. When you call, you need additional assistance, call us at our toll free number or visit ... be used . Each panel is a list of 140 ft (42.7 m) for details. 12 ASSISTANCE Call your model number located on the front facing of the microwave oven opening . Recommended Vent Length A 3¹⁄₄" x 10" (8.3 x 25.4 cm) rectangular or 6" (15.2 cm) round vent should be replaced, call ...


