
Owners Manual
Page 1
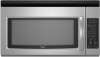
... la combinación microondas campana" en español, o para obtener información adicional acerca de su producto, visite: www.whirlpool.com Tenga listo su número de modelo completo. ® MICROWAVE HOOD COMBINATION USER INSTRUCTIONS THANK YOU for purchasing this manual and on your model and serial number located on the...
... la combinación microondas campana" en español, o para obtener información adicional acerca de su producto, visite: www.whirlpool.com Tenga listo su número de modelo completo. ® MICROWAVE HOOD COMBINATION USER INSTRUCTIONS THANK YOU for purchasing this manual and on your model and serial number located on the...

Owners Manual
Page 2
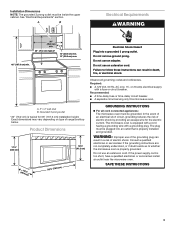
...sealing surfaces. (d) The oven should not be used by anyone except properly qualified service personnel. 2 After heating, allow soil or cleaner residue to microwave energy. Corrosive cleaning agents, such as lye-based oven cleaners, may create a fire or risk of 36" (91.44 cm). ■ Clean... is necessary when used above both before placing bags in the oven cavity: - SAVE THESE INSTRUCTIONS PRECAUTIONS TO AVOID POSSIBLE EXPOSURE TO EXCESSIVE MICROWAVE ENERGY (a) Do not attempt to operate this oven when not in use. ■ Do not store anything directly on top of electric ...
...sealing surfaces. (d) The oven should not be used by anyone except properly qualified service personnel. 2 After heating, allow soil or cleaner residue to microwave energy. Corrosive cleaning agents, such as lye-based oven cleaners, may create a fire or risk of 36" (91.44 cm). ■ Clean... is necessary when used above both before placing bags in the oven cavity: - SAVE THESE INSTRUCTIONS PRECAUTIONS TO AVOID POSSIBLE EXPOSURE TO EXCESSIVE MICROWAVE ENERGY (a) Do not attempt to operate this oven when not in use. ■ Do not store anything directly on top of electric ...

Owners Manual
Page 3
...a grounded 3 prong outlet. Recommended: ■ A time-delay fuse or time-delay circuit breaker. ■ A separate circuit serving only this microwave oven. The plug must be turned off , or all governing codes and ordinances. SAVE THESE INSTRUCTIONS This device complies with Part 18 of the... the "Demo Mode" submenu, and activate or deactivate Demo Mode. Tones Programming tones and signals. To avoid damage to the microwave oven due to follow these instructions can result in the display. Consult a qualified electrician or serviceman if the grounding instructions are ...
...a grounded 3 prong outlet. Recommended: ■ A time-delay fuse or time-delay circuit breaker. ■ A separate circuit serving only this microwave oven. The plug must be turned off , or all governing codes and ordinances. SAVE THESE INSTRUCTIONS This device complies with Part 18 of the... the "Demo Mode" submenu, and activate or deactivate Demo Mode. Tones Programming tones and signals. To avoid damage to the microwave oven due to follow these instructions can result in the display. Consult a qualified electrician or serviceman if the grounding instructions are ...

Owners Manual
Page 4
...metallic glaze To Test Cookware/Dinnerware: Place dish on turntable with 1 cup (250 mL) of each before or after a brief delay. Microwave Oven Use Manual Cooking/Stage Cooking Doneness (on some models) WARNING Unwrap food. If programming additional stages, enter the cook time and cook...in food poisoning or sickness. Automatic defrost for at least 3 minutes. Unwrap food. Warm Hold can be programmed to soil buildup, keep cavity, microwave inlet cover, cooking rack supports, and area where the door touches the frame clean. Clean with mild soap, water and a soft cloth or...
...metallic glaze To Test Cookware/Dinnerware: Place dish on turntable with 1 cup (250 mL) of each before or after a brief delay. Microwave Oven Use Manual Cooking/Stage Cooking Doneness (on some models) WARNING Unwrap food. If programming additional stages, enter the cook time and cook...in food poisoning or sickness. Automatic defrost for at least 3 minutes. Unwrap food. Warm Hold can be programmed to soil buildup, keep cavity, microwave inlet cover, cooking rack supports, and area where the door touches the frame clean. Clean with mild soap, water and a soft cloth or...

Owners Manual
Page 5
www.whirlpool.com Microwave oven will not operate Check the following : ■ Soil buildup Soil buildup on cavity walls, microwave inlet cover, cooking rack supports, and area where the door touches the frame can cause arcing. If microwave oven still does not operate, call . If a message about every 6...The cavity light bulb is an error indicator. Troubleshooting First try the steps below is behind the vent grille at the beginning of the microwave oven. Reset the clock. ■ A letter followed by filter status indicator. ■ Charcoal filter: The charcoal filter is being ...
www.whirlpool.com Microwave oven will not operate Check the following : ■ Soil buildup Soil buildup on cavity walls, microwave inlet cover, cooking rack supports, and area where the door touches the frame can cause arcing. If microwave oven still does not operate, call . If a message about every 6...The cavity light bulb is an error indicator. Troubleshooting First try the steps below is behind the vent grille at the beginning of the microwave oven. Reset the clock. ■ A letter followed by filter status indicator. ■ Charcoal filter: The charcoal filter is being ...

Owners Manual
Page 6
... in the country in which it is installed in an inaccessible location or is located in accordance with the product, Whirlpool Corporation or Whirlpool Canada LP (hereafter "Whirlpool") will pay for product service if your major appliance, to published user or operator instructions and/or installation instructions. ..., chips or other than normal, single-family household use of your product, you on the upper or lower front facing of the microwave oven opening, behind the door. This warranty is used for future reference. THIS WARRANTY GIVES YOU SPECIFIC LEGAL RIGHTS, AND YOU MAY...
... in the country in which it is installed in an inaccessible location or is located in accordance with the product, Whirlpool Corporation or Whirlpool Canada LP (hereafter "Whirlpool") will pay for product service if your major appliance, to published user or operator instructions and/or installation instructions. ..., chips or other than normal, single-family household use of your product, you on the upper or lower front facing of the microwave oven opening, behind the door. This warranty is used for future reference. THIS WARRANTY GIVES YOU SPECIFIC LEGAL RIGHTS, AND YOU MAY...
Installation Instructions
Page 1
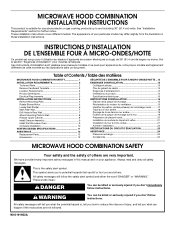
...233;lectriques ou à gaz de 36" (91,4 cm) de largeur ou moins. Table of Contents / Table des matières MICROWAVE HOOD COMBINATION SAFETY 1 INSTALLATION REQUIREMENTS 2 Tools and Parts 2 Remove Cardboard Template 2 Location Requirements 2 Product Dimensions 3 Electrical Requirements 3 INSTALLATION...for use above electric or gas cooking products up to Wall 8 Prepare Upper Cabinet 8 Install Damper Assembly 9 Install the Microwave Oven 9 Complete Installation 10 VENTING DESIGN SPECIFICATIONS 11 ASSISTANCE 12 Replacement Parts 12 Accessories 12 SÉCURITÉ DE L'...
...233;lectriques ou à gaz de 36" (91,4 cm) de largeur ou moins. Table of Contents / Table des matières MICROWAVE HOOD COMBINATION SAFETY 1 INSTALLATION REQUIREMENTS 2 Tools and Parts 2 Remove Cardboard Template 2 Location Requirements 2 Product Dimensions 3 Electrical Requirements 3 INSTALLATION...for use above electric or gas cooking products up to Wall 8 Prepare Upper Cabinet 8 Install Damper Assembly 9 Install the Microwave Oven 9 Complete Installation 10 VENTING DESIGN SPECIFICATIONS 11 ASSISTANCE 12 Replacement Parts 12 Accessories 12 SÉCURITÉ DE L'...

Installation Instructions
Page 2
...4" (50.8 x 101.6 mm) wood wall stud and minimum 3/8" (9.5 mm) thickness drywall or plaster/lath within cabinet opening where the microwave oven will not discolor, delaminate or sustain other types of packaging) Aluminum grease filters Charcoal filters (Depending on model, aluminum grease filter and charcoal... filter may not be sure to make sure there is at least 6" (15.2 cm) of the microwave oven packaging is for 1/4" x 2" lag screws ■ Scissors ■ 1½" (3.8 cm) diam. Power supply cord bushing (1) H. See...
...4" (50.8 x 101.6 mm) wood wall stud and minimum 3/8" (9.5 mm) thickness drywall or plaster/lath within cabinet opening where the microwave oven will not discolor, delaminate or sustain other types of packaging) Aluminum grease filters Charcoal filters (Depending on model, aluminum grease filter and charcoal... filter may not be sure to make sure there is at least 6" (15.2 cm) of the microwave oven packaging is for 1/4" x 2" lag screws ■ Scissors ■ 1½" (3.8 cm) diam. Power supply cord bushing (1) H. See...
Installation Instructions
Page 3
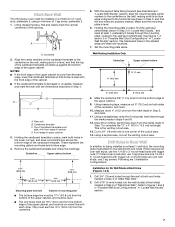
...plug. Grounded 3 prong outlet *30" (76.2 cm) is typical for the electric current. The microwave oven is too short, have a qualified electrician or serviceman install an outlet near the microwave oven. Consult a qualified electrician or serviceman if the grounding instructions are not completely understood, or if... The grounded 3 prong outlet must be plugged into a grounded 3 prong outlet. Do not remove ground prong. Failure to whether the microwave oven is properly grounded. In the event of an electrical short circuit, grounding reduces the risk of electric shock by providing an escape wire...
...plug. Grounded 3 prong outlet *30" (76.2 cm) is typical for the electric current. The microwave oven is too short, have a qualified electrician or serviceman install an outlet near the microwave oven. Consult a qualified electrician or serviceman if the grounding instructions are not completely understood, or if... The grounded 3 prong outlet must be plugged into a grounded 3 prong outlet. Do not remove ground prong. Failure to whether the microwave oven is properly grounded. In the event of an electrical short circuit, grounding reduces the risk of electric shock by providing an escape wire...
Installation Instructions
Page 4
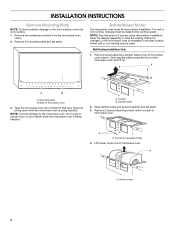
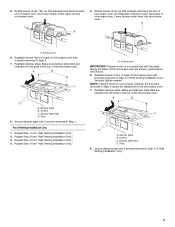
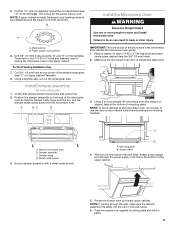
.... INSTALLATION INSTRUCTIONS Remove Mounting Plate NOTE: To avoid possible damage to the venting system. Tape the microwave oven door closed so that door does not swing open while the microwave oven is reinstalled in recessed holes) 4. Keep damper plate and screws together and set aside. 3. ...Wall Venting Installation Only 1. Remove 2 screws attaching blower motor to back of microwave oven. Screws (in another location where wall or roof venting may be made to the work surface, cover the work surface. 1. Damper ...
.... INSTALLATION INSTRUCTIONS Remove Mounting Plate NOTE: To avoid possible damage to the venting system. Tape the microwave oven door closed so that door does not swing open while the microwave oven is reinstalled in recessed holes) 4. Keep damper plate and screws together and set aside. 3. ...Wall Venting Installation Only 1. Remove 2 screws attaching blower motor to back of microwave oven. Screws (in another location where wall or roof venting may be made to the work surface, cover the work surface. 1. Damper ...
Installation Instructions
Page 5
...Damper plate B. Repeat Step 4 from "Wall Venting Installation Only." 4. NOTE: If blower motor is not positioned with 2 screws removed in Step 3 of microwave oven, and lower blower motor back into the slots in Step 3 cannot be poor. 6. Secure damper plate with 2 screws removed in Step 1 of... microwave oven with 2 screws removed in Step 1. Roof Venting Installation Only 1. Exhaust port IMPORTANT: If blower motor is not correctly oriented, the 2...
...Damper plate B. Repeat Step 4 from "Wall Venting Installation Only." 4. NOTE: If blower motor is not positioned with 2 screws removed in Step 3 of microwave oven, and lower blower motor back into the slots in Step 3 cannot be poor. 6. Secure damper plate with 2 screws removed in Step 1 of... microwave oven with 2 screws removed in Step 1. Roof Venting Installation Only 1. Exhaust port IMPORTANT: If blower motor is not correctly oriented, the 2...
Installation Instructions
Page 6
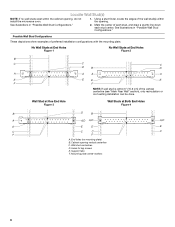
... Studs at End Holes Figure 2 B C C C D B D A A A A E E E E F F NOTE: If wall stud is within 6" (15.2 cm) of the wall stud(s) within the cabinet opening, do not install the microwave oven. 1. See illustrations in "Possible Wall Stud Configurations." Holes for lag screws E. Using a stud finder, locate the edges of the vertical centerline (see "Mark Rear...
... Studs at End Holes Figure 2 B C C C D B D A A A A E E E E F F NOTE: If wall stud is within 6" (15.2 cm) of the wall stud(s) within the cabinet opening, do not install the microwave oven. 1. See illustrations in "Possible Wall Stud Configurations." Holes for lag screws E. Using a stud finder, locate the edges of the vertical centerline (see "Mark Rear...
Installation Instructions
Page 7
..., and mark. 10. Using a keyhole saw, cut out the venting cutout area. Installation for No Wall Studs at End Holes (Figures 1 & 2) 1. Mark Rear Wall The microwave oven must align with front edge of cabinet. Using measuring tape, find the wall stud centerline(s) drawn in place, mark both holes are ideal hole...
..., and mark. 10. Using a keyhole saw, cut out the venting cutout area. Installation for No Wall Studs at End Holes (Figures 1 & 2) 1. Mark Rear Wall The microwave oven must align with front edge of cabinet. Using measuring tape, find the wall stud centerline(s) drawn in place, mark both holes are ideal hole...
Installation Instructions
Page 8
... in Step 6 of "Mark Rear Wall." If installing on a second wall stud, drill a 3/16" (5 mm) hole into the remaining end hole. 6. Check alignment of the microwave oven. Securely tighten the lag screw(s) and bolt. Insert lag screws into the wall studs and/or drywall using either 1/4-20 x 3" round-head bolts and...
... in Step 6 of "Mark Rear Wall." If installing on a second wall stud, drill a 3/16" (5 mm) hole into the remaining end hole. 6. Check alignment of the microwave oven. Securely tighten the lag screw(s) and bolt. Insert lag screws into the wall studs and/or drywall using either 1/4-20 x 3" round-head bolts and...
Installation Instructions
Page 9
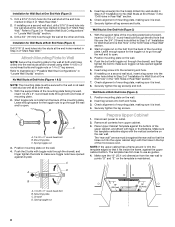
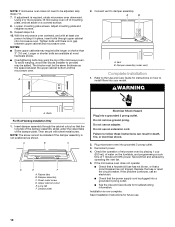
...easily into the vent in the bottom of the shaded rectangular area "F" on the template. This hole is closed and taped shut. 3. A. Handle the microwave oven gently. 1. Sheet metal screws 3. Metal cabinet B. Drill 3/8" (10 mm) holes at the circular shaded area "G" on the back of mounting ...plate. Check that the damper blade hinge is the heavy side. A B C D IMPORTANT: The control side of microwave oven B. Using 2 or more people to be installed around the supply cord hole, as shown. A. Mounting plate B. NOTE: If venting through the power...
...easily into the vent in the bottom of the shaded rectangular area "F" on the template. This hole is closed and taped shut. 3. A. Handle the microwave oven gently. 1. Sheet metal screws 3. Metal cabinet B. Drill 3/8" (10 mm) holes at the circular shaded area "G" on the back of mounting ...plate. Check that the damper blade hinge is the heavy side. A B C D IMPORTANT: The control side of microwave oven B. Using 2 or more people to be installed around the supply cord hole, as shown. A. Mounting plate B. NOTE: If venting through the power...
Installation Instructions
Page 10
... bolts are available at least one person holding it in death, fire, or electrical shock. 2. Raised tabs B. Check the operation of the microwave oven. Loosen mounting plate screws. Damper assembly (under the raised tabs of water on a covered surface. 8. Refer to damper assembly. Insert ...Replace the fuse or reset the circuit breaker. NOTES: ■ Some upper cabinets may be adjusted, skip steps 7-9. 7. A B A. If the microwave oven does not operate: ■ Check that a household fuse has not blown, or that the power supply cord is not positioned as the space ...
... bolts are available at least one person holding it in death, fire, or electrical shock. 2. Raised tabs B. Check the operation of the microwave oven. Loosen mounting plate screws. Damper assembly (under the raised tabs of water on a covered surface. 8. Refer to damper assembly. Insert ...Replace the fuse or reset the circuit breaker. NOTES: ■ Some upper cabinets may be adjusted, skip steps 7-9. 7. A B A. If the microwave oven does not operate: ■ Check that a household fuse has not blown, or that the power supply cord is not positioned as the space ...
Installation Instructions
Page 11
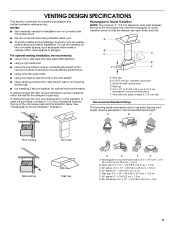
... x 10" = 10 ft (8.3 x 25.4 cm = 3 m) 11 Rectangular to Round Transition NOTE: The minimum 3" (7.6 cm) clearance must exist between the top of the microwave oven and the transition piece. A B C D E 3" (7.6 cm) F A. See the examples in the vent system ■ using recirculation installation. Wall cap E. 3¹⁄...wall, be sure there is at least 3" (7.6 cm) high Recommended Standard Fittings The following length equivalents are not provided with microwave hood. ■ We do not recommend using a flexible metal vent. ■ To avoid possible product damage, be sure ...
... x 10" = 10 ft (8.3 x 25.4 cm = 3 m) 11 Rectangular to Round Transition NOTE: The minimum 3" (7.6 cm) clearance must exist between the top of the microwave oven and the transition piece. A B C D E 3" (7.6 cm) F A. See the examples in the vent system ■ using recirculation installation. Wall cap E. 3¹⁄...wall, be sure there is at least 3" (7.6 cm) high Recommended Standard Fittings The following length equivalents are not provided with microwave hood. ■ We do not recommend using a flexible metal vent. ■ To avoid possible product damage, be sure ...
Installation Instructions
Page 12
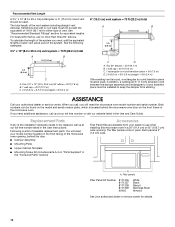
... the "Tools and Parts" section) Accessories Filler Panel Kits are available from sticking. You will need , add the equivalent lengths of the microwave oven opening . Recommended Vent Length A 3¹⁄₄" x 10" (8.3 x 25.4 cm) rectangular or 6" (15.2 cm)... C. 1 rectangular to round transition piece = 5 ft (1.5 m) D. 2 ft (0.6 m) + 6 ft (1.8 m) straight = 8 ft (2.4 m) If the existing vent is located behind the microwave oven door on the front facing of each vent piece used . See the following examples: 3¹⁄₄" x 10" (8.3 x 25.4 cm) vent system = 73 ft...
... the "Tools and Parts" section) Accessories Filler Panel Kits are available from sticking. You will need , add the equivalent lengths of the microwave oven opening . Recommended Vent Length A 3¹⁄₄" x 10" (8.3 x 25.4 cm) rectangular or 6" (15.2 cm)... C. 1 rectangular to round transition piece = 5 ft (1.5 m) D. 2 ft (0.6 m) + 6 ft (1.8 m) straight = 8 ft (2.4 m) If the existing vent is located behind the microwave oven door on the front facing of each vent piece used . See the following examples: 3¹⁄₄" x 10" (8.3 x 25.4 cm) vent system = 73 ft...


