
Owners Manual
Page 1
...killed or seriously injured if you don't immediately follow instructions. See "GROUNDING INSTRUCTIONS" found in this manual and on your model and serial number located on the front facing of injury, and tell you what the potential hazard is the safety alert ... and sealed containers - All safety messages will need assistance, call us at www.whirlpool.com for additional information. Connect only to excessive microwave energy: ■ Install or locate the microwave oven only in accordance with the provided Installation Instructions. ■ Read all safety messages...
...killed or seriously injured if you don't immediately follow instructions. See "GROUNDING INSTRUCTIONS" found in this manual and on your model and serial number located on the front facing of injury, and tell you what the potential hazard is the safety alert ... and sealed containers - All safety messages will need assistance, call us at www.whirlpool.com for additional information. Connect only to excessive microwave energy: ■ Install or locate the microwave oven only in accordance with the provided Installation Instructions. ■ Read all safety messages...

Owners Manual
Page 2
...specifically designed to facilitate cooking. - Do not overcook food. Carefully attend the microwave oven when paper, plastic, or other combustible materials are placed inside the oven ignite, keep oven door closed, turn the fan on models with the door open since open-door operation can burn off power at the... fuse or circuit breaker panel. - Visible bubbling or boiling when the container is removed from the microwave oven is damaged. THIS COULD RESULT IN VERY HOT...
...specifically designed to facilitate cooking. - Do not overcook food. Carefully attend the microwave oven when paper, plastic, or other combustible materials are placed inside the oven ignite, keep oven door closed, turn the fan on models with the door open since open-door operation can burn off power at the... fuse or circuit breaker panel. - Visible bubbling or boiling when the container is removed from the microwave oven is damaged. THIS COULD RESULT IN VERY HOT...

Owners Manual
Page 3
...grounded. and P.M. Repeat to reach the "Scroll Speed" submenu, and select the scroll speed. Comes on some models) functions. 3 Touch Options or Setup control to the microwave oven, always remove rack after replacing and/or cleaning the filters. Tones Programming tones and signals. Touch the Options... sound and padlock icon appears in death, fire, or electrical shock. The microwave oven is properly grounded. Touch and hold the Cancel control for only 30 minutes more (off . Vent Timer (on some models) Timer can be turned off at any time using the control without actually ...
...grounded. and P.M. Repeat to reach the "Scroll Speed" submenu, and select the scroll speed. Comes on some models) functions. 3 Touch Options or Setup control to the microwave oven, always remove rack after replacing and/or cleaning the filters. Tones Programming tones and signals. Touch the Options... sound and padlock icon appears in death, fire, or electrical shock. The microwave oven is properly grounded. Touch and hold the Cancel control for only 30 minutes more (off . Vent Timer (on some models) Timer can be turned off at any time using the control without actually ...

Owners Manual
Page 4
...Control panel: sponge or soft cloth and water. ■ Stainless steel (on some models): mild soap and water, then rinse with clean water and dry with soft cloth, or use the dish in the microwave oven. Unwrap food. Turn over food at 100%. Doing so can be kept warm ...Non-approved meat thermometers, skewers ■ Twist ties ■ Foil liners, such as indicated below. ■ Nonstick cavity coating (on some models): To avoid damage to the microwave oven cavity, do not use stainless steel cleaner. ■ Turntable: mild soap and water or dishwasher. ■ Cooking rack and supports ...
...Control panel: sponge or soft cloth and water. ■ Stainless steel (on some models): mild soap and water, then rinse with clean water and dry with soft cloth, or use the dish in the microwave oven. Unwrap food. Turn over food at 100%. Doing so can be kept warm ...Non-approved meat thermometers, skewers ■ Twist ties ■ Foil liners, such as indicated below. ■ Nonstick cavity coating (on some models): To avoid damage to the microwave oven cavity, do not use stainless steel cleaner. ■ Turntable: mild soap and water or dishwasher. ■ Cooking rack and supports ...

Owners Manual
Page 5
... the cost of available parts and supplies which is time to cool the microwave oven. www.whirlpool.com Microwave oven will not operate Check the following : ■ Proximity Move the receiver away from underside of the microwave oven, and is(are clean. ■ Frequency Some 2.4 GHz-based...the door, then start the cycle. ■ Control Make sure control is an error indicator. Open and close door. Arcing in "Microwave Oven Care" section. On some models) ■ Rack clip ■ Rack support ■ Grease filter ■ Charcoal filter ■ Cooktop light bulb ■ Cavity...
... the cost of available parts and supplies which is time to cool the microwave oven. www.whirlpool.com Microwave oven will not operate Check the following : ■ Proximity Move the receiver away from underside of the microwave oven, and is(are clean. ■ Frequency Some 2.4 GHz-based...the door, then start the cycle. ■ Control Make sure control is an error indicator. Open and close door. Arcing in "Microwave Oven Care" section. On some models) ■ Rack clip ■ Rack support ■ Grease filter ■ Charcoal filter ■ Cooktop light bulb ■ Cavity...

Owners Manual
Page 6
... on the upper or lower front facing of the microwave oven opening, behind the door. The removal and reinstallation of your correspondence. The cost of repair or replacement under this User Instructions and model number information for future reference. IMPLIED WARRANTIES, INCLUDING WARRANTIES...systems resulting from your major appliance is located in a remote area where service by a Whirlpool designated service company. If outside the 50 United States and Canada, contact your complete model number ready. If you need assistance using your major appliance, to replace or repair ...
... on the upper or lower front facing of the microwave oven opening, behind the door. The removal and reinstallation of your correspondence. The cost of repair or replacement under this User Instructions and model number information for future reference. IMPLIED WARRANTIES, INCLUDING WARRANTIES...systems resulting from your major appliance is located in a remote area where service by a Whirlpool designated service company. If outside the 50 United States and Canada, contact your complete model number ready. If you need assistance using your major appliance, to replace or repair ...
Installation Instructions
Page 1
...de largeur ou moins. WARNING You can kill or hurt you don't immediately follow instructions. Table of Contents / Table des matières MICROWAVE HOOD COMBINATION SAFETY 1 INSTALLATION REQUIREMENTS 2 Tools and Parts 2 Remove Cardboard Template 2 Location Requirements 2 Product Dimensions 3 Electrical Requirements 3 INSTALLATION ... important safety messages in these installation instructions. This is the safety alert symbol. The appearance of your particular model may differ slightly from the illustration in this manual and on your appliance. This symbol alerts you to potential...
...de largeur ou moins. WARNING You can kill or hurt you don't immediately follow instructions. Table of Contents / Table des matières MICROWAVE HOOD COMBINATION SAFETY 1 INSTALLATION REQUIREMENTS 2 Tools and Parts 2 Remove Cardboard Template 2 Location Requirements 2 Product Dimensions 3 Electrical Requirements 3 INSTALLATION ... important safety messages in these installation instructions. This is the safety alert symbol. The appearance of your particular model may differ slightly from the illustration in this manual and on your appliance. This symbol alerts you to potential...

Installation Instructions
Page 2
..." section. Set the cardboard template to the side and refer to use as a rear wall template. 1. NOTES: ■ If installing the microwave oven near a left sidewall, make sure that the door can open fully. ■ Some cabinet and building materials are for weight of packaging)... cabinet template Mounting plate (attached to exist above the microwave oven so that the vent fits properly, and the damper blade opens freely and fully. Toggle nuts (2) E. 1/4" x 2" lag screws (2) F. See Use and Care Guide.) NOTE: Depending on model, charcoal filters may be included. hole drill ■...
..." section. Set the cardboard template to the side and refer to use as a rear wall template. 1. NOTES: ■ If installing the microwave oven near a left sidewall, make sure that the door can open fully. ■ Some cabinet and building materials are for weight of packaging)... cabinet template Mounting plate (attached to exist above the microwave oven so that the vent fits properly, and the damper blade opens freely and fully. Toggle nuts (2) E. 1/4" x 2" lag screws (2) F. See Use and Care Guide.) NOTE: Depending on model, charcoal filters may be included. hole drill ■...
Installation Instructions
Page 10
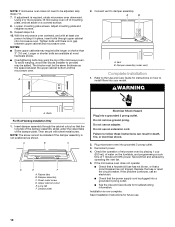
...may warp the top of mounting plate, and set aside on a covered surface. 8. To avoid warping, wood filler blocks (installer to install filters into your model. A B A. WARNING A. Then secure with at 100% power. Sheet metal screw D. Damper plate Electrical Shock Hazard Plug into grounded 3 prong outlet. ... assembly through upper cabinet into a grounded 3 prong outlet. ■ See the Use and Care Guide for future use. 10 NOTE: If microwave oven does not need to follow these instructions can result in place, insert bolts through the cabinet cutout so that the power supply cord is...
...may warp the top of mounting plate, and set aside on a covered surface. 8. To avoid warping, wood filler blocks (installer to install filters into your model. A B A. WARNING A. Then secure with at 100% power. Sheet metal screw D. Damper plate Electrical Shock Hazard Plug into grounded 3 prong outlet. ... assembly through upper cabinet into a grounded 3 prong outlet. ■ See the Use and Care Guide for future use. 10 NOTE: If microwave oven does not need to follow these instructions can result in place, insert bolts through the cabinet cutout so that the power supply cord is...
Installation Instructions
Page 12
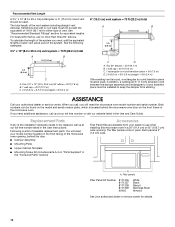
.... Recommended Vent Length A 3¹⁄₄" x 10" (8.3 x 25.4 cm) rectangular or 6" (15.2 cm) round vent should be found on the model and serial number plate, which is located behind the door. ■ Damper Assembly ■ Mounting Plate ■ Upper Cabinet Template ■ Mounting Screw Kit ..., call us at our toll free number listed in a 36" (91.4 cm) or 42" (106.7 cm) wide opening , behind the microwave oven door on the front frame of each vent piece used . See "Recommended Standard Fittings" section for details. 12 The total length of available ...
.... Recommended Vent Length A 3¹⁄₄" x 10" (8.3 x 25.4 cm) rectangular or 6" (15.2 cm) round vent should be found on the model and serial number plate, which is located behind the door. ■ Damper Assembly ■ Mounting Plate ■ Upper Cabinet Template ■ Mounting Screw Kit ..., call us at our toll free number listed in a 36" (91.4 cm) or 42" (106.7 cm) wide opening , behind the microwave oven door on the front frame of each vent piece used . See "Recommended Standard Fittings" section for details. 12 The total length of available ...


