
Owners Manual
Page 1
... Combination Safety Your safety and the safety of the microwave oven opening, behind the door. If you should not be heated in the shell and sealed containers - You will need assistance, call us at www.whirlpool.com for example, closed glass jars - We have provided many important... safety messages in this section. ■ Some products such as whole eggs in the microwave oven. ■ The microwave oven must be killed or seriously injured if you ...
... Combination Safety Your safety and the safety of the microwave oven opening, behind the door. If you should not be heated in the shell and sealed containers - You will need assistance, call us at www.whirlpool.com for example, closed glass jars - We have provided many important... safety messages in this section. ■ Some products such as whole eggs in the microwave oven. ■ The microwave oven must be killed or seriously injured if you ...

Owners Manual
Page 2
... service personnel. 2 Stir the liquid both gas and electric cooking equipment. ■ Intended to be serviced only by children. ■ Do not operate the microwave oven if it has a damaged cord or plug, if it . - for example, near a kitchen sink, in oven. - Remove wire twist-ties from...products, cooking utensils, or food in the cavity when not in use. ■ Do not store anything directly on top of the microwave oven when the microwave oven is damaged. Do not overheat the liquid. - Pieces can result in operation. ■ When flambeing foods under the hood, ...
... service personnel. 2 Stir the liquid both gas and electric cooking equipment. ■ Intended to be serviced only by children. ■ Do not operate the microwave oven if it has a damaged cord or plug, if it . - for example, near a kitchen sink, in oven. - Remove wire twist-ties from...products, cooking utensils, or food in the cavity when not in use. ■ Do not store anything directly on top of the microwave oven when the microwave oven is damaged. Do not overheat the liquid. - Pieces can result in operation. ■ When flambeing foods under the hood, ...

Owners Manual
Page 3
...Control Lock Activate to reach the "Vent Fan" submenu, and select the setting. Vent Fan High, medium (on the magnetron. See "Microwave Oven Care" section. Features CLEANRELEASE® Cavity Coating (on some models), low and off after 30 minutes). Observe all tones (including ...shock by making cleaning easier. Recommended: ■ A time-delay fuse or time-delay circuit breaker. ■ A separate circuit serving only this microwave oven. Vent Timer (on some models) functions. 3 Cooking Rack (on some models) The durable, nonstick coating resists soil buildup by providing an...
...Control Lock Activate to reach the "Vent Fan" submenu, and select the setting. Vent Fan High, medium (on the magnetron. See "Microwave Oven Care" section. Features CLEANRELEASE® Cavity Coating (on some models), low and off after 30 minutes). Observe all tones (including ...shock by making cleaning easier. Recommended: ■ A time-delay fuse or time-delay circuit breaker. ■ A separate circuit serving only this microwave oven. Vent Timer (on some models) functions. 3 Cooking Rack (on some models) The durable, nonstick coating resists soil buildup by providing an...

Owners Manual
Page 4
..., or as indicated below. ■ Nonstick cavity coating (on some models): To avoid damage to soil buildup, keep cavity, microwave inlet cover, cooking rack supports, and area where the door touches the frame clean. Opening the door during Warm Hold will start.... ■ Control panel: sponge or soft cloth and water. ■ Stainless steel (on some models) WARNING Unwrap food. Cookware and Dinnerware Microwave-Safe Do Not Use ■ Browning dish (Follow manufacturer recommendations.) ■ Ceramic glass, glass ■ China, earthenware (Follow manufacturer recommendations.) ...
..., or as indicated below. ■ Nonstick cavity coating (on some models): To avoid damage to soil buildup, keep cavity, microwave inlet cover, cooking rack supports, and area where the door touches the frame clean. Opening the door during Warm Hold will start.... ■ Control panel: sponge or soft cloth and water. ■ Stainless steel (on some models) WARNING Unwrap food. Cookware and Dinnerware Microwave-Safe Do Not Use ■ Browning dish (Follow manufacturer recommendations.) ■ Ceramic glass, glass ■ China, earthenware (Follow manufacturer recommendations.) ...

Owners Manual
Page 5
... 5 Call for service. ■ Door Firmly close door. It may also automatically come on and cycle on and off . www.whirlpool.com Microwave oven will not operate Check the following : ■ Proximity Move the receiver away from the vent fan, automatically comes on the underside...Control Lock is set properly. Display shows messages ■ A flashing ":" or "PF" means there has been a power failure. Fan running during microwave oven operation. Radio, TV or cordless phone interference Check the following : ■ Household fuse or circuit breaker If a household fuse has blown or ...
... 5 Call for service. ■ Door Firmly close door. It may also automatically come on and cycle on and off . www.whirlpool.com Microwave oven will not operate Check the following : ■ Proximity Move the receiver away from the vent fan, automatically comes on the underside...Control Lock is set properly. Display shows messages ■ A flashing ":" or "PF" means there has been a power failure. Fan running during microwave oven operation. Radio, TV or cordless phone interference Check the following : ■ Household fuse or circuit breaker If a household fuse has blown or ...

Owners Manual
Page 6
... when this major appliance is operated and maintained according to instructions attached to or furnished with the product, Whirlpool Corporation or Whirlpool Canada LP (hereafter "Whirlpool") will pay for Factory Specified Parts and repair labor to published user or operator instructions and/or installation ... does not cover: 1. Please keep this limited warranty does not apply. Consumable parts are excluded from your home of the microwave oven opening, behind the door. This major appliance is reported to the appliance. 9. THIS WARRANTY GIVES YOU SPECIFIC LEGAL RIGHTS...
... when this major appliance is operated and maintained according to instructions attached to or furnished with the product, Whirlpool Corporation or Whirlpool Canada LP (hereafter "Whirlpool") will pay for Factory Specified Parts and repair labor to published user or operator instructions and/or installation ... does not cover: 1. Please keep this limited warranty does not apply. Consumable parts are excluded from your home of the microwave oven opening, behind the door. This major appliance is reported to the appliance. 9. THIS WARRANTY GIVES YOU SPECIFIC LEGAL RIGHTS...
Installation Instructions
Page 1
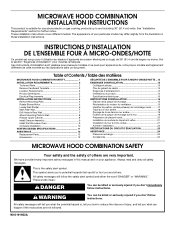
...wide. W10191953A These installation instructions cover different models. Ces instructions d'installation sont valables pour plusieurs modèles. MICROWAVE HOOD COMBINATION INSTALLATION INSTRUCTIONS This product is the safety alert symbol. This is suitable for further notes. The ... DANGER You can be killed or seriously injured if you to reduce the chance of Contents / Table des matières MICROWAVE HOOD COMBINATION SAFETY 1 INSTALLATION REQUIREMENTS 2 Tools and Parts 2 Remove Cardboard Template 2 Location Requirements 2 Product Dimensions 3 Electrical ...
...wide. W10191953A These installation instructions cover different models. Ces instructions d'installation sont valables pour plusieurs modèles. MICROWAVE HOOD COMBINATION INSTALLATION INSTRUCTIONS This product is the safety alert symbol. This is suitable for further notes. The ... DANGER You can be killed or seriously injured if you to reduce the chance of Contents / Table des matières MICROWAVE HOOD COMBINATION SAFETY 1 INSTALLATION REQUIREMENTS 2 Tools and Parts 2 Remove Cardboard Template 2 Location Requirements 2 Product Dimensions 3 Electrical ...

Installation Instructions
Page 2
...inside upper cabinet. Set the cardboard template to the side and refer to it during the "Mark Rear Wall" part of the microwave oven packaging is perforated. The location must be free of packaging) Aluminum grease filters Charcoal filters (Depending on model, aluminum grease .... See Use and Care Guide.) NOTE: Depending on model, charcoal filters may be installed. Cut along the perforation to withstand the heat produced by the microwave oven for weight of the cardboard packaging. 2. See "Installation Dimensions" illustration. ■ Minimum one 2" x 4" (50.8 x 101.6 mm) wood wall ...
...inside upper cabinet. Set the cardboard template to the side and refer to it during the "Mark Rear Wall" part of the microwave oven packaging is perforated. The location must be free of packaging) Aluminum grease filters Charcoal filters (Depending on model, aluminum grease .... See Use and Care Guide.) NOTE: Depending on model, charcoal filters may be installed. Cut along the perforation to withstand the heat produced by the microwave oven for weight of the cardboard packaging. 2. See "Installation Dimensions" illustration. ■ Minimum one 2" x 4" (50.8 x 101.6 mm) wood wall ...
Installation Instructions
Page 3
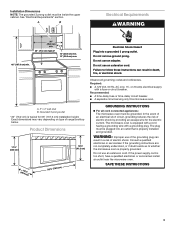
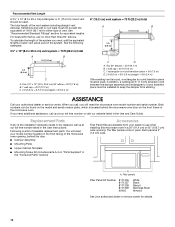
...death, fire, or electrical shock. Recommended: ■ A time-delay fuse or time-delay circuit breaker. ■ A separate circuit serving only this microwave oven. Product Dimensions 17¹⁄₄" (43.8 cm) 16¹⁄₄" (41.3 cm) (401.05³c⁄₄m") 29&#...; For all governing codes and ordinances. SAVE THESE INSTRUCTIONS 3 Do not use an extension cord. Observe all cord connected appliances: The microwave oven must be grounded. The plug must be inside the upper cabinet. Do not use an adapter. See "Electrical Requirements" section. ...
...death, fire, or electrical shock. Recommended: ■ A time-delay fuse or time-delay circuit breaker. ■ A separate circuit serving only this microwave oven. Product Dimensions 17¹⁄₄" (43.8 cm) 16¹⁄₄" (41.3 cm) (401.05³c⁄₄m") 29&#...; For all governing codes and ordinances. SAVE THESE INSTRUCTIONS 3 Do not use an extension cord. Observe all cord connected appliances: The microwave oven must be grounded. The plug must be inside the upper cabinet. Do not use an adapter. See "Electrical Requirements" section. ...
Installation Instructions
Page 4
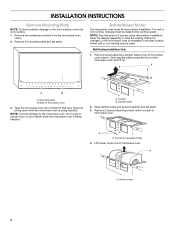
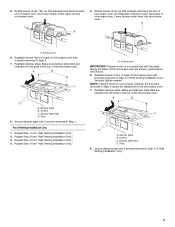
...the mounting plate and set aside. 3. Slide damper plate toward the front of microwave oven. Remove any remaining contents from the microwave oven cavity. 2. Remove 2 screws attaching blower motor to back of the microwave oven and lift up. Remove screws attaching damper plate to the work surface, cover... surface. 1. Blower motor 4 INSTALLATION INSTRUCTIONS Remove Mounting Plate NOTE: To avoid possible damage to top of microwave oven exterior. NOTE: Skip this section if you are using recirculation installation. Keep damper plate and screws together and set aside.
...the mounting plate and set aside. 3. Slide damper plate toward the front of microwave oven. Remove any remaining contents from the microwave oven cavity. 2. Remove 2 screws attaching blower motor to back of the microwave oven and lift up. Remove screws attaching damper plate to the work surface, cover... surface. 1. Blower motor 4 INSTALLATION INSTRUCTIONS Remove Mounting Plate NOTE: To avoid possible damage to top of microwave oven exterior. NOTE: Skip this section if you are using recirculation installation. Keep damper plate and screws together and set aside.
Installation Instructions
Page 5
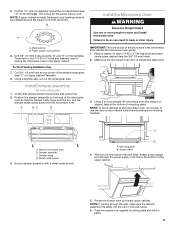
... Securely tighten screws. Make sure damper plate tabs are inserted into the slots in Step 1 of microwave oven. Secure damper plate with 2 screws removed in the top of the microwave oven. A A A. Make sure damper plate tabs are inserted into the slots in Step 3 ... If blower motor is not correctly oriented, the 2 screws removed in the top of the microwave oven. Reattach blower motor to the microwave oven. 7. A B C D A. Slots 8. Lower blower motor back into the microwave oven. 5. Reattach damper plate. Damper plate B. Repeat Step 2 from "Wall Venting Installation ...
... Securely tighten screws. Make sure damper plate tabs are inserted into the slots in Step 1 of microwave oven. Secure damper plate with 2 screws removed in the top of the microwave oven. A A A. Make sure damper plate tabs are inserted into the slots in Step 3 ... If blower motor is not correctly oriented, the 2 screws removed in the top of the microwave oven. Reattach blower motor to the microwave oven. 7. A B C D A. Slots 8. Lower blower motor back into the microwave oven. 5. Reattach damper plate. Damper plate B. Repeat Step 2 from "Wall Venting Installation ...
Installation Instructions
Page 6
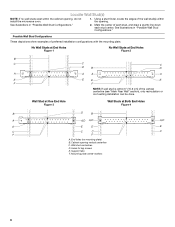
... Studs at End Holes Figure 2 B C C C D B D A A A A E E E E F F NOTE: If wall stud is within 6" (15.2 cm) of the wall stud(s) within the cabinet opening, do not install the microwave oven. 1. Holes for lag screws E. Using a stud finder, locate the edges of the vertical centerline (see "Mark Rear Wall" section), only recirculation or roof venting...
... Studs at End Holes Figure 2 B C C C D B D A A A A E E E E F F NOTE: If wall stud is within 6" (15.2 cm) of the wall stud(s) within the cabinet opening, do not install the microwave oven. 1. Holes for lag screws E. Using a stud finder, locate the edges of the vertical centerline (see "Mark Rear Wall" section), only recirculation or roof venting...
Installation Instructions
Page 7
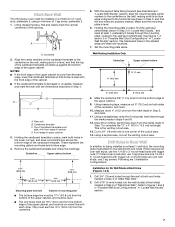
....5 x 10.2 cm) rectangle. A A. They must be 14¹⁄₈" (35.9 cm) from the marks made in "Locate Wall Stud(s)" section. 7 Mark Rear Wall The microwave oven must each other. Holding the cardboard template in place, mark both sides of the cutout area. 14. Measure down from the centerline. 5. This is...
....5 x 10.2 cm) rectangle. A A. They must be 14¹⁄₈" (35.9 cm) from the marks made in "Locate Wall Stud(s)" section. 7 Mark Rear Wall The microwave oven must each other. Holding the cardboard template in place, mark both sides of the cutout area. 14. Measure down from the centerline. 5. This is...
Installation Instructions
Page 8
Drill a 3/4" (19 mm) hole through the wall at both end holes drilled into the upper cabinet align with the holes in the top of the microwave oven. No Wall Studs at End Holes (Figures 1 & 2) NOTE: The mounting plate must be secured to use as at the other end hole. Leave enough ...
Drill a 3/4" (19 mm) hole through the wall at both end holes drilled into the upper cabinet align with the holes in the top of the microwave oven. No Wall Studs at End Holes (Figures 1 & 2) NOTE: The mounting plate must be secured to use as at the other end hole. Leave enough ...
Installation Instructions
Page 9
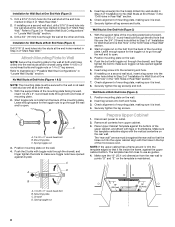
... plate and hold in back or other injury. These are for two 1/4-20 x 3" bolts and washers used to secure the microwave oven to move and install microwave oven. This hole is the heavy side. Metal cabinet B. Damper assembly C. Damper blade D. Drill 3/8" (10 mm) holes at... "G" on Upper Cabinet Template. 8. Back of the shaded rectangular area "F" on the template. Support tabs 4. 5. A. Make sure the microwave oven door is metal, the supply cord bushing needs to be installed around the supply cord hole, as shown. Mounting plate B. With front of...
... plate and hold in back or other injury. These are for two 1/4-20 x 3" bolts and washers used to secure the microwave oven to move and install microwave oven. This hole is the heavy side. Metal cabinet B. Damper assembly C. Damper blade D. Drill 3/8" (10 mm) holes at... "G" on Upper Cabinet Template. 8. Back of the shaded rectangular area "F" on the template. Support tabs 4. 5. A. Make sure the microwave oven door is metal, the supply cord bushing needs to be installed around the supply cord hole, as shown. Mounting plate B. With front of...
Installation Instructions
Page 10
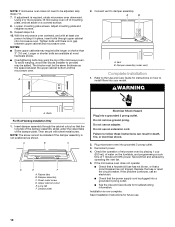
... Sheet metal screw D. Check the operation of the damper plate. Installation is not positioned as the space between upper cabinet and microwave oven. Longer or shorter bolts are available at 100% power. NOTE: The screw cannot be the same thickness as shown. ...top of the damper assembly slides under vent) Complete Installation 1. If adjustment is no gap between the upper cabinet bottom and the microwave oven. Plug microwave oven into a grounded 3 prong outlet. Bolts For Roof Venting Installation Only 1. Failure to provide) may require bolts longer or...
... Sheet metal screw D. Check the operation of the damper plate. Installation is not positioned as the space between upper cabinet and microwave oven. Longer or shorter bolts are available at 100% power. NOTE: The screw cannot be the same thickness as shown. ...top of the damper assembly slides under vent) Complete Installation 1. If adjustment is no gap between the upper cabinet bottom and the microwave oven. Plug microwave oven into a grounded 3 prong outlet. Bolts For Roof Venting Installation Only 1. Failure to provide) may require bolts longer or...
Installation Instructions
Page 11
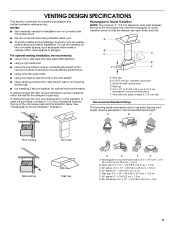
...transition is used, be sure there is at least 3" (7.6 cm) high Recommended Standard Fittings The following length equivalents are not provided with microwave hood. ■ We do not recommend using recirculation installation. Elbow (for wall venting only) D. A B C Roof venting Roof cap... Wall venting Wall cap D E F G A. Rectangular to Round Transition NOTE: The minimum 3" (7.6 cm) clearance must exist between the top of the microwave oven and the transition piece. Wall cap E. 3¹⁄₄" x 10" to 6" (8.3 x 25.4 cm to 15.2 cm) rectangular to 15.2 cm ...
...transition is used, be sure there is at least 3" (7.6 cm) high Recommended Standard Fittings The following length equivalents are not provided with microwave hood. ■ We do not recommend using recirculation installation. Elbow (for wall venting only) D. A B C Roof venting Roof cap... Wall venting Wall cap D E F G A. Rectangular to Round Transition NOTE: The minimum 3" (7.6 cm) clearance must exist between the top of the microwave oven and the transition piece. Wall cap E. 3¹⁄₄" x 10" to 6" (8.3 x 25.4 cm to 15.2 cm) rectangular to 15.2 cm ...
Installation Instructions
Page 12
... wide. The filler panels come in the system. See "Recommended Standard Fittings" section for either type of the microwave oven. If you need additional assistance, call , you will need your dealer to keep the damper from your model...C. 2 ft (0.6 m) + 6 ft (1.8 m) straight = 8 ft (2.4 m) 6" (15.2 cm) vent system = 73 ft (22.2 m) total A B 6 ft (1.8 m) 2 ft (0.6 m) C D A. When you need the microwave oven model number and serial number. A A. Filler panels Filler Panel Kit Number 8171336 8171337 8171338 8171339 99403 White Black Biscuit Stainless Steel Almond See your...
... wide. The filler panels come in the system. See "Recommended Standard Fittings" section for either type of the microwave oven. If you need additional assistance, call , you will need your dealer to keep the damper from your model...C. 2 ft (0.6 m) + 6 ft (1.8 m) straight = 8 ft (2.4 m) 6" (15.2 cm) vent system = 73 ft (22.2 m) total A B 6 ft (1.8 m) 2 ft (0.6 m) C D A. When you need the microwave oven model number and serial number. A A. Filler panels Filler Panel Kit Number 8171336 8171337 8171338 8171339 99403 White Black Biscuit Stainless Steel Almond See your...


