
User Manual
Page 1
...whirlpool.ca for purchasing this high-quality product. Table of Contents RANGE SAFETY 2 The Anti-Tip Bracket 2 FEATURE GUIDE 4 COOKTOP USE 5 OVEN USE 6 Electronic Oven Controls 6 Aluminum Foil 6 Positioning Racks and Bakeware 7 Oven Vent 7 Baking and Roasting 7 Broiling 7 Convection Baking and Roasting 8 Timed Cooking 8 RANGE...should experience a problem not covered in TROUBLESHOOTING, please visit our website at 1-800-807-6777. ® ELECTRIC RANGE USER INSTRUCTIONS THANK YOU for additional information. If you still need your model and serial number located on the ...
...whirlpool.ca for purchasing this high-quality product. Table of Contents RANGE SAFETY 2 The Anti-Tip Bracket 2 FEATURE GUIDE 4 COOKTOP USE 5 OVEN USE 6 Electronic Oven Controls 6 Aluminum Foil 6 Positioning Racks and Bakeware 7 Oven Vent 7 Baking and Roasting 7 Broiling 7 Convection Baking and Roasting 8 Timed Cooking 8 RANGE...should experience a problem not covered in TROUBLESHOOTING, please visit our website at 1-800-807-6777. ® ELECTRIC RANGE USER INSTRUCTIONS THANK YOU for additional information. If you still need your model and serial number located on the ...
User Manual
Page 2
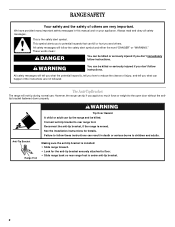
...to children and adults. Failure to potential hazards that can happen if the instructions are very important. Anti-Tip Bracket Range Foot Making sure the anti-tip bracket is installed: • Slide range forward. • Look for details. This is , tell you how to reduce the chance of others . WARNING... Your safety and the safety of injury, and tell you apply too much force or weight to floor. • Slide range back so rear range foot is moved. See the installation instructions for the anti-tip bracket securely attached to the open door without the antitip bracket fastened ...
...to children and adults. Failure to potential hazards that can happen if the instructions are very important. Anti-Tip Bracket Range Foot Making sure the anti-tip bracket is installed: • Slide range forward. • Look for details. This is , tell you how to reduce the chance of others . WARNING... Your safety and the safety of injury, and tell you apply too much force or weight to floor. • Slide range back so rear range foot is moved. See the installation instructions for the anti-tip bracket securely attached to the open door without the antitip bracket fastened ...
User Manual
Page 3
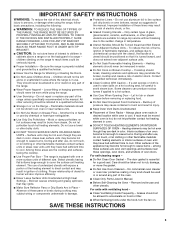
...on Broken Cooktop - Only certain types of glass, glass/ceramic, ceramic, earthenware, or other servicing should be used to wipe spills on the range to reach items could be referred to a qualified technician. ■ Storage in ignition of clothing. To reduce the risk of burns, ignition of...elements may become hot enough to cause burns. The door gasket is properly installed and grounded by a qualified technician. ■ Never Use the Range for a good seal. Care should be positioned so that may become hot enough to cause burns. No commercial oven cleaner or oven liner ...
...on Broken Cooktop - Only certain types of glass, glass/ceramic, ceramic, earthenware, or other servicing should be used to wipe spills on the range to reach items could be referred to a qualified technician. ■ Storage in ignition of clothing. To reduce the risk of burns, ignition of...elements may become hot enough to cause burns. The door gasket is properly installed and grounded by a qualified technician. ■ Never Use the Range for a good seal. Care should be positioned so that may become hot enough to cause burns. No commercial oven cleaner or oven liner ...
User Manual
Page 4
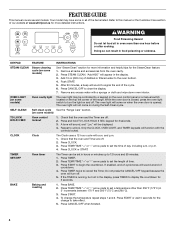
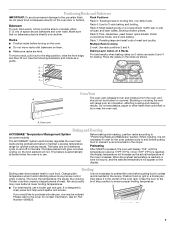
...Add 10 oz (295 mL) of distilled or filtered water to signal the end of countdown. 4. After 20 minutes, a beep will sound at www.whirlpool.ca for the change the temperature repeat steps 1 and 2. Press CANCEL/OFF to set a temperature other than one hour before or after cooking. Press... will sound to the oven bottom. 4. BAKE Baking and roasting 1. FEATURE GUIDE This manual covers several models. SELF-CLEAN Self-clean cycle See the "Range Care" section. (on the top left corner of the items listed. Only the CLOCK, OVEN LIGHT, and TIMER keypads will appear in the display,...
...Add 10 oz (295 mL) of distilled or filtered water to signal the end of countdown. 4. After 20 minutes, a beep will sound at www.whirlpool.ca for the change the temperature repeat steps 1 and 2. Press CANCEL/OFF to set a temperature other than one hour before or after cooking. Press... will sound to the oven bottom. 4. BAKE Baking and roasting 1. FEATURE GUIDE This manual covers several models. SELF-CLEAN Self-clean cycle See the "Range Care" section. (on the top left corner of the items listed. Only the CLOCK, OVEN LIGHT, and TIMER keypads will appear in the display,...
User Manual
Page 5
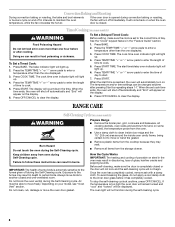
.../or shut off to touch, even after each use or (on at 170°F (75°C) for an oven function with a delayed start Range function Temperature and time adjust INSTRUCTIONS 1. If start should not be at serving temperature before and after the surface cooking area is displayed. Failure to...surface cooking area will help keep it in 5° increments between 300°F and 500°F (150°C and 260°C). 4. REMEMBER: When range is on the console panel. Press TEMP/TIME "+" or "-" arrow pads to adjust time and temperature settings. Timed Cooking allows the oven to be ...
.../or shut off to touch, even after each use or (on at 170°F (75°C) for an oven function with a delayed start Range function Temperature and time adjust INSTRUCTIONS 1. If start should not be at serving temperature before and after the surface cooking area is displayed. Failure to...surface cooking area will help keep it in 5° increments between 300°F and 500°F (150°C and 260°C). 4. REMEMBER: When range is on the console panel. Press TEMP/TIME "+" or "-" arrow pads to adjust time and temperature settings. Timed Cooking allows the oven to be ...
User Manual
Page 7
... putting food in unless recommended in the recipe. The bake and broil elements cycle on ; Preheating After START is not necessary to maintain a precise temperature range for optimal cooking results. Changing the temperature when Custom Broiling allows more precise control when cooking. The lower the temperature, the slower the cooking. It...
... putting food in unless recommended in the recipe. The bake and broil elements cycle on ; Preheating After START is not necessary to maintain a precise temperature range for optimal cooking results. Changing the temperature when Custom Broiling allows more precise control when cooking. The lower the temperature, the slower the cooking. It...
User Manual
Page 8
... . Press BAKE. 2. When the start time is extremely sensitive to maintain the oven temperature, while the fan circulates the hot air. RANGE CARE Self-Cleaning Cycle (on some models) WARNING Prepare Range ■ Remove the broiler pan, grid, cookware and bakeware, all items from the cooktop because they may melt. ■ Remove...
... . Press BAKE. 2. When the start time is extremely sensitive to maintain the oven temperature, while the fan circulates the hot air. RANGE CARE Self-Cleaning Cycle (on some models) WARNING Prepare Range ■ Remove the broiler pan, grid, cookware and bakeware, all items from the cooktop because they may melt. ■ Remove...
User Manual
Page 9
... cool to enter the desired self-clean cycle time. 3. This may be cleaned as soon as the entire range is recommended to use the Self-Clean cycle. General Cleaning IMPORTANT: Before cleaning, make sure all -purpose cleaner: Rinse with clean water and dry with... during the SteamClean cycle. ■ Once the SteamClean cycle is for heavy soil. These can visit the Customer Care section of our website at www.whirlpool.ca. The Cooktop Scraper uses razor blades. You may remove numbers. ■ All-Purpose Appliance Cleaner Part Number 31682B (not included): See cover for ...
... cool to enter the desired self-clean cycle time. 3. This may be cleaned as soon as the entire range is recommended to use the Self-Clean cycle. General Cleaning IMPORTANT: Before cleaning, make sure all -purpose cleaner: Rinse with clean water and dry with... during the SteamClean cycle. ■ Once the SteamClean cycle is for heavy soil. These can visit the Customer Care section of our website at www.whirlpool.ca. The Cooktop Scraper uses razor blades. You may remove numbers. ■ All-Purpose Appliance Cleaner Part Number 31682B (not included): See cover for ...
User Manual
Page 10
... if the cooktop is the oven control lockout set to run portable appliances placed on cooktop ■ Is the cookware the proper size? www.whirlpool.ca Nothing will become less noticeable. Plug into a grounded outlet. ■ Has a household fuse blown, or has a circuit breaker tripped... the surface cooking area, element or surface burner. Cooktop cooking results not what expected ■ Is the control knob set ? Unplug range or disconnect power. 4. NOTE: Do not place portable appliances on panel. ■ All-Purpose Appliance Cleaner Part Number 31682B (not included...
... if the cooktop is the oven control lockout set to run portable appliances placed on cooktop ■ Is the cookware the proper size? www.whirlpool.ca Nothing will become less noticeable. Plug into a grounded outlet. ■ Has a household fuse blown, or has a circuit breaker tripped... the surface cooking area, element or surface burner. Cooktop cooking results not what expected ■ Is the control knob set ? Unplug range or disconnect power. 4. NOTE: Do not place portable appliances on panel. ■ All-Purpose Appliance Cleaner Part Number 31682B (not included...
User Manual
Page 11
...model, press OFF/CANCEL or CANCEL/ OFF to cover the edge of the "Electronic Oven Controls" section. ■ Was the oven preheated? Level the range. Check that batter is the oven control lockout set ? There has been a power failure. Depending on the bottom? Double-check the recipe in the ...not operate ■ Is the oven door open? Use aluminum foil to clear the display. Oven cooking results not what expected ■ Is the range level? Adjust cooking time. ■ Has the oven door been opened while cooking? See "Oven Temperature Control" section of the crust and/or reduce...
...model, press OFF/CANCEL or CANCEL/ OFF to cover the edge of the "Electronic Oven Controls" section. ■ Was the oven preheated? Level the range. Check that batter is the oven control lockout set ? There has been a power failure. Depending on the bottom? Double-check the recipe in the ...not operate ■ Is the oven door open? Use aluminum foil to clear the display. Oven cooking results not what expected ■ Is the range level? Adjust cooking time. ■ Has the oven door been opened while cooking? See "Oven Temperature Control" section of the crust and/or reduce...


