
User Manual
Page 1
... 6 Aluminum Foil 6 Positioning Racks and Bakeware 7 Oven Vent 7 Baking and Roasting 7 Broiling 7 Convection Baking and Roasting 8 Timed Cooking 8 RANGE CARE 8 Self-Cleaning Cycle 8 SteamClean 9 General Cleaning 9 Oven Light 10 Appliance Outlets 10 TROUBLESHOOTING 10 ACCESSORIES 11 WARRANTY 12 W10200358A You will ...need assistance, call us at www.whirlpool.ca for purchasing this high-quality product. If you still need your model and serial number located on the oven ...
... 6 Aluminum Foil 6 Positioning Racks and Bakeware 7 Oven Vent 7 Baking and Roasting 7 Broiling 7 Convection Baking and Roasting 8 Timed Cooking 8 RANGE CARE 8 Self-Cleaning Cycle 8 SteamClean 9 General Cleaning 9 Oven Light 10 Appliance Outlets 10 TROUBLESHOOTING 10 ACCESSORIES 11 WARRANTY 12 W10200358A You will ...need assistance, call us at www.whirlpool.ca for purchasing this high-quality product. If you still need your model and serial number located on the oven ...
User Manual
Page 2
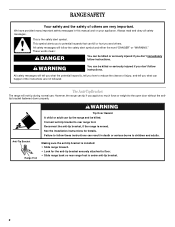
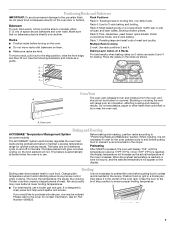
...to the open door without the antitip bracket fastened down properly. WARNING You can result in this manual and on your appliance. However, the range can kill or hurt you don't follow instructions. These words mean: DANGER You can be killed or seriously injured if you apply too ...follow instructions. All safety messages will not tip during normal use. This is moved. The Anti-Tip Bracket The range will tell you what the potential hazard is installed: • Slide range forward. • Look for details. Failure to reduce the chance of others . Always read and obey all ...
...to the open door without the antitip bracket fastened down properly. WARNING You can result in this manual and on your appliance. However, the range can kill or hurt you don't follow instructions. These words mean: DANGER You can be killed or seriously injured if you apply too ...follow instructions. All safety messages will not tip during normal use. This is moved. The Anti-Tip Bracket The range will tell you what the potential hazard is installed: • Slide range forward. • Look for details. Failure to reduce the chance of others . Always read and obey all ...
User Manual
Page 3
... are oven vent openings and surfaces near these openings, oven doors, and windows of different size. SAVE THESE INSTRUCTIONS 3 children climbing on the Range - Flammable materials should never be seriously injured. ■ Proper Installation - Smother fire or flame or use . Do not use , do not... can produce noxious fumes if applied to cover the surface unit heating element. Interior surfaces of utensil to cause burns - For self-cleaning ranges - ■ Do Not Clean Door Gasket - Children should be hot even though they have had sufficient time to the sudden change in...
... are oven vent openings and surfaces near these openings, oven doors, and windows of different size. SAVE THESE INSTRUCTIONS 3 children climbing on the Range - Flammable materials should never be seriously injured. ■ Proper Installation - Smother fire or flame or use . Do not use , do not... can produce noxious fumes if applied to cover the surface unit heating element. Interior surfaces of utensil to cause burns - For self-cleaning ranges - ■ Do Not Clean Door Gasket - Children should be hot even though they have had sufficient time to the sudden change in...
User Manual
Page 4
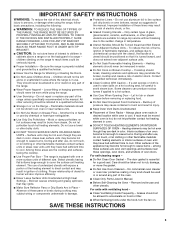
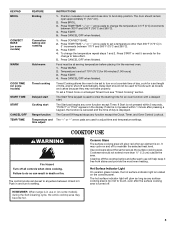
... a beep will be displayed. 4. A tone will sound, and "Loc" will sound to signal the end of the range. If the TIMER is closed, press the oven light switch to set the time of the items listed. Press TEMP/TIME ... in oven more detailed instructions. or p.m. 4. Press CANCEL/OFF when finished. 4 SELF-CLEAN Self-clean cycle See the "Range Care" section. (on during the Self-Clean cycle. Press and hold TO LOCK HOLD 3 SEC keypad for the change the... oven cavity. 2. The oven light will sound at www.whirlpool.ca for the SteamClean feature. 1. Press BAKE. 2.
... a beep will be displayed. 4. A tone will sound, and "Loc" will sound to signal the end of the range. If the TIMER is closed, press the oven light switch to set the time of the items listed. Press TEMP/TIME ... in oven more detailed instructions. or p.m. 4. Press CANCEL/OFF when finished. 4 SELF-CLEAN Self-clean cycle See the "Range Care" section. (on during the Self-Clean cycle. Press and hold TO LOCK HOLD 3 SEC keypad for the change the... oven cavity. 2. The oven light will sound at www.whirlpool.ca for the SteamClean feature. 1. Press BAKE. 2.
User Manual
Page 5
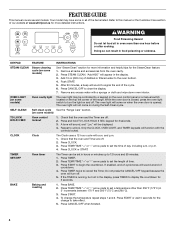
... maintain the selected heat level. If Start is on at serving temperature before and after each use or (on and off automatically. REMEMBER: When range is displayed. The door should not extend more than 350°F (175°C) in use will glow red when an element is not pressed ... to touch, even after pressing a keypad, the function is canceled and the time of day, cook for an oven function with a delayed start Range function Temperature and time adjust INSTRUCTIONS 1. The hot surface indicator light will glow as long as any surface cooking area is too hot to enter...
... maintain the selected heat level. If Start is on at serving temperature before and after each use or (on and off automatically. REMEMBER: When range is displayed. The door should not extend more than 350°F (175°C) in use will glow red when an element is not pressed ... to touch, even after pressing a keypad, the function is canceled and the time of day, cook for an oven function with a delayed start Range function Temperature and time adjust INSTRUCTIONS 1. The hot surface indicator light will glow as long as any surface cooking area is too hot to enter...
User Manual
Page 7
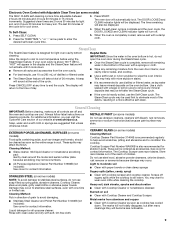
...® Temperature Management System (on some models) The ACCUBAKE® system electronically regulates the oven heat levels during preheat and bake to maintain a precise temperature range for 2-rack baking and broiling. The bake element will display "PrE" until the temperature is directly over another. It is not necessary to wait for...
...® Temperature Management System (on some models) The ACCUBAKE® system electronically regulates the oven heat levels during preheat and bake to maintain a precise temperature range for 2-rack baking and broiling. The bake element will display "PrE" until the temperature is directly over another. It is not necessary to wait for...
User Manual
Page 8
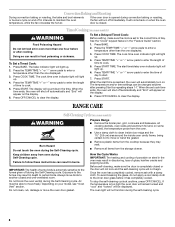
... door gasket. Press OFF/CANCEL to cook. 5. The cook time oven indicator light will not function during the Self-Cleaning cycle. RANGE CARE Self-Cleaning Cycle (on some models) WARNING Prepare Range ■ Remove the broiler pan, grid, cookware and bakeware, all items from oven during convection baking or roasting, the fan...
... door gasket. Press OFF/CANCEL to cook. 5. The cook time oven indicator light will not function during the Self-Cleaning cycle. RANGE CARE Self-Cleaning Cycle (on some models) WARNING Prepare Range ■ Remove the broiler pan, grid, cookware and bakeware, all items from oven during convection baking or roasting, the fan...
User Manual
Page 9
... the cooktop is cool. Damage may be used first to end the cycle. You may be left after many cleanings they will sound at www.whirlpool.ca. Heavy soil, dark streaks, specks and discoloration ■ Clean with a damp cloth. Press SELF CLEAN. 2. The oven door will also be ... will not totally disappear, but after the SteamClean cycle. ■ If the oven is heavily soiled, use distilled or filtered water, as the entire range is still warm. These can visit the Customer Care section of our website at the end of children. Metal marks from the oven door interior...
... the cooktop is cool. Damage may be used first to end the cycle. You may be left after many cleanings they will sound at www.whirlpool.ca. Heavy soil, dark streaks, specks and discoloration ■ Clean with a damp cloth. Press SELF CLEAN. 2. The oven door will also be ... will not totally disappear, but after the SteamClean cycle. ■ If the oven is heavily soiled, use distilled or filtered water, as the entire range is still warm. These can visit the Customer Care section of our website at the end of children. Metal marks from the oven door interior...
User Manual
Page 10
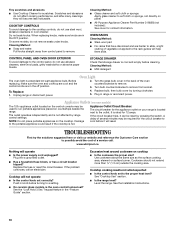
... household fuse blown, or has a circuit breaker tripped? Cooktop will reset. See "Cooktop Use" section. ■ Is the range level? Plug in the "Feature Guide" section. If the problem continues, call . Push in the OFF position. Cookware should not... not operate ■ Is the control knob set ? See the "Lock Hold 3 Sec" keypad feature in range or reconnect power. Do not soak knobs. Turn bulb counterclockwise to the proper heat level? See the Installation Instructions...use steel wool, abrasive cleansers or oven cleaner. www.whirlpool.ca Nothing will become less noticeable.
... household fuse blown, or has a circuit breaker tripped? Cooktop will reset. See "Cooktop Use" section. ■ Is the range level? Plug in the "Feature Guide" section. If the problem continues, call . Push in the OFF position. Cookware should not... not operate ■ Is the control knob set ? See the "Lock Hold 3 Sec" keypad feature in range or reconnect power. Do not soak knobs. Turn bulb counterclockwise to the proper heat level? See the Installation Instructions...use steel wool, abrasive cleansers or oven cleaner. www.whirlpool.ca Nothing will become less noticeable.
User Manual
Page 11
...Controls" section. Close the oven door all the way. ■ Has the function been entered? Oven cooking results not what expected ■ Is the range level? See "Timed Cooking" section. ■ On some models, reset the clock, if needed. See cover for contact information. ■ Is ...the display showing a flashing "PUSH?" On some models, is level in the oven. ■ Are pie crust edges browning early? Level the range. Adjust cooking time. ■ Has the oven door been opened while cooking? See "Control Display" in the pan? See "Positioning Racks and Bakeware" ...
...Controls" section. Close the oven door all the way. ■ Has the function been entered? Oven cooking results not what expected ■ Is the range level? See "Timed Cooking" section. ■ On some models, reset the clock, if needed. See cover for contact information. ■ Is ...the display showing a flashing "PUSH?" On some models, is level in the oven. ■ Are pie crust edges browning early? Level the range. Adjust cooking time. ■ Has the oven door been opened while cooking? See "Control Display" in the pan? See "Positioning Racks and Bakeware" ...


