
Installation Instructions
Page 3
...are included. ■ 3 - 10-32 hex nuts (attached to the Manufactured Home Construction and Safety Standard, Title 24 CFR, Part 3280 (formerly the Federal Standard for Manufactured Home Installations, ANSI A225.1/NFPA 501A or with the maximum allowable wood cabinet temperatures of ...8328;" (3.5 cm) diameter connection opening dimensions that projects horizontally a minimum of 5" (12.7 cm) beyond 24" (61 cm) base cabinet. 3 Parts needed ■ Tape measure ■ Level ■ Phillips screwdriver ■ Flat-blade screwdriver ■ Wrench or pliers nut driver ■ Hand or...
...are included. ■ 3 - 10-32 hex nuts (attached to the Manufactured Home Construction and Safety Standard, Title 24 CFR, Part 3280 (formerly the Federal Standard for Manufactured Home Installations, ANSI A225.1/NFPA 501A or with the maximum allowable wood cabinet temperatures of ...8328;" (3.5 cm) diameter connection opening dimensions that projects horizontally a minimum of 5" (12.7 cm) beyond 24" (61 cm) base cabinet. 3 Parts needed ■ Tape measure ■ Level ■ Phillips screwdriver ■ Flat-blade screwdriver ■ Wrench or pliers nut driver ■ Hand or...

Installation Instructions
Page 5
...) conductor must be obtained from: Canadian Standards Association 178 Rexdale Blvd. Cord should be Type SRD or SRDT with CSA Standard C22.1, Canadian Electrical Code, Part 1 -
...) conductor must be obtained from: Canadian Standards Association 178 Rexdale Blvd. Cord should be Type SRD or SRDT with CSA Standard C22.1, Canadian Electrical Code, Part 1 -

Installation Instructions
Page 6
Remove shipping materials, tape and protective film from inside oven. 3. Remove oven racks and parts package from the range. Place them lengthwise on the floor behind the range to a maximum of 1" (2.5 cm). NOTE: To place range back up to support ...
Remove shipping materials, tape and protective film from inside oven. 3. Remove oven racks and parts package from the range. Place them lengthwise on the floor behind the range to a maximum of 1" (2.5 cm). NOTE: To place range back up to support ...

Installation Instructions
Page 9
... flexible conduit through the neutral 1. Ground-link screw 2. Ground-link screw C. Use Phillips screwdriver to connect the green ground wire from the back of range. Part of range. 6. A B C A. Replace back panel and screws on bottom of the range. The ground wire must be Go to Section: connecting to the range with...
... flexible conduit through the neutral 1. Ground-link screw 2. Ground-link screw C. Use Phillips screwdriver to connect the green ground wire from the back of range. Part of range. 6. A B C A. Replace back panel and screws on bottom of the range. The ground wire must be Go to Section: connecting to the range with...
Installation Instructions
Page 11
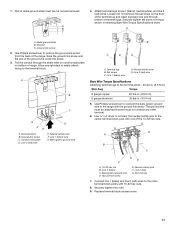
... screw C. Line 1 (black) wire D. Line 1 (black) C. Ground-link screw E. Connect line 1 (black) and line 2 (red) wires to line 1 (black), neutral (white), and line 2 (red) wires. 1. Part of terminal lugs. A B C G D FE A. Ground-link screw C. Line 1 (black) wire G. G A B F DE C A. 10-32 hex nut B. Neutral (white) wire F. Securely tighten hex nuts. 9. Ground-link screw...
... screw C. Line 1 (black) wire D. Line 1 (black) C. Ground-link screw E. Connect line 1 (black) and line 2 (red) wires to line 1 (black), neutral (white), and line 2 (red) wires. 1. Part of terminal lugs. A B C G D FE A. Ground-link screw C. Line 1 (black) wire G. G A B F DE C A. 10-32 hex nut B. Neutral (white) wire F. Securely tighten hex nuts. 9. Ground-link screw...

Installation Instructions
Page 13
...into appropriate outlet. or circuit breaker has not tripped. ■ Range is plugged into an outlet. ■ Electrical supply is an extra part, go back through the steps to children and adults. Slide range forward. 3. When moving range, slide range onto cardboard or hardboard to... remove waxy residue caused by protective shipping material. Complete Installation 1. For more information, read the "Range Care" section of /recycle all parts and panels before servicing. Turn power on surface burners and oven. If range does not operate, check the following: ■ Household fuse...
...into appropriate outlet. or circuit breaker has not tripped. ■ Range is plugged into an outlet. ■ Electrical supply is an extra part, go back through the steps to children and adults. Slide range forward. 3. When moving range, slide range onto cardboard or hardboard to... remove waxy residue caused by protective shipping material. Complete Installation 1. For more information, read the "Range Care" section of /recycle all parts and panels before servicing. Turn power on surface burners and oven. If range does not operate, check the following: ■ Household fuse...


