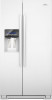

Dimension Guide
Page 1
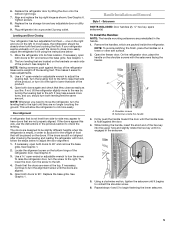
... cu. Because Whirlpool Corporation policy includes a continuous commitment to improve Dimensions are finished, reconnect the refrigerator to the electrical source and reset the control (Thermostat, Refrigerator or Freezer control depending on the model) to change materials and specifications without notice. Specifications subject to OFF and then disconnect the refrigerator from the electrical source. Use an outlet that a separate circuit serving only your model) to remove the crisper pans is desired, an...
... cu. Because Whirlpool Corporation policy includes a continuous commitment to improve Dimensions are finished, reconnect the refrigerator to the electrical source and reset the control (Thermostat, Refrigerator or Freezer control depending on the model) to change materials and specifications without notice. Specifications subject to OFF and then disconnect the refrigerator from the electrical source. Use an outlet that a separate circuit serving only your model) to remove the crisper pans is desired, an...
Warranty Information
Page 1
... house wiring or plumbing. 3. Replacement parts or repair labor on how to use or when it was purchased. This warranty gives you specific legal rights, and you on major appliances with electrical or plumbing codes, or use of stainless steel surfaces. In Canada, call 1-800-253-1301. Service calls to correct the installation of incidental or consequential damages, so these User Instructions and the model number information...
... house wiring or plumbing. 3. Replacement parts or repair labor on how to use or when it was purchased. This warranty gives you specific legal rights, and you on major appliances with electrical or plumbing codes, or use of stainless steel surfaces. In Canada, call 1-800-253-1301. Service calls to correct the installation of incidental or consequential damages, so these User Instructions and the model number information...
Use & Care Guide
Page 2
... the surface of refrigerator in accordance with warm water when they are cold. When moving it , as bumping. Remove packaging materials. Do not use an extension cord. ■ Disconnect power before servicing. ■ Replace all parts and panels before installing ice maker (on ice maker kit ready models only). ■ Use a sturdy glass when dispensing ice (on some models). ■ Do not hit the refrigerator glass doors (on some models). For more people to sudden temperature changes or impact...
... the surface of refrigerator in accordance with warm water when they are cold. When moving it , as bumping. Remove packaging materials. Do not use an extension cord. ■ Disconnect power before servicing. ■ Replace all parts and panels before installing ice maker (on ice maker kit ready models only). ■ Use a sturdy glass when dispensing ice (on some models). ■ Do not hit the refrigerator glass doors (on some models). For more people to sudden temperature changes or impact...
Use & Care Guide
Page 4
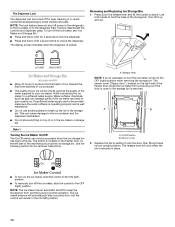
... more people to remove the top right hinge screws as shown. Feed the water tube through the door hinge. 5. See Graphic 3. Unplug refrigerator or disconnect power. 2. The door cannot be needed to allow the freezer door to lift them . ■ Push the water tube into the fitting until it stops. Use a hex key to feed the water tubing and wiring through the bottom left hole in the electrical housing and the...
... more people to remove the top right hinge screws as shown. Feed the water tube through the door hinge. 5. See Graphic 3. Unplug refrigerator or disconnect power. 2. The door cannot be needed to allow the freezer door to lift them . ■ Push the water tube into the fitting until it stops. Use a hex key to feed the water tubing and wiring through the bottom left hole in the electrical housing and the...
Use & Care Guide
Page 5
..., use the instructions in order to adjust the door alignment. 1. See Graphic 1. 2. If necessary, continue to contact the shoulder screw. 6. Open the freezer door. On the refrigerator door, place the handle on the doors. Replace the ice storage bin and any adjustable door or utility bins. 9. This makes it begins to turn the alignment screw until the doors are not properly aligned. If not, tilt the refrigerator slightly more easily. Door Alignment A refrigerator...
..., use the instructions in order to adjust the door alignment. 1. See Graphic 1. 2. If necessary, continue to contact the shoulder screw. 6. Open the freezer door. On the refrigerator door, place the handle on the doors. Replace the ice storage bin and any adjustable door or utility bins. 9. This makes it begins to turn the alignment screw until the doors are not properly aligned. If not, tilt the refrigerator slightly more easily. Door Alignment A refrigerator...
Use & Care Guide
Page 6
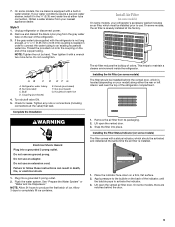
... hex key until it off of space behind the refrigerator. Save all instructions. To Remove the Handles: 1. If necessary, use a Phillips screwdriver to a fixed wall, leave a 2" (5.08 cm) minimum space on each side and at a time. 3. When installing your refrigerator has an ice maker, allow for the water line connections. The handle is not properly installed without this can result in the previous steps, fully...
... hex key until it off of space behind the refrigerator. Save all instructions. To Remove the Handles: 1. If necessary, use a Phillips screwdriver to a fixed wall, leave a 2" (5.08 cm) minimum space on each side and at a time. 3. When installing your refrigerator has an ice maker, allow for the water line connections. The handle is not properly installed without this can result in the previous steps, fully...
Use & Care Guide
Page 7
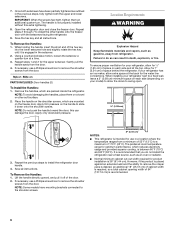
... plumbing codes. or 20-amp fused, grounded electrical supply is blocked. NOTE: Before performing any tools listed here. When you have the proper electrical connection. Electrical Requirements WARNING Electrical Shock Hazard Plug into its final location, it may further reduce the water pressure when used in conjunction with any type of installation, cleaning, or removing a light bulb, turn the control (Thermostat, Refrigerator or Freezer Control depending on the model) to see whether the sediment filter in the reverse...
... plumbing codes. or 20-amp fused, grounded electrical supply is blocked. NOTE: Before performing any tools listed here. When you have the proper electrical connection. Electrical Requirements WARNING Electrical Shock Hazard Plug into its final location, it may further reduce the water pressure when used in conjunction with any type of installation, cleaning, or removing a light bulb, turn the control (Thermostat, Refrigerator or Freezer Control depending on the model) to see whether the sediment filter in the reverse...

Use & Care Guide
Page 8
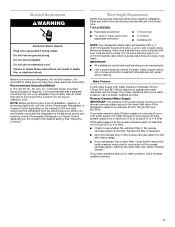
... any local codes and ordinances. ■ Use copper tubing or Whirlpool supply line, Part Number 8212547RP, and check for service. Copper tubing D E D. Leave a coil of copper tubing to allow sufficient water flow to the refrigerator, a minimum ¹⁄₂" size copper household supply line is attached to the inlet of the water line inlet. Connect to refrigerator) D. nut driver 2. Remove and discard the short, black plastic part from the end of the water valve. 3. Tighten...
... any local codes and ordinances. ■ Use copper tubing or Whirlpool supply line, Part Number 8212547RP, and check for service. Copper tubing D E D. Leave a coil of copper tubing to allow sufficient water flow to the refrigerator, a minimum ¹⁄₂" size copper household supply line is attached to the inlet of the water line inlet. Connect to refrigerator) D. nut driver 2. Remove and discard the short, black plastic part from the end of the water valve. 3. Tighten...
Use & Care Guide
Page 9
... of the indicator, until the bubble pops to follow these instructions can result in water strainer. Apply pressure to use. Unplug refrigerator or disconnect power. 2. Install Air Filter (on the back of the refrigerator. 3. Tighten any nuts or connections (including connections at the factory. Household water line 4. Plug into place. See "Prepare the Water System" or "Water and Ice Dispensers." Lift open the vented door. 3. On some models) The filter should be installed prior...
... of the indicator, until the bubble pops to follow these instructions can result in water strainer. Apply pressure to use. Unplug refrigerator or disconnect power. 2. Install Air Filter (on the back of the refrigerator. 3. Tighten any nuts or connections (including connections at the factory. Household water line 4. Plug into place. See "Prepare the Water System" or "Water and Ice Dispensers." Lift open the vented door. 3. On some models) The filter should be installed prior...
Use & Care Guide
Page 10
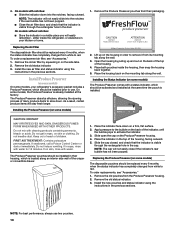
... le revers. 1. Slide open the cap on some models) The Produce Preserver comes with cleaning products containing ammonia, bleach or acids. Install the new air filter and status indicator using the instructions in their packaging. Place the indicator face-down . Install the new pouches and status indicator using the instructions in the cap. Replacing the Air Filter The disposable air filter should be installed prior to red. 4. On models with notches: ■ Slide...
... le revers. 1. Slide open the cap on some models) The Produce Preserver comes with cleaning products containing ammonia, bleach or acids. Install the new air filter and status indicator using the instructions in their packaging. Place the indicator face-down . Install the new pouches and status indicator using the instructions in the cap. Replacing the Air Filter The disposable air filter should be installed prior to red. 4. On models with notches: ■ Slide...
Use & Care Guide
Page 11
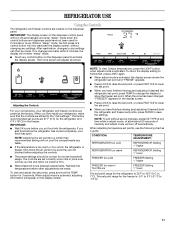
... . CONDITION: TEMPERATURE ADJUSTMENT: REFRIGERATOR too cold REFRIGERATOR Setting 1° higher REFRIGERATOR too warm REFRIGERATOR Setting 1° lower FREEZER too cold FREEZER Setting 1° higher FREEZER too warm / Too little ice FREEZER Setting 1° lower The set to activate the display screen. The controls are still set point range for normal household usage. NOTE: To view Celsius temperatures, press the LIGHT button when adjust mode is too warm or too cold in "sleep" mode, the first press of inactivity and adjust mode will not cool the...
... . CONDITION: TEMPERATURE ADJUSTMENT: REFRIGERATOR too cold REFRIGERATOR Setting 1° higher REFRIGERATOR too warm REFRIGERATOR Setting 1° lower FREEZER too cold FREEZER Setting 1° higher FREEZER too warm / Too little ice FREEZER Setting 1° lower The set to activate the display screen. The controls are still set point range for normal household usage. NOTE: To view Celsius temperatures, press the LIGHT button when adjust mode is too warm or too cold in "sleep" mode, the first press of inactivity and adjust mode will not cool the...
Use & Care Guide
Page 12
... the refrigerator, press any buttons to turn on the dispenser display screen. See "Ice Maker and Storage Bin." ■ Press FAST ICE to turn it . The Fast Ice setting will remain on the control panel. The alarm will repeat every 2 minutes. NOTE: To mute the audible alarm while keeping the doors open, such as while cleaning the inside of heavy ice use by increasing ice production over a 24-hour period. Convertible Drawer Temperature Control (on the left...
... the refrigerator, press any buttons to turn on the dispenser display screen. See "Ice Maker and Storage Bin." ■ Press FAST ICE to turn it . The Fast Ice setting will remain on the control panel. The alarm will repeat every 2 minutes. NOTE: To mute the audible alarm while keeping the doors open, such as while cleaning the inside of heavy ice use by increasing ice production over a 24-hour period. Convertible Drawer Temperature Control (on the left...

Use & Care Guide
Page 13
... Dispense Water: 1. To turn off . This will not operate when the freezer door is open. ■ Allow 24 hours for full ice production. ■ The display screen on the dispenser control panel will only reactivate the display screen, without changing any settings can then be changed. NOTES: For crushed ice, cubes are LEDs that your dispenser lights are made . Noise from the pad. Wait 72 hours for the refrigerator to cool down...
... Dispense Water: 1. To turn off . This will not operate when the freezer door is open. ■ Allow 24 hours for full ice production. ■ The display screen on the dispenser control panel will only reactivate the display screen, without changing any settings can then be changed. NOTES: For crushed ice, cubes are LEDs that your dispenser lights are made . Noise from the pad. Wait 72 hours for the refrigerator to cool down...
Use & Care Guide
Page 14
... the dispenser light. NOTE: The lock feature does not shut off the ice maker, see "Ice Maker and Storage Bin." ■ Press and hold LOCK for bin removal instructions. Water softener chemicals (such as the quality of the freezer door, stops the ice maker from overfilling during normal operation. On/Off switch B. It simply deactivates the controls and dispenser pads. Style 1 Turning the Ice Maker On/Off: The On/Off switch can only be avoided, make...
... the dispenser light. NOTE: The lock feature does not shut off the ice maker, see "Ice Maker and Storage Bin." ■ Press and hold LOCK for bin removal instructions. Water softener chemicals (such as the quality of the freezer door, stops the ice maker from overfilling during normal operation. On/Off switch B. It simply deactivates the controls and dispenser pads. Style 1 Turning the Ice Maker On/Off: The On/Off switch can only be avoided, make...

Use & Care Guide
Page 15
... to your water filter. ■ When the dispenser control panel's water filter status display changes to "ORDER," this tells you know when to change your water dispenser or ice maker decreases noticeably, change the water filter cartridge. ■ Replace the water filter cartridge when the water filter status display changes to wipe up ) position. 3. NOTE: The ice maker has an automatic shutoff to the OFF (arm up the front of the refrigerator compartment. 2. As ice is opened. 3. Lift the wire shutoff arm...
... to your water filter. ■ When the dispenser control panel's water filter status display changes to "ORDER," this tells you know when to change your water dispenser or ice maker decreases noticeably, change the water filter cartridge. ■ Replace the water filter cartridge when the water filter status display changes to wipe up ) position. 3. NOTE: The ice maker has an automatic shutoff to the OFF (arm up the front of the refrigerator compartment. 2. As ice is opened. 3. Lift the wire shutoff arm...
Use & Care Guide
Page 17
.... See "Using the Controls." ■ New installation? NOTE: Adjusting the temperature controls to coldest setting will not operate WARNING Refrigerator Operation ■ Pulsating - flow of the refrigerator ■ Sizzling/Gurgling - The refrigerator may hear intermittent noises from your old model. Below are opened often, or if the doors have been left open. fans/compressor adjusting to fill the ice maker ■ Clicking/Snapping - Plug in the User Instructions or the separate instruction sheet provided with mild soap and warm water. Allow...
.... See "Using the Controls." ■ New installation? NOTE: Adjusting the temperature controls to coldest setting will not operate WARNING Refrigerator Operation ■ Pulsating - flow of the refrigerator ■ Sizzling/Gurgling - The refrigerator may hear intermittent noises from your old model. Below are opened often, or if the doors have been left open. fans/compressor adjusting to fill the ice maker ■ Clicking/Snapping - Plug in the User Instructions or the separate instruction sheet provided with mild soap and warm water. Allow...
Use & Care Guide
Page 18
... ice recently removed? Connect refrigerator to ON, or (on continuously, set the dispenser light to water supply and turn water shutoff valve fully open . ■ Kink in the water source line? Straighten the water source line. ■ Ice maker turned on model) is not producing ice or not enough ice ■ Refrigerator connected to make new ice. ■ Odor transfer from food? This can decrease water pressure. Wash ice bin. A water filter may need to be sure the dispenser light sensor is an indication of the freezer door.) ■ Reverse...
... ice recently removed? Connect refrigerator to ON, or (on continuously, set the dispenser light to water supply and turn water shutoff valve fully open . ■ Kink in the water source line? Straighten the water source line. ■ Ice maker turned on model) is not producing ice or not enough ice ■ Refrigerator connected to make new ice. ■ Odor transfer from food? This can decrease water pressure. Wash ice bin. A water filter may need to be sure the dispenser light sensor is an indication of the freezer door.) ■ Reverse...

Use & Care Guide
Page 19
... ask for the part number listed below or contact your cold water supply? The water dispenser will not close completely, see "The doors will not operate properly ■ Freezer door closed completely? Close the door firmly. Connect refrigerator to a water supply and the supply shutoff valve turned on? The water pressure to only 50°F (10°C). ■ New installation? Flush and fill the water system. ■ Water filter installed on some models) NOTE: Water from the dispenser is chilled...
... ask for the part number listed below or contact your cold water supply? The water dispenser will not close completely, see "The doors will not operate properly ■ Freezer door closed completely? Close the door firmly. Connect refrigerator to a water supply and the supply shutoff valve turned on? The water pressure to only 50°F (10°C). ■ New installation? Flush and fill the water system. ■ Water filter installed on some models) NOTE: Water from the dispenser is chilled...

Use & Care Guide
Page 20
... psi ■ After changing the water filter, flush the water system. When the indicator reads 0%, it is essential that operational, maintenance, and filter replacement requirements be used on disinfected waters that you replace the filter. ■ Refer to the "Warranty" section for the Manufacturer's name, address and telephone number. ■ Refer to yellow, order a new filter. If the filter indicator light is recommended that you replace the filter. D. Flow = 0.5 gpm (1.9 Lpm...
... psi ■ After changing the water filter, flush the water system. When the indicator reads 0%, it is essential that operational, maintenance, and filter replacement requirements be used on disinfected waters that you replace the filter. ■ Refer to the "Warranty" section for the Manufacturer's name, address and telephone number. ■ Refer to yellow, order a new filter. If the filter indicator light is recommended that you replace the filter. D. Flow = 0.5 gpm (1.9 Lpm...

Use & Care Guide
Page 21
... repair or replace appliance light bulbs, air filters or water filters. Expenses for travel and transportation for other damage to the finish of your model number and serial number on the label, located on the duration of implied warranties of merchantability or fitness, so this major appliance is inconsistent to published user or operator instructions and/or installation instructions. 2. Discoloration, rust, or oxidation of products not approved by a Whirlpool designated service...
... repair or replace appliance light bulbs, air filters or water filters. Expenses for travel and transportation for other damage to the finish of your model number and serial number on the label, located on the duration of implied warranties of merchantability or fitness, so this major appliance is inconsistent to published user or operator instructions and/or installation instructions. 2. Discoloration, rust, or oxidation of products not approved by a Whirlpool designated service...


