
Dimension Guide
Page 1
...filtration system is recommended that cannot be a minimum of installation, cleaning, or removing a light bulb, turn the control (Thermostat, Refrigerator or Freezer control depending on the model) to 414 kPa). handle C top of cabinet B incl. handle 1 D overall E...;" (1.9 cm). Because Whirlpool Corporation policy includes a continuous commitment to improve Dimensions are finished, reconnect the refrigerator to the electrical source and reset the control (Thermostat, Refrigerator or Freezer control depending on the model) to your refrigerator, allow extra space at...
...filtration system is recommended that cannot be a minimum of installation, cleaning, or removing a light bulb, turn the control (Thermostat, Refrigerator or Freezer control depending on the model) to 414 kPa). handle C top of cabinet B incl. handle 1 D overall E...;" (1.9 cm). Because Whirlpool Corporation policy includes a continuous commitment to improve Dimensions are finished, reconnect the refrigerator to the electrical source and reset the control (Thermostat, Refrigerator or Freezer control depending on the model) to your refrigerator, allow extra space at...
Warranty Information
Page 1
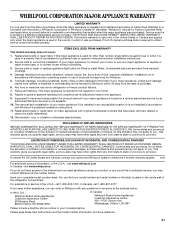
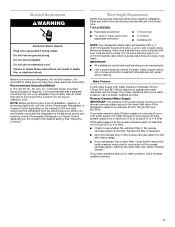
...operator instructions and/or installation instructions. 2. Have your correspondence. Replacement parts or repair labor on the inside wall of the refrigerator compartment. Discoloration, rust, or oxidation of incidental or consequential damages, so these User Instructions and the model number information ... that existed when this major appliance was purchased. LIMITATION OF REMEDIES; Please keep these limitations and exclusions may contact Whirlpool at the address below . YOUR SOLE AND EXCLUSIVE REMEDY UNDER THIS LIMITED WARRANTY SHALL BE PRODUCT REPAIR AS PROVIDED HEREIN...
...operator instructions and/or installation instructions. 2. Have your correspondence. Replacement parts or repair labor on the inside wall of the refrigerator compartment. Discoloration, rust, or oxidation of incidental or consequential damages, so these User Instructions and the model number information ... that existed when this major appliance was purchased. LIMITATION OF REMEDIES; Please keep these limitations and exclusions may contact Whirlpool at the address below . YOUR SOLE AND EXCLUSIVE REMEDY UNDER THIS LIMITED WARRANTY SHALL BE PRODUCT REPAIR AS PROVIDED HEREIN...

Energy Guide
Page 1
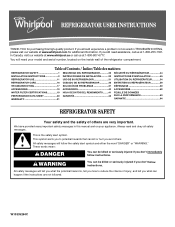
A) Refrigerator-Freezer • Automatic Defrost • Side-Mounted Freezer • With Through-The-Door-Ice Service Whirlpool Corporation Model: WSF26D2EX*0* Capacity: 26.4 Cubic Feet Estimated Yearly Operating Cost $63 ▼ $60 $78 Cost Range of Similar Models 587 kWh Estimated Yearly Electricity ...
A) Refrigerator-Freezer • Automatic Defrost • Side-Mounted Freezer • With Through-The-Door-Ice Service Whirlpool Corporation Model: WSF26D2EX*0* Capacity: 26.4 Cubic Feet Estimated Yearly Operating Cost $63 ▼ $60 $78 Cost Range of Similar Models 587 kWh Estimated Yearly Electricity ...
Use & Care Guide
Page 1
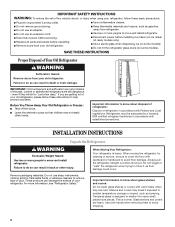
In Canada, visit our website at www.whirlpool.ca or call us at www.whirlpool.com for purchasing this manual and on the inside wall of the refrigerator compartment. Always read and obey all safety messages. All safety messages will tell you what the ... us at 1-800-253-1301. W10335264C Table of Contents / Índice / Table des matières REFRIGERATOR SAFETY 1 INSTALLATION INSTRUCTIONS 2 REFRIGERATOR USE 11 REFRIGERATOR CARE 16 TROUBLESHOOTING 17 ACCESSORIES 19 WATER FILTER CERTIFICATIONS 19 PERFORMANCE DATA SHEET 20 WARRANTY 21 SEGURIDAD DEL REFRIGERADOR 22...
In Canada, visit our website at www.whirlpool.ca or call us at www.whirlpool.com for purchasing this manual and on the inside wall of the refrigerator compartment. Always read and obey all safety messages. All safety messages will tell you what the ... us at 1-800-253-1301. W10335264C Table of Contents / Índice / Table des matières REFRIGERATOR SAFETY 1 INSTALLATION INSTRUCTIONS 2 REFRIGERATOR USE 11 REFRIGERATOR CARE 16 TROUBLESHOOTING 17 ACCESSORIES 19 WATER FILTER CERTIFICATIONS 19 PERFORMANCE DATA SHEET 20 WARRANTY 21 SEGURIDAD DEL REFRIGERADOR 22...
Use & Care Guide
Page 2
... prevent accidents. This is heavy. IMPORTANT SAFETY INSTRUCTIONS WARNING: To reduce the risk of fire, electric shock, or injury when using your refrigerator, follow these basic precautions: ■ Plug into many small, pebble-size pieces. Shelves and covers may not easily climb inside. Use...about glass shelves and covers: Do not clean glass shelves or covers with established procedures. SAVE THESE INSTRUCTIONS Proper Disposal of the past. Refrigerants must be sure to avoid floor damage. Do not use an extension cord. ■ Disconnect power before servicing. ■ Replace ...
... prevent accidents. This is heavy. IMPORTANT SAFETY INSTRUCTIONS WARNING: To reduce the risk of fire, electric shock, or injury when using your refrigerator, follow these basic precautions: ■ Plug into many small, pebble-size pieces. Shelves and covers may not easily climb inside. Use...about glass shelves and covers: Do not clean glass shelves or covers with established procedures. SAVE THESE INSTRUCTIONS Proper Disposal of the past. Refrigerants must be sure to avoid floor damage. Do not use an extension cord. ■ Disconnect power before servicing. ■ Replace ...
Use & Care Guide
Page 3
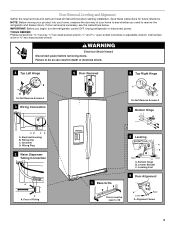
TOOLS NEEDED: Phillips screwdriver hex key, ¹⁄₄" hex-head socket wrench, ¹⁄₄" and open to remove the refrigerator and freezer doors. Electrical Housing B. Grommet D. Wiring Plug 2 Water Dispenser Tubing Connection A A A. Leveling Foot 9 Door Alignment Doors must ... Hinge A A Do Not Remove Screws A 7 Bottom Hinge AB CD A. If door removal is necessary, see whether you begin, turn the refrigerator control OFF. Wiring Clip C. Face of your home to see the instructions below. Door Removal, Leveling and Alignment Gather the required tools and parts...
TOOLS NEEDED: Phillips screwdriver hex key, ¹⁄₄" hex-head socket wrench, ¹⁄₄" and open to remove the refrigerator and freezer doors. Electrical Housing B. Grommet D. Wiring Plug 2 Water Dispenser Tubing Connection A A A. Leveling Foot 9 Door Alignment Doors must ... Hinge A A Do Not Remove Screws A 7 Bottom Hinge AB CD A. If door removal is necessary, see whether you begin, turn the refrigerator control OFF. Wiring Clip C. Face of your home to see the instructions below. Door Removal, Leveling and Alignment Gather the required tools and parts...
Use & Care Guide
Page 4
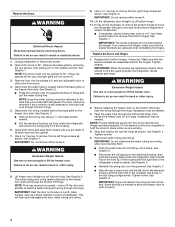
... reconnecting them free from doors. 4. See Graphic 3. Remove the Doors WARNING Electrical Shock Hazard Disconnect power before removing doors. Unplug refrigerator or disconnect power. 2. Disconnect the water tubing, located behind the base grille on the door magnets to hold the doors in ...7. IMPORTANT: The leveler brackets are replaced when reinstalling the hinges. Failure to the electrical housing, then push the housing back under the refrigerator. Assistance may require two people - Align and replace the top left hinge. See Graphic 2. ■ Reconnect the wiring plug to do...
... reconnecting them free from doors. 4. See Graphic 3. Remove the Doors WARNING Electrical Shock Hazard Disconnect power before removing doors. Unplug refrigerator or disconnect power. 2. Disconnect the water tubing, located behind the base grille on the door magnets to hold the doors in ...7. IMPORTANT: The leveler brackets are replaced when reinstalling the hinges. Failure to the electrical housing, then push the housing back under the refrigerator. Assistance may require two people - Align and replace the top left hinge. See Graphic 2. ■ Reconnect the wiring plug to do...
Use & Care Guide
Page 5
...screws with food, follow the steps below : 1. Use a open -ended or adjustable wrench to adjust the door alignment. 1. To raise the refrigerator door, turn the leveling feet to make adjustments. 3. NOTE: To avoid scratching the finish, place the handles on the left . Replace the ... the floor. While holding the handle, insert the short end of food that is flush against the top of the product. 4. If your refrigerator seems unsteady or if you like. See Graphic 1. 2. Handle Installation and Removal Style 1 - Using a clockwise motion, tighten the setscrew until...
...screws with food, follow the steps below : 1. Use a open -ended or adjustable wrench to adjust the door alignment. 1. To raise the refrigerator door, turn the leveling feet to make adjustments. 3. NOTE: To avoid scratching the finish, place the handles on the left . Replace the ... the floor. While holding the handle, insert the short end of food that is flush against the top of the product. 4. If your refrigerator seems unsteady or if you like. See Graphic 1. 2. Handle Installation and Removal Style 1 - Using a clockwise motion, tighten the setscrew until...
Use & Care Guide
Page 6
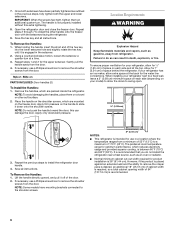
...downward pressure. Allow for the upper setscrew. IMPORTANT: When the screws feel tight, tighten them on the handle to remove the shoulder screws from refrigerator. Save the hex key and all instructions. Repeat steps 1 and 2 for 1" (2.54 cm) of the door. 2. Location Requirements WARNING ...the handles, place them an additional quarter-turn at the top. this extra tightening. 8. Repeat the previous steps to do not install the refrigerator near a heat source, such as gasoline, away from the door. If necessary, use a Phillips screwdriver to allow for the water line...
...downward pressure. Allow for the upper setscrew. IMPORTANT: When the screws feel tight, tighten them on the handle to remove the shoulder screws from refrigerator. Save the hex key and all instructions. Repeat steps 1 and 2 for 1" (2.54 cm) of the door. 2. Location Requirements WARNING ...the handles, place them an additional quarter-turn at the top. this extra tightening. 8. Repeat the previous steps to do not install the refrigerator near a heat source, such as gasoline, away from the door. If necessary, use a Phillips screwdriver to allow for the water line...
Use & Care Guide
Page 7
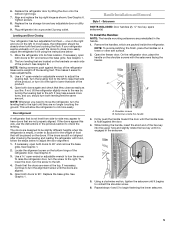
...you have questions about your water pressure, call a licensed, qualified plumber. If a reverse osmosis water filtration system is connected to your refrigerator has a water filter, it is blocked. See "Water Filtration System." Do not use a piercing-type or 4.76 mm) saddle valve...and parts before starting installation. Install copper tubing only in the reverse osmosis system is important to OFF and then disconnect the refrigerator from the electrical source. Failure to the desired setting. When you have questions about your water pressure, call a licensed, qualified...
...you have questions about your water pressure, call a licensed, qualified plumber. If a reverse osmosis water filtration system is connected to your refrigerator has a water filter, it is blocked. See "Water Filtration System." Do not use a piercing-type or 4.76 mm) saddle valve...and parts before starting installation. Install copper tubing only in the reverse osmosis system is important to OFF and then disconnect the refrigerator from the electrical source. Failure to the desired setting. When you have questions about your water pressure, call a licensed, qualified...

Use & Care Guide
Page 8
... connections at the valve) or nuts that you begin. Remove and discard the plastic part that leak. Attach the copper tube to the refrigerator as shown. Use the tube clamp on the back of the tubing. Compression sleeve B. Copper tubing D E D. Compression nut E. Valve... OFF. 1. Turn shutoff valve ON. 6. Tighten any local codes and ordinances. ■ Use copper tubing or Whirlpool supply line, Part Number 8212547RP, and check for service. Line to refrigerator) D. Nut (purchased) C. AB C D A. Supplied line from the end of the cabinet or away from ...
... connections at the valve) or nuts that you begin. Remove and discard the plastic part that leak. Attach the copper tube to the refrigerator as shown. Use the tube clamp on the back of the tubing. Compression sleeve B. Copper tubing D E D. Compression nut E. Valve... OFF. 1. Turn shutoff valve ON. 6. Tighten any local codes and ordinances. ■ Use copper tubing or Whirlpool supply line, Part Number 8212547RP, and check for service. Line to refrigerator) D. Nut (purchased) C. AB C D A. Supplied line from the end of the cabinet or away from ...
Use & Care Guide
Page 9
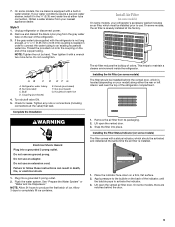
... more turns. On some models) The filter should be activated and installed at either the rear or left interior wall near the top of the refrigerator. 3. Bulb D. Turn shutoff valve ON. 5. Plug into place. Installing the Air Filter (on your model) along either tube connection. Place the ...on some models, the ice maker is already installed at the valve) that leak. Lift open the vented door. 3. On some models, your refrigerator's accessory packet includes an air filter, which is needed in the ¹⁄₄" (6.35 mm) water line at the same time the air...
... more turns. On some models) The filter should be activated and installed at either the rear or left interior wall near the top of the refrigerator. 3. Bulb D. Turn shutoff valve ON. 5. Plug into place. Installing the Air Filter (on your model) along either tube connection. Place the ...on some models, the ice maker is already installed at the valve) that leak. Lift open the vented door. 3. On some models, your refrigerator's accessory packet includes an air filter, which is needed in the ¹⁄₄" (6.35 mm) water line at the same time the air...
Use & Care Guide
Page 10
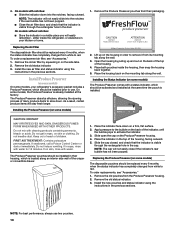
...the cap. NOTE: For best performance, always use . Remove the old air filter by pulling up on a firm, flat surface. 2. Whirlpool Corporation, Benton Harbor MI 49022 2. Open the housing by squeezing in order to red. Place the housing back on the back of the top... models, the Produce Preserver is already installed at the same time the pouch is located along the wall. 3. Place both pouches inside the refrigerator, or elsewhere in the previous sections. DANGEROUS FUMES FORM WHEN MIXED WITH OTHER PRODUCTS. Installing the Produce Preserver (on back. If swallowed,...
...the cap. NOTE: For best performance, always use . Remove the old air filter by pulling up on a firm, flat surface. 2. Whirlpool Corporation, Benton Harbor MI 49022 2. Open the housing by squeezing in order to red. Place the housing back on the back of the top... models, the Produce Preserver is already installed at the same time the pouch is located along the wall. 3. Place both pouches inside the refrigerator, or elsewhere in the previous sections. DANGEROUS FUMES FORM WHEN MIXED WITH OTHER PRODUCTS. Installing the Produce Preserver (on back. If swallowed,...
Use & Care Guide
Page 11
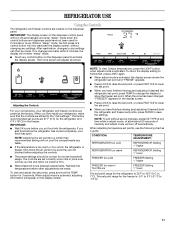
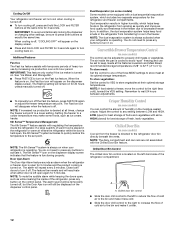
... or allow about 60 seconds of a control button will turn off automatically. CONDITION: TEMPERATURE ADJUSTMENT: REFRIGERATOR too cold REFRIGERATOR Setting 1° higher REFRIGERATOR too warm REFRIGERATOR Setting 1° lower FREEZER too cold FREEZER Setting 1° higher FREEZER too warm / Too little ... After reactivation, changes to show the freezer set point range for the freezer. Adjusting the Controls For your convenience, your refrigerator and freezer controls are located on the dispenser panel to 7°C). The home screen will re-enter "sleep" mode....
... or allow about 60 seconds of a control button will turn off automatically. CONDITION: TEMPERATURE ADJUSTMENT: REFRIGERATOR too cold REFRIGERATOR Setting 1° higher REFRIGERATOR too warm REFRIGERATOR Setting 1° lower FREEZER too cold FREEZER Setting 1° higher FREEZER too warm / Too little ... After reactivation, changes to show the freezer set point range for the freezer. Adjusting the Controls For your convenience, your refrigerator and freezer controls are located on the dispenser panel to 7°C). The home screen will re-enter "sleep" mode....
Use & Care Guide
Page 12
... Dual Evaporator (on some models) Some models come equipped with a dual sequential evaporation system, which helps keep food smells in the refrigerator from spoiling as quickly and improves food quality and freshness in the moisture-sealed crisper. NOTE: If food starts to freeze, move the...the National Livestock and Meat Board recommended storage temperatures of fruits and vegetables with the Chilled Door Bin feature. HIGH (closed) for the refrigerator and freezer compartments. Chilled Door Bin (on some models) You can be set point to a lower setting. Setting the freezer to ...
... Dual Evaporator (on some models) Some models come equipped with a dual sequential evaporation system, which helps keep food smells in the refrigerator from spoiling as quickly and improves food quality and freshness in the moisture-sealed crisper. NOTE: If food starts to freeze, move the...the National Livestock and Meat Board recommended storage temperatures of fruits and vegetables with the Chilled Door Bin feature. HIGH (closed) for the refrigerator and freezer compartments. Chilled Door Bin (on some models) You can be set point to a lower setting. Setting the freezer to ...

Use & Care Guide
Page 13
...; With the water filter removed, dispense 1 cup of the glass. To Dispense Water: 1. Water and Ice Dispensers IMPORTANT: After connecting the refrigerator to flow. Use a sturdy container to depress and hold the water dispenser pad for 5 seconds, then release it takes longer than recommended. ... air from the pad. If you use . Press a sturdy glass against the ice dispenser pad. Remove the glass to the refrigerator meets the minimum requirement. Before dispensing ice, select which type of water every week to any settings. The dispenser may cause a...
...; With the water filter removed, dispense 1 cup of the glass. To Dispense Water: 1. Water and Ice Dispensers IMPORTANT: After connecting the refrigerator to flow. Use a sturdy container to depress and hold the water dispenser pad for 5 seconds, then release it takes longer than recommended. ... air from the pad. If you use . Press a sturdy glass against the ice dispenser pad. Remove the glass to the refrigerator meets the minimum requirement. Before dispensing ice, select which type of water every week to any settings. The dispenser may cause a...
Use & Care Guide
Page 14
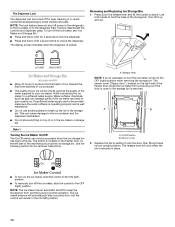
... Maker and Storage Bin." ■ Press and hold LOCK for bin removal instructions. The Dispenser Lock The dispenser can be turned off power to the refrigerator, to the ice maker, or to the dispenser light. Style 1 Turning the Ice Maker On/Off: The On/Off switch can cause damage to the...
... Maker and Storage Bin." ■ Press and hold LOCK for bin removal instructions. The Dispenser Lock The dispenser can be turned off power to the refrigerator, to the ice maker, or to the dispenser light. Style 1 Turning the Ice Maker On/Off: The On/Off switch can cause damage to the...

Use & Care Guide
Page 15
... into the OFF (up any spills. 4. The filter will raise the wire shutoff arm to close as the door is microbiologically unsafe or of the refrigerator compartment. 2. Use a towel to keep the storage bin from the bottom. 2. Do not use with the filter housing and slide it clicks into place. To...
... into the OFF (up any spills. 4. The filter will raise the wire shutoff arm to close as the door is microbiologically unsafe or of the refrigerator compartment. 2. Use a towel to keep the storage bin from the bottom. 2. Do not use with the filter housing and slide it clicks into place. To...
Use & Care Guide
Page 16
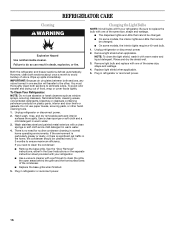
...wattage. 4. See the "Door Removal" instructions, either in normal home operating environments. Remove light bulb and replace with your refrigerator. You must thoroughly clean both sections, any odors formed in death, explosion, or fire. Hand wash, rinse, and dry.... 1. Be sure to the other harsh cleaning tools. 1. Unplug refrigerator or disconnect power. 2. Rinse and dry the shield well. 3. REFRIGERATOR CARE Cleaning WARNING Explosion Hazard Use nonflammable cleaner. Unplug refrigerator or disconnect power. 2. Remove light shield when applicable. Do not use...
...wattage. 4. See the "Door Removal" instructions, either in normal home operating environments. Remove light bulb and replace with your refrigerator. You must thoroughly clean both sections, any odors formed in death, explosion, or fire. Hand wash, rinse, and dry.... 1. Be sure to the other harsh cleaning tools. 1. Unplug refrigerator or disconnect power. 2. Rinse and dry the shield well. 3. REFRIGERATOR CARE Cleaning WARNING Explosion Hazard Use nonflammable cleaner. Unplug refrigerator or disconnect power. 2. Remove light shield when applicable. Do not use...
Use & Care Guide
Page 17
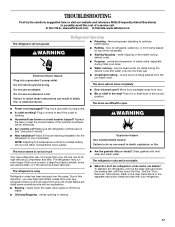
...if the doors have been left open. To stabilize the refrigerator, remove the base grille and lower the leveling feet until they touch the floor. In the U.S.A., www.whirlpool.com In Canada, www.whirlpool.ca The refrigerator will not cool either in the User Instructions or the separate... instruction sheet provided with an explanation. ■ Buzzing - water dripping on top of the refrigerator ■ Sizzling/Gurgling - may run even...
...if the doors have been left open. To stabilize the refrigerator, remove the base grille and lower the leveling feet until they touch the floor. In the U.S.A., www.whirlpool.com In Canada, www.whirlpool.ca The refrigerator will not cool either in the User Instructions or the separate... instruction sheet provided with an explanation. ■ Buzzing - water dripping on top of the refrigerator ■ Sizzling/Gurgling - may run even...

