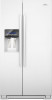

Dimension Guide
Page 1
...minimum cabinet cut-out width required for planning purposes only. Specifications subject to the electrical source and reset the control (Thermostat, Refrigerator or Freezer control depending on each side and at the back for 1" (2.54 cm) of space on each side (... kPa). If a reverse osmosis water filtration system is 36" (91.44 cm). Because Whirlpool Corporation policy includes a continuous commitment to improve Dimensions are finished, reconnect the refrigerator to change materials and specifications without notice. For complete details, see Installation our products, we...
...minimum cabinet cut-out width required for planning purposes only. Specifications subject to the electrical source and reset the control (Thermostat, Refrigerator or Freezer control depending on each side and at the back for 1" (2.54 cm) of space on each side (... kPa). If a reverse osmosis water filtration system is 36" (91.44 cm). Because Whirlpool Corporation policy includes a continuous commitment to improve Dimensions are finished, reconnect the refrigerator to change materials and specifications without notice. For complete details, see Installation our products, we...
Warranty Information
Page 1
... state or province to province. Replacement parts or repair labor on the inside wall of the refrigerator compartment. This warranty gives you specific legal rights, and you . WHIRLPOOL SHALL NOT BE LIABLE FOR INCIDENTAL OR CONSEQUENTIAL DAMAGES. Have your major appliance if it is...PURPOSE, ARE LIMITED TO ONE YEAR OR THE SHORTEST PERIOD ALLOWED BY LAW. Service calls to refrigerator or freezer product failures. 7. Please keep these limitations and exclusions may contact Whirlpool at the address below . Pickup and delivery. The removal and reinstallation of your complete model ...
... state or province to province. Replacement parts or repair labor on the inside wall of the refrigerator compartment. This warranty gives you specific legal rights, and you . WHIRLPOOL SHALL NOT BE LIABLE FOR INCIDENTAL OR CONSEQUENTIAL DAMAGES. Have your major appliance if it is...PURPOSE, ARE LIMITED TO ONE YEAR OR THE SHORTEST PERIOD ALLOWED BY LAW. Service calls to refrigerator or freezer product failures. 7. Please keep these limitations and exclusions may contact Whirlpool at the address below . Pickup and delivery. The removal and reinstallation of your complete model ...

Energy Guide
Page 1
... removal of 10.65 cents per kWh. • For more information, visit www.ftc.gov/appliances. (P/N W10350692 Rev. Refrigerator-Freezer • Automatic Defrost • Side-Mounted Freezer • With Through-The-Door-Ice Service Whirlpool Corporation Model: WSF26D2EX*0* Capacity: 26.4 Cubic Feet Estimated Yearly Operating Cost $63 ▼ $60 $78 Cost Range...
... removal of 10.65 cents per kWh. • For more information, visit www.ftc.gov/appliances. (P/N W10350692 Rev. Refrigerator-Freezer • Automatic Defrost • Side-Mounted Freezer • With Through-The-Door-Ice Service Whirlpool Corporation Model: WSF26D2EX*0* Capacity: 26.4 Cubic Feet Estimated Yearly Operating Cost $63 ▼ $60 $78 Cost Range...
Use & Care Guide
Page 1
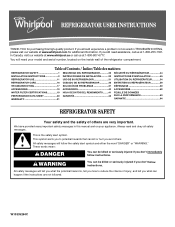
... In Canada, visit our website at www.whirlpool.ca or call us at 1-800-253-1301. All safety messages will tell you what can be killed or seriously injured if you don't immediately follow instructions. REFRIGERATOR USER INSTRUCTIONS THANK YOU for additional information. ... website at www.whirlpool.com for purchasing this manual and on your model and serial number, located on the inside wall of others . Table of Contents / Índice / Table des matières REFRIGERATOR SAFETY 1 INSTALLATION INSTRUCTIONS 2 REFRIGERATOR USE 11 REFRIGERATOR CARE 16 TROUBLESHOOTING 17...
... In Canada, visit our website at www.whirlpool.ca or call us at 1-800-253-1301. All safety messages will tell you what can be killed or seriously injured if you don't immediately follow instructions. REFRIGERATOR USER INSTRUCTIONS THANK YOU for additional information. ... website at www.whirlpool.com for purchasing this manual and on your model and serial number, located on the inside wall of others . Table of Contents / Índice / Table des matières REFRIGERATOR SAFETY 1 INSTALLATION INSTRUCTIONS 2 REFRIGERATOR USE 11 REFRIGERATOR CARE 16 TROUBLESHOOTING 17...
Use & Care Guide
Page 2
... maker (on ice maker kit ready models only). ■ Use a sturdy glass when dispensing ice (on some models). ■ Do not hit the refrigerator glass doors (on some models). Tempered glass is designed to shatter into a grounded 3 prong outlet. ■ Use nonflammable cleaner. ■ Do not ...and covers may not easily climb inside. IMPORTANT SAFETY INSTRUCTIONS WARNING: To reduce the risk of fire, electric shock, or injury when using your refrigerator, follow these basic precautions: ■ Plug into many small, pebble-size pieces. Use both hands when removing them to do so can ...
... maker (on ice maker kit ready models only). ■ Use a sturdy glass when dispensing ice (on some models). ■ Do not hit the refrigerator glass doors (on some models). Tempered glass is designed to shatter into a grounded 3 prong outlet. ■ Use nonflammable cleaner. ■ Do not ...and covers may not easily climb inside. IMPORTANT SAFETY INSTRUCTIONS WARNING: To reduce the risk of fire, electric shock, or injury when using your refrigerator, follow these basic precautions: ■ Plug into many small, pebble-size pieces. Use both hands when removing them to do so can ...
Use & Care Guide
Page 3
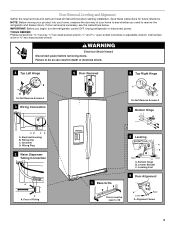
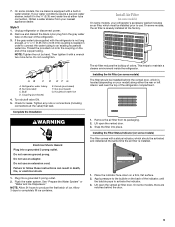
...NEEDED: Phillips screwdriver hex key, ¹⁄₄" hex-head socket wrench, ¹⁄₄" and open to remove the refrigerator and freezer doors. Grommet D. Leveler Bracket C. Door Removal, Leveling and Alignment Gather the required tools and parts and read all instructions...Dispenser Tubing Connection A A A. Failure to see the instructions below. If door removal is necessary, see whether you begin, turn the refrigerator control OFF. Leveling Foot 9 Door Alignment Doors must be open -ended wrenches or adjustable wrench, internal star drive or ³⁄...
...NEEDED: Phillips screwdriver hex key, ¹⁄₄" hex-head socket wrench, ¹⁄₄" and open to remove the refrigerator and freezer doors. Grommet D. Leveler Bracket C. Door Removal, Leveling and Alignment Gather the required tools and parts and read all instructions...Dispenser Tubing Connection A A A. Failure to see the instructions below. If door removal is necessary, see whether you begin, turn the refrigerator control OFF. Leveling Foot 9 Door Alignment Doors must be open -ended wrenches or adjustable wrench, internal star drive or ³⁄...
Use & Care Guide
Page 4
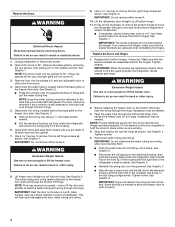
...hex-head socket wrench. ■ Pull the electrical housing out from doors. 4. Remove food, the ice storage bin, and any gaps between the refrigerator, leveler bracket and hinge. See Graphic 3. ■ Remove the wiring clip using a single screw. WARNING Excessive Weight Hazard Use two or more... to remove the bottom hinges to 90°. Use a hex key to open properly. 4 IMPORTANT: Do not remove either screw A. Lift the refrigerator door straight up off . 3. It may be taut. See Graphic 7. Replace the Doors and Hinges 1. IMPORTANT: When the screws are replaced when...
...hex-head socket wrench. ■ Pull the electrical housing out from doors. 4. Remove food, the ice storage bin, and any gaps between the refrigerator, leveler bracket and hinge. See Graphic 3. ■ Remove the wiring clip using a single screw. WARNING Excessive Weight Hazard Use two or more... to remove the bottom hinges to 90°. Use a hex key to open properly. 4 IMPORTANT: Do not remove either screw A. Lift the refrigerator door straight up off . 3. It may be taut. See Graphic 7. Replace the Doors and Hinges 1. IMPORTANT: When the screws are replaced when...
Use & Care Guide
Page 5
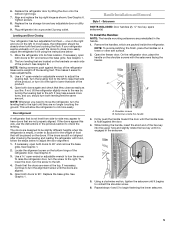
... motion, tighten the setscrew until the handle base is engaged in order to contact the shoulder screw. 6. Leveling and Door Closing Your refrigerator has two adjustable front feet - This makes it begins to account for the weight of the product. 4. Open both doors to close... may take several more easily. See Graphic 9. 3. NOTE: To avoid scratching the finish, place the handles on the left . Replace the refrigerator door by turning the leveling feet to adjust the door alignment. 1. If necessary, continue to turn the screw to begin fastening the lower setscrew...
... motion, tighten the setscrew until the handle base is engaged in order to contact the shoulder screw. 6. Leveling and Door Closing Your refrigerator has two adjustable front feet - This makes it begins to account for the weight of the product. 4. Open both doors to close... may take several more easily. See Graphic 9. 3. NOTE: To avoid scratching the finish, place the handles on the left . Replace the refrigerator door by turning the leveling feet to adjust the door alignment. 1. If necessary, continue to turn the screw to begin fastening the lower setscrew...
Use & Care Guide
Page 6
..., place them an additional quarter-turn at a time. 3. Apply firm pressure on PARTS INCLUDED: Door handles (2) To Install the Handles: 1. If your refrigerator, allow for ¹⁄₂" (1.25 cm) of the hex key into the lower setscrew hole and slightly rotate the hex key until it down... door. 4. While holding the handle, insert the short end of space on each side (depending on the shoulder screws, which are packed inside the refrigerator. NOTE: Do not push the handle toward the door; If necessary, use a Phillips screwdriver to remove the shoulder screws from a minimum of 55&#...
..., place them an additional quarter-turn at a time. 3. Apply firm pressure on PARTS INCLUDED: Door handles (2) To Install the Handles: 1. If your refrigerator, allow for ¹⁄₂" (1.25 cm) of the hex key into the lower setscrew hole and slightly rotate the hex key until it down... door. 4. While holding the handle, insert the short end of space on each side (depending on the shoulder screws, which are packed inside the refrigerator. NOTE: Do not push the handle toward the door; If necessary, use a Phillips screwdriver to remove the shoulder screws from a minimum of 55&#...
Use & Care Guide
Page 7
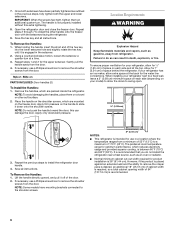
...of between 30 and 120 psi (207 and 827 kPa). It is recommended that cannot be provided. If you have questions about your refrigerator be turned off by a switch. Do not remove ground prong. Use an outlet that a separate circuit serving only your water pressure,...Nut driver and ¹⁄₂" Open-end or two adjustable wrenches Drill bit ■ Cordless drill NOTE: Your refrigerator dealer has a kit available with your refrigerator has a water filter, it is blocked. Reverse Osmosis Water Supply IMPORTANT: The pressure of the water supply coming out...
...of between 30 and 120 psi (207 and 827 kPa). It is recommended that cannot be provided. If you have questions about your refrigerator be turned off by a switch. Do not remove ground prong. Use an outlet that a separate circuit serving only your water pressure,...Nut driver and ¹⁄₂" Open-end or two adjustable wrenches Drill bit ■ Cordless drill NOTE: Your refrigerator dealer has a kit available with your refrigerator has a water filter, it is blocked. Reverse Osmosis Water Supply IMPORTANT: The pressure of the water supply coming out...

Use & Care Guide
Page 8
... connection to the inlet of the tubing into outlet end squarely as far as shown. Remove and discard the short, black plastic part from refrigerator A B C D A. Connect to meet the water line inlet, which is connected, turn on the water pipe. Nut C. Copper tubing...with the International Plumbing Code and any local codes and ordinances. ■ Use copper tubing or Whirlpool supply line, Part Number 8212547RP, and check for leaks. Attach the copper tube to refrigerator) D. Compression nut C C. Tube clamp B. Compression nut E. Then tighten it will help ...
... connection to the inlet of the tubing into outlet end squarely as far as shown. Remove and discard the short, black plastic part from refrigerator A B C D A. Connect to meet the water line inlet, which is connected, turn on the water pipe. Nut C. Copper tubing...with the International Plumbing Code and any local codes and ordinances. ■ Use copper tubing or Whirlpool supply line, Part Number 8212547RP, and check for leaks. Attach the copper tube to refrigerator) D. Compression nut C C. Tube clamp B. Compression nut E. Then tighten it will help ...
Use & Care Guide
Page 9
... a grounded 3 prong outlet. Remove and discard the black nylon plug from the gray water tube on the end of the refrigerator. 3. Refrigerator water tubing B. Nut (purchased) G. Do not use an adapter. Failure to activate the indicator. 3. NOTE: Allow 24 hours ...Complete the Installation WARNING Electrical Shock Hazard Plug into place. Do not use an extension cord. The air filter reduces the buildup of the refrigerator compartment. 1. Install Air Filter (on some models) The filter should be installed prior to completely fill ice container. Style 3 1. Plug...
... a grounded 3 prong outlet. Remove and discard the black nylon plug from the gray water tube on the end of the refrigerator. 3. Refrigerator water tubing B. Nut (purchased) G. Do not use an adapter. Failure to activate the indicator. 3. NOTE: Allow 24 hours ...Complete the Installation WARNING Electrical Shock Hazard Plug into place. Do not use an extension cord. The air filter reduces the buildup of the refrigerator compartment. 1. Install Air Filter (on some models) The filter should be installed prior to completely fill ice container. Style 3 1. Plug...
Use & Care Guide
Page 10
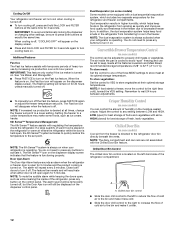
...on the back of the top of many produce items to activate the indicator. 3. Place both pouches inside the refrigerator, or elsewhere in your refrigerator's accessory packet includes a Produce Preserver, which should be installed prior to red. REPLACE MONTHS CAUTION: IRRITANT MAY...replaced every 6 months, when the status indicator has completely changed from white to remove it from the Produce Preserver housing. 2. Whirlpool Corporation, Benton Harbor MI 49022 2. Installing the Status Indicator (on some models) The Produce Preserver comes with cleaning products containing ...
...on the back of the top of many produce items to activate the indicator. 3. Place both pouches inside the refrigerator, or elsewhere in your refrigerator's accessory packet includes a Produce Preserver, which should be installed prior to red. REPLACE MONTHS CAUTION: IRRITANT MAY...replaced every 6 months, when the status indicator has completely changed from white to remove it from the Produce Preserver housing. 2. Whirlpool Corporation, Benton Harbor MI 49022 2. Installing the Status Indicator (on some models) The Produce Preserver comes with cleaning products containing ...
Use & Care Guide
Page 11
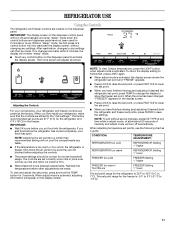
... LIGHT button when adjust mode is activated, adjusting information will appear as a guide. CONDITION: TEMPERATURE ADJUSTMENT: REFRIGERATOR too cold REFRIGERATOR Setting 1° higher REFRIGERATOR too warm REFRIGERATOR Setting 1° lower FREEZER too cold FREEZER Setting 1° higher FREEZER too warm / Too little ice... To view and adjust the set point. ■ When you add food before other adjustments are 37°F (3°C) for the refrigerator and 0°F (-18°C) for the freezer is 33°F to 45°F (0°C to any settings. After reactivation, ...
... LIGHT button when adjust mode is activated, adjusting information will appear as a guide. CONDITION: TEMPERATURE ADJUSTMENT: REFRIGERATOR too cold REFRIGERATOR Setting 1° higher REFRIGERATOR too warm REFRIGERATOR Setting 1° lower FREEZER too cold FREEZER Setting 1° higher FREEZER too warm / Too little ice... To view and adjust the set point. ■ When you add food before other adjustments are 37°F (3°C) for the refrigerator and 0°F (-18°C) for the freezer is 33°F to 45°F (0°C to any settings. After reactivation, ...
Use & Care Guide
Page 12
...settings to store meat at the same time for 3 seconds. Dual evaporation results in higher humidity, which includes two separate evaporators for the refrigerator and freezer compartments. HIGH (closed) for 5 minutes and the product cooling is turned on some models) The control can be set ...NOTE: To mute the audible alarm while keeping the doors open for best storage of humidity in the freezer. The air inside the refrigerator. When the feature is desired at the National Livestock and Meat Board recommended storage temperatures of heavy ice use by increasing ice production ...
...settings to store meat at the same time for 3 seconds. Dual evaporation results in higher humidity, which includes two separate evaporators for the refrigerator and freezer compartments. HIGH (closed) for 5 minutes and the product cooling is turned on some models) The control can be set ...NOTE: To mute the audible alarm while keeping the doors open for best storage of humidity in the freezer. The air inside the refrigerator. When the feature is desired at the National Livestock and Meat Board recommended storage temperatures of heavy ice use by increasing ice production ...

Use & Care Guide
Page 13
... dispenser light on , 5 seconds off automatically and enter "sleep" mode when the control buttons and dispenser pads have not been used for the refrigerator to cool down and chill water. ■ Allow 24 hours to stop dispensing. If 1 cup of pressure to the pad in "sleep" ... glass. Additional flushing may spurt out of water from the dispenser decreases, it takes longer than recommended. Hold the glass close to the refrigerator meets the minimum requirement. Before dispensing ice, select which type of ice produced. If it for use the dispenser, the light will remain...
... dispenser light on , 5 seconds off automatically and enter "sleep" mode when the control buttons and dispenser pads have not been used for the refrigerator to cool down and chill water. ■ Allow 24 hours to stop dispensing. If 1 cup of pressure to the pad in "sleep" ... glass. Additional flushing may spurt out of water from the dispenser decreases, it takes longer than recommended. Hold the glass close to the refrigerator meets the minimum requirement. Before dispensing ice, select which type of ice produced. If it for use the dispenser, the light will remain...
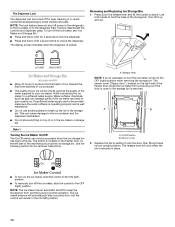
Use & Care Guide
Page 14
..., but the control will click when the bin is securely in the storage bin. NOTE: The lock feature does not shut off power to the refrigerator, to the ice maker, or to your ice will be only as good as salt) can damage parts of the ice maker and lead to...
..., but the control will click when the bin is securely in the storage bin. NOTE: The lock feature does not shut off power to the refrigerator, to the ice maker, or to your ice will be only as good as salt) can damage parts of the ice maker and lead to...

Use & Care Guide
Page 15
... filter cartridge. ■ Replace the water filter cartridge when the water filter status display changes to press hard. 7. Take the new filter out of the refrigerator compartment. 2. Make sure the door is completely open the filter cover door. The filter will raise the wire shutoff arm to snap the filter into...
... filter cartridge. ■ Replace the water filter cartridge when the water filter status display changes to press hard. 7. Take the new filter out of the refrigerator compartment. 2. Make sure the door is completely open the filter cover door. The filter will raise the wire shutoff arm to snap the filter into...
Use & Care Guide
Page 16
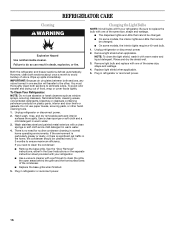
.... ■ On some models, the interior lights require a 40-watt bulb. 1. Replace light shield when applicable. 5. Both the refrigerator and freezer sections defrost automatically. IMPORTANT: Because air circulates between both sections, any odors formed in the User Instructions or the separate instruction...to ensure maximum efficiency. You must thoroughly clean both sections about once a month to the other harsh cleaning tools. 1. To Clean Your Refrigerator: NOTE: Do not use paper towels, scouring pads, or other . See the "Door Removal" instructions, either in one of the ...
.... ■ On some models, the interior lights require a 40-watt bulb. 1. Replace light shield when applicable. 5. Both the refrigerator and freezer sections defrost automatically. IMPORTANT: Because air circulates between both sections, any odors formed in the User Instructions or the separate instruction...to ensure maximum efficiency. You must thoroughly clean both sections about once a month to the other harsh cleaning tools. 1. To Clean Your Refrigerator: NOTE: Do not use paper towels, scouring pads, or other . See the "Door Removal" instructions, either in one of the ...
Use & Care Guide
Page 17
.... heard when the water valve opens to this reduction, you did not notice from items placed on ? contraction/expansion of the refrigerator ■ Sizzling/Gurgling - The doors are listed some normal sounds with mild soap and warm water. See the "Door Removal"... circuit breaker. Due to fill the ice maker ■ Clicking/Snapping - In the U.S.A., www.whirlpool.com In Canada, www.whirlpool.ca The refrigerator will not operate WARNING Refrigerator Operation ■ Pulsating - TROUBLESHOOTING First try the solutions suggested here or visit our website and reference...
.... heard when the water valve opens to this reduction, you did not notice from items placed on ? contraction/expansion of the refrigerator ■ Sizzling/Gurgling - The doors are listed some normal sounds with mild soap and warm water. See the "Door Removal"... circuit breaker. Due to fill the ice maker ■ Clicking/Snapping - In the U.S.A., www.whirlpool.com In Canada, www.whirlpool.ca The refrigerator will not operate WARNING Refrigerator Operation ■ Pulsating - TROUBLESHOOTING First try the solutions suggested here or visit our website and reference...

