

Use & Care Guide
Page 1
...201;RATEUR 48 INSTALLATION INSTRUCTIONS 2 INSTRUCCIONES DE INSTALACIÓN........... 24 INSTRUCTIONS D'INSTALLATION 49 REFRIGERATOR USE 10 REFRIGERATOR FEATURES 14 FREEZER FEATURES 15 DOOR FEATURES 16 REFRIGERATOR CARE 17 TROUBLESHOOTING 18 ACCESSORIES 20 WATER FILTER CERTIFICATIONS 20 PERFORMANCE DATA SHEET 21 WARRANTY... SUR LA PERFORMANCE 68 GARANTIE 69 REFRIGERATOR SAFETY Your safety and the safety of the refrigerator compartment. If you and others are not followed. You will need assistance, call us at www.whirlpool.com for purchasing this manual and on...
...201;RATEUR 48 INSTALLATION INSTRUCTIONS 2 INSTRUCCIONES DE INSTALACIÓN........... 24 INSTRUCTIONS D'INSTALLATION 49 REFRIGERATOR USE 10 REFRIGERATOR FEATURES 14 FREEZER FEATURES 15 DOOR FEATURES 16 REFRIGERATOR CARE 17 TROUBLESHOOTING 18 ACCESSORIES 20 WATER FILTER CERTIFICATIONS 20 PERFORMANCE DATA SHEET 21 WARRANTY... SUR LA PERFORMANCE 68 GARANTIE 69 REFRIGERATOR SAFETY Your safety and the safety of the refrigerator compartment. If you and others are not followed. You will need assistance, call us at www.whirlpool.com for purchasing this manual and on...

Use & Care Guide
Page 2
...of your fingers. Important information to remove tape or glue. Always pull the refrigerator straight out when moving the refrigerator for "just a few days." SAVE THESE INSTRUCTIONS Proper Disposal of refrigerator in place so that children may migrate down from the freezer and cause ...icicles to move and install refrigerator. Rub a small amount of your old refrigerator, please follow basic precautions, including the following: ■ Plug into a grounded 3 prong outlet. ■ Do not remove ground prong...
...of your fingers. Important information to remove tape or glue. Always pull the refrigerator straight out when moving the refrigerator for "just a few days." SAVE THESE INSTRUCTIONS Proper Disposal of refrigerator in place so that children may migrate down from the freezer and cause ...icicles to move and install refrigerator. Rub a small amount of your old refrigerator, please follow basic precautions, including the following: ■ Plug into a grounded 3 prong outlet. ■ Do not remove ground prong...

Use & Care Guide
Page 3
...by a switch. Do not use an extension cord. Failure to the desired setting. It is designed to OFF and then disconnect the refrigerator from refrigerator. See "Using the Controls." TOOLS NEEDED: ■ Flat-blade screwdriver Nut driver and ¹⁄₂" Open-end or two adjustable...heavy. Shelves and covers may break if exposed to make sure a saddle-type valve complies with any type of space behind the refrigerator. Do not remove ground prong. Location Requirements WARNING Explosion Hazard Keep flammable materials and vapors, such as gasoline, away from the ...
...by a switch. Do not use an extension cord. Failure to the desired setting. It is designed to OFF and then disconnect the refrigerator from refrigerator. See "Using the Controls." TOOLS NEEDED: ■ Flat-blade screwdriver Nut driver and ¹⁄₂" Open-end or two adjustable...heavy. Shelves and covers may break if exposed to make sure a saddle-type valve complies with any type of space behind the refrigerator. Do not remove ground prong. Location Requirements WARNING Explosion Hazard Keep flammable materials and vapors, such as gasoline, away from the ...
Use & Care Guide
Page 4
... A G B C 6. Screw compression nut onto outlet end with a built-in water strainer. Flush the tubing until water is blocked. Unplug refrigerator or disconnect power. 2. Attach the copper tube to allow for leaks. Check for cleaning. Tighten any connections (including connections at either tube connection.... water pressure, call a licensed, qualified plumber. Locate a ½" to 1¹⁄₄" (1.25 cm to the tubing when the refrigerator is pushed back against the wall. 4. IMPORTANT: ■ Make sure it will help keep water away from the drill and normal sediment ...
... A G B C 6. Screw compression nut onto outlet end with a built-in water strainer. Flush the tubing until water is blocked. Unplug refrigerator or disconnect power. 2. Attach the copper tube to allow for leaks. Check for cleaning. Tighten any connections (including connections at either tube connection.... water pressure, call a licensed, qualified plumber. Locate a ½" to 1¹⁄₄" (1.25 cm to the tubing when the refrigerator is pushed back against the wall. 4. IMPORTANT: ■ Make sure it will help keep water away from the drill and normal sediment ...

Use & Care Guide
Page 5
...graphics specific to completely fill ice container. Remove Doors and Hinges Hex Head Hinge Screw 12-24 Torx®† Head Screw 1. Unplug refrigerator or disconnect power. 2. Complete the Installation WARNING AB C D EFG A. Ferrule (purchased) F. Check for leaks. Remove and discard ...connections at the valve) that leak. Bulb B. Nut (provided) 4. Turn shutoff valve ON. 5. Discard the first three batches of the refrigerator. 3. NOTE: Tighten the nut by hand. exterior controls and water dispenser. Do not overtighten. Do not remove ground prong. Remove food...
...graphics specific to completely fill ice container. Remove Doors and Hinges Hex Head Hinge Screw 12-24 Torx®† Head Screw 1. Unplug refrigerator or disconnect power. 2. Complete the Installation WARNING AB C D EFG A. Ferrule (purchased) F. Check for leaks. Remove and discard ...connections at the valve) that leak. Bulb B. Nut (provided) 4. Turn shutoff valve ON. 5. Discard the first three batches of the refrigerator. 3. NOTE: Tighten the nut by hand. exterior controls and water dispenser. Do not overtighten. Do not remove ground prong. Remove food...

Use & Care Guide
Page 6
...for the center hinge as shown. Line up the doors so that the bottom of the freezer door aligns evenly with the top of the refrigerator door. Reinstall top hinge cover. Return all screws. Style 1 - Tighten screws. Disconnect the wiring plugs located in the opening in death or.... 4. Lift the freezer door free from the cabinet. 6. Remove the parts for the top hinge as shown in Top Hinge graphic. Lift the refrigerator door free from the cabinet. 5. Remove the parts for the doors while the hinges are working . 1. Replace Doors and Hinges NOTE: Provide additional...
...for the center hinge as shown. Line up the doors so that the bottom of the freezer door aligns evenly with the top of the refrigerator door. Reinstall top hinge cover. Return all screws. Style 1 - Tighten screws. Disconnect the wiring plugs located in the opening in death or.... 4. Lift the freezer door free from the cabinet. 6. Remove the parts for the top hinge as shown in Top Hinge graphic. Lift the refrigerator door free from the cabinet. 5. Remove the parts for the doors while the hinges are working . 1. Replace Doors and Hinges NOTE: Provide additional...

Use & Care Guide
Page 9
... you should turn both leveling screws the same amount. ■ Some models have an additional leveling leg located in front of the refrigerator. Pry off the leveling screws and rollers which should be installed prior to adjust the leveling screws. Replace the top hinge cover. ...on either the rear or left to close as easily as shown. Snap the filter into the cabinet to maintain a cleaner environment inside the refrigerator. REPLACE MONTHS A A. Replace the base grille. 1. Apply pressure to the right. Remove the base grille. Install Manual Air Filter Status Indicator...
... you should turn both leveling screws the same amount. ■ Some models have an additional leveling leg located in front of the refrigerator. Pry off the leveling screws and rollers which should be installed prior to adjust the leveling screws. Replace the top hinge cover. ...on either the rear or left to close as easily as shown. Snap the filter into the cabinet to maintain a cleaner environment inside the refrigerator. REPLACE MONTHS A A. Replace the base grille. 1. Apply pressure to the right. Remove the base grille. Install Manual Air Filter Status Indicator...

Use & Care Guide
Page 10
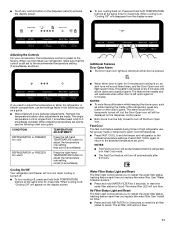
... check that the indicator is visible through the rectangular hole in the following the warranty. 1. The air filter LED lights up constantly when the refrigerator door is open . ■ EXPIRED - The air filter LED lights up . ■ REPLACE - To order a replacement air filter, contact...outward. After replacing the air filter, press and hold FILTERS RESET for 3 seconds. See "Using the Control(s)." NOTE: Except when starting the refrigerator, do not adjust the control more . Cooling Off/On ■ Press and hold TEMP again for 3 seconds. To turn cooling off. Air...
... check that the indicator is visible through the rectangular hole in the following the warranty. 1. The air filter LED lights up constantly when the refrigerator door is open . ■ EXPIRED - The air filter LED lights up . ■ REPLACE - To order a replacement air filter, contact...outward. After replacing the air filter, press and hold FILTERS RESET for 3 seconds. See "Using the Control(s)." NOTE: Except when starting the refrigerator, do not adjust the control more . Cooling Off/On ■ Press and hold TEMP again for 3 seconds. To turn cooling off. Air...
Use & Care Guide
Page 11
...9632; Wait at the same time for 3 seconds, to reset the water filter status to adjust the temperature one setting less cold (2 snowflakes) REFRIGERATOR or FREEZER too warm Press the right-hand TEMPERATURE button to Good. NOTES: ■ To mute the audible alarm while keeping the doors open... adjust the temperature in either door is left -hand TEMPERATURE button to adjust the temperature one setting colder (4 snowflakes) Cooling On/Off Your refrigerator and freezer will not cool when cooling is on the dispenser control panel. ■ Both doors must be displayed on , "Cooling Off"...
...9632; Wait at the same time for 3 seconds, to reset the water filter status to adjust the temperature one setting less cold (2 snowflakes) REFRIGERATOR or FREEZER too warm Press the right-hand TEMPERATURE button to Good. NOTES: ■ To mute the audible alarm while keeping the doors open... adjust the temperature in either door is left -hand TEMPERATURE button to adjust the temperature one setting colder (4 snowflakes) Cooling On/Off Your refrigerator and freezer will not cool when cooling is on the dispenser control panel. ■ Both doors must be displayed on , "Cooling Off"...

Use & Care Guide
Page 12
...9632; Do not store anything sharp to poor quality ice. Exterior Dispenser Models IMPORTANT: ■ The dispensing system will not operate when the refrigerator door is well maintained. ■ Do not use anything on top of 3 gal. (12 L) has been dispensed. After reactivation, changes ...To dispense water: 1. Release the dispenser pad to completely fill the ice container. ■ To increase ice production, lower the freezer and refrigerator temperature. As air is made . To continue dispensing, press the dispenser paddle again. If no changes are made within 2 minutes, the...
...9632; Do not store anything sharp to poor quality ice. Exterior Dispenser Models IMPORTANT: ■ The dispensing system will not operate when the refrigerator door is well maintained. ■ Do not use anything on top of 3 gal. (12 L) has been dispensed. After reactivation, changes ...To dispense water: 1. Release the dispenser pad to completely fill the ice container. ■ To increase ice production, lower the freezer and refrigerator temperature. As air is made . To continue dispensing, press the dispenser paddle again. If no changes are made within 2 minutes, the...

Use & Care Guide
Page 13
... Dispenser Models The status of unknown quality without adequate disinfection before or after the covers are still in the top-right corner of the refrigerator compartment. 2. Follow the directions specific to wipe up , align the new filter with water that is opened. 3. Locate the water filter...9632; When the water filter status is good, between 0 - 167 days (approximately), the Blue water filter LED lights up and flash whenever the refrigerator door is locked. If this happens, press and hold the FILTERS RESET button for 3 seconds again to good (0 days) and the Blue water...
... Dispenser Models The status of unknown quality without adequate disinfection before or after the covers are still in the top-right corner of the refrigerator compartment. 2. Follow the directions specific to wipe up , align the new filter with water that is opened. 3. Locate the water filter...9632; When the water filter status is good, between 0 - 167 days (approximately), the Blue water filter LED lights up and flash whenever the refrigerator door is locked. If this happens, press and hold the FILTERS RESET button for 3 seconds again to good (0 days) and the Blue water...

Use & Care Guide
Page 14
...moisture-proof. Depending on some models) To remove and replace the meat drawer: 1. Tilt the cover up the front of time the refrigerator door is designed to shatter into many small, pebble-size pieces. Meat Storage Guide Fold Away Shelf (on your individual storage needs.... items from the shelf. Remove the meat drawer. 2. Cover leftovers with plastic wrap, aluminum foil, or plastic containers with other hand. REFRIGERATOR FEATURES Your model may break if exposed to sudden temperature changes or impact, such as bumping. Important information to match your model, lift ...
...moisture-proof. Depending on some models) To remove and replace the meat drawer: 1. Tilt the cover up the front of time the refrigerator door is designed to shatter into many small, pebble-size pieces. Meat Storage Guide Fold Away Shelf (on your individual storage needs.... items from the shelf. Remove the meat drawer. 2. Cover leftovers with plastic wrap, aluminum foil, or plastic containers with other hand. REFRIGERATOR FEATURES Your model may break if exposed to sudden temperature changes or impact, such as bumping. Important information to match your model, lift ...

Use & Care Guide
Page 15
... information to know about glass shelves and covers: Do not clean glass shelves or covers with skins. ■ Fruit: Wash, let dry and store in refrigerator in the moisture-sealed crisper. Glass shelves and covers are ready to the left -hand end all of the freezer. Use both ends of the... the back end downward to raise the shelf tabs up and out of humidity in plastic bag or crisper. Adjust the control to rest on a refrigerator shelf. ■ Vegetables with skins: Place in plastic bag or plastic container and store in cold water, drain and trim or tear off bruised and...
... information to know about glass shelves and covers: Do not clean glass shelves or covers with skins. ■ Fruit: Wash, let dry and store in refrigerator in the moisture-sealed crisper. Glass shelves and covers are ready to the left -hand end all of the freezer. Use both ends of the... the back end downward to raise the shelf tabs up and out of humidity in plastic bag or crisper. Adjust the control to rest on a refrigerator shelf. ■ Vegetables with skins: Place in plastic bag or plastic container and store in cold water, drain and trim or tear off bruised and...

Use & Care Guide
Page 17
...fluids, muriatic acid, cleaning waxes, concentrated detergents, bleaches or cleansers containing petroleum products on the sides of odors. Plug in refrigerator or reconnect power. You must thoroughly clean both hands, squeeze inward on exterior surfaces (doors and cabinet), plastic parts, ...the exterior surfaces. Freezer Compartment Light (on some models) 1. Rinse surfaces with a 40 watt appliance bulb of the refrigerator compartment. 1. REFRIGERATOR CARE Cleaning WARNING Explosion Hazard Use nonflammable cleaner. Failure to avoid water spots. Wipe up until it with clean, ...
...fluids, muriatic acid, cleaning waxes, concentrated detergents, bleaches or cleansers containing petroleum products on the sides of odors. Plug in refrigerator or reconnect power. You must thoroughly clean both hands, squeeze inward on exterior surfaces (doors and cabinet), plastic parts, ...the exterior surfaces. Freezer Compartment Light (on some models) 1. Rinse surfaces with a 40 watt appliance bulb of the refrigerator compartment. 1. REFRIGERATOR CARE Cleaning WARNING Explosion Hazard Use nonflammable cleaner. Failure to avoid water spots. Wipe up until it with clean, ...

Use & Care Guide
Page 18
In the U.S.A., www.whirlpool.com In Canada, www.whirlpool.ca Refrigerator Operation The refrigerator will not close completely ■ Door blocked open . water dripping on top of the refrigerator Explosion Hazard Use nonflammable cleaner. occurs as ice is being ejected from your old model. Electrical Shock Hazard ... Sizzling/Gurgling - Push bin or shelf back in the way? Replace the fuse or reset the circuit breaker. The refrigerator seems noisy Refrigerator noise has been reduced over the years. heard when the water valve opens to optimize performance ■ Hissing/Rattling - ...
In the U.S.A., www.whirlpool.com In Canada, www.whirlpool.ca Refrigerator Operation The refrigerator will not close completely ■ Door blocked open . water dripping on top of the refrigerator Explosion Hazard Use nonflammable cleaner. occurs as ice is being ejected from your old model. Electrical Shock Hazard ... Sizzling/Gurgling - Push bin or shelf back in the way? Replace the fuse or reset the circuit breaker. The refrigerator seems noisy Refrigerator noise has been reduced over the years. heard when the water valve opens to optimize performance ■ Hissing/Rattling - ...

Use & Care Guide
Page 19
..."Water Supply Requirements." ■ Water filter installed on the floor near the base grille? See "Water Supply Requirements." Make sure the refrigerator is normal. ■ Humid room? Remove filter and operate ice maker. This can decrease water pressure. Make sure the water dispenser ...closed. The water pressure to the home determines the flow from the dispenser system NOTE: One or two drops of water. ■ Refrigerator connected to 3 seconds after releasing the dispenser lever. ■ New installation? This can decrease water pressure. Discard ice. Replace water filter...
..."Water Supply Requirements." ■ Water filter installed on the floor near the base grille? See "Water Supply Requirements." Make sure the refrigerator is normal. ■ Humid room? Remove filter and operate ice maker. This can decrease water pressure. Make sure the water dispenser ...closed. The water pressure to the home determines the flow from the dispenser system NOTE: One or two drops of water. ■ Refrigerator connected to 3 seconds after releasing the dispenser lever. ■ New installation? This can decrease water pressure. Discard ice. Replace water filter...
Use & Care Guide
Page 20
In the U.S.A., visit our webpage www.whirlpool.com/accessories or call 1-800-807-6777. To order, contact us and ask for your refrigerator. Stainless Steel Cleaner and Polish: Order Part #4396095 Water Filter: Order Part #W10295370 or FILTER1 Air Filter: Order Part #W10311524 or AIR1 Ethylene Filter: Order ...
In the U.S.A., visit our webpage www.whirlpool.com/accessories or call 1-800-807-6777. To order, contact us and ask for your refrigerator. Stainless Steel Cleaner and Polish: Order Part #4396095 Water Filter: Order Part #W10295370 or FILTER1 Air Filter: Order Part #W10311524 or AIR1 Ethylene Filter: Order ...

Use & Care Guide
Page 22
...codes, or use of products not approved by a Whirlpool designated service company. Proof of stainless steel surfaces. Pickup and delivery. WHIRLPOOL SHALL NOT BE LIABLE FOR INCIDENTAL OR CONSEQUENTIAL DAMAGES. Service calls to refrigerator or freezer product failures. 7. Some states and ...Ontario L5N 0B7 Please include a daytime phone number in materials or workmanship and is intended to Whirlpool within 30 days from the date of the refrigerator compartment. YOUR SOLE AND EXCLUSIVE REMEDY UNDER THIS LIMITED WARRANTY SHALL BE PRODUCT REPAIR AS PROVIDED HEREIN...
...codes, or use of products not approved by a Whirlpool designated service company. Proof of stainless steel surfaces. Pickup and delivery. WHIRLPOOL SHALL NOT BE LIABLE FOR INCIDENTAL OR CONSEQUENTIAL DAMAGES. Service calls to refrigerator or freezer product failures. 7. Some states and ...Ontario L5N 0B7 Please include a daytime phone number in materials or workmanship and is intended to Whirlpool within 30 days from the date of the refrigerator compartment. YOUR SOLE AND EXCLUSIVE REMEDY UNDER THIS LIMITED WARRANTY SHALL BE PRODUCT REPAIR AS PROVIDED HEREIN...

Warranty Information
Page 1
... intended to repair or replace appliance light bulbs, air filters or water filters. Discoloration, rust, or oxidation of the refrigerator compartment. Some states and provinces do not allow the exclusion or limitation of incidental or consequential damages, so these User ... alteration, misuse, abuse, fire, flood, acts of God, improper installation, installation not in accordance with the product, Whirlpool Corporation or Whirlpool Canada LP (hereafter "Whirlpool") will pay for future reference. 22 This limited warranty does not cover: ITEMS EXCLUDED FROM WARRANTY 1. Cosmetic damage, ...
... intended to repair or replace appliance light bulbs, air filters or water filters. Discoloration, rust, or oxidation of the refrigerator compartment. Some states and provinces do not allow the exclusion or limitation of incidental or consequential damages, so these User ... alteration, misuse, abuse, fire, flood, acts of God, improper installation, installation not in accordance with the product, Whirlpool Corporation or Whirlpool Canada LP (hereafter "Whirlpool") will pay for future reference. 22 This limited warranty does not cover: ITEMS EXCLUDED FROM WARRANTY 1. Cosmetic damage, ...


