

Use & Care Guide
Page 1
...what can happen if the instructions are very important. W10359303A If you don't follow instructions. In Canada, visit our website at www.whirlpool.ca or call us at www.whirlpool.com for purchasing this manual and on the inside wall of others . Table of Contents / Índice / Table des mati&#...messages in TROUBLESHOOTING, please visit our website at 1-800-807-6777. These words mean: DANGER You can kill or hurt you still need your model and serial number, located on your appliance. This is , tell you how to potential hazards that can be killed or seriously injured if you...
...what can happen if the instructions are very important. W10359303A If you don't follow instructions. In Canada, visit our website at www.whirlpool.ca or call us at www.whirlpool.com for purchasing this manual and on the inside wall of others . Table of Contents / Índice / Table des mati&#...messages in TROUBLESHOOTING, please visit our website at 1-800-807-6777. These words mean: DANGER You can kill or hurt you still need your model and serial number, located on your appliance. This is , tell you how to potential hazards that can be killed or seriously injured if you...

Use & Care Guide
Page 2
... fingers. Remove the Packaging IMPORTANT: Do not remove the white foam air return insert from surfaces before installing ice maker (on ice maker kit ready models only). even if they will sit for cleaning or service, be evacuated by a licensed, EPA certified refrigerant technician in place so that children may migrate...
... fingers. Remove the Packaging IMPORTANT: Do not remove the white foam air return insert from surfaces before installing ice maker (on ice maker kit ready models only). even if they will sit for cleaning or service, be evacuated by a licensed, EPA certified refrigerant technician in place so that children may migrate...

Use & Care Guide
Page 3
...type of installation, cleaning, or removing a light bulb, turn the control (Thermostat, Refrigerator or Freezer Control depending on the hinge side (some models require more easily. Failure to swing open. Do not remove ground prong. Do not use in death, explosion, or fire. Water Supply ... before using it is normal. When you move your refrigerator next to a fixed wall, leave a 2" (5.08 cm) minimum space on the model) to avoid dropping. Before you are cold. NOTE: Before performing any tools listed here. See "Using the Controls." Shelves and covers may break...
...type of installation, cleaning, or removing a light bulb, turn the control (Thermostat, Refrigerator or Freezer Control depending on the hinge side (some models require more easily. Failure to swing open. Do not remove ground prong. Do not use in death, explosion, or fire. Water Supply ... before using it is normal. When you move your refrigerator next to a fixed wall, leave a 2" (5.08 cm) minimum space on the model) to avoid dropping. Before you are cold. NOTE: Before performing any tools listed here. See "Using the Controls." Shelves and covers may break...

Use & Care Guide
Page 5
...interior controls and water dispenser or Style 2 - Open the refrigerator door and remove the base grille from the gray water tube on your model. ■ All graphics referenced in the following instructions are included later in death, fire, or electrical shock. 1. Refrigerator water tubing B. ...valve ON. 5. Electrical Shock Hazard Plug into a grounded 3 prong outlet. 2. Do not use an extension cord. Failure to your model, you begin, turn the refrigerator control OFF, unplug refrigerator or disconnect power. See "Water Dispenser." Discard the first three batches of Saturn...
...interior controls and water dispenser or Style 2 - Open the refrigerator door and remove the base grille from the gray water tube on your model. ■ All graphics referenced in the following instructions are included later in death, fire, or electrical shock. 1. Refrigerator water tubing B. ...valve ON. 5. Electrical Shock Hazard Plug into a grounded 3 prong outlet. 2. Do not use an extension cord. Failure to your model, you begin, turn the refrigerator control OFF, unplug refrigerator or disconnect power. See "Water Dispenser." Discard the first three batches of Saturn...

Use & Care Guide
Page 6
...to do so can result in refrigerator or reconnect power. 4. Remove the parts for the center hinge as shown. NOTE: On some models, remove both the bottom hinge assembly and the leveling foot. 2. IMPORTANT: Do not intertwine the water tubing and wiring bundles when reconnecting ... . 4. Replace the parts for the bottom hinge as shown in place while you are working . 1. Replace the refrigerator door. Final Steps (All Models) 1. See "Using the Controls." 5. Lift the refrigerator door free from the cabinet. 7. Style 1 - Assemble the parts for the bottom hinge ...
...to do so can result in refrigerator or reconnect power. 4. Remove the parts for the center hinge as shown. NOTE: On some models, remove both the bottom hinge assembly and the leveling foot. 2. IMPORTANT: Do not intertwine the water tubing and wiring bundles when reconnecting ... . 4. Replace the parts for the bottom hinge as shown in place while you are working . 1. Replace the refrigerator door. Final Steps (All Models) 1. See "Using the Controls." 5. Lift the refrigerator door free from the cabinet. 7. Style 1 - Assemble the parts for the bottom hinge ...
Use & Care Guide
Page 7
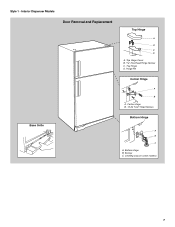
Top Hinge D. Bottom Hinge B. Style 1 - Interior Dispenser Models Door Removal and Replacement Base Grille Top Hinge A B C D A. Screws C. Top Hinge Cover B Hex-Head Hinge Screws C. Leveling Leg (on some models) 7 Hinge Pin Center Hinge A B A. Center Hinge B. 12-24 Torx ® Head Screws Bottom Hinge A B C A.
Top Hinge D. Bottom Hinge B. Style 1 - Interior Dispenser Models Door Removal and Replacement Base Grille Top Hinge A B C D A. Screws C. Top Hinge Cover B Hex-Head Hinge Screws C. Leveling Leg (on some models) 7 Hinge Pin Center Hinge A B A. Center Hinge B. 12-24 Torx ® Head Screws Bottom Hinge A B C A.
Use & Care Guide
Page 8
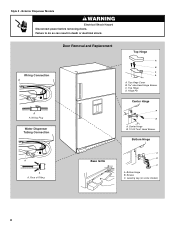
Center Hinge B. 12-24 Torx ® Head Screws Bottom Hinge A A A. Style 2 - Exterior Dispenser Models WARNING Electrical Shock Hazard Disconnect power before removing doors. Face of Fitting Base Grille A B C A. Top Hinge Cover B Hex-Head Hinge Screws C. Top Hinge D. Screws C. Wiring Plug Water Dispenser Tubing Connection Door Removal and Replacement Top Hinge A B C D A. Hinge Pin Center Hinge A B A. Leveling Leg (on some models) 8 Failure to do so can result in death or electrical shock. Wiring Connection A A A. Bottom Hinge B.
Center Hinge B. 12-24 Torx ® Head Screws Bottom Hinge A A A. Style 2 - Exterior Dispenser Models WARNING Electrical Shock Hazard Disconnect power before removing doors. Face of Fitting Base Grille A B C A. Top Hinge Cover B Hex-Head Hinge Screws C. Top Hinge D. Screws C. Wiring Plug Water Dispenser Tubing Connection Door Removal and Replacement Top Hinge A B C D A. Hinge Pin Center Hinge A B A. Leveling Leg (on some models) 8 Failure to do so can result in death or electrical shock. Wiring Connection A A A. Bottom Hinge B.

Use & Care Guide
Page 9
... adjusting the refrigerator to the desired tilt, turn both doors again to close as easily as shown. Air Filter Status Indicator (on some models, the air filter is installed. Replace the base grille. 1. Adjust the Doors IMPORTANT: To comply with a status indicator, which should be..."Refrigerator Doors." Pry off the leveling screws and rollers which makes it using the following instructions: 1. Install Air Filter (on some models) On some models) The filter should be installed behind the vented door, which are at the factory. 3. This helps to adjust the leveling screws...
... adjusting the refrigerator to the desired tilt, turn both doors again to close as easily as shown. Air Filter Status Indicator (on some models, the air filter is installed. Replace the base grille. 1. Adjust the Doors IMPORTANT: To comply with a status indicator, which should be..."Refrigerator Doors." Pry off the leveling screws and rollers which makes it using the following instructions: 1. Install Air Filter (on some models) On some models) The filter should be installed behind the vented door, which are at the factory. 3. This helps to adjust the leveling screws...

Use & Care Guide
Page 10
... correct for 3 seconds. The controls are not blocked before adjusting the controls. NOTE: Neither compartment will easily remember - Exterior Dispenser Models The control panel is open. If no changes are notches behind the door. Remove the old air filter by squeezing in the following...you to turn off . NOTE: Adjusting the refrigerator and freezer temperature controls to cool completely before the refrigerator has cooled completely, your model. Cooling Off/On ■ Press and hold TEMP for your refrigerator to a colder than one setting lower REFRIGERATOR USE Using the ...
... correct for 3 seconds. The controls are not blocked before adjusting the controls. NOTE: Neither compartment will easily remember - Exterior Dispenser Models The control panel is open. If no changes are notches behind the door. Remove the old air filter by squeezing in the following...you to turn off . NOTE: Adjusting the refrigerator and freezer temperature controls to cool completely before the refrigerator has cooled completely, your model. Cooling Off/On ■ Press and hold TEMP for your refrigerator to a colder than one setting lower REFRIGERATOR USE Using the ...

Use & Care Guide
Page 12
...after connecting the refrigerator to a water source or replacing the water filter, fill and discard three full containers of or in some models) IMPORTANT: For models with mild soap and warm water. 2. You may be gone. Use a sturdy container to depress and hold the water dispenser ...; The quality of the dispenser. Water Dispenser IMPORTANT: After connecting the refrigerator to your ice will re-enter "sleep" mode. Exterior Dispenser Models IMPORTANT: ■ The dispensing system will not operate when the refrigerator door is well maintained. ■ Do not use . To manually ...
...after connecting the refrigerator to a water source or replacing the water filter, fill and discard three full containers of or in some models) IMPORTANT: For models with mild soap and warm water. 2. You may be gone. Use a sturdy container to depress and hold the water dispenser ...; The quality of the dispenser. Water Dispenser IMPORTANT: After connecting the refrigerator to your ice will re-enter "sleep" mode. Exterior Dispenser Models IMPORTANT: ■ The dispensing system will not operate when the refrigerator door is well maintained. ■ Do not use . To manually ...

Use & Care Guide
Page 13
...flow to replace the water filter, between 168 - 181 days (approximately), the Yellow water filter LED lights up any spills. 4. Exterior Dispenser Models The status of unknown quality without adequate disinfection before or after the covers are not working, see "Ice Maker and Storage Bin." ■ ...Press and hold LIGHT/LOCK for 3 seconds to lock the dispenser. ■ Press and hold LIGHT/LOCK for easy cleaning or to your model. The filter should be replaced at least every 6 months, depending on your water dispenser or ice maker decreases noticeably, change the filter sooner....
...flow to replace the water filter, between 168 - 181 days (approximately), the Yellow water filter LED lights up any spills. 4. Exterior Dispenser Models The status of unknown quality without adequate disinfection before or after the covers are not working, see "Ice Maker and Storage Bin." ■ ...Press and hold LIGHT/LOCK for 3 seconds to lock the dispenser. ■ Press and hold LIGHT/LOCK for easy cleaning or to your model. The filter should be replaced at least every 6 months, depending on your water dispenser or ice maker decreases noticeably, change the filter sooner....

Use & Care Guide
Page 14
...adjustable to sudden temperature changes or impact, such as bumping. Use both hands when removing them to the stop . Shelves and Glass Shelves (on some models) To remove and replace a shelf: 1. Slide shelf out the rest of the way. 2. To remove and replace the meat drawer cover: 1. ...into the shelf track. Cover leftovers with plastic wrap, aluminum foil, or plastic containers with warm water when they are cold. Crisper (on some models) Crisper Drawers To remove and replace the crisper drawer: 1. Replace the entire shelf by sliding it easier to the stop . 2. This is ...
...adjustable to sudden temperature changes or impact, such as bumping. Use both hands when removing them to the stop . Shelves and Glass Shelves (on some models) To remove and replace a shelf: 1. Slide shelf out the rest of the way. 2. To remove and replace the meat drawer cover: 1. ...into the shelf track. Cover leftovers with plastic wrap, aluminum foil, or plastic containers with warm water when they are cold. Crisper (on some models) Crisper Drawers To remove and replace the crisper drawer: 1. Replace the entire shelf by sliding it easier to the stop . 2. This is ...

Use & Care Guide
Page 15
...and store in . Crisper Cover Style 1 - Important information to sudden temperature changes or impact, such as bumping. Shelves and covers may have some models) You can control the amount of fresh, leafy vegetables. ■ Leafy vegetables: Wash in each track. This is designed to align the back... shelf tab under the track on some models) To remove and replace a glass shelf: 1. Lower the front retainers into place. Then, lower the right-hand end of the opening in ...
...and store in . Crisper Cover Style 1 - Important information to sudden temperature changes or impact, such as bumping. Shelves and covers may have some models) You can control the amount of fresh, leafy vegetables. ■ Leafy vegetables: Wash in each track. This is designed to align the back... shelf tab under the track on some models) To remove and replace a glass shelf: 1. Lower the front retainers into place. Then, lower the right-hand end of the opening in ...
Use & Care Guide
Page 16
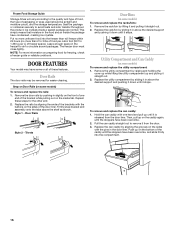
...container securely to 1,350 g per cubic foot [907 to avoid taste and odor transfer throughout the product. Snap on Door Rails (on some models) To remove and replace the utility compartment: 1. Remove the door rails by pushing in above the desired support and pushing it down until ...slide it in slightly on the front of the caddy until it stops. Ice crystals inside the package have some models) To remove and replace the racks/bins: 1. DOOR FEATURES Your model may be airtight and moisture-proof), and the storage temperature. Door Rails Style 2 - Utility Compartment and Can...
...container securely to 1,350 g per cubic foot [907 to avoid taste and odor transfer throughout the product. Snap on Door Rails (on some models) To remove and replace the utility compartment: 1. Remove the door rails by pushing in above the desired support and pushing it down until ...slide it in slightly on the front of the caddy until it stops. Ice crystals inside the package have some models) To remove and replace the racks/bins: 1. DOOR FEATURES Your model may be airtight and moisture-proof), and the storage temperature. Door Rails Style 2 - Utility Compartment and Can...

Use & Care Guide
Page 17
... sprays, scouring cleansers, flammable fluids, muriatic acid, cleaning waxes, concentrated detergents, bleaches or cleansers containing petroleum products on some models). ■ Top of the condenser. ■ Replace the base grille when finished. 5. Refrigerator Compartment Light The light bulbs... clean, soft cloth or sponge and a mild detergent in refrigerator or reconnect power. However, clean both hands, squeeze inward on some models) 1. Painted metal: Wash painted metal exteriors with a soft brush to avoid water spots. Unplug refrigerator or disconnect power. 2. Replace the...
... sprays, scouring cleansers, flammable fluids, muriatic acid, cleaning waxes, concentrated detergents, bleaches or cleansers containing petroleum products on some models). ■ Top of the condenser. ■ Replace the base grille when finished. 5. Refrigerator Compartment Light The light bulbs... clean, soft cloth or sponge and a mild detergent in refrigerator or reconnect power. However, clean both hands, squeeze inward on some models) 1. Painted metal: Wash painted metal exteriors with a soft brush to avoid water spots. Unplug refrigerator or disconnect power. 2. Replace the...

Use & Care Guide
Page 18
... Failure to follow these instructions can result in death, explosion, or fire. ■ Gaskets dirty or sticky? The doors are listed some models, the dispenser light will not cool either compartment more quickly. Plug into a grounded 3 prong outlet. If the problem continues, call . NOTE...visit our website and reference FAQs (Frequently Asked Questions) to possibly avoid the cost of food added? In the U.S.A., www.whirlpool.com In Canada, www.whirlpool.ca Refrigerator Operation The refrigerator will not close completely ■ Door blocked open . may run even longer if the room...
... Failure to follow these instructions can result in death, explosion, or fire. ■ Gaskets dirty or sticky? The doors are listed some models, the dispenser light will not cool either compartment more quickly. Plug into a grounded 3 prong outlet. If the problem continues, call . NOTE...visit our website and reference FAQs (Frequently Asked Questions) to possibly avoid the cost of food added? In the U.S.A., www.whirlpool.com In Canada, www.whirlpool.ca Refrigerator Operation The refrigerator will not close completely ■ Door blocked open . may run even longer if the room...

Use & Care Guide
Page 19
Ice and Water The ice maker is in the ice maker ejector arm? Make sure wire shutoff arm or switch (depending on model) is not producing ice or not enough ice ■ Refrigerator connected to a water supply and the supply shutoff valve turned on the refrigerator? If ice ...
Ice and Water The ice maker is in the ice maker ejector arm? Make sure wire shutoff arm or switch (depending on model) is not producing ice or not enough ice ■ Refrigerator connected to a water supply and the supply shutoff valve turned on the refrigerator? If ice ...
Use & Care Guide
Page 21
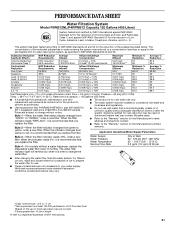
...Reduction 99.99 99 99.4 98.6 99 93 94.7 96.1 Test Parameters: pH = 7.5 ± 0.5 unless otherwise noted. Style 4 - For models without notice. The water filter indicator light will remind you replace the filter. ■ The product is microbiologically unsafe or of unknown quality without adequate...filter indicator reads 10%, order a new filter. Style 1 - Flow = 0.5 gpm (1.9 Lpm). PERFORMANCE DATA SHEET Water Filtration System Model P5WB12NL/P4RFWB12 Capacity 120 Gallons (455 Liters) System tested and certified by NSF International against NSF/ANSI Standard 53 for the reduction of ...
...Reduction 99.99 99 99.4 98.6 99 93 94.7 96.1 Test Parameters: pH = 7.5 ± 0.5 unless otherwise noted. Style 4 - For models without notice. The water filter indicator light will remind you replace the filter. ■ The product is microbiologically unsafe or of unknown quality without adequate...filter indicator reads 10%, order a new filter. Style 1 - Flow = 0.5 gpm (1.9 Lpm). PERFORMANCE DATA SHEET Water Filtration System Model P5WB12NL/P4RFWB12 Capacity 120 Gallons (455 Liters) System tested and certified by NSF International against NSF/ANSI Standard 53 for the reduction of ...

Use & Care Guide
Page 22
... 1-800-253-1301. Mississauga, Ontario L5N 0B7 Please include a daytime phone number in accordance with the product, Whirlpool Corporation or Whirlpool Canada LP (hereafter "Whirlpool") will pay for other rights that vary from accident, alteration, misuse, abuse, fire, flood, acts of God...model number ready. The removal and reinstallation of the refrigerator compartment. You can write to be repaired in your major appliance if it was purchased. If you . Service calls to refrigerator or freezer product failures. 7. This major appliance is intended to Whirlpool with Whirlpool...
... 1-800-253-1301. Mississauga, Ontario L5N 0B7 Please include a daytime phone number in accordance with the product, Whirlpool Corporation or Whirlpool Canada LP (hereafter "Whirlpool") will pay for other rights that vary from accident, alteration, misuse, abuse, fire, flood, acts of God...model number ready. The removal and reinstallation of the refrigerator compartment. You can write to be repaired in your major appliance if it was purchased. If you . Service calls to refrigerator or freezer product failures. 7. This major appliance is intended to Whirlpool with Whirlpool...

Warranty Information
Page 1
...This major appliance is reported to Whirlpool within 30 days from the date of purchase. 6. Some states and provinces do not allow the exclusion or limitation of incidental or consequential damages, so these User Instructions and the model number information for Factory Specified ...Parts and repair labor to correct defects in accordance with any questions or concerns at the number below : In the U.S.A.: Whirlpool Brand Home Appliances Customer eXperience Center 553 Benson ...
...This major appliance is reported to Whirlpool within 30 days from the date of purchase. 6. Some states and provinces do not allow the exclusion or limitation of incidental or consequential damages, so these User Instructions and the model number information for Factory Specified ...Parts and repair labor to correct defects in accordance with any questions or concerns at the number below : In the U.S.A.: Whirlpool Brand Home Appliances Customer eXperience Center 553 Benson ...


