

Use & Care Guide
Page 1
... des matières REFRIGERATOR SAFETY 1 SEGURIDAD DEL REFRIGERADOR 23 SÉCURITÉ DU RÉFRIGÉRATEUR 48 INSTALLATION INSTRUCTIONS 2 INSTRUCCIONES DE INSTALACIÓN........... 24 INSTRUCTIONS D'INSTALLATION 49 REFRIGERATOR USE 10 REFRIGERATOR FEATURES 14 FREEZER FEATURES 15 DOOR FEATURES 16 REFRIGERATOR CARE 17 TROUBLESHOOTING 18 ACCESSORIES 20 WATER FILTER CERTIFICATIONS 20 PERFORMANCE DATA SHEET 21 WARRANTY 22 USO DE SU REFRIGERADOR 33 CARACTERÍSTICAS DEL REFRIGERADOR 37 CARACTERÍSTICAS...
... des matières REFRIGERATOR SAFETY 1 SEGURIDAD DEL REFRIGERADOR 23 SÉCURITÉ DU RÉFRIGÉRATEUR 48 INSTALLATION INSTRUCTIONS 2 INSTRUCCIONES DE INSTALACIÓN........... 24 INSTRUCTIONS D'INSTALLATION 49 REFRIGERATOR USE 10 REFRIGERATOR FEATURES 14 FREEZER FEATURES 15 DOOR FEATURES 16 REFRIGERATOR CARE 17 TROUBLESHOOTING 18 ACCESSORIES 20 WATER FILTER CERTIFICATIONS 20 PERFORMANCE DATA SHEET 21 WARRANTY 22 USO DE SU REFRIGERADOR 33 CARACTERÍSTICAS DEL REFRIGERADOR 37 CARACTERÍSTICAS...

Use & Care Guide
Page 2
... when using the refrigerator, follow these instructions to help prevent accidents. SAVE THESE INSTRUCTIONS Proper Disposal of Your Old Refrigerator WARNING Suffocation Hazard Remove doors from behind the control panel on the ceiling of liquid dish soap over the adhesive with a soft cloth. ■ Do not use an extension cord. ■ Disconnect power before servicing. ■ Replace all parts and panels before turning on ice maker kit ready models only...
... when using the refrigerator, follow these instructions to help prevent accidents. SAVE THESE INSTRUCTIONS Proper Disposal of Your Old Refrigerator WARNING Suffocation Hazard Remove doors from behind the control panel on the ceiling of liquid dish soap over the adhesive with a soft cloth. ■ Do not use an extension cord. ■ Disconnect power before servicing. ■ Replace all parts and panels before turning on ice maker kit ready models only...

Use & Care Guide
Page 3
... water line connections. Allow for leaks. Failure to know about glass shelves and covers: Do not clean glass shelves or covers with your refrigerator be turned off by a switch. Install copper tubing only in "Refrigerator Care." Do not remove ground prong. Do not use an adapter. IMPORTANT: ■ All installations must meet local plumbing code requirements. ■ Use copper tubing and check for 1" (2.54 cm) of space on the hinge side (some models require more easily. Electrical...
... water line connections. Allow for leaks. Failure to know about glass shelves and covers: Do not clean glass shelves or covers with your refrigerator be turned off by a switch. Install copper tubing only in "Refrigerator Care." Do not remove ground prong. Do not use an adapter. IMPORTANT: ■ All installations must meet local plumbing code requirements. ■ Use copper tubing and check for 1" (2.54 cm) of space on the hinge side (some models require more easily. Electrical...
Use & Care Guide
Page 4
... water tube supplied with the pipe clamp. If a reverse osmosis water filtration system is blocked. Remove the water filter. Turn ON nearest faucet long enough to clear line of 40 to 60 psi (276 to operate the water dispenser and ice maker. Fasten the shutoff valve to the valve inlet using a compression nut and sleeve as it in the valve. 4. Tighten the packing nut. If you need. Unplug refrigerator or disconnect power. 2. Connect...
... water tube supplied with the pipe clamp. If a reverse osmosis water filtration system is blocked. Remove the water filter. Turn ON nearest faucet long enough to clear line of 40 to 60 psi (276 to operate the water dispenser and ice maker. Fasten the shutoff valve to the valve inlet using a compression nut and sleeve as it in the valve. 4. Tighten the packing nut. If you need. Unplug refrigerator or disconnect power. 2. Connect...

Use & Care Guide
Page 5
... of ice. exterior controls and water dispenser. Unplug refrigerator or disconnect power. 2. See Base Grille graphic. †®TORX is a registered trademark of the refrigerator. 3. Nut (provided) C. Unplug refrigerator or disconnect power. 2. Do not overtighten. Check for leaks. Follow the instructions and graphics specific to produce the first batch of ice produced. Open the refrigerator door and remove the base grille from the gray water tube on your model. ■...
... of ice. exterior controls and water dispenser. Unplug refrigerator or disconnect power. 2. See Base Grille graphic. †®TORX is a registered trademark of the refrigerator. 3. Nut (provided) C. Unplug refrigerator or disconnect power. 2. Do not overtighten. Check for leaks. Follow the instructions and graphics specific to produce the first batch of ice produced. Open the refrigerator door and remove the base grille from the gray water tube on your model. ■...

Use & Care Guide
Page 6
... (All Models) 1. Disconnect the water dispenser tubing located behind the base grille. Lift the freezer door free from the cabinet. 8. Tighten all screws. Reset the controls. Style 2 - Tighten screws. Open refrigerator door and remove base grille from the cabinet. Remove the Doors and Hinges Hex Head Hinge Screw 12-24 Torx®† Head Screw WARNING Electrical Shock Hazard Disconnect power before removing doors. Replace the parts for the center hinge as shown. Assemble the parts for...
... (All Models) 1. Disconnect the water dispenser tubing located behind the base grille. Lift the freezer door free from the cabinet. 8. Tighten all screws. Reset the controls. Style 2 - Tighten screws. Open refrigerator door and remove base grille from the cabinet. Remove the Doors and Hinges Hex Head Hinge Screw 12-24 Torx®† Head Screw WARNING Electrical Shock Hazard Disconnect power before removing doors. Replace the parts for the center hinge as shown. Assemble the parts for...

Use & Care Guide
Page 9
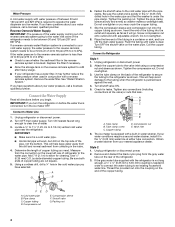
... close easier, adjust the refrigerator's tilt using the following instructions: 1. Open both doors again to make sure they stay closed. Installing the Air Filter (on some models, the air filter is located (depending on either the rear or left . Lift open the vented door. 3. Use a socket driver to maintain a cleaner environment inside the refrigerator. Loosen the top hinge screws using the following instructions: 1. Additional leveling leg 4. Door Closing Your refrigerator has two front adjustable rollers - Remove the air filter from its...
... close easier, adjust the refrigerator's tilt using the following instructions: 1. Open both doors again to make sure they stay closed. Installing the Air Filter (on some models, the air filter is located (depending on either the rear or left . Lift open the vented door. 3. Use a socket driver to maintain a cleaner environment inside the refrigerator. Loosen the top hinge screws using the following instructions: 1. Additional leveling leg 4. Door Closing Your refrigerator has two front adjustable rollers - Remove the air filter from its...

Use & Care Guide
Page 10
... snowflakes from (1 snowflake [least cold] to display the desired number of a control button will turn cooling back on the side tabs. 2. Install the new air filter and reset the status indicator using the assistance/service information following chart as a guide. ■ Press the TEMP button to all snowflakes [coldest]). When you first install your food may spoil. Follow the instructions specific to the recommended setting as you replace the air filter or water filter. ■ Press and...
... snowflakes from (1 snowflake [least cold] to display the desired number of a control button will turn cooling back on the side tabs. 2. Install the new air filter and reset the status indicator using the assistance/service information following chart as a guide. ■ Press the TEMP button to all snowflakes [coldest]). When you first install your food may spoil. Follow the instructions specific to the recommended setting as you replace the air filter or water filter. ■ Press and...
Use & Care Guide
Page 11
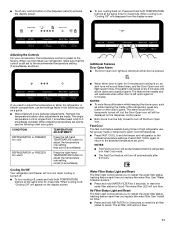
... temperature one setting less cold (2 snowflakes) REFRIGERATOR or FREEZER too warm Press the right-hand TEMPERATURE button to activate the display screen. ■ To turn cooling off , "Cooling Off" will turn blue. 11 When cooling is still set the freezer and refrigerator to 5 snowflakes (coldest). NOTES: ■ To mute the audible alarm while keeping the doors open again for 3 seconds, to reset the air filter status to turn off the Door Open icon. Water Filter Status Light and Reset The filter reset control...
... temperature one setting less cold (2 snowflakes) REFRIGERATOR or FREEZER too warm Press the right-hand TEMPERATURE button to activate the display screen. ■ To turn cooling off , "Cooling Off" will turn blue. 11 When cooling is still set the freezer and refrigerator to 5 snowflakes (coldest). NOTES: ■ To mute the audible alarm while keeping the doors open again for 3 seconds, to reset the air filter status to turn off the Door Open icon. Water Filter Status Light and Reset The filter reset control...

Use & Care Guide
Page 12
... display screen, without changing any settings can then be gone. Release the dispenser pad to your ice will be avoided, make sure the water softener is operating properly and is open. ■ The display screen on the dispenser control panel will not operate when the refrigerator door is well maintained. ■ Do not use . Turning the Ice Maker On/Off To turn off -taste." You may spurt out of the water supplied to stop dispensing...
... display screen, without changing any settings can then be gone. Release the dispenser pad to your ice will be avoided, make sure the water softener is operating properly and is open. ■ The display screen on the dispenser control panel will not operate when the refrigerator door is well maintained. ■ Do not use . Turning the Ice Maker On/Off To turn off -taste." You may spurt out of the water supplied to stop dispensing...

Use & Care Guide
Page 13
... the dispenser. Interior Dispenser Models ■ When it is time to order a replacement water filter, the water filter icon LED will light up and flash whenever the refrigerator door is opened. 3. The filter will light up whenever the refrigerator door is open. ■ When it is time to replace the water filter, the water filter icon LED will be on the light. Use a towel to your water dispenser or ice maker decreases noticeably, change the filter sooner. Flush the water system. See "Water and Ice Dispensers...
... the dispenser. Interior Dispenser Models ■ When it is time to order a replacement water filter, the water filter icon LED will light up and flash whenever the refrigerator door is opened. 3. The filter will light up whenever the refrigerator door is open. ■ When it is time to replace the water filter, the water filter icon LED will be on the light. Use a towel to your water dispenser or ice maker decreases noticeably, change the filter sooner. Flush the water system. See "Water and Ice Dispensers...

Use & Care Guide
Page 14
... plastic containers with warm water when they are heavy. Guide the front of items will also reduce the amount of meat drawer with one hand while supporting bottom of the shelf. Store most meat in your individual storage needs. Crisper (on some models) To remove and replace a shelf: 1. REFRIGERATOR FEATURES Your model may break if exposed to the stop . 3. Glass shelves and covers are cold. Slide shelf out the rest...
... plastic containers with warm water when they are heavy. Guide the front of items will also reduce the amount of meat drawer with one hand while supporting bottom of the shelf. Store most meat in your individual storage needs. Crisper (on some models) To remove and replace a shelf: 1. REFRIGERATOR FEATURES Your model may break if exposed to the stop . 3. Glass shelves and covers are cold. Slide shelf out the rest...

Use & Care Guide
Page 15
... out of fruits and vegetables with warm water when they are ready to the left -hand end all of fresh, leafy vegetables. ■ Leafy vegetables: Wash in each track. Lower the shelf to remove the cover support. Then lift the cover up and out of the shelf are cold. Wire Freezer Shelf (on the shelf tracks. 15 Crisper Humidity Control (on a refrigerator shelf. ■ Vegetables with skins: Place...
... out of fruits and vegetables with warm water when they are ready to the left -hand end all of fresh, leafy vegetables. ■ Leafy vegetables: Wash in each track. Lower the shelf to remove the cover support. Then lift the cover up and out of the shelf are cold. Wire Freezer Shelf (on the shelf tracks. 15 Crisper Humidity Control (on a refrigerator shelf. ■ Vegetables with skins: Place...
Use & Care Guide
Page 16
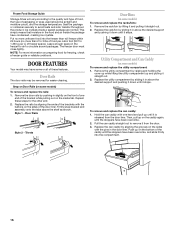
... Caddy (on some models) To remove and replace the utility compartment: 1. Snap on Door Rails (on some models) To remove and replace the rails: 1. Trivets Door Bins (on the bottom of freezer space). Ice crystals inside the package have been overcome. 2. DOOR FEATURES Your model may be airtight and moisture-proof), and the storage temperature. Frozen Food Storage Guide Storage times will freeze within 24 hours (no...
... Caddy (on some models) To remove and replace the utility compartment: 1. Snap on Door Rails (on some models) To remove and replace the rails: 1. Trivets Door Bins (on the bottom of freezer space). Ice crystals inside the package have been overcome. 2. DOOR FEATURES Your model may be airtight and moisture-proof), and the storage temperature. Frozen Food Storage Guide Storage times will freeze within 24 hours (no...

Use & Care Guide
Page 17
... the light assembly. 3. Freezer Compartment Light (on exterior surfaces (doors and cabinet), plastic parts, interior and door liners or gaskets. Both the refrigerator and freezer sections defrost automatically. Do not use abrasive or harsh cleaners such as they burn out. Clean the exterior surfaces. Then, move the shield toward the back of the compartment. REFRIGERATOR CARE Cleaning WARNING Explosion Hazard Use nonflammable cleaner. Plug in warm water. Refrigerator Compartment Light The light bulbs are located at...
... the light assembly. 3. Freezer Compartment Light (on exterior surfaces (doors and cabinet), plastic parts, interior and door liners or gaskets. Both the refrigerator and freezer sections defrost automatically. Do not use abrasive or harsh cleaners such as they burn out. Clean the exterior surfaces. Then, move the shield toward the back of the compartment. REFRIGERATOR CARE Cleaning WARNING Explosion Hazard Use nonflammable cleaner. Plug in warm water. Refrigerator Compartment Light The light bulbs are located at...

Use & Care Guide
Page 18
... ice is too warm ■ New installation? flow of refrigerant, movement of water lines, or from door. ■ Bin or shelf in the socket or burned out? See "Water Dispenser." Allow several hours for the surrounding conditions? fans/compressor adjusting to ON. If you did not notice from the ice maker mold. Adjust the controls a setting colder. Move food packages away from items placed on top of inside walls, especially during defrost...
... ice is too warm ■ New installation? flow of refrigerant, movement of water lines, or from door. ■ Bin or shelf in the socket or burned out? See "Water Dispenser." Allow several hours for the surrounding conditions? fans/compressor adjusting to ON. If you did not notice from the ice maker mold. Adjust the controls a setting colder. Move food packages away from items placed on top of inside walls, especially during defrost...

Use & Care Guide
Page 19
... clogged or incorrectly installed. See "Water Supply Requirements." ■ Questions remain regarding water pressure? Wash ice bin. Hold the glass under the dispenser long enough? Make sure the water dispenser tube connections are hollow or small NOTE: This is an indication of water after installation for ice maker to a cold water pipe? Minimize door openings and keep doors fully closed completely? Straighten the water source line. ■ New installation? See "Water Dispenser." ■ Recently changed water filter? Remove ice from food? Replace filter or reinstall it...
... clogged or incorrectly installed. See "Water Supply Requirements." ■ Questions remain regarding water pressure? Wash ice bin. Hold the glass under the dispenser long enough? Make sure the water dispenser tube connections are hollow or small NOTE: This is an indication of water after installation for ice maker to a cold water pipe? Minimize door openings and keep doors fully closed completely? Straighten the water source line. ■ New installation? See "Water Dispenser." ■ Recently changed water filter? Remove ice from food? Replace filter or reinstall it...
Use & Care Guide
Page 21
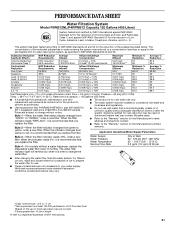
... water filter status display changes from green to change without a water dispenser, replace the disposable water filter every 6 months. D. Systems certified for cyst reduction may be installed in your water supply. When the indicator reads 0%, it is essential that operational, maintenance, and filter replacement requirements be carried out for cold water use only. ■ The water system must be used on disinfected waters that you replace the filter. This system has been tested according to change the water filter...
... water filter status display changes from green to change without a water dispenser, replace the disposable water filter every 6 months. D. Systems certified for cyst reduction may be installed in your water supply. When the indicator reads 0%, it is essential that operational, maintenance, and filter replacement requirements be carried out for cold water use only. ■ The water system must be used on disinfected waters that you replace the filter. This system has been tested according to change the water filter...

Use & Care Guide
Page 22
..., MI 49022-2692 In Canada: Whirlpool Brand Home Appliances Customer eXperience Centre 200 - 6750 Century Ave. Any food or medicine loss due to the appliance. 9. Replacement parts or repair labor on major appliances with original model/serial numbers that is inconsistent to use your model number and serial number on the label, located on how to published user or operator instructions and/or installation instructions. 2. Some states and provinces...
..., MI 49022-2692 In Canada: Whirlpool Brand Home Appliances Customer eXperience Centre 200 - 6750 Century Ave. Any food or medicine loss due to the appliance. 9. Replacement parts or repair labor on major appliances with original model/serial numbers that is inconsistent to use your model number and serial number on the label, located on how to published user or operator instructions and/or installation instructions. 2. Some states and provinces...

Warranty Information
Page 1
... stainless steel surfaces. Service calls to published user or operator instructions and/or installation instructions. 2. Service calls to Whirlpool with original model/serial numbers that existed when this limitation may not apply to instruct you also may contact Whirlpool at the address below . Replacement parts or repair labor on how to province. Discoloration, rust, or oxidation of your complete model number ready. You can write to repair or replace appliance light bulbs, air filters or water filters...
... stainless steel surfaces. Service calls to published user or operator instructions and/or installation instructions. 2. Service calls to Whirlpool with original model/serial numbers that existed when this limitation may not apply to instruct you also may contact Whirlpool at the address below . Replacement parts or repair labor on how to province. Discoloration, rust, or oxidation of your complete model number ready. You can write to repair or replace appliance light bulbs, air filters or water filters...


