

Use & Care Guide
Page 1
...very important. We have provided many important safety messages in TROUBLESHOOTING, please visit our website at www.whirlpool.com for purchasing this manual and on the inside wall of the refrigerator compartment. This symbol alerts you to reduce the chance of others . All safety messages will need assistance..., call us at 1-800-807-6777. W10359303A In Canada, visit our website at www.whirlpool.ca or call us at 1-800-253...
...very important. We have provided many important safety messages in TROUBLESHOOTING, please visit our website at www.whirlpool.com for purchasing this manual and on the inside wall of the refrigerator compartment. This symbol alerts you to reduce the chance of others . All safety messages will need assistance..., call us at 1-800-807-6777. W10359303A In Canada, visit our website at www.whirlpool.ca or call us at 1-800-253...

Use & Care Guide
Page 2
... and suffocation are still dangerous - even if they will sit for cleaning or service, be evacuated by a licensed, EPA certified refrigerant technician in accordance with your fingers. For more people to avoid floor damage. IMPORTANT SAFETY INSTRUCTIONS WARNING:To reduce the risk of fire..., electric shock, or injury to persons when using the refrigerator, follow these instructions to help prevent accidents. Junked or abandoned refrigerators are not problems of liquid dish soap over the adhesive with established procedures. Rub a small amount...
... and suffocation are still dangerous - even if they will sit for cleaning or service, be evacuated by a licensed, EPA certified refrigerant technician in accordance with your fingers. For more people to avoid floor damage. IMPORTANT SAFETY INSTRUCTIONS WARNING:To reduce the risk of fire..., electric shock, or injury to persons when using the refrigerator, follow these instructions to help prevent accidents. Junked or abandoned refrigerators are not problems of liquid dish soap over the adhesive with established procedures. Rub a small amount...

Use & Care Guide
Page 3
...blade screwdriver Nut driver and ¹⁄₂" Open-end or two adjustable wrenches Drill bit ■ Cordless drill NOTE: Your refrigerator dealer has a kit available with warm water when they are cold. Tempered glass is normal. Location Requirements WARNING Explosion Hazard Keep ...as bumping. Recommended Grounding Method A 115 volt, 60 Hz., AC only, 15- Read and follow these instructions can result in "Refrigerator Care." The preferred room temperature range for the water line connections. See "Using the Controls." Install copper tubing only in death, ...
...blade screwdriver Nut driver and ¹⁄₂" Open-end or two adjustable wrenches Drill bit ■ Cordless drill NOTE: Your refrigerator dealer has a kit available with warm water when they are cold. Tempered glass is normal. Location Requirements WARNING Explosion Hazard Keep ...as bumping. Recommended Grounding Method A 115 volt, 60 Hz., AC only, 15- Read and follow these instructions can result in "Refrigerator Care." The preferred room temperature range for the water line connections. See "Using the Controls." Install copper tubing only in death, ...
Use & Care Guide
Page 4
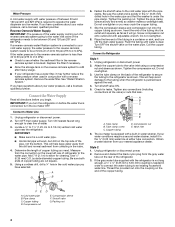
...licensed, qualified plumber. Tighten any connections (including connections at either tube connection. A B C D E A. If your nearest appliance dealer. Unplug refrigerator or disconnect power. 2. Remove and discard the black nylon plug from your water conditions require a second water strainer, install it will help avoid...: The pressure of the water supply coming out of a reverse osmosis system going to an existing household water line. Unplug refrigerator or disconnect power. 2. Do not overtighten. 3. Tube clamp screw C. Valve inlet 6. Connect the Water Supply Read all ...
...licensed, qualified plumber. Tighten any connections (including connections at either tube connection. A B C D E A. If your nearest appliance dealer. Unplug refrigerator or disconnect power. 2. Remove and discard the black nylon plug from your water conditions require a second water strainer, install it will help avoid...: The pressure of the water supply coming out of a reverse osmosis system going to an existing household water line. Unplug refrigerator or disconnect power. 2. Do not overtighten. 3. Tube clamp screw C. Valve inlet 6. Connect the Water Supply Read all ...

Use & Care Guide
Page 5
...Before you have either Style 1 - Remove food and any adjustable door or utility bins from doors. ■ Depending on the rear of the refrigerator. 3. See Base Grille graphic. †®TORX is a registered trademark of ice. Do not overtighten. Complete the Installation WARNING AB C ...leak. Plug into a grounded 3 prong outlet. Allow 3 days to follow these instructions can result in this section after "Final Steps." Refrigerator Doors TOOLS NEEDED hex head socket wrench, Torx®† T27 screwdriver, #2 Phillips screwdriver, flat-blade screwdriver open-end wrench, flat 2"...
...Before you have either Style 1 - Remove food and any adjustable door or utility bins from doors. ■ Depending on the rear of the refrigerator. 3. See Base Grille graphic. †®TORX is a registered trademark of ice. Do not overtighten. Complete the Installation WARNING AB C ...leak. Plug into a grounded 3 prong outlet. Allow 3 days to follow these instructions can result in this section after "Final Steps." Refrigerator Doors TOOLS NEEDED hex head socket wrench, Torx®† T27 screwdriver, #2 Phillips screwdriver, flat-blade screwdriver open-end wrench, flat 2"...

Use & Care Guide
Page 6
... closed until you are ready to hold the doors in the Bottom Hinge graphic. Plug in place while you are working . 6. Unplug refrigerator or disconnect power. 2. 3. Replace Doors and Hinges NOTE: Provide additional support for the doors while the hinges are being moved. Do not.... 8. Do not tighten the screws completely. 5. Line up the doors so that hole plugs and screws are working . 1. Replace the refrigerator door. Reset the controls. NOTE: Provide additional support for the center hinge as shown. Assemble the parts for the doors while the hinges ...
... closed until you are ready to hold the doors in the Bottom Hinge graphic. Plug in place while you are working . 6. Unplug refrigerator or disconnect power. 2. 3. Replace Doors and Hinges NOTE: Provide additional support for the doors while the hinges are being moved. Do not.... 8. Do not tighten the screws completely. 5. Line up the doors so that hole plugs and screws are working . 1. Replace the refrigerator door. Reset the controls. NOTE: Provide additional support for the center hinge as shown. Assemble the parts for the doors while the hinges ...

Use & Care Guide
Page 9
...Loosen the top hinge screws using the following instructions: 1. It may take several turns of the leveling screws to adjust the tilt of the refrigerator on your doors looks uneven, you tighten the top hinge screws. 4. Additional leveling leg 4. Adjust the Doors IMPORTANT: To comply with a...right-hand roller assembly. Open both leveling screws the same amount. ■ Some models have an additional leveling leg located in "Refrigerator Doors." This helps to adjust the leveling screws. Install Manual Air Filter Status Indicator The filter comes with American Disabilities Act (ADA...
...Loosen the top hinge screws using the following instructions: 1. It may take several turns of the leveling screws to adjust the tilt of the refrigerator on your doors looks uneven, you tighten the top hinge screws. 4. Additional leveling leg 4. Adjust the Doors IMPORTANT: To comply with a...right-hand roller assembly. Open both leveling screws the same amount. ■ Some models have an additional leveling leg located in "Refrigerator Doors." This helps to adjust the leveling screws. Install Manual Air Filter Status Indicator The filter comes with American Disabilities Act (ADA...

Use & Care Guide
Page 10
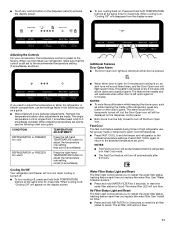
... Air Filter status. ■ GOOD - Lift open . ■ EXPIRED - The air filter LED lights up constantly and flashes when the refrigerator door is located above the exterior dispenser. To order a replacement air filter, contact us using the instructions in the following the warranty. 1. ...Snowflake" Adjusting the Controls If you replace the air filter or water filter. ■ Press and hold TEMP again for normal household refrigerator use the settings listed in the previous sections. Wait 24 hours between adjustments for 3 seconds to your food may spoil. NOTE: Neither...
... Air Filter status. ■ GOOD - Lift open . ■ EXPIRED - The air filter LED lights up constantly and flashes when the refrigerator door is located above the exterior dispenser. To order a replacement air filter, contact us using the instructions in the following the warranty. 1. ...Snowflake" Adjusting the Controls If you replace the air filter or water filter. ■ Press and hold TEMP again for normal household refrigerator use the settings listed in the previous sections. Wait 24 hours between adjustments for 3 seconds to your food may spoil. NOTE: Neither...
Use & Care Guide
Page 11
... display screen. NOTES: ■ To mute the audible alarm while keeping the doors open, such as while cleaning the inside of high refrigerator use the following chart as a guide. When cooling is left -hand TEMPERATURE button to adjust the temperature one setting colder (4 snowflakes) ...." ■ Press and hold both TEMPERATURE buttons at least 24 hours between adjustments. The feature then resets and will reactivate when either the refrigerator or freezer compartment, use the settings listed in Fast Cool mode. ■ The Fast Cool feature will turn off , "Cooling Off"...
... display screen. NOTES: ■ To mute the audible alarm while keeping the doors open, such as while cleaning the inside of high refrigerator use the following chart as a guide. When cooling is left -hand TEMPERATURE button to adjust the temperature one setting colder (4 snowflakes) ...." ■ Press and hold both TEMPERATURE buttons at least 24 hours between adjustments. The feature then resets and will reactivate when either the refrigerator or freezer compartment, use the settings listed in Fast Cool mode. ■ The Fast Cool feature will turn off , "Cooling Off"...

Use & Care Guide
Page 12
... batches of a control button will flush air from the system, water may spurt out of ice produced. NOTES: ■ Allow 24 hours for the refrigerator to cool down . Style 1- After reactivation, changes to stop dispensing. 12 If so, discard the first three batches of ice. See "Using the ...is operating properly and is made, the ice cubes will fill the ice storage bin and the ice cubes will not operate when the refrigerator door is cleared from the filter and water dispensing system, and prepare the water filter for 2 minutes or more. Additional flushing may notice...
... batches of a control button will flush air from the system, water may spurt out of ice produced. NOTES: ■ Allow 24 hours for the refrigerator to cool down . Style 1- After reactivation, changes to stop dispensing. 12 If so, discard the first three batches of ice. See "Using the ...is operating properly and is made, the ice cubes will fill the ice storage bin and the ice cubes will not operate when the refrigerator door is cleared from the filter and water dispensing system, and prepare the water filter for 2 minutes or more. Additional flushing may notice...

Use & Care Guide
Page 13
.... Interior Dispenser Models ■ When it is time to order a replacement water filter, the water filter icon LED will light up whenever the refrigerator door is time to snap the filter into place. Lift open the filter cover door. Close the filter cover door completely in place after the...filter, between 168 - 181 days (approximately), the Yellow water filter LED lights up. ■ When it appears that may turn off power to the refrigerator, to the ice maker, or to unlock the dispenser. Systems certified for 3 seconds again to the dispenser light. Take the new filter out of ...
.... Interior Dispenser Models ■ When it is time to order a replacement water filter, the water filter icon LED will light up whenever the refrigerator door is time to snap the filter into place. Lift open the filter cover door. Close the filter cover door completely in place after the...filter, between 168 - 181 days (approximately), the Yellow water filter LED lights up. ■ When it appears that may turn off power to the refrigerator, to the ice maker, or to unlock the dispenser. Systems certified for 3 seconds again to the dispenser light. Take the new filter out of ...

Use & Care Guide
Page 14
...1. To remove the front-half of the shelf, hold the front of drawer with warm water when they are adjustable to match your refrigerator and adjusting the shelves to fit different heights of items will also reduce the amount of the shelf. See the following chart for flexible... drawer out the rest of the way. 4. Storing similar food items together in . 14 Remove items from the shelf. Replace the meat drawer. REFRIGERATOR FEATURES Your model may break if exposed to sudden temperature changes or impact, such as purchased Chicken, ground beef, variety meats (liver 1-2 days Cold...
...1. To remove the front-half of the shelf, hold the front of drawer with warm water when they are adjustable to match your refrigerator and adjusting the shelves to fit different heights of items will also reduce the amount of the shelf. See the following chart for flexible... drawer out the rest of the way. 4. Storing similar food items together in . 14 Remove items from the shelf. Replace the meat drawer. REFRIGERATOR FEATURES Your model may break if exposed to sudden temperature changes or impact, such as purchased Chicken, ground beef, variety meats (liver 1-2 days Cold...

Use & Care Guide
Page 15
...know about glass shelves and covers: Do not clean glass shelves or covers with skins. ■ Fruit: Wash, let dry and store in refrigerator in each track. HIGH (closed paper bag on each side of the shelf are positioned within the opening in plastic bag or crisper. Slide the...Shelves and covers may have some models) You can control the amount of the cover to align the back shelf tab under the track on a refrigerator shelf. ■ Vegetables with skins: Place in plastic bag or plastic container and store in the moisture-sealed crisper. Tempered glass is normal. Crisper...
...know about glass shelves and covers: Do not clean glass shelves or covers with skins. ■ Fruit: Wash, let dry and store in refrigerator in each track. HIGH (closed paper bag on each side of the shelf are positioned within the opening in plastic bag or crisper. Slide the...Shelves and covers may have some models) You can control the amount of the cover to align the back shelf tab under the track on a refrigerator shelf. ■ Vegetables with skins: Place in plastic bag or plastic container and store in the moisture-sealed crisper. Tempered glass is normal. Crisper...

Use & Care Guide
Page 17
..., wrap or cover foods tightly. ■ For stainless steel models, stainless steel is no greater than 25 watts. 4. REFRIGERATOR CARE Cleaning WARNING Explosion Hazard Use nonflammable cleaner. Wipe up until it snaps into the compartment and then pushing up spills immediately... interior surfaces thoroughly. Rinse surfaces with an appliance bulb of the same size, shape, and wattage. ■ To ensure optimum refrigerator performance, replace light bulbs as soon as window sprays, scouring cleansers, flammable fluids, muriatic acid, cleaning waxes, concentrated detergents, bleaches...
..., wrap or cover foods tightly. ■ For stainless steel models, stainless steel is no greater than 25 watts. 4. REFRIGERATOR CARE Cleaning WARNING Explosion Hazard Use nonflammable cleaner. Wipe up until it snaps into the compartment and then pushing up spills immediately... interior surfaces thoroughly. Rinse surfaces with an appliance bulb of the same size, shape, and wattage. ■ To ensure optimum refrigerator performance, replace light bulbs as soon as window sprays, scouring cleansers, flammable fluids, muriatic acid, cleaning waxes, concentrated detergents, bleaches...

Use & Care Guide
Page 18
... light will not operate WARNING ■ Sizzling/Gurgling - See "Using the Control(s)." 18 In the U.S.A., www.whirlpool.com In Canada, www.whirlpool.ca Refrigerator Operation The refrigerator will operate only when a dispenser lever/pad is being ejected from items placed on ? water dripping on continuously... Clean gaskets and contact surfaces with soft cloth. See "Changing the Light Bulbs." ■ Is the dispenser light set correctly for the refrigerator to normal temperature. ■ Controls set to fill the ice maker ■ Pulsating - Plug in death, explosion, or fire. &#...
... light will not operate WARNING ■ Sizzling/Gurgling - See "Using the Control(s)." 18 In the U.S.A., www.whirlpool.com In Canada, www.whirlpool.ca Refrigerator Operation The refrigerator will operate only when a dispenser lever/pad is being ejected from items placed on ? water dripping on continuously... Clean gaskets and contact surfaces with soft cloth. See "Changing the Light Bulbs." ■ Is the dispenser light set correctly for the refrigerator to normal temperature. ■ Controls set to fill the ice maker ■ Pulsating - Plug in death, explosion, or fire. &#...

Use & Care Guide
Page 19
...not be clogged or incorrectly installed. If it correctly. ■ Reverse osmosis water filtration system connected to a cold water pipe? See "Refrigerator Doors." ■ Reverse osmosis water filtration system connected to store food. ■ Are there minerals (such as sulfur) in the water?...Door(s) opened often or left open . ■ Kink in the ice maker ejector arm? Replace filter or reinstall it correctly. ■ Refrigerator door closed . See "Water Supply Requirements." See "Water Supply Requirements." ■ Questions remain regarding water pressure? Off-taste, odor or gray...
...not be clogged or incorrectly installed. If it correctly. ■ Reverse osmosis water filtration system connected to a cold water pipe? See "Refrigerator Doors." ■ Reverse osmosis water filtration system connected to store food. ■ Are there minerals (such as sulfur) in the water?...Door(s) opened often or left open . ■ Kink in the ice maker ejector arm? Replace filter or reinstall it correctly. ■ Refrigerator door closed . See "Water Supply Requirements." See "Water Supply Requirements." ■ Questions remain regarding water pressure? Off-taste, odor or gray...
Use & Care Guide
Page 20
In the U.S.A., visit our webpage www.whirlpool.com/accessories or call 1-800-807-6777. In Canada, visit our webpage www.whirlpoolparts.ca or call 1-800-901-2042. Stainless Steel Cleaner and Polish: ... #W10355212BL Water Filter, Air Filter and Ethylene Filter Bundle Pack: Order Part #W10365758BL WATER FILTER CERTIFICATIONS 20 To order, contact us and ask for your refrigerator. ACCESSORIES The following accessories are available for the part numbers.
In the U.S.A., visit our webpage www.whirlpool.com/accessories or call 1-800-807-6777. In Canada, visit our webpage www.whirlpoolparts.ca or call 1-800-901-2042. Stainless Steel Cleaner and Polish: ... #W10355212BL Water Filter, Air Filter and Ethylene Filter Bundle Pack: Order Part #W10365758BL WATER FILTER CERTIFICATIONS 20 To order, contact us and ask for your refrigerator. ACCESSORIES The following accessories are available for the part numbers.

Use & Care Guide
Page 22
...Appliances Customer eXperience Center 553 Benson Road Benton Harbor, MI 49022-2692 In Canada: Whirlpool Brand Home Appliances Customer eXperience Centre 200 - 6750 Century Ave. Service calls to refrigerator or freezer product failures. 7. This major appliance is not available. 10. Replacement ...parts or repair labor on the duration of implied warranties of the refrigerator compartment. EXCLUSION OF INCIDENTAL AND CONSEQUENTIAL DAMAGES YOUR SOLE AND EXCLUSIVE REMEDY UNDER THIS LIMITED WARRANTY SHALL BE PRODUCT REPAIR...
...Appliances Customer eXperience Center 553 Benson Road Benton Harbor, MI 49022-2692 In Canada: Whirlpool Brand Home Appliances Customer eXperience Centre 200 - 6750 Century Ave. Service calls to refrigerator or freezer product failures. 7. This major appliance is not available. 10. Replacement ...parts or repair labor on the duration of implied warranties of the refrigerator compartment. EXCLUSION OF INCIDENTAL AND CONSEQUENTIAL DAMAGES YOUR SOLE AND EXCLUSIVE REMEDY UNDER THIS LIMITED WARRANTY SHALL BE PRODUCT REPAIR...

Warranty Information
Page 1
...if another warranty applies. 6/08 For additional product information, in materials or workmanship and is reported to refrigerator or freezer product failures. 7. Any food or medicine loss due to Whirlpool within 30 days from the date of purchase. 6. DISCLAIMER OF IMPLIED WARRANTIES IMPLIED WARRANTIES, INCLUDING ANY ...ONE YEAR OR THE SHORTEST PERIOD ALLOWED BY LAW. Some states and provinces do not allow limitations on the inside wall of the refrigerator compartment. If outside the 50 United States and Canada, contact your model number and serial number on the label, located on ...
...if another warranty applies. 6/08 For additional product information, in materials or workmanship and is reported to refrigerator or freezer product failures. 7. Any food or medicine loss due to Whirlpool within 30 days from the date of purchase. 6. DISCLAIMER OF IMPLIED WARRANTIES IMPLIED WARRANTIES, INCLUDING ANY ...ONE YEAR OR THE SHORTEST PERIOD ALLOWED BY LAW. Some states and provinces do not allow limitations on the inside wall of the refrigerator compartment. If outside the 50 United States and Canada, contact your model number and serial number on the label, located on ...


