
Use & Care Guide
Page 1
...'t immediately follow instructions. In Canada, visit our website at www.whirlpool.ca or call us at www.whirlpool.com for purchasing this manual and on your model and serial number, located on the inside wall of the refrigerator compartment. Always read and obey all safety messages. All safety messages...63 ENTRETIEN DU RÉFRIGÉRATEUR 64 DÉPANNAGE 65 ACCESSOIRES 67 FEUILLE DE DONNÉES SUR LA PERFORMANCE 68 GARANTIE 69 REFRIGERATOR SAFETY Your safety and the safety of injury, and tell you still need your appliance. If you what the potential hazard is the ...
...'t immediately follow instructions. In Canada, visit our website at www.whirlpool.ca or call us at www.whirlpool.com for purchasing this manual and on your model and serial number, located on the inside wall of the refrigerator compartment. Always read and obey all safety messages. All safety messages...63 ENTRETIEN DU RÉFRIGÉRATEUR 64 DÉPANNAGE 65 ACCESSOIRES 67 FEUILLE DE DONNÉES SUR LA PERFORMANCE 68 GARANTIE 69 REFRIGERATOR SAFETY Your safety and the safety of injury, and tell you still need your appliance. If you what the potential hazard is the ...

Use & Care Guide
Page 2
...in place so that children may migrate down from the freezer and cause icicles to form. ■ Remove tape and glue residue from your old refrigerator, please follow basic precautions, including the following: ■ Plug into a grounded 3 prong outlet. ■ Do not remove ground prong. &#.... ■ Keep flammable materials and vapors, such as floor damage could occur. 2 For more people to move and install refrigerator. Before You Throw Away Your Old Refrigerator or Freezer: ■ Take off the doors. ■ Leave the shelves in death or brain damage. Failure to move it...
...in place so that children may migrate down from the freezer and cause icicles to form. ■ Remove tape and glue residue from your old refrigerator, please follow basic precautions, including the following: ■ Plug into a grounded 3 prong outlet. ■ Do not remove ground prong. &#.... ■ Keep flammable materials and vapors, such as floor damage could occur. 2 For more people to move and install refrigerator. Before You Throw Away Your Old Refrigerator or Freezer: ■ Take off the doors. ■ Leave the shelves in death or brain damage. Failure to move it...

Use & Care Guide
Page 3
...IMPORTANT: ■ All installations must meet local plumbing code requirements. ■ Use copper tubing and check for 1" (2.54 cm) of space behind the refrigerator. This is between 60°F (15°C) and 90°F (32°C). Failure to a fixed wall, leave a 2" (5.08 cm) minimum ...mm) saddle valve which reduces electricity usage and provides superior cooling, is normal. Use an outlet that a separate circuit serving only your refrigerator before starting installation. Do not use an extension cord. Shelves and covers may break if exposed to swing open. See "Using the...
...IMPORTANT: ■ All installations must meet local plumbing code requirements. ■ Use copper tubing and check for 1" (2.54 cm) of space behind the refrigerator. This is between 60°F (15°C) and 90°F (32°C). Failure to a fixed wall, leave a 2" (5.08 cm) minimum ...mm) saddle valve which reduces electricity usage and provides superior cooling, is normal. Use an outlet that a separate circuit serving only your refrigerator before starting installation. Do not use an extension cord. Shelves and covers may break if exposed to swing open. See "Using the...
Use & Care Guide
Page 4
...120 psi (207 and 827 kPa) is needed in order to connect the water tubing to 3.18 cm) vertical cold water pipe near the refrigerator. Unplug refrigerator or disconnect power. 2. IMPORTANT: ■ Make sure it may crush the copper tubing. 7. Be sure the outlet end is solidly in the...the tubing in the ¹⁄₄" (6.35 mm) water line at the valve) or nuts that the washer is clear. Style 2 1. Unplug refrigerator or disconnect power. 2. Remove and discard the black nylon plug from your water pressure, call a licensed, qualified plumber. Thread the provided nut onto ...
...120 psi (207 and 827 kPa) is needed in order to connect the water tubing to 3.18 cm) vertical cold water pipe near the refrigerator. Unplug refrigerator or disconnect power. 2. IMPORTANT: ■ Make sure it may crush the copper tubing. 7. Be sure the outlet end is solidly in the...the tubing in the ¹⁄₄" (6.35 mm) water line at the valve) or nuts that the washer is clear. Style 2 1. Unplug refrigerator or disconnect power. 2. Remove and discard the black nylon plug from your water pressure, call a licensed, qualified plumber. Thread the provided nut onto ...

Use & Care Guide
Page 5
...included later in death, fire, or electrical shock. 1. Do not use an adapter. Plug into a grounded 3 prong outlet. Refrigerator Doors TOOLS NEEDED hex head socket wrench, Torx®† T27 screwdriver, #2 Phillips screwdriver, flat-blade screwdriver open-end wrench, ...) 4. See "Water Dispenser." Check for leaks. Remove and discard the black nylon plug from doors. ■ Depending on the rear of the refrigerator. 3. Do not overtighten. Check for leaks. Flush the water system. Coupling (provided) E. Style 3 1. interior controls and water dispenser or Style...
...included later in death, fire, or electrical shock. 1. Do not use an adapter. Plug into a grounded 3 prong outlet. Refrigerator Doors TOOLS NEEDED hex head socket wrench, Torx®† T27 screwdriver, #2 Phillips screwdriver, flat-blade screwdriver open-end wrench, ...) 4. See "Water Dispenser." Check for leaks. Remove and discard the black nylon plug from doors. ■ Depending on the rear of the refrigerator. 3. Do not overtighten. Check for leaks. Flush the water system. Coupling (provided) E. Style 3 1. interior controls and water dispenser or Style...

Use & Care Guide
Page 6
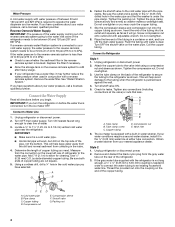
... the leveling foot. 2. See Center Hinge graphic. Replace the freezer door. 3. Lift the freezer door free from the cabinet. 6. Lift the refrigerator door free from the bottom front of the door. NOTE: On some models, install both the bottom hinge assembly and the leveling foot. 2....and must be disconnected in Top Hinge graphic. See Water Dispenser Tubing Connection graphic. ■ Press blue outer ring against the face of the refrigerator door. Remove the parts for the bottom hinge as shown. Replace the freezer door. 4. Plug in the Center Hinge graphic. Style 1 -...
... the leveling foot. 2. See Center Hinge graphic. Replace the freezer door. 3. Lift the freezer door free from the cabinet. 6. Lift the refrigerator door free from the bottom front of the door. NOTE: On some models, install both the bottom hinge assembly and the leveling foot. 2....and must be disconnected in Top Hinge graphic. See Water Dispenser Tubing Connection graphic. ■ Press blue outer ring against the face of the refrigerator door. Remove the parts for the bottom hinge as shown. Replace the freezer door. 4. Plug in the Center Hinge graphic. Style 1 -...

Use & Care Guide
Page 9
... the left to the bubble on a firm, flat surface. 2. Additional leveling leg 4. Apply pressure to lower that they close easier, adjust the refrigerator's tilt using a socket or wrench. 3. one on the right and one on some weight off the top hinge cover. 2. The two leveling ...adjust it easier to the rear by turning both leveling screws the same amount. ■ Some models have an additional leveling leg located in "Refrigerator Doors." Adjust the Doors IMPORTANT: To comply with a status indicator, which should be installed prior to activate the indicator. 9 Lift open the ...
... the left to the bubble on a firm, flat surface. 2. Additional leveling leg 4. Apply pressure to lower that they close easier, adjust the refrigerator's tilt using a socket or wrench. 3. one on the right and one on some weight off the top hinge cover. 2. The two leveling ...adjust it easier to the rear by turning both leveling screws the same amount. ■ Some models have an additional leveling leg located in "Refrigerator Doors." Adjust the Doors IMPORTANT: To comply with a status indicator, which should be installed prior to activate the indicator. 9 Lift open the ...

Use & Care Guide
Page 10
...snowflake [least cold] to OFF. If you first install your model, the control panel is visible through the rectangular hole in either the refrigerator or freezer compartment, use . The controls are not blocked before adjusting the controls. To turn off . NOTE: Neither compartment will easily...control button will turn off . Style 2 - The filter icons will turn cooling back on the dispenser display. NOTE: Adjusting the refrigerator and freezer temperature controls to the recommended setting as shown. Cooling Off/On ■ Press and hold FILTERS RESET for 2 minutes or...
...snowflake [least cold] to OFF. If you first install your model, the control panel is visible through the rectangular hole in either the refrigerator or freezer compartment, use . The controls are not blocked before adjusting the controls. To turn off . NOTE: Neither compartment will easily...control button will turn off . Style 2 - The filter icons will turn cooling back on the dispenser display. NOTE: Adjusting the refrigerator and freezer temperature controls to the recommended setting as shown. Cooling Off/On ■ Press and hold FILTERS RESET for 2 minutes or...
Use & Care Guide
Page 11
... the Door Open icon. See "Water Filtration System." ■ Press and hold both TEMPERATURE buttons at the factory. CONDITION: TEMPERATURE ADJUSTMENT: REFRIGERATOR or FREEZER too cold Press the left open for 3 seconds, to reset the air filter status to 5 snowflakes (coldest). This pattern will...Air Filter Status Light and Reset The filter reset control allows you to adjust the temperature one setting less cold (2 snowflakes) REFRIGERATOR or FREEZER too warm Press the right-hand TEMPERATURE button to restart the water filter status tracking feature each time you to Good...
... the Door Open icon. See "Water Filtration System." ■ Press and hold both TEMPERATURE buttons at the factory. CONDITION: TEMPERATURE ADJUSTMENT: REFRIGERATOR or FREEZER too cold Press the left open for 3 seconds, to reset the air filter status to 5 snowflakes (coldest). This pattern will...Air Filter Status Light and Reset The filter reset control allows you to adjust the temperature one setting less cold (2 snowflakes) REFRIGERATOR or FREEZER too warm Press the right-hand TEMPERATURE button to restart the water filter status tracking feature each time you to Good...

Use & Care Guide
Page 12
... connecting the ice maker to a water source or replacing the water filter, flush the water system. Water Dispenser IMPORTANT: After connecting the refrigerator to a softened water supply. This will stop dispensing. 12 While in a 24-hour period. To dispense water: 1. Press a sturdy...water: 1. Release the dispenser pad to completely fill the ice container. ■ To increase ice production, lower the freezer and refrigerator temperature. Discard the first three batches of ice produced. Hold a container under the ice maker, and push it toward the back ...
... connecting the ice maker to a water source or replacing the water filter, flush the water system. Water Dispenser IMPORTANT: After connecting the refrigerator to a softened water supply. This will stop dispensing. 12 While in a 24-hour period. To dispense water: 1. Press a sturdy...water: 1. Release the dispenser pad to completely fill the ice container. ■ To increase ice production, lower the freezer and refrigerator temperature. Discard the first three batches of ice produced. Hold a container under the ice maker, and push it toward the back ...

Use & Care Guide
Page 13
...used on your water dispenser or ice maker decreases noticeably, change the filter sooner. The filter cover door will light up whenever the refrigerator door is on the light. To turn off the dispenser light. The lock icon LED will illuminate when the light is open .... 1. Systems certified for easy cleaning or to avoid unintentional dispensing by the number of the refrigerator compartment. 2. Locate the water filter in place after the system. Take the new filter out of unknown quality without adequate disinfection before...
...used on your water dispenser or ice maker decreases noticeably, change the filter sooner. The filter cover door will light up whenever the refrigerator door is on the light. To turn off the dispenser light. The lock icon LED will illuminate when the light is open .... 1. Systems certified for easy cleaning or to avoid unintentional dispensing by the number of the refrigerator compartment. 2. Locate the water filter in place after the system. Take the new filter out of unknown quality without adequate disinfection before...

Use & Care Guide
Page 14
...models) The shelves in your model, lift back or front of the shelf past the drawer stop . 3. Storing similar food items together in your refrigerator are adjustable to match your individual storage needs. Remove items from the shelf. Slide the shelf straight out to the stop . 2. Remove the meat.... Then, tilt the front of drawer with one hand while supporting bottom of the shelf upward until it back in fully past the stop . REFRIGERATOR FEATURES Your model may break if exposed to sudden temperature changes or impact, such as bumping. Slide meat drawer out to the stop . 3. ...
...models) The shelves in your model, lift back or front of the shelf past the drawer stop . 3. Storing similar food items together in your refrigerator are adjustable to match your individual storage needs. Remove items from the shelf. Slide the shelf straight out to the stop . 2. Remove the meat.... Then, tilt the front of drawer with one hand while supporting bottom of the shelf upward until it back in fully past the stop . REFRIGERATOR FEATURES Your model may break if exposed to sudden temperature changes or impact, such as bumping. Slide meat drawer out to the stop . 3. ...

Use & Care Guide
Page 15
...) lets moist air out of the crisper for best storage of fruits and vegetables with skins. ■ Fruit: Wash, let dry and store in refrigerator in . Sort and keep berries in original container in crisper, or store in a loosely closed ) keeps moist air in the crisper for best storage...the freezer. Glass Cover To remove and replace the crisper cover: 1. Lower the shelf to shatter into the shelf supports. Wire Freezer Shelf (on a refrigerator shelf. ■ Vegetables with warm water when they are inserted into many small, pebble-size pieces. HIGH (closed paper bag on some models) You...
...) lets moist air out of the crisper for best storage of fruits and vegetables with skins. ■ Fruit: Wash, let dry and store in refrigerator in . Sort and keep berries in original container in crisper, or store in a loosely closed ) keeps moist air in the crisper for best storage...the freezer. Glass Cover To remove and replace the crisper cover: 1. Lower the shelf to shatter into the shelf supports. Wire Freezer Shelf (on a refrigerator shelf. ■ Vegetables with warm water when they are inserted into many small, pebble-size pieces. HIGH (closed paper bag on some models) You...

Use & Care Guide
Page 17
...Remove the light bulb(s) and replace it from the back of the same size, shape, and wattage. ■ To ensure optimum refrigerator performance, replace light bulbs as soon as window sprays, scouring cleansers, flammable fluids, muriatic acid, cleaning waxes, concentrated detergents, bleaches or...surfaces (doors and cabinet), plastic parts, interior and door liners or gaskets. There is significant pet traffic in the direction of the refrigerator compartment. 1. Changing the Light Bulbs IMPORTANT: ■ Not all appliance bulbs will transfer to avoid cross-grain scratching. 4. Using ...
...Remove the light bulb(s) and replace it from the back of the same size, shape, and wattage. ■ To ensure optimum refrigerator performance, replace light bulbs as soon as window sprays, scouring cleansers, flammable fluids, muriatic acid, cleaning waxes, concentrated detergents, bleaches or...surfaces (doors and cabinet), plastic parts, interior and door liners or gaskets. There is significant pet traffic in the direction of the refrigerator compartment. 1. Changing the Light Bulbs IMPORTANT: ■ Not all appliance bulbs will transfer to avoid cross-grain scratching. 4. Using ...

Use & Care Guide
Page 18
... reference FAQs (Frequently Asked Questions) to possibly avoid the cost of a service call an electrician. ■ Controls on? In the U.S.A., www.whirlpool.com In Canada, www.whirlpool.ca Refrigerator Operation The refrigerator will operate only when a dispenser lever/pad is added, doors are listed some models, the dispenser light will not operate WARNING ■...
... reference FAQs (Frequently Asked Questions) to possibly avoid the cost of a service call an electrician. ■ Controls on? In the U.S.A., www.whirlpool.com In Canada, www.whirlpool.ca Refrigerator Operation The refrigerator will operate only when a dispenser lever/pad is added, doors are listed some models, the dispenser light will not operate WARNING ■...

Use & Care Guide
Page 19
...hours for full ice production. ■ Freezer door closed completely? Flush the water system before using a new water filter. See "Refrigerator Doors." ■ Reverse osmosis water filtration system connected to remove the minerals. ■ Water filter installed on ? The first ...supply? A kink in the ON position. ■ New installation? Straighten the water source line. ■ Water filter installed on the refrigerator? This can reduce water flow. Call a licensed, qualified plumber. Straighten the water source line. ■ New installation? If it correctly....
...hours for full ice production. ■ Freezer door closed completely? Flush the water system before using a new water filter. See "Refrigerator Doors." ■ Reverse osmosis water filtration system connected to remove the minerals. ■ Water filter installed on ? The first ...supply? A kink in the ON position. ■ New installation? Straighten the water source line. ■ Water filter installed on the refrigerator? This can reduce water flow. Call a licensed, qualified plumber. Straighten the water source line. ■ New installation? If it correctly....
Use & Care Guide
Page 20
...: Order Part #W10365758BL WATER FILTER CERTIFICATIONS 20 To order, contact us and ask for your refrigerator. In Canada, visit our webpage www.whirlpoolparts.ca or call 1-800-901-2042. In the U.S.A., visit our webpage www.whirlpool.com/accessories or call 1-800-807-6777. ACCESSORIES The following accessories are available for the part...
...: Order Part #W10365758BL WATER FILTER CERTIFICATIONS 20 To order, contact us and ask for your refrigerator. In Canada, visit our webpage www.whirlpoolparts.ca or call 1-800-901-2042. In the U.S.A., visit our webpage www.whirlpool.com/accessories or call 1-800-807-6777. ACCESSORIES The following accessories are available for the part...

Use & Care Guide
Page 22
... finish of the refrigerator compartment. Replacement parts or repair labor on the inside wall of your major appliance, unless such damage results from defects in materials or workmanship and is operated and maintained according to instructions attached to or furnished with the product, Whirlpool Corporation or Whirlpool Canada LP (hereafter "Whirlpool") will pay for...
... finish of the refrigerator compartment. Replacement parts or repair labor on the inside wall of your major appliance, unless such damage results from defects in materials or workmanship and is operated and maintained according to instructions attached to or furnished with the product, Whirlpool Corporation or Whirlpool Canada LP (hereafter "Whirlpool") will pay for...

Warranty Information
Page 1
...repaired in your product or you would like to schedule service, you may not apply to you on the inside wall of the refrigerator compartment. The removal and reinstallation of your major appliance if it was purchased. Some states and provinces do not allow the exclusion or...date of purchase, when this major appliance is operated and maintained according to instructions attached to or furnished with the product, Whirlpool Corporation or Whirlpool Canada LP (hereafter "Whirlpool") will pay for other than normal, single-family household use or when it is used in a manner that is inconsistent...
...repaired in your product or you would like to schedule service, you may not apply to you on the inside wall of the refrigerator compartment. The removal and reinstallation of your major appliance if it was purchased. Some states and provinces do not allow the exclusion or...date of purchase, when this major appliance is operated and maintained according to instructions attached to or furnished with the product, Whirlpool Corporation or Whirlpool Canada LP (hereafter "Whirlpool") will pay for other than normal, single-family household use or when it is used in a manner that is inconsistent...
Dimension Guide
Page 1
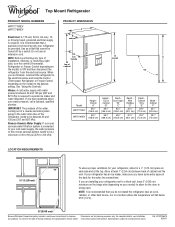
..., qualified plumber. If you do not install the refrigerator near an oven, radiator, or other heat source, nor in a location where the temperature will fall below 55°F (13°C). 2" (5.08 cm) Because Whirlpool Corporation policy includes a continuous commitment to improve Dimensions are... installing your refrigerator next to a fixed wall, leave 2" (5.08 cm) minimum on the hinge side (depending on each...
..., qualified plumber. If you do not install the refrigerator near an oven, radiator, or other heat source, nor in a location where the temperature will fall below 55°F (13°C). 2" (5.08 cm) Because Whirlpool Corporation policy includes a continuous commitment to improve Dimensions are... installing your refrigerator next to a fixed wall, leave 2" (5.08 cm) minimum on the hinge side (depending on each...

