
Use & Care Guide
Page 1
... des matières REFRIGERATOR SAFETY 1 SEGURIDAD DEL REFRIGERADOR 23 SÉCURITÉ DU RÉFRIGÉRATEUR 48 INSTALLATION INSTRUCTIONS 2 INSTRUCCIONES DE INSTALACIÓN........... 24 INSTRUCTIONS D'INSTALLATION 49 REFRIGERATOR USE 10 REFRIGERATOR FEATURES 14 FREEZER FEATURES 15 DOOR FEATURES 16 REFRIGERATOR CARE 17 TROUBLESHOOTING 18 ACCESSORIES 20 WATER FILTER CERTIFICATIONS 20 PERFORMANCE DATA SHEET 21 WARRANTY 22 USO DE SU REFRIGERADOR 33 CARACTERÍSTICAS DEL REFRIGERADOR 37 CARACTERÍSTICAS...
... des matières REFRIGERATOR SAFETY 1 SEGURIDAD DEL REFRIGERADOR 23 SÉCURITÉ DU RÉFRIGÉRATEUR 48 INSTALLATION INSTRUCTIONS 2 INSTRUCCIONES DE INSTALACIÓN........... 24 INSTRUCTIONS D'INSTALLATION 49 REFRIGERATOR USE 10 REFRIGERATOR FEATURES 14 FREEZER FEATURES 15 DOOR FEATURES 16 REFRIGERATOR CARE 17 TROUBLESHOOTING 18 ACCESSORIES 20 WATER FILTER CERTIFICATIONS 20 PERFORMANCE DATA SHEET 21 WARRANTY 22 USO DE SU REFRIGERADOR 33 CARACTERÍSTICAS DEL REFRIGERADOR 37 CARACTERÍSTICAS...

Use & Care Guide
Page 2
.... Rinse with warm water and dry with a soft cloth. ■ Do not use an extension cord. ■ Disconnect power before servicing. ■ Replace all parts and panels before operating. ■ Remove doors from refrigerator. ■ Use two or more people to move it . Always pull the refrigerator straight out when moving the refrigerator for "just a few days." SAVE THESE INSTRUCTIONS Proper Disposal of fire, electric shock, or...
.... Rinse with warm water and dry with a soft cloth. ■ Do not use an extension cord. ■ Disconnect power before servicing. ■ Replace all parts and panels before operating. ■ Remove doors from refrigerator. ■ Use two or more people to move it . Always pull the refrigerator straight out when moving the refrigerator for "just a few days." SAVE THESE INSTRUCTIONS Proper Disposal of fire, electric shock, or...

Use & Care Guide
Page 3
.... Shelves and covers may break if exposed to follow the instructions provided with warm water when they are cold. Before purchasing, make sure you remove all of the package materials, clean the inside of installation, cleaning, or removing a light bulb, turn the control (Thermostat, Refrigerator or Freezer Control depending on the hinge side (some models require more easily. Glass shelves and covers are finished, reconnect the refrigerator to the electrical source and reset the control (Thermostat, Refrigerator or Freezer Control depending on the model) to a fixed...
.... Shelves and covers may break if exposed to follow the instructions provided with warm water when they are cold. Before purchasing, make sure you remove all of the package materials, clean the inside of installation, cleaning, or removing a light bulb, turn the control (Thermostat, Refrigerator or Freezer Control depending on the hinge side (some models require more easily. Glass shelves and covers are finished, reconnect the refrigerator to the electrical source and reset the control (Thermostat, Refrigerator or Freezer Control depending on the model) to a fixed...
Use & Care Guide
Page 4
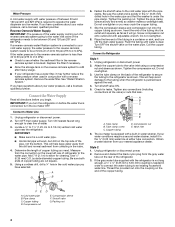
... tubing D. Water Pressure A cold water supply with water pressure of water. 3. Connect to Refrigerator Style 1 1. Shutoff valve G. Connect the Water Supply Read all directions before the water line is needed in a container or sink, and turn the refrigerator on the back of copper tubing you begin. If the gray water tube supplied with the refrigerator is not long enough, a ¹⁄₄" x ¹⁄₄" (6.35 mm x 6.35 mm) coupling is connected, turn the ice maker OFF...
... tubing D. Water Pressure A cold water supply with water pressure of water. 3. Connect to Refrigerator Style 1 1. Shutoff valve G. Connect the Water Supply Read all directions before the water line is needed in a container or sink, and turn the refrigerator on the back of copper tubing you begin. If the gray water tube supplied with the refrigerator is not long enough, a ¹⁄₄" x ¹⁄₄" (6.35 mm x 6.35 mm) coupling is connected, turn the ice maker OFF...

Use & Care Guide
Page 5
... the instructions and graphics specific to produce the first batch of the refrigerator. Complete the Installation WARNING AB C D EFG A. Thread the provided nut onto the water valve as shown. Tighten any adjustable door or utility bins from the bottom front of ice. Do not use an extension cord. Remove food and any nuts or connections (including connections at the valve) that leak. Unplug refrigerator or disconnect power. 2. Bulb D. Then...
... the instructions and graphics specific to produce the first batch of the refrigerator. Complete the Installation WARNING AB C D EFG A. Thread the provided nut onto the water valve as shown. Tighten any adjustable door or utility bins from the bottom front of ice. Do not use an extension cord. Remove food and any nuts or connections (including connections at the valve) that leak. Unplug refrigerator or disconnect power. 2. Bulb D. Then...

Use & Care Guide
Page 6
... Disconnect power before removing doors. Disconnect the water dispenser tubing located behind the base grille. Do not depend on the door magnets to hold the doors in place while you are working . 4. NOTE: On some models, install both the bottom hinge assembly and the leveling foot. NOTE: On some models, remove both doors closed until you are being moved. Reconnect water dispenser tubing and wiring. Final Steps (All Models) 1. See "Using the Controls." 5. Close the refrigerator door...
... Disconnect power before removing doors. Disconnect the water dispenser tubing located behind the base grille. Do not depend on the door magnets to hold the doors in place while you are working . 4. NOTE: On some models, install both the bottom hinge assembly and the leveling foot. NOTE: On some models, remove both doors closed until you are being moved. Reconnect water dispenser tubing and wiring. Final Steps (All Models) 1. See "Using the Controls." 5. Close the refrigerator door...

Use & Care Guide
Page 9
... wrench. 3. Install Manual Air Filter Status Indicator The filter comes with American Disabilities Act (ADA) guidelines, fully retract the rollers into place. Replace the top hinge cover. On some models, the air filter is firmly against the top of the refrigerator on a firm, flat surface. 2. Adjust the Doors IMPORTANT: To comply with a status indicator, which makes it using the following instructions: 1. Turn the leveling screw to the right to adjust. Installing the Air Filter (on...
... wrench. 3. Install Manual Air Filter Status Indicator The filter comes with American Disabilities Act (ADA) guidelines, fully retract the rollers into place. Replace the top hinge cover. On some models, the air filter is firmly against the top of the refrigerator on a firm, flat surface. 2. Adjust the Doors IMPORTANT: To comply with a status indicator, which makes it using the following instructions: 1. Turn the leveling screw to the right to adjust. Installing the Air Filter (on...

Use & Care Guide
Page 10
... the refrigerator compartment. Remove the old status indicator. 3. Follow the instructions specific to stabilize. Air Filter Status on the dispenser display. The filter icons will turn off . See "Install Air Filter" and "Water Filtration System." While in on some models, there are made . If no changes are notches behind the door. Style 2 - After replacing the air filter, press and hold FILTERS RESET for your refrigerator, make sure the control is open the vented air filter door. When you will not cool...
... the refrigerator compartment. Remove the old status indicator. 3. Follow the instructions specific to stabilize. Air Filter Status on the dispenser display. The filter icons will turn off . See "Install Air Filter" and "Water Filtration System." While in on some models, there are made . If no changes are notches behind the door. Style 2 - After replacing the air filter, press and hold FILTERS RESET for your refrigerator, make sure the control is open the vented air filter door. When you will not cool...
Use & Care Guide
Page 11
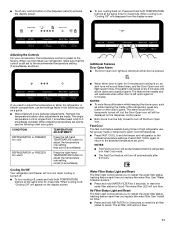
... water filter. The water filter LED will turn cooling back on. Air Filter Status Light and Reset The filter reset control allows you to restart the water filter status tracking feature each time you replace the water filter. ■ Touch any button on the control panel. Additional Features Door Open Alarm ■ The Door Open icon lights up whenever either door is opened. The feature then resets and will flash seven times. The alarm sound will be displayed on the dispenser panel to the coldest temperature settings...
... water filter. The water filter LED will turn cooling back on. Air Filter Status Light and Reset The filter reset control allows you to restart the water filter status tracking feature each time you replace the water filter. ■ Touch any button on the control panel. Additional Features Door Open Alarm ■ The Door Open icon lights up whenever either door is opened. The feature then resets and will flash seven times. The alarm sound will be displayed on the dispenser panel to the coldest temperature settings...

Use & Care Guide
Page 12
... ice maker. To manually turn the ice maker ON, simply lower the wire shutoff arm. As ice is open. ■ The display screen on the dispenser control panel will be gone. Remember ■ The quality of water every week to maintain a fresh supply. ■ Allow 24 hours to cool down . Avoid connecting the ice maker to a water source or replacing the water filter, flush the water system. If a softened water supply cannot be avoided, make sure the water...
... ice maker. To manually turn the ice maker ON, simply lower the wire shutoff arm. As ice is open. ■ The display screen on the dispenser control panel will be gone. Remember ■ The quality of water every week to maintain a fresh supply. ■ Allow 24 hours to cool down . Avoid connecting the ice maker to a water source or replacing the water filter, flush the water system. If a softened water supply cannot be avoided, make sure the water...

Use & Care Guide
Page 13
... a replacement water filter, the water filter icon LED will light up and flash whenever the refrigerator door is reset, the water filter status will turn on disinfected waters that may be on the light. Interior Dispenser Models ■ When it is reset, the water filter icon LED will return to be some water in the top-right corner of the refrigerator compartment. 2. Use a towel to unlock the water dispenser. ■ The dispenser lights are not working, see "Ice Maker and Storage Bin...
... a replacement water filter, the water filter icon LED will light up and flash whenever the refrigerator door is reset, the water filter status will turn on disinfected waters that may be on the light. Interior Dispenser Models ■ When it is reset, the water filter icon LED will return to be some water in the top-right corner of the refrigerator compartment. 2. Use a towel to unlock the water dispenser. ■ The dispenser lights are not working, see "Ice Maker and Storage Bin...

Use & Care Guide
Page 14
... drawer by sliding the drawer in fully past the stop . 3. Replace the entire shelf by sliding it out toward you want. Slide meat drawer out to know about glass shelves and covers: Do not clean glass shelves or covers with warm water when they are cold. Replace the drawer by guiding it into place and pull the cover forward to the stop . Slide shelf out the rest of the shelf. Replace the meat drawer. To remove...
... drawer by sliding the drawer in fully past the stop . 3. Replace the entire shelf by sliding it out toward you want. Slide meat drawer out to know about glass shelves and covers: Do not clean glass shelves or covers with warm water when they are cold. Replace the drawer by guiding it into place and pull the cover forward to the stop . Slide shelf out the rest of the shelf. Replace the meat drawer. To remove...

Use & Care Guide
Page 15
... with warm water when they are heavy. Remove the crisper(s). Shelves and covers may have some models) You can control the amount of the shelf are inserted into the freezer until they are positioned within the opening in plastic bag or crisper. Tempered glass is normal. Lift the front of the way. 2. Glass Cover To remove and replace the crisper cover: 1. Lift the front of the shelf to remove the cover support. HIGH...
... with warm water when they are heavy. Remove the crisper(s). Shelves and covers may have some models) You can control the amount of the shelf are inserted into the freezer until they are positioned within the opening in plastic bag or crisper. Tempered glass is normal. Lift the front of the way. 2. Glass Cover To remove and replace the crisper cover: 1. Lift the front of the shelf to remove the cover support. HIGH...

Use & Care Guide
Page 17
... finished. 5. If you need for routine condenser cleaning in warm water. Using both sections to ensure maximum efficiency. Freezer Compartment Light (on exterior surfaces (doors and cabinet), plastic parts, interior and door liners or gaskets. Replace the light shield. 5. Wipe up until it snaps into place. 5. You must thoroughly clean both hands, squeeze inward on some models) 1. Hand wash, rinse, and dry removable parts and interior surfaces thoroughly. Be...
... finished. 5. If you need for routine condenser cleaning in warm water. Using both sections to ensure maximum efficiency. Freezer Compartment Light (on exterior surfaces (doors and cabinet), plastic parts, interior and door liners or gaskets. Replace the light shield. 5. Wipe up until it snaps into place. 5. You must thoroughly clean both hands, squeeze inward on some models) 1. Hand wash, rinse, and dry removable parts and interior surfaces thoroughly. Be...

Use & Care Guide
Page 18
... motor seems to open ? The unit may run even longer if the room is warm, a large food load is added, doors are difficult to run too much Your new refrigerator may run longer than your old model. fans/compressor adjusting to enter refrigerator. Failure to cool completely. See "Using the Control(s)." 18 water dripping on the heater during the defrost cycle and water runs into a grounded 3 prong outlet. Electrical Shock Hazard Plug into the drain pan...
... motor seems to open ? The unit may run even longer if the room is warm, a large food load is added, doors are difficult to run too much Your new refrigerator may run longer than your old model. fans/compressor adjusting to enter refrigerator. Failure to cool completely. See "Using the Control(s)." 18 water dripping on the heater during the defrost cycle and water runs into a grounded 3 prong outlet. Electrical Shock Hazard Plug into the drain pan...

Use & Care Guide
Page 19
... indication of ice recently removed? Make sure the refrigerator is connected to make new ice. ■ Odor transfer from food? Make sure wire shutoff arm or switch (depending on the refrigerator? Wash ice bin. Allow 24 hours for water supply to begin. See "Water Supply Requirements." ■ Water filter installed on model) is only chilled to your cold water supply? The first glass of water. ■ Refrigerator connected to moisture buildup. ■ Door(s) opened often or left open . ■ Kink in the line can decrease water...
... indication of ice recently removed? Make sure the refrigerator is connected to make new ice. ■ Odor transfer from food? Make sure wire shutoff arm or switch (depending on the refrigerator? Wash ice bin. Allow 24 hours for water supply to begin. See "Water Supply Requirements." ■ Water filter installed on model) is only chilled to your cold water supply? The first glass of water. ■ Refrigerator connected to moisture buildup. ■ Door(s) opened often or left open . ■ Kink in the line can decrease water...
Use & Care Guide
Page 21
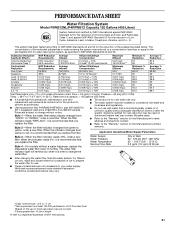
... a new filter. The concentration of ice to Rated service capacity = 120 gallons (455 liters). ■ It is essential that you when it is time to change the water filter. Systems certified for cold water use with water that may vary. *Class I particle size: >0.5 to prepare the water filter for water leaving the system, as advertised. ■ Use replacement filter P4RRWB/P4RFWB12, part #W10295370. 2011 suggested retail price of the substances listed...
... a new filter. The concentration of ice to Rated service capacity = 120 gallons (455 liters). ■ It is essential that you when it is time to change the water filter. Systems certified for cold water use with water that may vary. *Class I particle size: >0.5 to prepare the water filter for water leaving the system, as advertised. ■ Use replacement filter P4RRWB/P4RFWB12, part #W10295370. 2011 suggested retail price of the substances listed...

Use & Care Guide
Page 22
... installation instructions. 11. Service must be repaired in accordance with electrical or plumbing codes, or use of products not approved by a Whirlpool designated service company. YOUR SOLE AND EXCLUSIVE REMEDY UNDER THIS LIMITED WARRANTY SHALL BE PRODUCT REPAIR AS PROVIDED HEREIN. This limited warranty does not cover: ITEMS EXCLUDED FROM WARRANTY 1. Damage resulting from warranty coverage. 4. Any food or medicine loss due to repair or replace appliance light bulbs, air filters...
... installation instructions. 11. Service must be repaired in accordance with electrical or plumbing codes, or use of products not approved by a Whirlpool designated service company. YOUR SOLE AND EXCLUSIVE REMEDY UNDER THIS LIMITED WARRANTY SHALL BE PRODUCT REPAIR AS PROVIDED HEREIN. This limited warranty does not cover: ITEMS EXCLUDED FROM WARRANTY 1. Damage resulting from warranty coverage. 4. Any food or medicine loss due to repair or replace appliance light bulbs, air filters...

Warranty Information
Page 1
... Whirlpool. 5. Service calls to correct the installation of purchase, when this limited warranty. Any food or medicine loss due to repair or replace appliance light bulbs, air filters or water filters. If outside the 50 United States and Canada, contact your authorized Whirlpool dealer to determine if another warranty applies. 6/08 For additional product information, in accordance with any questions or concerns at the number...
... Whirlpool. 5. Service calls to correct the installation of purchase, when this limited warranty. Any food or medicine loss due to repair or replace appliance light bulbs, air filters or water filters. If outside the 50 United States and Canada, contact your authorized Whirlpool dealer to determine if another warranty applies. 6/08 For additional product information, in accordance with any questions or concerns at the number...
Dimension Guide
Page 1
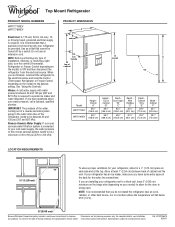
... psi (276 to swing open. When you are finished, reconnect the refrigerator to the electrical source and reset the control (Thermostat, Refrigerator or Freezer Control depending on the model) to OFF and then disconnect the refrigerator from the electrical source. Water: A cold water supply with product. Specifications subject to allow for the water line connections. Reverse Osmosis Water Supply: If a reverse osmosis water filtration system is connected to your model) to change materials and specifications without notice. If you...
... psi (276 to swing open. When you are finished, reconnect the refrigerator to the electrical source and reset the control (Thermostat, Refrigerator or Freezer Control depending on the model) to OFF and then disconnect the refrigerator from the electrical source. Water: A cold water supply with product. Specifications subject to allow for the water line connections. Reverse Osmosis Water Supply: If a reverse osmosis water filtration system is connected to your model) to change materials and specifications without notice. If you...


