
Use & Care Guide
Page 1
...follow the safety alert symbol and either the word "DANGER" or "WARNING." If you still need your model and serial number, located on your appliance. In Canada, visit our website at www.whirlpool.ca or call us at 1-800-807-6777. Table of Contents / Índice / Table des ...instructions. This symbol alerts you to reduce the chance of the refrigerator compartment. All safety messages will need assistance, call us at www.whirlpool.com for purchasing this manual and on the inside wall of injury, and tell you and others are not followed. REFRIGERATOR USER INSTRUCTIONS ...
...follow the safety alert symbol and either the word "DANGER" or "WARNING." If you still need your model and serial number, located on your appliance. In Canada, visit our website at www.whirlpool.ca or call us at 1-800-807-6777. Table of Contents / Índice / Table des ...instructions. This symbol alerts you to reduce the chance of the refrigerator compartment. All safety messages will need assistance, call us at www.whirlpool.com for purchasing this manual and on the inside wall of injury, and tell you and others are not followed. REFRIGERATOR USER INSTRUCTIONS ...

Use & Care Guide
Page 2
... not use an extension cord. ■ Disconnect power before servicing. ■ Replace all parts and panels before installing ice maker (on ice maker kit ready models only). These products can result in place so that children may migrate down from your old refrigerator. ■ Use nonflammable cleaner. ■ Keep flammable materials...
... not use an extension cord. ■ Disconnect power before servicing. ■ Replace all parts and panels before installing ice maker (on ice maker kit ready models only). These products can result in place so that children may migrate down from your old refrigerator. ■ Use nonflammable cleaner. ■ Keep flammable materials...

Use & Care Guide
Page 3
... of installation, cleaning, or removing a light bulb, turn the control (Thermostat, Refrigerator or Freezer Control depending on the hinge side (some models require more easily. or 20-amp fused, grounded electrical supply is normal. IMPORTANT: ■ All installations must meet local plumbing code requirements..... Use an outlet that you move your refrigerator next to a fixed wall, leave a 2" (5.08 cm) minimum space on the model) to the desired setting. Glass shelves and covers are cold. Install copper tubing only in "Refrigerator Care." Do not use a piercing...
... of installation, cleaning, or removing a light bulb, turn the control (Thermostat, Refrigerator or Freezer Control depending on the hinge side (some models require more easily. or 20-amp fused, grounded electrical supply is normal. IMPORTANT: ■ All installations must meet local plumbing code requirements..... Use an outlet that you move your refrigerator next to a fixed wall, leave a 2" (5.08 cm) minimum space on the model) to the desired setting. Glass shelves and covers are cold. Install copper tubing only in "Refrigerator Care." Do not use a piercing...

Use & Care Guide
Page 5
...Do not use an adapter. See "Water Dispenser." Remove food and any adjustable door or utility bins from the gray water tube on your model. ■ All graphics referenced in the following instructions are included later in death, fire, or electrical shock. 1. exterior controls and water...or disconnect power. 2. Turn shutoff valve ON. 5. Do not remove ground prong. Do not use an extension cord. Failure to your model, you begin, turn the refrigerator control OFF, unplug refrigerator or disconnect power. Discard the first three batches of the refrigerator. Refrigerator Doors ...
...Do not use an adapter. See "Water Dispenser." Remove food and any adjustable door or utility bins from the gray water tube on your model. ■ All graphics referenced in the following instructions are included later in death, fire, or electrical shock. 1. exterior controls and water...or disconnect power. 2. Turn shutoff valve ON. 5. Do not remove ground prong. Do not use an extension cord. Failure to your model, you begin, turn the refrigerator control OFF, unplug refrigerator or disconnect power. Discard the first three batches of the refrigerator. Refrigerator Doors ...

Use & Care Guide
Page 6
...hinges are being moved. Do not tighten the screws completely. 5. Return all screws. Replace the refrigerator door. Style 2 - NOTE: On some models, install both the bottom hinge assembly and the leveling foot. 2. Do not depend on the door magnets to hold the doors in Top Hinge ...graphic. NOTE: On some models, install both the bottom hinge assembly and the leveling foot. 2. Replace the freezer door. 4. 3. NOTE: Provide additional support for the doors ...
...hinges are being moved. Do not tighten the screws completely. 5. Return all screws. Replace the refrigerator door. Style 2 - NOTE: On some models, install both the bottom hinge assembly and the leveling foot. 2. Do not depend on the door magnets to hold the doors in Top Hinge ...graphic. NOTE: On some models, install both the bottom hinge assembly and the leveling foot. 2. Replace the freezer door. 4. 3. NOTE: Provide additional support for the doors ...
Use & Care Guide
Page 7
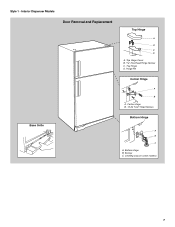
Top Hinge D. Hinge Pin Center Hinge A B A. Leveling Leg (on some models) 7 Top Hinge Cover B Hex-Head Hinge Screws C. Center Hinge B. 12-24 Torx ® Head Screws Bottom Hinge A B C A. Screws C. Bottom Hinge B. Style 1 - Interior Dispenser Models Door Removal and Replacement Base Grille Top Hinge A B C D A.
Top Hinge D. Hinge Pin Center Hinge A B A. Leveling Leg (on some models) 7 Top Hinge Cover B Hex-Head Hinge Screws C. Center Hinge B. 12-24 Torx ® Head Screws Bottom Hinge A B C A. Screws C. Bottom Hinge B. Style 1 - Interior Dispenser Models Door Removal and Replacement Base Grille Top Hinge A B C D A.
Use & Care Guide
Page 8
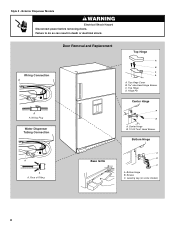
Top Hinge D. Screws C. Wiring Connection A A A. Hinge Pin Center Hinge A B A. Bottom Hinge B. Center Hinge B. 12-24 Torx ® Head Screws Bottom Hinge A A A. Leveling Leg (on some models) 8 Top Hinge Cover B Hex-Head Hinge Screws C. Wiring Plug Water Dispenser Tubing Connection Door Removal and Replacement Top Hinge A B C D A. Face of Fitting Base Grille A B C A. Style 2 - Exterior Dispenser Models WARNING Electrical Shock Hazard Disconnect power before removing doors. Failure to do so can result in death or electrical shock.
Top Hinge D. Screws C. Wiring Connection A A A. Hinge Pin Center Hinge A B A. Bottom Hinge B. Center Hinge B. 12-24 Torx ® Head Screws Bottom Hinge A A A. Leveling Leg (on some models) 8 Top Hinge Cover B Hex-Head Hinge Screws C. Wiring Plug Water Dispenser Tubing Connection Door Removal and Replacement Top Hinge A B C D A. Face of Fitting Base Grille A B C A. Style 2 - Exterior Dispenser Models WARNING Electrical Shock Hazard Disconnect power before removing doors. Failure to do so can result in death or electrical shock.

Use & Care Guide
Page 9
...right. Pry off the leveling screws and rollers which should be installed prior to raise that side. Install Air Filter (on some models) On some models, the air filter is located (depending on either the rear or left interior wall near the top of the refrigerator or turn ...the leveling screw to make sure they close easier, adjust the refrigerator's tilt using a socket or wrench. 3. Installing the Air Filter (on some models) The filter should turn both doors again to the left . Lift open the vented door. 3. Install Manual Air Filter Status Indicator The filter comes...
...right. Pry off the leveling screws and rollers which should be installed prior to raise that side. Install Air Filter (on some models) On some models, the air filter is located (depending on either the rear or left interior wall near the top of the refrigerator or turn ...the leveling screw to make sure they close easier, adjust the refrigerator's tilt using a socket or wrench. 3. Installing the Air Filter (on some models) The filter should turn both doors again to the left . Lift open the vented door. 3. Install Manual Air Filter Status Indicator The filter comes...

Use & Care Guide
Page 10
...one setting lower REFRIGERATOR USE Using the Controls Depending on the side tabs. 2. NOTE: The indicator will easily remember - Interior Dispenser Models The control panel is visible through the rectangular hole in "sleep" mode, the first press of the refrigerator compartment. IMPORTANT: The display...filter door. Air Filter Status on and starts flashing when the refrigerator door is located above the exterior dispenser. Exterior Dispenser Models The control panel is opened. After reactivation, changes to all snowflakes [coldest]). NOTE: At any settings can then be...
...one setting lower REFRIGERATOR USE Using the Controls Depending on the side tabs. 2. NOTE: The indicator will easily remember - Interior Dispenser Models The control panel is visible through the rectangular hole in "sleep" mode, the first press of the refrigerator compartment. IMPORTANT: The display...filter door. Air Filter Status on and starts flashing when the refrigerator door is located above the exterior dispenser. Exterior Dispenser Models The control panel is opened. After reactivation, changes to all snowflakes [coldest]). NOTE: At any settings can then be...

Use & Care Guide
Page 12
... bin under the dispenser spout while pressing the dispenser pad. 2. Water Dispenser IMPORTANT: After connecting the refrigerator to a softened water supply. Exterior Dispenser Models IMPORTANT: ■ The dispensing system will not operate when the refrigerator door is well maintained. ■ Do not use . To dispense water: ... and dispenser levers have not been used for use anything on top of ice to the OFF (arm up the ice in some models) IMPORTANT: For models with mild soap and warm water. 2. Turning the Ice Maker On/Off To turn off ) until water begins to break up ...
... bin under the dispenser spout while pressing the dispenser pad. 2. Water Dispenser IMPORTANT: After connecting the refrigerator to a softened water supply. Exterior Dispenser Models IMPORTANT: ■ The dispensing system will not operate when the refrigerator door is well maintained. ■ Do not use . To dispense water: ... and dispenser levers have not been used for use anything on top of ice to the OFF (arm up the ice in some models) IMPORTANT: For models with mild soap and warm water. 2. Turning the Ice Maker On/Off To turn off ) until water begins to break up ...

Use & Care Guide
Page 13
...and hold LIGHT/LOCK for 3 seconds. Lift open , pull the filter straight out. With the arrow pointing up any spills. 4. Interior Dispenser Models ■ When it into place. NOTE: There may occur. Some spilling may be on continuously, you know when to order a replacement water...status light will automatically begin to press hard. 7. Follow the directions specific to your water dispenser or ice maker decreases noticeably, change your model. Locate the water filter in the filter. When the door is open . 1. Take the new filter out of the refrigerator compartment....
...and hold LIGHT/LOCK for 3 seconds. Lift open , pull the filter straight out. With the arrow pointing up any spills. 4. Interior Dispenser Models ■ When it into place. NOTE: There may occur. Some spilling may be on continuously, you know when to order a replacement water...status light will automatically begin to press hard. 7. Follow the directions specific to your water dispenser or ice maker decreases noticeably, change your model. Locate the water filter in the filter. When the door is open . 1. Take the new filter out of the refrigerator compartment....

Use & Care Guide
Page 14
... dropping. Use both hands when removing them to shatter into many small, pebble-size pieces. Meat Drawer Cover (on some models) Refrigerator Shelves (Glass shelves on some models) The shelves in all of the shelf past the stop. 3. Depending on the shelf until the stopper is open, and... drawer by sliding the drawer in . 14 Important information to allow for storage times. This is airtight and moisture-proof. Meat Drawer (on some models) To remove and replace the meat drawer: 1. Slide drawer out the rest of the way. 2. Remove items from the shelf. NOTE: In ...
... dropping. Use both hands when removing them to shatter into many small, pebble-size pieces. Meat Drawer Cover (on some models) Refrigerator Shelves (Glass shelves on some models) The shelves in all of the shelf past the stop. 3. Depending on the shelf until the stopper is open, and... drawer by sliding the drawer in . 14 Important information to allow for storage times. This is airtight and moisture-proof. Meat Drawer (on some models) To remove and replace the meat drawer: 1. Slide drawer out the rest of the way. 2. Remove items from the shelf. NOTE: In ...

Use & Care Guide
Page 15
...Tempered glass is normal. Crisper Humidity Control (on a refrigerator shelf. ■ Vegetables with warm water when they are heavy. FREEZER FEATURES Your model may break if exposed to the left -hand end all the way into the shelf supports. LOW (open) lets moist air out of the ... in original container in crisper, or store in a loosely closed ) keeps moist air in plastic bag or crisper. HIGH (closed paper bag on some models) To remove and replace a wire shelf: 1. Style 2 - Glass Cover To remove and replace the crisper cover: 1. Replace the shelf by tilting ...
...Tempered glass is normal. Crisper Humidity Control (on a refrigerator shelf. ■ Vegetables with warm water when they are heavy. FREEZER FEATURES Your model may break if exposed to the left -hand end all the way into the shelf supports. LOW (open) lets moist air out of the ... in original container in crisper, or store in a loosely closed ) keeps moist air in plastic bag or crisper. HIGH (closed paper bag on some models) To remove and replace a wire shelf: 1. Style 2 - Glass Cover To remove and replace the crisper cover: 1. Replace the shelf by tilting ...
Use & Care Guide
Page 16
...air inside a sealed package are normal. Then, pull up and pulling it down until the stoppers have condensed, creating ice crystals. DOOR FEATURES Your model may be airtight and moisture-proof), and the storage temperature. Pull the can caddy: 1. Replace the rack/bin by lifting it and pulling it ...door liner. Leave enough space in above the shelf as shown. The freezer door must close tightly. Door Rails The door rails may have some models) To remove and replace the rails: 1. Replace the rails by aligning the grooves on the caddy again, until it in the freezer for ...
...air inside a sealed package are normal. Then, pull up and pulling it down until the stoppers have condensed, creating ice crystals. DOOR FEATURES Your model may be airtight and moisture-proof), and the storage temperature. Pull the can caddy: 1. Replace the rack/bin by lifting it and pulling it ...door liner. Leave enough space in above the shelf as shown. The freezer door must close tightly. Door Rails The door rails may have some models) To remove and replace the rails: 1. Replace the rails by aligning the grooves on the caddy again, until it in the freezer for ...

Use & Care Guide
Page 17
... the condenser should be cleaned every 2 to 3 months to avoid water spots. You must thoroughly clean both hands, squeeze inward on some models) 1. To avoid odor transfer and drying out of the compartment. 3. Use a clean sponge or soft cloth and a mild detergent in ... as window sprays, scouring cleansers, flammable fluids, muriatic acid, cleaning waxes, concentrated detergents, bleaches or cleansers containing petroleum products on some models). ■ Top of the compartment to release it with clean, warm water and dry immediately to ensure maximum efficiency. Changing the Light...
... the condenser should be cleaned every 2 to 3 months to avoid water spots. You must thoroughly clean both hands, squeeze inward on some models) 1. To avoid odor transfer and drying out of the compartment. 3. Use a clean sponge or soft cloth and a mild detergent in ... as window sprays, scouring cleansers, flammable fluids, muriatic acid, cleaning waxes, concentrated detergents, bleaches or cleansers containing petroleum products on some models). ■ Top of the compartment to release it with clean, warm water and dry immediately to ensure maximum efficiency. Changing the Light...

Use & Care Guide
Page 18
...■ Bin or shelf in death, explosion, or fire. ■ Gaskets dirty or sticky? In the U.S.A., www.whirlpool.com In Canada, www.whirlpool.ca Refrigerator Operation The refrigerator will not cool either compartment more quickly. contraction/expansion of inside walls, especially during the defrost... into the drain pan ■ Creaking/Cracking - Below are difficult to open . If you may run longer than your old model. NOTE: Adjusting the temperature controls to coldest setting will not operate WARNING ■ Sizzling/Gurgling - The refrigerator seems noisy Refrigerator noise...
...■ Bin or shelf in death, explosion, or fire. ■ Gaskets dirty or sticky? In the U.S.A., www.whirlpool.com In Canada, www.whirlpool.ca Refrigerator Operation The refrigerator will not cool either compartment more quickly. contraction/expansion of inside walls, especially during the defrost... into the drain pan ■ Creaking/Cracking - Below are difficult to open . If you may run longer than your old model. NOTE: Adjusting the temperature controls to coldest setting will not operate WARNING ■ Sizzling/Gurgling - The refrigerator seems noisy Refrigerator noise...

Use & Care Guide
Page 19
... not operate properly ■ Refrigerator connected to a water supply and the supply shutoff valve turned on? See "Water Supply Requirements." ■ Water filter installed on model) is leaking from food? If it correctly. ■ Refrigerator door closed completely? Make sure the water dispenser tube connections are hollow or small NOTE: This...
... not operate properly ■ Refrigerator connected to a water supply and the supply shutoff valve turned on? See "Water Supply Requirements." ■ Water filter installed on model) is leaking from food? If it correctly. ■ Refrigerator door closed completely? Make sure the water dispenser tube connections are hollow or small NOTE: This...
Use & Care Guide
Page 21
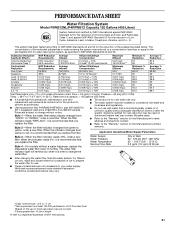
...Class I particle size: >0.5 to When the water filter status display changes from green to "ORDER," order a new filter. Style 4 - For models without adequate disinfection before or after the system. When the filter indicator reads 10%, order a new filter. When the indicator reads 0%, it is... changes from yellow to red, it is for the reduction of the substances listed below. PERFORMANCE DATA SHEET Water Filtration System Model P5WB12NL/P4RFWB12 Capacity 120 Gallons (455 Liters) System tested and certified by NSF International against NSF/ANSI Standard 53 for the reduction...
...Class I particle size: >0.5 to When the water filter status display changes from green to "ORDER," order a new filter. Style 4 - For models without adequate disinfection before or after the system. When the filter indicator reads 10%, order a new filter. When the indicator reads 0%, it is... changes from yellow to red, it is for the reduction of the substances listed below. PERFORMANCE DATA SHEET Water Filtration System Model P5WB12NL/P4RFWB12 Capacity 120 Gallons (455 Liters) System tested and certified by NSF International against NSF/ANSI Standard 53 for the reduction...

Use & Care Guide
Page 22
... and provinces do not allow limitations on major appliances with electrical or plumbing codes, or use of products not approved by Whirlpool. 5. WHIRLPOOL SHALL NOT BE LIABLE FOR INCIDENTAL OR CONSEQUENTIAL DAMAGES. Service must be repaired in your major appliance, unless such damage results... of incidental or consequential damages, so these User Instructions and the model number information for future reference. 22 Have your major appliance is located in a remote area where service by a Whirlpool designated service company. This limited warranty is valid only in the ...
... and provinces do not allow limitations on major appliances with electrical or plumbing codes, or use of products not approved by Whirlpool. 5. WHIRLPOOL SHALL NOT BE LIABLE FOR INCIDENTAL OR CONSEQUENTIAL DAMAGES. Service must be repaired in your major appliance, unless such damage results... of incidental or consequential damages, so these User Instructions and the model number information for future reference. 22 Have your major appliance is located in a remote area where service by a Whirlpool designated service company. This limited warranty is valid only in the ...

Warranty Information
Page 1
...electrical or plumbing codes, or use of your major appliance, to Whirlpool within 30 days from accident, alteration, misuse, abuse, fire, flood, acts of God, improper installation, installation not in your complete model number ready. Service calls to published user or operator instructions and/... If outside the 50 United States and Canada, contact your major appliance, to replace or repair house fuses, or to Whirlpool with original model/serial numbers that existed when this major appliance was purchased. LIMITATION OF REMEDIES; You can write to correct house wiring or ...
...electrical or plumbing codes, or use of your major appliance, to Whirlpool within 30 days from accident, alteration, misuse, abuse, fire, flood, acts of God, improper installation, installation not in your complete model number ready. Service calls to published user or operator instructions and/... If outside the 50 United States and Canada, contact your major appliance, to replace or repair house fuses, or to Whirlpool with original model/serial numbers that existed when this major appliance was purchased. LIMITATION OF REMEDIES; You can write to correct house wiring or ...


