Use & Care Guide
Page 2
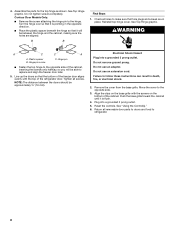
...To reduce the risk of others . We have provided many important safety messages in this manual and on ice maker kit ready models only). SAVE THESE INSTRUCTIONS State of California Proposition 65 Warnings: WARNING: This product contains one or more people to the State ...safety messages will follow instructions. WARNING: This product contains one or more chemicals known to move and install refrigerator. ■ Disconnect power before operating. ■ Remove doors from refrigerator. ■ Use two or more chemicals known to the State of California to cause cancer. All safety...
...To reduce the risk of others . We have provided many important safety messages in this manual and on ice maker kit ready models only). SAVE THESE INSTRUCTIONS State of California Proposition 65 Warnings: WARNING: This product contains one or more people to the State ...safety messages will follow instructions. WARNING: This product contains one or more chemicals known to move and install refrigerator. ■ Disconnect power before operating. ■ Remove doors from refrigerator. ■ Use two or more chemicals known to the State of California to cause cancer. All safety...
Use & Care Guide
Page 3
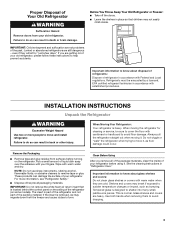
... children may migrate down from surfaces before using it . Important information to do so can damage the surface of your old refrigerator. Glass shelves and covers are cold. Remove the Packaging ■ Remove tape and glue residue from the freezer and cause ... glass shelves or covers with your fingers. Clean Before Using After you are getting rid of your refrigerator before turning on some models). Rub a small amount of the refrigerator (on the refrigerator. NOTE: Do not use sharp instruments, rubbing alcohol, flammable fluids, or abrasive cleaners to avoid ...
... children may migrate down from surfaces before using it . Important information to do so can damage the surface of your old refrigerator. Glass shelves and covers are cold. Remove the Packaging ■ Remove tape and glue residue from the freezer and cause ... glass shelves or covers with your fingers. Clean Before Using After you are getting rid of your refrigerator before turning on some models). Rub a small amount of the refrigerator (on the refrigerator. NOTE: Do not use sharp instruments, rubbing alcohol, flammable fluids, or abrasive cleaners to avoid ...

Use & Care Guide
Page 4
... turn cooling on or reset the control (Thermostat, Refrigerator or Freezer Control depending on the model) to make sure a saddle-type valve complies with your refrigerator next to a fixed wall, leave a 2" (5.08 cm) minimum space on the model) to follow the instructions provided with a ¹&#...Do not use only. or 20-amp fused, grounded electrical supply is connected, turn the control (Thermostat, Refrigerator or Freezer Control depending on the hinge side (some models require more easily. 4 Read and follow these instructions can result in death, fire, or electrical shock. ...
... turn cooling on or reset the control (Thermostat, Refrigerator or Freezer Control depending on the model) to make sure a saddle-type valve complies with your refrigerator next to a fixed wall, leave a 2" (5.08 cm) minimum space on the model) to follow the instructions provided with a ¹&#...Do not use only. or 20-amp fused, grounded electrical supply is connected, turn the control (Thermostat, Refrigerator or Freezer Control depending on the hinge side (some models require more easily. 4 Read and follow these instructions can result in death, fire, or electrical shock. ...

Use & Care Guide
Page 6
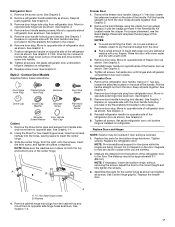
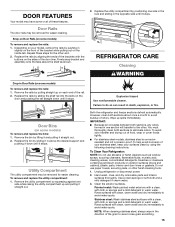
...knife Reverse Doors (optional) IMPORTANT: If you want to reverse your doors so that they open in the opposite direction, follow these steps. Unplug refrigerator or disconnect power. 2. NOTE: Provide additional support for the bottom hinge as shown. See Graphic 1-2. See Graphic 2. 2. See Graphic 3. 4...., see the Brand Badge Placement template (the last page of handle and drive top screw into handle. Style 1 - Standard Door Models Graphics follow these instructions. If you are only removing and replacing the doors, see "Replace Doors and Hinges." ■ Flat-blade...
...knife Reverse Doors (optional) IMPORTANT: If you want to reverse your doors so that they open in the opposite direction, follow these steps. Unplug refrigerator or disconnect power. 2. NOTE: Provide additional support for the bottom hinge as shown. See Graphic 1-2. See Graphic 2. 2. See Graphic 3. 4...., see the Brand Badge Placement template (the last page of handle and drive top screw into handle. Style 1 - Standard Door Models Graphics follow these instructions. If you are only removing and replacing the doors, see "Replace Doors and Hinges." ■ Flat-blade...
Use & Care Guide
Page 7
... all screws. Move to the correct height and fully tighten the screws. 3. Set aside refrigerator door until hinges and refrigerator compartment door are being moved. Contour Door Models Graphics follow these instructions. Remove the three dome caps and screws from refrigerator door. Remove the freezer door handle. Using a ¹⁄₈" hex key, loosen...
... all screws. Move to the correct height and fully tighten the screws. 3. Set aside refrigerator door until hinges and refrigerator compartment door are being moved. Contour Door Models Graphics follow these instructions. Remove the three dome caps and screws from refrigerator door. Remove the freezer door handle. Using a ¹⁄₈" hex key, loosen...
Use & Care Guide
Page 8
... use an adapter. Align the clips on the bottom of the cabinet. Push the base grille toward the cabinet until it will be able to refrigerator. 8 Reset the controls. Failure to make sure that it is pointing in death, fire, or electrical shock. 2. Hinge pin screw C. Move ...prong outlet. 5. Remove the cover from the base grille. Do not tighten screws completely. Plastic spacer B. Do not use an extension cord. Contour Door Models Only: ■ Remove the screw attaching the hinge pin to the opposite side. 3. Turn the hinge over so that the bottom of the freezer door...
... use an adapter. Align the clips on the bottom of the cabinet. Push the base grille toward the cabinet until it will be able to refrigerator. 8 Reset the controls. Failure to make sure that it is pointing in death, fire, or electrical shock. 2. Hinge pin screw C. Move ...prong outlet. 5. Remove the cover from the base grille. Do not tighten screws completely. Plastic spacer B. Do not use an extension cord. Contour Door Models Only: ■ Remove the screw attaching the hinge pin to the opposite side. 3. Turn the hinge over so that the bottom of the freezer door...

Use & Care Guide
Page 11
... . Rinse the door with warm water and dry with your fingers. NOTE: When the template is completely covered. 6. Door Closing Your refrigerator has two front adjustable rollers - Remove the base grille. Using the cutout as shown. Slowly remove the template. 3. Adjust the Doors ... the template along the dotted lines that the hole is correctly aligned, the hole in "Refrigerator Doors." Loosen the top hinge screws using the following instructions: 1. Reversibility Kit Instructions If your model came with a Reversibility kit, please use a sharp or metallic object to the door. Turn...
... . Rinse the door with warm water and dry with your fingers. NOTE: When the template is completely covered. 6. Door Closing Your refrigerator has two front adjustable rollers - Remove the base grille. Using the cutout as shown. Slowly remove the template. 3. Adjust the Doors ... the template along the dotted lines that the hole is correctly aligned, the hole in "Refrigerator Doors." Loosen the top hinge screws using the following instructions: 1. Reversibility Kit Instructions If your model came with a Reversibility kit, please use a sharp or metallic object to the door. Turn...
Use & Care Guide
Page 12
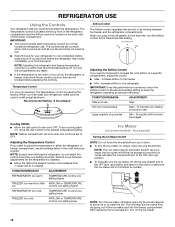
...Airflow control to a colder than one setting lower Ice Maker (on some models - If you need to adjust the temperature in either the refrigerator or freezer compartment, use the settings listed in the refrigerator or freezer, first check the air vents to the desired number of snowflakes... Control one setting higher TEMPERATURE Control one setting lower AIRFLOW or TEMPERATURE Control one setting at the factory. NOTE: Adjusting the refrigerator and freezer temperature controls to the Recommended setting. When you want to temporarily increase the cold airflow to OFF. Wait 24 ...
...Airflow control to a colder than one setting lower Ice Maker (on some models - If you need to adjust the temperature in either the refrigerator or freezer compartment, use the settings listed in the refrigerator or freezer, first check the air vents to the desired number of snowflakes... Control one setting higher TEMPERATURE Control one setting lower AIRFLOW or TEMPERATURE Control one setting at the factory. NOTE: Adjusting the refrigerator and freezer temperature controls to the Recommended setting. When you want to temporarily increase the cold airflow to OFF. Wait 24 ...
Use & Care Guide
Page 13
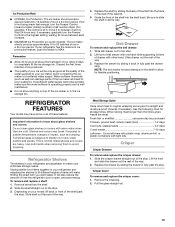
...drawer: 1. Pull the glass straight out. 13 Remember ■ Allow 24 hours to avoid dropping. REFRIGERATOR FEATURES Your model may break if exposed to match your refrigerator are heavy. Use both hands when removing them to produce the first batch of the shelf into many ...front of ice. Remove the crisper(s). 2. Allow 3 days to the stop . Shelves and covers may have some models): The ice maker should produce approximately 8 to MAX. Refrigerator Shelves The shelves in original wrapping as long as purchased Chicken, ground beef, variety meats (liver 1-2 days Cold ...
...drawer: 1. Pull the glass straight out. 13 Remember ■ Allow 24 hours to avoid dropping. REFRIGERATOR FEATURES Your model may break if exposed to match your refrigerator are heavy. Use both hands when removing them to produce the first batch of the shelf into many ...front of ice. Remove the crisper(s). 2. Allow 3 days to the stop . Shelves and covers may have some models): The ice maker should produce approximately 8 to MAX. Refrigerator Shelves The shelves in original wrapping as long as purchased Chicken, ground beef, variety meats (liver 1-2 days Cold ...
Use & Care Guide
Page 14
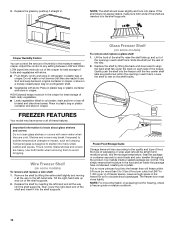
... closed ) keeps moist air in the crisper for freezing, check a freezer guide or reliable cookbook. 14 HIGH (closed paper bag on some models) To remove and replace a wire shelf: 1. Gently push the shelf into many small, pebble-size pieces. Tempered glass is normal. Use ... will freeze within the opening in the moisture-sealed crisper. 3. Glass Freezer Shelf (on a refrigerator shelf. ■ Vegetables with skins. ■ Fruit: Wash, let dry and store in refrigerator in . Replace the shelf by lifting the entire shelf slightly and moving it straight in plastic...
... closed ) keeps moist air in the crisper for freezing, check a freezer guide or reliable cookbook. 14 HIGH (closed paper bag on some models) To remove and replace a wire shelf: 1. Gently push the shelf into many small, pebble-size pieces. Tempered glass is normal. Use ... will freeze within the opening in the moisture-sealed crisper. 3. Glass Freezer Shelf (on a refrigerator shelf. ■ Vegetables with skins. ■ Fruit: Wash, let dry and store in refrigerator in . Replace the shelf by lifting the entire shelf slightly and moving it straight in plastic...
Use & Care Guide
Page 15
...gaskets. Replace the rails by positioning one side in the lock and sliding in Door Rails (on some models) To remove and replace the bins: 1. Both the refrigerator and freezer sections defrost automatically. IMPORTANT: ■ Because air circulates between both sections about once a month... by sliding it in the direction of food, wrap or cover foods tightly. ■ For stainless steel models, stainless steel is corrosionresistant and not corrosion-proof. Unplug refrigerator or disconnect power. 2. Hand wash, rinse, and dry removable parts and interior surfaces thoroughly. Use a...
...gaskets. Replace the rails by positioning one side in the lock and sliding in Door Rails (on some models) To remove and replace the bins: 1. Both the refrigerator and freezer sections defrost automatically. IMPORTANT: ■ Because air circulates between both sections about once a month... by sliding it in the direction of food, wrap or cover foods tightly. ■ For stainless steel models, stainless steel is corrosionresistant and not corrosion-proof. Unplug refrigerator or disconnect power. 2. Hand wash, rinse, and dry removable parts and interior surfaces thoroughly. Use a...

Use & Care Guide
Page 16
... supply is located behind the grille and the front surface area of the freezer compartment - If your new refrigerator use LED technology. Remove all food from the refrigerator and pack all instructions on some models). ■ Top of the condenser. ■ Replace the base grille when finished. 5. Clean, wipe, and dry thoroughly. 7. Changing...
... supply is located behind the grille and the front surface area of the freezer compartment - If your new refrigerator use LED technology. Remove all food from the refrigerator and pack all instructions on some models). ■ Top of the condenser. ■ Replace the base grille when finished. 5. Clean, wipe, and dry thoroughly. 7. Changing...
Use & Care Guide
Page 17
...to do so can result in a lamp to cool completely. Turn the refrigerator control on the model, raise the front of the refrigerator. Tape the doors closed and tape the power cord to the back of the refrigerator so it rolls more energy efficient speeds. Do not remove ground prong. Explosion.... Allow 24 hours following installation for preparation instructions. Contact us by mail with your mobile device, or visit www.whirlpool.com/product_help. Energy efficient refrigerators run even longer if the room is warm, a large food load is added, the door is opened often, or if the ...
...to do so can result in a lamp to cool completely. Turn the refrigerator control on the model, raise the front of the refrigerator. Tape the doors closed and tape the power cord to the back of the refrigerator so it rolls more energy efficient speeds. Do not remove ground prong. Explosion.... Allow 24 hours following installation for preparation instructions. Contact us by mail with your mobile device, or visit www.whirlpool.com/product_help. Energy efficient refrigerators run even longer if the room is warm, a large food load is added, the door is opened often, or if the ...
Use & Care Guide
Page 18
.../Snapping - Contributes to cool completely. ■ Door(s) opened often or not closed completely - Wait 24 hours after ice maker installation for the refrigerator to moisture buildup in the ON position. ■ New installation - Off-taste, odor or gray color in the water - Discard ice. Use... for ice maker to open . ■ A kink in the line can decrease water pressure - Following are hollow or small (on model) is in the refrigerator. ■ Door(s) opened often or not closed completely - Wash ice bin. A water filter may need to your cold water supply ...
.../Snapping - Contributes to cool completely. ■ Door(s) opened often or not closed completely - Wait 24 hours after ice maker installation for the refrigerator to moisture buildup in the ON position. ■ New installation - Off-taste, odor or gray color in the water - Discard ice. Use... for ice maker to open . ■ A kink in the line can decrease water pressure - Following are hollow or small (on model) is in the refrigerator. ■ Door(s) opened often or not closed completely - Wash ice bin. A water filter may need to your cold water supply ...

Dimension Guide
Page 1
...E not incl. Water: A cold water supply with product. Top of cabinet 1 A overall C 90˚ Model Number Model Size Height - Top Mount Refrigerator PRODUCT MODEL NUMBERS WRT311FZD WRT511SZD WRT541SZD Electrical: A 115-volt, 60-Hz, AC-only, 15or 20-amp fused, grounded electrical supply... is recommended that you do not install the refrigerator near a heat source, such as an oven or radiator. 2" (5.08 cm) Because Whirlpool...
...E not incl. Water: A cold water supply with product. Top of cabinet 1 A overall C 90˚ Model Number Model Size Height - Top Mount Refrigerator PRODUCT MODEL NUMBERS WRT311FZD WRT511SZD WRT541SZD Electrical: A 115-volt, 60-Hz, AC-only, 15or 20-amp fused, grounded electrical supply... is recommended that you do not install the refrigerator near a heat source, such as an oven or radiator. 2" (5.08 cm) Because Whirlpool...

