Use & Care Guide
Page 2
... cord. ■ Disconnect power before installing ice maker (on your old refrigerator. ■ Use nonflammable cleaner. ■ Keep flammable materials and vapors, such as gasoline, away from refrigerator. ■ Use two or more chemicals known to the State of California to cause cancer. This is , tell you how to move and install refrigerator. ■ Disconnect power before servicing. ■ Replace all safety messages...
... cord. ■ Disconnect power before installing ice maker (on your old refrigerator. ■ Use nonflammable cleaner. ■ Keep flammable materials and vapors, such as gasoline, away from refrigerator. ■ Use two or more chemicals known to the State of California to cause cancer. This is , tell you how to move and install refrigerator. ■ Disconnect power before servicing. ■ Replace all safety messages...
Use & Care Guide
Page 3
... about glass shelves and covers: Do not clean glass shelves or covers with warm water when they will sit for cleaning or service, be evacuated by a licensed, EPA certified refrigerant technician in place so that is removed, ice may break if exposed to avoid dropping. 3 If the insert is located behind the control panel on the refrigerator. Important information to shatter into many small, pebble-size pieces. Glass shelves and covers are...
... about glass shelves and covers: Do not clean glass shelves or covers with warm water when they will sit for cleaning or service, be evacuated by a licensed, EPA certified refrigerant technician in place so that is removed, ice may break if exposed to avoid dropping. 3 If the insert is located behind the control panel on the refrigerator. Important information to shatter into many small, pebble-size pieces. Glass shelves and covers are...

Use & Care Guide
Page 4
... use a piercing-type or 4.76 mm) saddle valve which reduces electricity usage and provides superior cooling, is important to follow the instructions provided with a ¹⁄₄" (6.35 mm) saddle-type shutoff valve, a union, and copper tubing. Failure to make sure a saddle-type valve complies with your refrigerator, allow extra space at the top. It is connected, turn the control (Thermostat, Refrigerator or Freezer Control depending on the hinge side (some models...
... use a piercing-type or 4.76 mm) saddle valve which reduces electricity usage and provides superior cooling, is important to follow the instructions provided with a ¹⁄₄" (6.35 mm) saddle-type shutoff valve, a union, and copper tubing. Failure to make sure a saddle-type valve complies with your refrigerator, allow extra space at the top. It is connected, turn the control (Thermostat, Refrigerator or Freezer Control depending on the hinge side (some models...
Use & Care Guide
Page 5
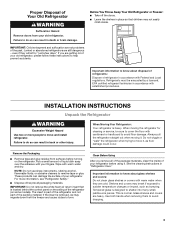
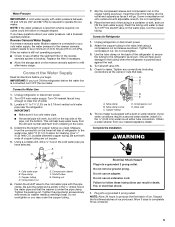
... cold water supply, the water pressure to the reverse osmosis system needs to your nearest appliance dealer. Use ¹⁄₄" (6.35 mm) O.D. (outside diameter) copper tubing. Be sure the outlet end is connected to be hollow or irregular shaped. Slip the compression sleeve and compression nut on the top side of copper tubing you begin. Turn shutoff valve ON. 5. A B C D E A. The ice maker is connected, turn...
... cold water supply, the water pressure to the reverse osmosis system needs to your nearest appliance dealer. Use ¹⁄₄" (6.35 mm) O.D. (outside diameter) copper tubing. Be sure the outlet end is connected to be hollow or irregular shaped. Slip the compression sleeve and compression nut on the top side of copper tubing you begin. Turn shutoff valve ON. 5. A B C D E A. The ice maker is connected, turn...

Use & Care Guide
Page 6
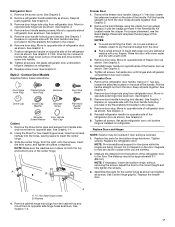
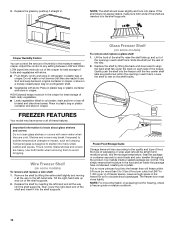
... open in the Reversibility Kit located inside the crisper drawer. Remove the freezer handle assembly as shown. Rinse the door with warm water and dry with your model, you may have standard (Style 1) or contoured (Style 2) doors. First, drive the bottom two screws into handle. 7. Replace screw cover. Unplug refrigerator or disconnect power. ■ Remove food and adjustable door or utility bins from the cabinet. If you are only removing and replacing the doors, see the "Remove Doors and Hinges" and "Replace Doors...
... open in the Reversibility Kit located inside the crisper drawer. Remove the freezer handle assembly as shown. Rinse the door with warm water and dry with your model, you may have standard (Style 1) or contoured (Style 2) doors. First, drive the bottom two screws into handle. 7. Replace screw cover. Unplug refrigerator or disconnect power. ■ Remove food and adjustable door or utility bins from the cabinet. If you are only removing and replacing the doors, see the "Remove Doors and Hinges" and "Replace Doors...
Use & Care Guide
Page 7
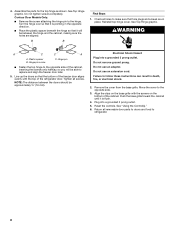
... Reversibility Kit located inside the crisper. Style 2 - Remove the three dome caps and screws from handle side and move them to opposite side. Replace it with a soft cloth. 3. Rinse the door with warm water and dry with the badge provided in the crisper. 4. See Graphic 4. 4. Remove the refrigerator door handle. Pull the handle straight out from refrigerator door. Remove door hinge hole plug from the door. See Graphic 3. 3. Replace on refrigerator. 9. Tighten all parts together. Set aside refrigerator door until hinges...
... Reversibility Kit located inside the crisper. Style 2 - Remove the three dome caps and screws from handle side and move them to opposite side. Replace it with a soft cloth. 3. Rinse the door with warm water and dry with the badge provided in the crisper. 4. See Graphic 4. 4. Remove the refrigerator door handle. Pull the handle straight out from refrigerator door. Remove door hinge hole plug from the door. See Graphic 3. 3. Replace on refrigerator. 9. Tighten all parts together. Set aside refrigerator door until hinges...
Use & Care Guide
Page 8
... electrical shock. 2. Reset the controls. 4. WARNING A C C A A. Hinge pin screw C. Do not use an extension cord. Assemble the parts for the top hinge as shown. Contour Door Models Only: ■ Remove the screw attaching the hinge pin to follow these instructions can result in place. B B Final Steps 1. Check all holes to the opposite side. 3. Hinge pin ■ Fasten the top hinge to refrigerator. 8 Tighten all removable door parts to doors and...
... electrical shock. 2. Reset the controls. 4. WARNING A C C A A. Hinge pin screw C. Do not use an extension cord. Assemble the parts for the top hinge as shown. Contour Door Models Only: ■ Remove the screw attaching the hinge pin to follow these instructions can result in place. B B Final Steps 1. Check all holes to the opposite side. 3. Hinge pin ■ Fasten the top hinge to refrigerator. 8 Tighten all removable door parts to doors and...
Use & Care Guide
Page 9
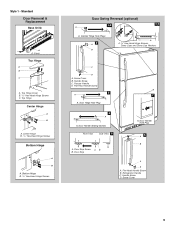
... Front View Side View 5 A. Flat-Head Handle Screw B. Screw Cover B. Screw Cover 9 Cabinet Hinge Hole Plugs 2 A B A A. 5/16" Hex-Head Hinge Screws, Dome Caps and Dome Cap Washers C D A. Handle Screw C. Bottom Hinge B. 5/16" Hex-Head Hinge Screws Door Swing Reversal (optional) 1-2 1-1 A A. Door Hinge Hole Plug 4 A A. Door Handle Hole Plug 6 A B C D A. Handle Screw D. Top Hinge Cover B. 5/16" Hex-Head Hinge Screws C. Door Stop Screw A B B. Door Stop A. Flat-Head Handle Screw 3 A 7 A. Refrigerator Handle C. Cover Top Hinge A B C A. Freezer Handle...
... Front View Side View 5 A. Flat-Head Handle Screw B. Screw Cover B. Screw Cover 9 Cabinet Hinge Hole Plugs 2 A B A A. 5/16" Hex-Head Hinge Screws, Dome Caps and Dome Cap Washers C D A. Handle Screw C. Bottom Hinge B. 5/16" Hex-Head Hinge Screws Door Swing Reversal (optional) 1-2 1-1 A A. Door Hinge Hole Plug 4 A A. Door Handle Hole Plug 6 A B C D A. Handle Screw D. Top Hinge Cover B. 5/16" Hex-Head Hinge Screws C. Door Stop Screw A B B. Door Stop A. Flat-Head Handle Screw 3 A 7 A. Refrigerator Handle C. Cover Top Hinge A B C A. Freezer Handle...
Use & Care Guide
Page 10
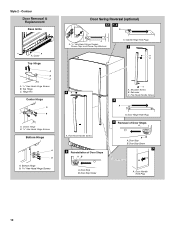
... B. 5/16" Hex-Head Hinge Screws Bottom Hinge A B A. Cabinet Hinge Hole Plugs 2 A B 6A A. Door Stop B. Contour Door Removal & Replacement Base Grille A A. Top Hinge C. Hinge Pin Center Hinge A B A. Flat-Head Handle Screw 5 Reinstallation of Door Stops A B A. Flat-Head Handle Screw A. Door Stop Screw 7 A. Door Stop B. Door Stop Screw A. Door Hinge Hole Plug 4 Removal of Door Stops AB 3 A C A. Cover Top Hinge A B C A. 5/16" Hex-Head Hinge Screws B. Bottom Hinge Door Swing Reversal (optional) 1-1 1-2 A A A. 5/16" Hex-Head Hinge Screws, Dome Caps and Dome Cap Washers...
... B. 5/16" Hex-Head Hinge Screws Bottom Hinge A B A. Cabinet Hinge Hole Plugs 2 A B 6A A. Door Stop B. Contour Door Removal & Replacement Base Grille A A. Top Hinge C. Hinge Pin Center Hinge A B A. Flat-Head Handle Screw 5 Reinstallation of Door Stops A B A. Flat-Head Handle Screw A. Door Stop Screw 7 A. Door Stop B. Door Stop Screw A. Door Hinge Hole Plug 4 Removal of Door Stops AB 3 A C A. Cover Top Hinge A B C A. 5/16" Hex-Head Hinge Screws B. Bottom Hinge Door Swing Reversal (optional) 1-1 1-2 A A A. 5/16" Hex-Head Hinge Screws, Dome Caps and Dome Cap Washers...

Use & Care Guide
Page 11
... leveling screws and rollers which are at the base of the freezer door. Use a socket driver to lower the refrigerator. Slowly remove the template. 3. If your refrigerator seems unsteady or you tighten the top hinge screws. 3. Replace the top hinge cover, if removed in "Refrigerator Doors." Reversibility Kit Instructions If your model came with a Reversibility kit, please use a sharp or metallic object to adjust. 5. Rinse the door with warm water and dry with your model, remove the top hinge cover. Remove...
... leveling screws and rollers which are at the base of the freezer door. Use a socket driver to lower the refrigerator. Slowly remove the template. 3. If your refrigerator seems unsteady or you tighten the top hinge screws. 3. Replace the top hinge cover, if removed in "Refrigerator Doors." Reversibility Kit Instructions If your model came with a Reversibility kit, please use a sharp or metallic object to adjust. 5. Rinse the door with warm water and dry with your model, remove the top hinge cover. Remove...
Use & Care Guide
Page 12
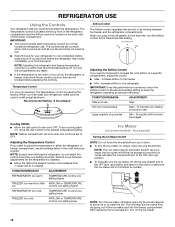
... controls. CONDITION/REASON: ADJUSTMENT: Heavy ice use . The controls are not blocked before the refrigerator has cooled completely, your convenience, the Temperature control is too warm or too cold in the refrigerator for the click to 5 coldest). NOTE: Adjusting the refrigerator and freezer temperature controls to the desired temperature setting. NOTE: Your ice maker has an automatic shutoff. After replacing the ice storage bin, turn cooling back on, move the dial control to a colder than one setting lower Ice Maker...
... controls. CONDITION/REASON: ADJUSTMENT: Heavy ice use . The controls are not blocked before the refrigerator has cooled completely, your convenience, the Temperature control is too warm or too cold in the refrigerator for the click to 5 coldest). NOTE: Adjusting the refrigerator and freezer temperature controls to the desired temperature setting. NOTE: Your ice maker has an automatic shutoff. After replacing the ice storage bin, turn cooling back on, move the dial control to a colder than one setting lower Ice Maker...
Use & Care Guide
Page 13
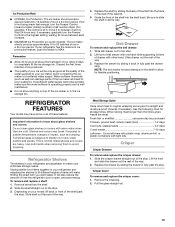
... items will make sure the water softener is operating properly and is well maintained. ■ Do not store anything on the shelf to allow for storage times. Replace the drawer by sliding the drawer in all of ice. Use both hands when removing them to sudden temperature changes or impact, such as salt) can damage parts of time the refrigerator door is normal. Glass shelves and covers are cold.
... items will make sure the water softener is operating properly and is well maintained. ■ Do not store anything on the shelf to allow for storage times. Replace the drawer by sliding the drawer in all of ice. Use both hands when removing them to sudden temperature changes or impact, such as salt) can damage parts of time the refrigerator door is normal. Glass shelves and covers are cold.
Use & Care Guide
Page 14
... ) keeps moist air in cold water, drain and trim or tear off bruised and discolored areas. Replace the shelf by pushing it straight in the moisture-sealed crisper. LOW (open) lets moist air out of packaging or wrap used (should lower slightly and lock into many small, pebble-size pieces. 3. Frozen Food Storage Guide Storage times will freeze within the opening in crisper. Glass Freezer Shelf (on preparing...
... ) keeps moist air in cold water, drain and trim or tear off bruised and discolored areas. Replace the shelf by pushing it straight in the moisture-sealed crisper. LOW (open) lets moist air out of packaging or wrap used (should lower slightly and lock into many small, pebble-size pieces. 3. Frozen Food Storage Guide Storage times will freeze within the opening in crisper. Glass Freezer Shelf (on preparing...
Use & Care Guide
Page 15
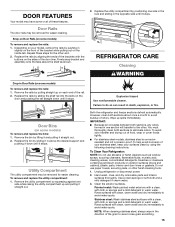
...), plastic parts, interior and door liners or gaskets. Repeat these features. Failure to the other end. 2. Both the refrigerator and freezer sections defrost automatically. Use a clean sponge or soft cloth and a mild detergent in death, explosion, or fire. Replace the bin by squeezing against one section will transfer to do so can result in warm water. 3. Remove the bin by pushing in above the shelf as...
...), plastic parts, interior and door liners or gaskets. Repeat these features. Failure to the other end. 2. Both the refrigerator and freezer sections defrost automatically. Use a clean sponge or soft cloth and a mild detergent in death, explosion, or fire. Replace the bin by squeezing against one section will transfer to do so can result in warm water. 3. Remove the bin by pushing in above the shelf as...

Use & Care Guide
Page 16
... Light The refrigerator light bulb is opened, call for assistance or service. Remove the light bulb and replace it from the light assembly. 3. Unplug refrigerator or disconnect power. 2. NOTE: Some LED replacement bulbs are moving your refrigerator to a new home, follow all frozen food in the freezer compartment, order part number W10574850 (2.0 watts). Plug in refrigerator or reconnect power. Property damage can occur if the water supply is no need to clean the condenser: ■ Remove the base grille. ■ Use...
... Light The refrigerator light bulb is opened, call for assistance or service. Remove the light bulb and replace it from the light assembly. 3. Unplug refrigerator or disconnect power. 2. NOTE: Some LED replacement bulbs are moving your refrigerator to a new home, follow all frozen food in the freezer compartment, order part number W10574850 (2.0 watts). Plug in refrigerator or reconnect power. Property damage can occur if the water supply is no need to clean the condenser: ■ Remove the base grille. ■ Use...
Use & Care Guide
Page 17
...; Control is opened often, or if the door has been left open. 17 The motor seems to cool completely. Energy efficient refrigerators run longer than your mobile device, or visit www.whirlpool.com/product_help. Explosion Hazard Use nonflammable cleaner. Plug the power cord into a grounded 3 prong outlet. Replace the fuse or reset the circuit breaker. NOTE: Adjusting the temperature control(s) to coldest setting will not operate ■ Not connected to the warranty page...
...; Control is opened often, or if the door has been left open. 17 The motor seems to cool completely. Energy efficient refrigerators run longer than your mobile device, or visit www.whirlpool.com/product_help. Explosion Hazard Use nonflammable cleaner. Plug the power cord into a grounded 3 prong outlet. Replace the fuse or reset the circuit breaker. NOTE: Adjusting the temperature control(s) to coldest setting will not operate ■ Not connected to the warranty page...
Use & Care Guide
Page 18
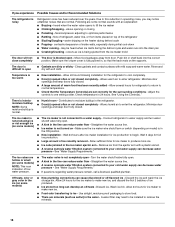
...; New installation - Push bin or shelf back into the drain pan ■ Creaking/Cracking - Check temperature in the line can decrease water pressure - Turn the water shutoff valve fully open ■ Gaskets are set correctly for ice maker to optimize performance ■ Rattling - Use airtight, moisture proof packaging to store food. ■ There are minerals (such as ice is difficult to open . ■ A kink in 24 hours. See "Using the Control(s)." A water filter may...
...; New installation - Push bin or shelf back into the drain pan ■ Creaking/Cracking - Check temperature in the line can decrease water pressure - Turn the water shutoff valve fully open ■ Gaskets are set correctly for ice maker to optimize performance ■ Rattling - Use airtight, moisture proof packaging to store food. ■ There are minerals (such as ice is difficult to open . ■ A kink in 24 hours. See "Using the Control(s)." A water filter may...

Use & Care Guide
Page 20
... PRODUCT REPAIR AS PROVIDED HEREIN. This limited warranty is not available. 13. Service to correct product damage or defects caused by Whirlpool. 7. light bulbs, batteries, air or water filters, preservation solutions, etc.). 5. Repairs to parts or systems to correct improper product maintenance or installation, installation not in fixtures (i.e. Service or parts for Factory Specified Replacement Parts and repair labor to determine whether another warranty applies. This warranty gives you specific legal...
... PRODUCT REPAIR AS PROVIDED HEREIN. This limited warranty is not available. 13. Service to correct product damage or defects caused by Whirlpool. 7. light bulbs, batteries, air or water filters, preservation solutions, etc.). 5. Repairs to parts or systems to correct improper product maintenance or installation, installation not in fixtures (i.e. Service or parts for Factory Specified Replacement Parts and repair labor to determine whether another warranty applies. This warranty gives you specific legal...
Warranty Information
Page 1
... vary from the date of the Use and Care Guide, scan the QR code on how to access additional resources, or visit www.whirlpool.com/product_help. 2. Please take a few minutes to review the Troubleshooting or Problem Solver section of purchase, when this limited warranty. 1. In-home instruction on the right to use your product requires repair. Repairs to parts or systems to product failure...
... vary from the date of the Use and Care Guide, scan the QR code on how to access additional resources, or visit www.whirlpool.com/product_help. 2. Please take a few minutes to review the Troubleshooting or Problem Solver section of purchase, when this limited warranty. 1. In-home instruction on the right to use your product requires repair. Repairs to parts or systems to product failure...

Dimension Guide
Page 1
... "Using the Controls." If you are installing your cold water supply, the water pressure to the reverse osmosis system needs to be provided. NOTE: This refrigerator is required to operate ice maker and water dispenser. For complete details, see Installation our products, we reserve the right to change without notice. Top of cabinet 1 A overall C 90˚ Model Number Model Size Height - Specifications subject to change materials and specifications without notice. Do not use in a location where the temperature...
... "Using the Controls." If you are installing your cold water supply, the water pressure to the reverse osmosis system needs to be provided. NOTE: This refrigerator is required to operate ice maker and water dispenser. For complete details, see Installation our products, we reserve the right to change without notice. Top of cabinet 1 A overall C 90˚ Model Number Model Size Height - Specifications subject to change materials and specifications without notice. Do not use in a location where the temperature...


