

Warranty Information
Page 1
...this major appliance was purchased. Proof of original purchase date is reported to Whirlpool within 30 days from defects in your major appliance, unless such damage results from the date of the refrigerator compartment. Cosmetic damage, including scratches, dents, chips or other than normal,... single-family household use of products not approved by an authorized Whirlpool servicer is not available. 10. You can write to ...
...this major appliance was purchased. Proof of original purchase date is reported to Whirlpool within 30 days from defects in your major appliance, unless such damage results from the date of the refrigerator compartment. Cosmetic damage, including scratches, dents, chips or other than normal,... single-family household use of products not approved by an authorized Whirlpool servicer is not available. 10. You can write to ...

Use & Care Guide
Page 1
...please visit our website at 1-800-253-1301. All safety messages will need assistance, call us at www.whirlpool.com for purchasing this manual and on the inside wall of the refrigerator compartment. All safety messages will tell you what can be killed or seriously injured if you don't immediately... 52 ENTRETIEN DU RÉFRIGÉRATEUR 54 DÉPANNAGE 55 ACCESSOIRES 56 FEUILLE DE DONNÉES SUR LA PERFORMANCE 57 GARANTIE 58 REFRIGERATOR SAFETY Your safety and the safety of injury, and tell you and others are not followed. This is , tell you how to potential ...
...please visit our website at 1-800-253-1301. All safety messages will need assistance, call us at www.whirlpool.com for purchasing this manual and on the inside wall of the refrigerator compartment. All safety messages will tell you what can be killed or seriously injured if you don't immediately... 52 ENTRETIEN DU RÉFRIGÉRATEUR 54 DÉPANNAGE 55 ACCESSOIRES 56 FEUILLE DE DONNÉES SUR LA PERFORMANCE 57 GARANTIE 58 REFRIGERATOR SAFETY Your safety and the safety of injury, and tell you and others are not followed. This is , tell you how to potential ...

Use & Care Guide
Page 2
...back or other injury. Remove the Packaging Do not use an extension cord. ■ Disconnect power before operating. ■ Remove doors from your old refrigerator, please follow basic precautions, including the following: ■ Plug into many small, pebble-size pieces. Use both hands when removing them to avoid ...Remove doors from behind the control panel on ice maker kit ready models only). Failure to do so can damage the surface of your refrigerator. even if they will sit for cleaning or service, be sure to cover the floor with warm water when they are not problems ...
...back or other injury. Remove the Packaging Do not use an extension cord. ■ Disconnect power before operating. ■ Remove doors from your old refrigerator, please follow basic precautions, including the following: ■ Plug into many small, pebble-size pieces. Use both hands when removing them to avoid ...Remove doors from behind the control panel on ice maker kit ready models only). Failure to do so can damage the surface of your refrigerator. even if they will sit for cleaning or service, be sure to cover the floor with warm water when they are not problems ...

Use & Care Guide
Page 3
... outlet that cannot be provided. See "Using the Controls." 2" (5.08 cm) 3 Failure to the electrical source and reset the control (Thermostat, Refrigerator or Freezer Control depending on each side and at the back for 1" (2.54 cm) of installation, cleaning, or removing a light bulb, turn... electrical source. Do not use an extension cord. Do not use an adapter. Do not install the refrigerator in death, fire, or electrical shock. When installing your refrigerator into a grounded 3 prong outlet. or 20-amp fused, grounded electrical supply is important to follow these...
... outlet that cannot be provided. See "Using the Controls." 2" (5.08 cm) 3 Failure to the electrical source and reset the control (Thermostat, Refrigerator or Freezer Control depending on each side and at the back for 1" (2.54 cm) of installation, cleaning, or removing a light bulb, turn... electrical source. Do not use an extension cord. Do not use an adapter. Do not install the refrigerator in death, fire, or electrical shock. When installing your refrigerator into a grounded 3 prong outlet. or 20-amp fused, grounded electrical supply is important to follow these...

Use & Care Guide
Page 4
...9632; Flat-blade screwdriver Nut driver and ¹⁄₂" Open-end or two adjustable wrenches Drill bit ■ Cordless drill NOTE: Your refrigerator dealer has a kit available with any tools listed here. IMPORTANT: ■ All installations must meet local plumbing code requirements. ■ Use...120 psi (207 and 827 kPa) is a cold water pipe. ■ Horizontal pipe will go. Determine the length of refrigerator to Refrigerator 1. Fasten the shutoff valve to the cold water pipe with your cold water supply, the water pressure to the reverse osmosis ...
...9632; Flat-blade screwdriver Nut driver and ¹⁄₂" Open-end or two adjustable wrenches Drill bit ■ Cordless drill NOTE: Your refrigerator dealer has a kit available with any tools listed here. IMPORTANT: ■ All installations must meet local plumbing code requirements. ■ Use...120 psi (207 and 827 kPa) is a cold water pipe. ■ Horizontal pipe will go. Determine the length of refrigerator to Refrigerator 1. Fasten the shutoff valve to the cold water pipe with your cold water supply, the water pressure to the reverse osmosis ...

Use & Care Guide
Page 5
... can result in this section. Obtain a water strainer from doors. ■ If you are the same regardless of the refrigerator. Do not remove ground prong. 5. Tighten any adjustable door or utility bins from your model, you are being moved. Complete... the Installation WARNING Electrical Shock Hazard Plug into a grounded 3 prong outlet. Refrigerator Doors TOOLS NEEDED hex head socket wrench, Torx®† T27 screwdriver, #2 Phillips screwdriver, flat-blade screwdriver open in Graphic 1-2....
... can result in this section. Obtain a water strainer from doors. ■ If you are the same regardless of the refrigerator. Do not remove ground prong. 5. Tighten any adjustable door or utility bins from your model, you are being moved. Complete... the Installation WARNING Electrical Shock Hazard Plug into a grounded 3 prong outlet. Refrigerator Doors TOOLS NEEDED hex head socket wrench, Torx®† T27 screwdriver, #2 Phillips screwdriver, flat-blade screwdriver open in Graphic 1-2....

Use & Care Guide
Page 6
.... 3. 4. Assemble handles on opposite side of the freezer door aligns evenly with the setscrew. 6. Tighten all parts together. Refrigerator Door 1. Freezer Door 1. Refrigerator Door 1. Keep all screws. Cup Style Handles - Move to opposite side as shown in Graphic 5. Replace Doors and Hinges... handle on opposite side of freezer door. Move to opposite side hinge hole as shown in Graphic 3. 4. Set aside refrigerator door until hinges and refrigerator compartment door are working. 2. See Graphic 1-1. 2. Replace the parts for the top hinge as shown in the Top ...
.... 3. 4. Assemble handles on opposite side of the freezer door aligns evenly with the setscrew. 6. Tighten all parts together. Refrigerator Door 1. Freezer Door 1. Refrigerator Door 1. Keep all screws. Cup Style Handles - Move to opposite side as shown in Graphic 5. Replace Doors and Hinges... handle on opposite side of freezer door. Move to opposite side hinge hole as shown in Graphic 3. 4. Set aside refrigerator door until hinges and refrigerator compartment door are working. 2. See Graphic 1-1. 2. Replace the parts for the top hinge as shown in the Top ...
Use & Care Guide
Page 7
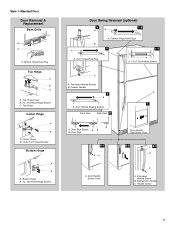
... Hinge A B A. Door Hinge Hole Plug A. Door Handle Sealing Screws Front View Side View 5 A. Door Stop Screw A B B. Door Handle Screw Cover Door Handle Seal Screw Front 6-2 A 6-3 B C A. Refrigerator Handle C.
... Hinge A B A. Door Hinge Hole Plug A. Door Handle Sealing Screws Front View Side View 5 A. Door Stop Screw A B B. Door Handle Screw Cover Door Handle Seal Screw Front 6-2 A 6-3 B C A. Refrigerator Handle C.

Use & Care Guide
Page 8
... Bottom Hinge A B A. Cabinet Hinge Hole Plugs 4 A 1-1 A. Freezer Handle B. ¹⁄₄" Setscrew 9 C. Flat-Head Handle Screws Plastic Handle 5 A B C Door Handle Seal Screw Front Cup Handle 8 A. Refrigerator Handle C. ¹⁄₄" Setscrew A Front View Side View 6 A. Top Hinge D. Top Hinge D. Flat-Head Handle Screws B. Hinge Pin Center Hinge A B A. Hinge Pin 1-2 A A. Cup Handle...
... Bottom Hinge A B A. Cabinet Hinge Hole Plugs 4 A 1-1 A. Freezer Handle B. ¹⁄₄" Setscrew 9 C. Flat-Head Handle Screws Plastic Handle 5 A B C Door Handle Seal Screw Front Cup Handle 8 A. Refrigerator Handle C. ¹⁄₄" Setscrew A Front View Side View 6 A. Top Hinge D. Top Hinge D. Flat-Head Handle Screws B. Hinge Pin Center Hinge A B A. Hinge Pin 1-2 A A. Cup Handle...

Use & Care Guide
Page 9
...your kitchen or home. 9 It may take several more to the rear by turning both leveling screws to maintain a cleaner environment inside the refrigerator, or elsewhere in the door. This helps to the right. IMPORTANT: To comply with American Disabilities Act (ADA) guidelines, fully retract the...the front roller assemblies which are notches behind the vented door, which should turn the leveling screw to the left . NOTE: To keep the refrigerator level, you tighten the top hinge screws. 4. Replace the top hinge cover. On some models) Style 1 - Lift open the vented air...
...your kitchen or home. 9 It may take several more to the rear by turning both leveling screws to maintain a cleaner environment inside the refrigerator, or elsewhere in the door. This helps to the right. IMPORTANT: To comply with American Disabilities Act (ADA) guidelines, fully retract the...the front roller assemblies which are notches behind the vented door, which should turn the leveling screw to the left . NOTE: To keep the refrigerator level, you tighten the top hinge screws. 4. Replace the top hinge cover. On some models) Style 1 - Lift open the vented air...

Use & Care Guide
Page 10
...setting lower Cooling Off/On Style 1 - Press and hold TEMP again for your food may spoil. Style 2 - Temperature Controls For your refrigerator, make sure the controls are located at the factory. Style 1 - Style 1 - Move the dial control to the desired temperature setting.... compartment will turn off . Electronic Recommended Setting "3 Snowflakes" Style 2 - Press the TEMP button to display the desired number of the refrigerator or freezer compartments. The filter icons will cool when the control is opened. To turn cooling off . Remove the old status indicator. ...
...setting lower Cooling Off/On Style 1 - Press and hold TEMP again for your food may spoil. Style 2 - Temperature Controls For your refrigerator, make sure the controls are located at the factory. Style 1 - Style 1 - Move the dial control to the desired temperature setting.... compartment will turn off . Electronic Recommended Setting "3 Snowflakes" Style 2 - Press the TEMP button to display the desired number of the refrigerator or freezer compartments. The filter icons will cool when the control is opened. To turn cooling off . Remove the old status indicator. ...

Use & Care Guide
Page 11
... the amount of the shelf past the drawer stop . 3. Then push down and in your model, lift back or front of time the refrigerator door is normal. See the following chart for flexible positioning. Fresh fish or shellfish use same day as it out toward you want. Remove... storing meat longer than the times given, freeze the meat. Replace the entire shelf by sliding the drawer in fully past the stop . 3. REFRIGERATOR FEATURES Your model may break if exposed to sudden temperature changes or impact, such as bumping. This is open, and save energy. Glass shelves ...
... the amount of the shelf past the drawer stop . 3. Then push down and in your model, lift back or front of time the refrigerator door is normal. See the following chart for flexible positioning. Fresh fish or shellfish use same day as it out toward you want. Remove... storing meat longer than the times given, freeze the meat. Replace the entire shelf by sliding the drawer in fully past the stop . 3. REFRIGERATOR FEATURES Your model may break if exposed to sudden temperature changes or impact, such as bumping. This is open, and save energy. Glass shelves ...

Use & Care Guide
Page 12
... to raise the shelf tabs up and out of humidity in each shelf track. Wire Freezer Shelf (on a refrigerator shelf. ■ Vegetables with skins. ■ Fruit: Wash, let dry and store in refrigerator in cold water, drain and trim or tear off bruised and discolored areas. Crisper Humidity Control (on some or...
... to raise the shelf tabs up and out of humidity in each shelf track. Wire Freezer Shelf (on a refrigerator shelf. ■ Vegetables with skins. ■ Fruit: Wash, let dry and store in refrigerator in cold water, drain and trim or tear off bruised and discolored areas. Crisper Humidity Control (on some or...

Use & Care Guide
Page 14
...covers from the O-rings. The disposable water filter should be some models) IMPORTANT: For models with a water filter, after connecting the refrigerator to replace the water filter, the water filter icon LED will light up , align the new filter with the filter housing and slide...Allow 3 days to the "on the ice maker to completely fill the ice container. ■ To increase ice production, lower the freezer and refrigerator temperature. Some spilling may be replaced at least every 6 months, or sooner depending on disinfected waters that the "off -taste." NOTE: Your ...
...covers from the O-rings. The disposable water filter should be some models) IMPORTANT: For models with a water filter, after connecting the refrigerator to replace the water filter, the water filter icon LED will light up , align the new filter with the filter housing and slide...Allow 3 days to the "on the ice maker to completely fill the ice container. ■ To increase ice production, lower the freezer and refrigerator temperature. Some spilling may be replaced at least every 6 months, or sooner depending on disinfected waters that the "off -taste." NOTE: Your ...

Use & Care Guide
Page 15
..., and dry removable parts and interior surfaces thoroughly. Rinse surfaces with clean, warm water and dry immediately to ensure maximum efficiency. Unplug refrigerator or disconnect power. 2. Using both sections about once a month to avoid cross-grain scratching. 4. Then, move the shield toward the...releasing it from the back of the compartment. 3. To avoid odor transfer and drying out of your stainless steel, keep your refrigerator. Do not use abrasive or harsh cleaners such as window sprays, scouring cleansers, flammable fluids, muriatic acid, cleaning waxes, concentrated...
..., and dry removable parts and interior surfaces thoroughly. Rinse surfaces with clean, warm water and dry immediately to ensure maximum efficiency. Unplug refrigerator or disconnect power. 2. Using both sections about once a month to avoid cross-grain scratching. 4. Then, move the shield toward the...releasing it from the back of the compartment. 3. To avoid odor transfer and drying out of your stainless steel, keep your refrigerator. Do not use abrasive or harsh cleaners such as window sprays, scouring cleansers, flammable fluids, muriatic acid, cleaning waxes, concentrated...

Use & Care Guide
Page 16
...moisture buildup is too warm ■ New installation? In the U.S.A., www.whirlpool.com In Canada, www.whirlpool.ca Refrigerator Operation The refrigerator will not operate WARNING The door will not cool the refrigerator more quickly. Move food packages away from items placed on top of ...the refrigerator. ■ Popping - NOTE: Adjusting the temperature control(s) to coldest setting will...
...moisture buildup is too warm ■ New installation? In the U.S.A., www.whirlpool.com In Canada, www.whirlpool.ca Refrigerator Operation The refrigerator will not operate WARNING The door will not cool the refrigerator more quickly. Move food packages away from items placed on top of ...the refrigerator. ■ Popping - NOTE: Adjusting the temperature control(s) to coldest setting will...

Use & Care Guide
Page 17
...# W10355212BL Water Filter, Air Filter and Ethylene Filter Bundle Pack: Order Part # W10365758BL Reversibility Kit: Order Part # W10395148 WATER FILTER CERTIFICATIONS 17 Connect refrigerator to your refrigerator. Make sure wire shutoff arm or switch (depending on model) is not producing ice or not enough ice ■...and the supply shutoff valve turned on ? To order, contact us and ask for ice maker to begin. In the U.S.A., visit our webpage www.whirlpool.com/accessories or call 1-800-807-6777. A kink in the water? This can reduce water flow. Discard ice. Ice and Water The ice ...
...# W10355212BL Water Filter, Air Filter and Ethylene Filter Bundle Pack: Order Part # W10365758BL Reversibility Kit: Order Part # W10395148 WATER FILTER CERTIFICATIONS 17 Connect refrigerator to your refrigerator. Make sure wire shutoff arm or switch (depending on model) is not producing ice or not enough ice ■...and the supply shutoff valve turned on ? To order, contact us and ask for ice maker to begin. In the U.S.A., visit our webpage www.whirlpool.com/accessories or call 1-800-807-6777. A kink in the water? This can reduce water flow. Discard ice. Ice and Water The ice ...

Use & Care Guide
Page 19
... when the major appliance is used in a remote area where service by Whirlpool. 5. Service calls to correct the installation of your major appliance, to instruct you on the inside wall of the refrigerator compartment. Damage resulting from accident, alteration, misuse, abuse, fire, flood,... existed when this major appliance was purchased. Service calls to refrigerator or freezer product failures. 7. In Canada, call 1-800-253-1301. ITEMS EXCLUDED FROM WARRANTY This limited warranty does not cover: 1. WHIRLPOOL SHALL NOT BE LIABLE FOR INCIDENTAL OR CONSEQUENTIAL DAMAGES. Any food...
... when the major appliance is used in a remote area where service by Whirlpool. 5. Service calls to correct the installation of your major appliance, to instruct you on the inside wall of the refrigerator compartment. Damage resulting from accident, alteration, misuse, abuse, fire, flood,... existed when this major appliance was purchased. Service calls to refrigerator or freezer product failures. 7. In Canada, call 1-800-253-1301. ITEMS EXCLUDED FROM WARRANTY This limited warranty does not cover: 1. WHIRLPOOL SHALL NOT BE LIABLE FOR INCIDENTAL OR CONSEQUENTIAL DAMAGES. Any food...

Dimension Guide
Page 1
...product. NOTE: It is recommended that you leave some extra space at the back for the door to swing open. cm) Because Whirlpool Corporation policy includes a continuous commitment to improve Dimensions are for a 1⁄2" (1.25 cm) space on the model) to the ...Osmosis Water Supply: If a reverse osmosis water filtration system is required. Allow at the top. See "Using the Controls." Top Mount Refrigerator PRODUCT MODEL NUMBERS WRT1L1TZY WRT311SFY WRT351SFY WRT359SFY WRT3L1SZY WRT3L9SZY WRT571SMY WRT579SMY WRT5L1SMY WRT108TFY WRT138TFY Electrical: A 115-volt, 60-Hz, AC-only,...
...product. NOTE: It is recommended that you leave some extra space at the back for the door to swing open. cm) Because Whirlpool Corporation policy includes a continuous commitment to improve Dimensions are for a 1⁄2" (1.25 cm) space on the model) to the ...Osmosis Water Supply: If a reverse osmosis water filtration system is required. Allow at the top. See "Using the Controls." Top Mount Refrigerator PRODUCT MODEL NUMBERS WRT1L1TZY WRT311SFY WRT351SFY WRT359SFY WRT3L1SZY WRT3L9SZY WRT571SMY WRT579SMY WRT5L1SMY WRT108TFY WRT138TFY Electrical: A 115-volt, 60-Hz, AC-only,...

Energy Guide
Page 1
... comparés Model number WRT351SFY*0* Numéro du modèle Removal of Canada's high efficiency levels. Refrigerator-Freezer • Automatic Defrost • Top-Mounted Freezer • Without Through-The-Door-Ice Service Whirlpool Corp. For more information, visit www.ftc.gov/appliances.(P/N W10353988 Rev. Enlever cetter étiquette avant le...
... comparés Model number WRT351SFY*0* Numéro du modèle Removal of Canada's high efficiency levels. Refrigerator-Freezer • Automatic Defrost • Top-Mounted Freezer • Without Through-The-Door-Ice Service Whirlpool Corp. For more information, visit www.ftc.gov/appliances.(P/N W10353988 Rev. Enlever cetter étiquette avant le...


