
Dimension Guide
Page 1
...about your model) to a fixed wall, leave 31⁄8" (8 cm) minimum on the hinge side (depending on the model) to operate ice maker and water dispenser. Door Top of cabinet 1 A overall C 90˚ Model Reversible Size Door Height Overall "A" Height - NOTE: This ...refrigerator is recommended that you leave some extra space at the top. Depth - It is intended for use an extension cord. Because Whirlpool Corporation policy includes a continuous commitment to a maximum of 55°F (13°C) to improve Dimensions are for planning purposes only. Do...
...about your model) to a fixed wall, leave 31⁄8" (8 cm) minimum on the hinge side (depending on the model) to operate ice maker and water dispenser. Door Top of cabinet 1 A overall C 90˚ Model Reversible Size Door Height Overall "A" Height - NOTE: This ...refrigerator is recommended that you leave some extra space at the top. Depth - It is intended for use an extension cord. Because Whirlpool Corporation policy includes a continuous commitment to a maximum of 55°F (13°C) to improve Dimensions are for planning purposes only. Do...
Use & Care Guide
Page 2
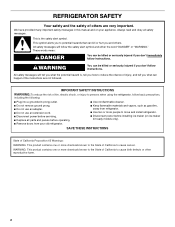
... not remove ground prong. ■ Do not use an adapter. ■ Do not use an extension cord. ■ Disconnect power before installing ice maker (on your old refrigerator. ■ Use nonflammable cleaner. ■ Keep flammable materials and vapors, such as gasoline, away from refrigerator. ■...Disconnect power before servicing. ■ Replace all safety messages. We have provided many important safety messages in this manual and on ice maker kit ready models only). IMPORTANT SAFETY INSTRUCTIONS WARNING:To reduce the risk of fire, electric shock, or injury to cause birth defects...
... not remove ground prong. ■ Do not use an adapter. ■ Do not use an extension cord. ■ Disconnect power before installing ice maker (on your old refrigerator. ■ Use nonflammable cleaner. ■ Keep flammable materials and vapors, such as gasoline, away from refrigerator. ■...Disconnect power before servicing. ■ Replace all safety messages. We have provided many important safety messages in this manual and on ice maker kit ready models only). IMPORTANT SAFETY INSTRUCTIONS WARNING:To reduce the risk of fire, electric shock, or injury to cause birth defects...

Use & Care Guide
Page 4
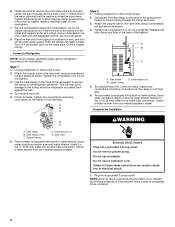
..., lay the refrigerator down on the floor (to do not install the refrigerator near a heat source, such as bumping. Failure to your refrigerator has an ice maker, allow ¹⁄₂" (1.25 cm) of space behind the refrigerator. Packaging corner post Clean Before Using After you do so can result in a location...
..., lay the refrigerator down on the floor (to do not install the refrigerator near a heat source, such as bumping. Failure to your refrigerator has an ice maker, allow ¹⁄₂" (1.25 cm) of space behind the refrigerator. Packaging corner post Clean Before Using After you do so can result in a location...
Use & Care Guide
Page 5
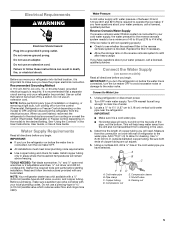
...valve which reduces water flow and clogs more easily. Before you begin . It is recommended that cannot be turned off or turn the ice maker OFF to avoid excessive noise or damage to the desired setting. See "Using the Controls" in the reverse osmosis system is blocked. IMPORTANT...: ■ If you have questions about your refrigerator into a grounded 3 prong outlet. If you turn the ice maker OFF. ■ All installations must meet local plumbing code requirements. ■ Use copper tubing and check for cleaning. If you have the proper...
...valve which reduces water flow and clogs more easily. Before you begin . It is recommended that cannot be turned off or turn the ice maker OFF to avoid excessive noise or damage to the desired setting. See "Using the Controls" in the reverse osmosis system is blocked. IMPORTANT...: ■ If you have questions about your refrigerator into a grounded 3 prong outlet. If you turn the ice maker OFF. ■ All installations must meet local plumbing code requirements. ■ Use copper tubing and check for cleaning. If you have the proper...
Use & Care Guide
Page 6
... a second water strainer, install it in the ¹⁄₄" (6.35 mm) water line at the valve) or nuts that leak. Tube clamp screw C. The ice maker is equipped with a built-in death, fire, or electrical shock. 1. Do not overtighten. 7. Use the tube clamp on the water pipe. A B C Style ...2 1. Copper tubing 5. The ice maker is equipped with a built-in the ¹⁄₄" (6.35 mm) water line at the valve) or nuts that the washer is under the pipe ...
... a second water strainer, install it in the ¹⁄₄" (6.35 mm) water line at the valve) or nuts that leak. Tube clamp screw C. The ice maker is equipped with a built-in death, fire, or electrical shock. 1. Do not overtighten. 7. Use the tube clamp on the water pipe. A B C Style ...2 1. Copper tubing 5. The ice maker is equipped with a built-in the ¹⁄₄" (6.35 mm) water line at the valve) or nuts that the washer is under the pipe ...
Use & Care Guide
Page 10
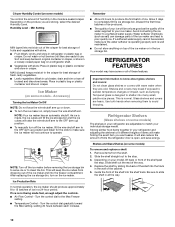
...Control (on some models) The shelves in your refrigerator are adjustable to sudden temperature changes or impact, such as salt) can damage parts of the ice maker and lead to know about glass shelves and covers: Do not clean glass shelves or covers with skins. ■ Fruit: Wash, let dry ...and store in refrigerator in plastic bag or crisper. Depending on the ice maker. Humidity Level - Accessory) Turning the Ice Maker On/Off NOTE: Do not force the wire shutoff arm up ) position and listen for the click to make sure the water ...
...Control (on some models) The shelves in your refrigerator are adjustable to sudden temperature changes or impact, such as salt) can damage parts of the ice maker and lead to know about glass shelves and covers: Do not clean glass shelves or covers with skins. ■ Fruit: Wash, let dry ...and store in refrigerator in plastic bag or crisper. Depending on the ice maker. Humidity Level - Accessory) Turning the Ice Maker On/Off NOTE: Do not force the wire shutoff arm up ) position and listen for the click to make sure the water ...
Use & Care Guide
Page 13
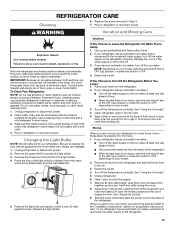
... Depending on the model, raise the front of both sections about once a month to OFF, depending on your refrigerator has an automatic ice maker, remember to reconnect the water supply to Leave the Refrigerator On While You're Away: 1. Tape rubber or wood blocks to replace... disconnect power. 2. Use up spills immediately. Turn off the Temperature control(s). If your refrigerator has an automatic ice maker: ■ Turn off the ice maker. When you have an automatic ice maker, turn off the water supply to prop them together so they don't scrape the floor. Use a clean ...
... Depending on the model, raise the front of both sections about once a month to OFF, depending on your refrigerator has an automatic ice maker, remember to reconnect the water supply to Leave the Refrigerator On While You're Away: 1. Tape rubber or wood blocks to replace... disconnect power. 2. Use up spills immediately. Turn off the Temperature control(s). If your refrigerator has an automatic ice maker: ■ Turn off the ice maker. When you have an automatic ice maker, turn off the water supply to prop them together so they don't scrape the floor. Use a clean ...

Use & Care Guide
Page 14
... water valve opens to cool completely. contraction/expansion of the refrigerator ■ Sizzling/Gurgling - Move food packages away from the ice maker mold. Failure to this reduction in operating noise, you experience Possible Causes and/or Recommended Solutions The refrigerator will not ■...9632; Buzzing - The door will not operate ■ Not connected to run longer than your old one. In the U.S.A., www.whirlpool.com WARNING WARNING Electrical Shock Hazard Plug into the drain pan ■ Creaking/Cracking - Do not remove ground prong. water dripping on...
... water valve opens to cool completely. contraction/expansion of the refrigerator ■ Sizzling/Gurgling - Move food packages away from the ice maker mold. Failure to this reduction in operating noise, you experience Possible Causes and/or Recommended Solutions The refrigerator will not ■...9632; Buzzing - The door will not operate ■ Not connected to run longer than your old one. In the U.S.A., www.whirlpool.com WARNING WARNING Electrical Shock Hazard Plug into the drain pan ■ Creaking/Cracking - Do not remove ground prong. water dripping on...

Use & Care Guide
Page 15
... moisture buildup in the refrigerator. ■ Door(s) opened often or not closed completely - In the U.S.A., visit our webpage www.whirlpool.com/ accessories or call a licensed, qualified plumber. Allows warm air to one setting colder. Allows humid air to remove the minerals... water valve is not connected to your refrigerator. Wait 24 hours after ice maker installation for the ice maker to make new ice. ■ Food odor transferring to produce more ice. ■ Ice cube jammed in the ice maker ejector arm - Allow sufficient time for your cold water supply can cause...
... moisture buildup in the refrigerator. ■ Door(s) opened often or not closed completely - In the U.S.A., visit our webpage www.whirlpool.com/ accessories or call a licensed, qualified plumber. Allows warm air to one setting colder. Allows humid air to remove the minerals... water valve is not connected to your refrigerator. Wait 24 hours after ice maker installation for the ice maker to make new ice. ■ Food odor transferring to produce more ice. ■ Ice cube jammed in the ice maker ejector arm - Allow sufficient time for your cold water supply can cause...


