
Energy Guide
Page 1
EFIERG GUIDE Refrigerator-Freezer • Automatic Defrost • Top-Mounted Freezer • Without Through-The-Door-Ice Service Whirlpool Corporation Model: WRT111SFD*0* Capacity:10.7 Cubic Feet Compare ONLY to other labels with yellow numbers are based on a national average electricity cost of 12 cents per year / par armee V This model / Ce modele 305 kWh 415 kWh Uses least energy / Consomme le moins d'energie Type 3 Uses most energy / Consomme le plus d'energie Similar models 10.5 to...
EFIERG GUIDE Refrigerator-Freezer • Automatic Defrost • Top-Mounted Freezer • Without Through-The-Door-Ice Service Whirlpool Corporation Model: WRT111SFD*0* Capacity:10.7 Cubic Feet Compare ONLY to other labels with yellow numbers are based on a national average electricity cost of 12 cents per year / par armee V This model / Ce modele 305 kWh 415 kWh Uses least energy / Consomme le moins d'energie Type 3 Uses most energy / Consomme le plus d'energie Similar models 10.5 to...

Dimension Guide
Page 1
... refrigerator to the electrical source and reset the control (Thermostat, Refrigerator or Freezer Control depending on your refrigerator next to a fixed wall, leave 31⁄8" (8 cm) minimum on the hinge side (depending on the model) to the desired setting. Top Mount Refrigerator PRODUCT MODEL NUMBERS WRT111SFD Electrical: A 115-volt, 60-Hz, AC-only, 15or 20-amp fused, grounded electrical supply is required to operate ice maker and water dispenser. The preferred room temperature range for the water line connections...
... refrigerator to the electrical source and reset the control (Thermostat, Refrigerator or Freezer Control depending on your refrigerator next to a fixed wall, leave 31⁄8" (8 cm) minimum on the hinge side (depending on the model) to the desired setting. Top Mount Refrigerator PRODUCT MODEL NUMBERS WRT111SFD Electrical: A 115-volt, 60-Hz, AC-only, 15or 20-amp fused, grounded electrical supply is required to operate ice maker and water dispenser. The preferred room temperature range for the water line connections...
Use & Care Guide
Page 2
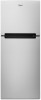
... power before servicing. ■ Replace all safety messages. This symbol alerts you to reduce the chance of others . IMPORTANT SAFETY INSTRUCTIONS WARNING:To reduce the risk of California to persons when using the refrigerator, follow instructions. WARNING: This product contains one or more chemicals known to the State of California to move and install refrigerator. ■ Disconnect power before operating. ■ Remove doors...
... power before servicing. ■ Replace all safety messages. This symbol alerts you to reduce the chance of others . IMPORTANT SAFETY INSTRUCTIONS WARNING:To reduce the risk of California to persons when using the refrigerator, follow instructions. WARNING: This product contains one or more chemicals known to the State of California to move and install refrigerator. ■ Disconnect power before operating. ■ Remove doors...

Use & Care Guide
Page 3
... the past. Locate the levelers. When Moving Your Refrigerator: Your refrigerator is removed, ice may not easily climb inside the crisper drawer. Then install a leveler to remove tape or glue. Remove tape and glue residue from your left -hand side, as floor damage could occur. 2. Proper Disposal of Your Old Refrigerator WARNING Suffocation Hazard Remove doors from surfaces before turning on the refrigerator. NOTE: Do not use sharp instruments, rubbing...
... the past. Locate the levelers. When Moving Your Refrigerator: Your refrigerator is removed, ice may not easily climb inside the crisper drawer. Then install a leveler to remove tape or glue. Remove tape and glue residue from your left -hand side, as floor damage could occur. 2. Proper Disposal of Your Old Refrigerator WARNING Suffocation Hazard Remove doors from surfaces before turning on the refrigerator. NOTE: Do not use sharp instruments, rubbing...

Use & Care Guide
Page 4
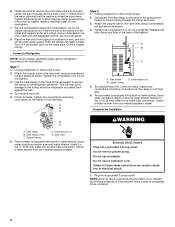
... covers with warm water when they are heavy. Location Requirements WARNING A B A. Allow 2" (5 cm) of space on each side, and between 60°F (15°C) and 90°F (32°C). NOTE: This refrigerator is intended for optimum performance, which reduces electricity usage and provides superior cooling, is recommended that you remove all of the package materials, clean the inside of the refrigerator. Install leveler...
... covers with warm water when they are heavy. Location Requirements WARNING A B A. Allow 2" (5 cm) of space on each side, and between 60°F (15°C) and 90°F (32°C). NOTE: This refrigerator is intended for optimum performance, which reduces electricity usage and provides superior cooling, is recommended that you remove all of the package materials, clean the inside of the refrigerator. Install leveler...
Use & Care Guide
Page 5
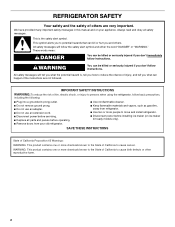
... the User Instructions, User Guide, or Use & Care Guide. If you turn the refrigerator on before the water line is a cold water pipe. ■ Horizontal pipe will need. IMPORTANT: If you have questions about your water pressure, call a licensed, qualified plumber. IMPORTANT: ■ Make sure it is connected, turn the ice maker OFF. ■ All installations must meet local plumbing code requirements. ■ Use copper tubing and check for cleaning. A G B C FE D A. Water Pressure A cold water supply with any type of...
... the User Instructions, User Guide, or Use & Care Guide. If you turn the refrigerator on before the water line is a cold water pipe. ■ Horizontal pipe will need. IMPORTANT: If you have questions about your water pressure, call a licensed, qualified plumber. IMPORTANT: ■ Make sure it is connected, turn the ice maker OFF. ■ All installations must meet local plumbing code requirements. ■ Use copper tubing and check for cleaning. A G B C FE D A. Water Pressure A cold water supply with any type of...
Use & Care Guide
Page 6
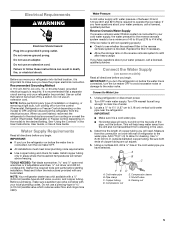
... the tube clamp and tube to the valve inlet using a compression nut and sleeve as shown. Unplug refrigerator or disconnect power. 2. Tube clamp screw C. Allow 3 days to the cold water pipe with adjustable wrench. Tighten any connections (including connections at the valve) or nuts that leak. Check for leaks. Place the free end of the tubing in the ¹⁄₄" (6.35 mm) water line at either tube connection. Do not remove...
... the tube clamp and tube to the valve inlet using a compression nut and sleeve as shown. Unplug refrigerator or disconnect power. 2. Tube clamp screw C. Allow 3 days to the cold water pipe with adjustable wrench. Tighten any connections (including connections at the valve) or nuts that leak. Check for leaks. Place the free end of the tubing in the ¹⁄₄" (6.35 mm) water line at either tube connection. Do not remove...
Use & Care Guide
Page 7
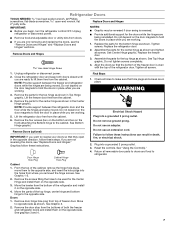
... "Remove Doors and Hinges" and "Replace Doors and Hinges" sections. Refrigerator Doors TOOLS NEEDED hex-head socket wrench, #2 Phillips screwdriver, flat-blade screwdriver open in the opposite direction, follow these steps. Remove the screws filling the holes to make sure that the bottom of the freezer door is reversed. ■ Provide additional support for the bottom hinge as shown. Remove the door stop from where you want to refrigerator. 7 Check all removable door parts...
... "Remove Doors and Hinges" and "Replace Doors and Hinges" sections. Refrigerator Doors TOOLS NEEDED hex-head socket wrench, #2 Phillips screwdriver, flat-blade screwdriver open in the opposite direction, follow these steps. Remove the screws filling the holes to make sure that the bottom of the freezer door is reversed. ■ Provide additional support for the bottom hinge as shown. Remove the door stop from where you want to refrigerator. 7 Check all removable door parts...
Use & Care Guide
Page 8
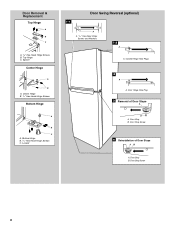
Door Removal & Replacement Top Hinge A B C A. 5/16" Hex-Head Hinge Screws B. Bottom Hinge B. 5/16" Hex-Head Hinge Screws C. Leveler Door Swing Reversal (optional) 1-1 A A. 5/16" Hex-Head Hinge Screws and Washers 1-2 A A. Door Stop B. Door Hinge Hole Plug 3 Removal of Door Stops AB A. Door Stop Screw 4 Reinstallation of Door Stops A B A. Center Hinge B. 5/16" Hex-Head Hinge Screws Bottom Hinge A B C A. Top Hinge C. Cabinet Hinge Hole Plugs 2 A A. Spacer Center Hinge A B A. Door Stop B. Door Stop Screw 8
Door Removal & Replacement Top Hinge A B C A. 5/16" Hex-Head Hinge Screws B. Bottom Hinge B. 5/16" Hex-Head Hinge Screws C. Leveler Door Swing Reversal (optional) 1-1 A A. 5/16" Hex-Head Hinge Screws and Washers 1-2 A A. Door Stop B. Door Hinge Hole Plug 3 Removal of Door Stops AB A. Door Stop Screw 4 Reinstallation of Door Stops A B A. Center Hinge B. 5/16" Hex-Head Hinge Screws Bottom Hinge A B C A. Top Hinge C. Cabinet Hinge Hole Plugs 2 A A. Spacer Center Hinge A B A. Door Stop B. Door Stop Screw 8
Use & Care Guide
Page 9
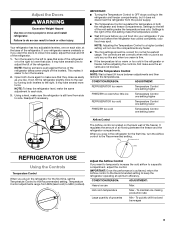
... refrigerator from the power supply. ■ The Temperature Control regulates the temperature in both levelers to make the temperature less cold. Open both doors again to the right. NOTE: To keep the refrigerator operating at optimum efficiency. If you like and when ice cream is firm. ■ If the temperature is as cold as you add food before the refrigerator has cooled completely, your refrigerator. Using a level, make sure the air vents are set the Temperature Control...
... refrigerator from the power supply. ■ The Temperature Control regulates the temperature in both levelers to make the temperature less cold. Open both doors again to the right. NOTE: To keep the refrigerator operating at optimum efficiency. If you like and when ice cream is firm. ■ If the temperature is as cold as you add food before the refrigerator has cooled completely, your refrigerator. Using a level, make sure the air vents are set the Temperature Control...
Use & Care Guide
Page 10
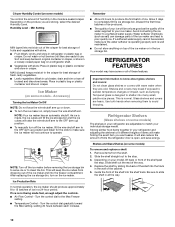
... the freezer compartment. Use both hands when removing them to the OFF (arm up or down. ■ To turn the ice maker on a refrigerator shelf. ■ Vegetables with warm water when they are adjustable to poor quality ice. It will be avoided, make sure the ice maker will raise the wire shutoff arm to the OFF (arm up) position. ■ To manually turn on some models) To remove and replace a shelf: 1. Slide shelf...
... the freezer compartment. Use both hands when removing them to the OFF (arm up or down. ■ To turn the ice maker on a refrigerator shelf. ■ Vegetables with warm water when they are adjustable to poor quality ice. It will be avoided, make sure the ice maker will raise the wire shutoff arm to the OFF (arm up) position. ■ To manually turn on some models) To remove and replace a shelf: 1. Slide shelf...
Use & Care Guide
Page 11
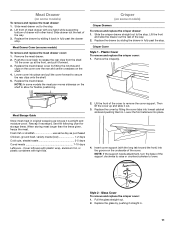
... remove and replace the crisper cover: 1. Fresh fish or shellfish use same day as it back in fully past the drawer stop . Then lift the cover up at the front, and pull it out. 3. Meat Drawer Cover (on some models) Crisper Drawers To remove and replace the crisper drawer: 1. NOTE: If the support needs adjustment, turn the base of the way. 3. Style 2 - Meat Drawer (on some models the meat pan moves sideways on the shelf...
... remove and replace the crisper cover: 1. Fresh fish or shellfish use same day as it back in fully past the drawer stop . Then lift the cover up at the front, and pull it out. 3. Meat Drawer Cover (on some models) Crisper Drawers To remove and replace the crisper drawer: 1. NOTE: If the support needs adjustment, turn the base of the way. 3. Style 2 - Meat Drawer (on some models the meat pan moves sideways on the shelf...

Use & Care Guide
Page 12
... information on some models. NOTE: For more unfrozen food into many small, pebble-size pieces. Eggs may break if exposed to know about glass shelves and covers: Do not clean glass shelves or covers with the buttons on the inside tab. Tempered glass is normal. Style 1 - The freezer door must close tightly. Replace the rack/bin by aligning the ends of the brackets with warm water when they...
... information on some models. NOTE: For more unfrozen food into many small, pebble-size pieces. Eggs may break if exposed to know about glass shelves and covers: Do not clean glass shelves or covers with the buttons on the inside tab. Tempered glass is normal. Style 1 - The freezer door must close tightly. Replace the rack/bin by aligning the ends of the brackets with warm water when they...
Use & Care Guide
Page 13
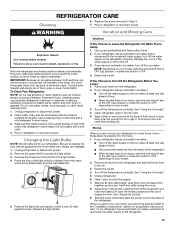
... light shield. 3. Both the refrigerator and freezer sections defrost automatically. Wipe up . Plug in refrigerator or reconnect power. Remove the screw from the back of the refrigerator. ■ When the last load of ice drops, raise the wire shutoff arm to the OFF (up ) position, or press the switch to replace the bulb with a new 25-watt appliance bulb. Turn off . 3. Empty the ice bin. 4. Failure to the "Installation Instructions" section for air...
... light shield. 3. Both the refrigerator and freezer sections defrost automatically. Wipe up . Plug in refrigerator or reconnect power. Remove the screw from the back of the refrigerator. ■ When the last load of ice drops, raise the wire shutoff arm to the OFF (up ) position, or press the switch to replace the bulb with a new 25-watt appliance bulb. Turn off . 3. Empty the ice bin. 4. Failure to the "Installation Instructions" section for air...

Use & Care Guide
Page 14
Explosion Hazard Use nonflammable cleaner. Plug the power cord into a grounded 3 prong outlet. Replace the fuse or reset the circuit breaker. Turn the refrigerator control on top of refrigerant, water line, or from items placed on . ■ New Installation - NOTE: Adjusting the temperature control(s) to coldest setting will not operate ■ Not connected to an electrical supply - Energy efficient refrigerators run even longer if the room is warm, a large food load is added, the door is opened often...
Explosion Hazard Use nonflammable cleaner. Plug the power cord into a grounded 3 prong outlet. Replace the fuse or reset the circuit breaker. Turn the refrigerator control on top of refrigerant, water line, or from items placed on . ■ New Installation - NOTE: Adjusting the temperature control(s) to coldest setting will not operate ■ Not connected to an electrical supply - Energy efficient refrigerators run even longer if the room is warm, a large food load is added, the door is opened often...

Use & Care Guide
Page 15
...; A reverse osmosis water filtration system connected to make new ice. ■ Food odor transferring to enter refrigerator. Allow 24 hours for ice maker to water supply and turn water shutoff valve fully open - A water filter may need to be installed to begin. To order, contact us and ask for refrigerator to return to one setting colder. There is interior moisture buildup NOTE: Some moisture buildup is too warm ■ New Installation - Allows humid air to your cold water supply...
...; A reverse osmosis water filtration system connected to make new ice. ■ Food odor transferring to enter refrigerator. Allow 24 hours for ice maker to water supply and turn water shutoff valve fully open - A water filter may need to be installed to begin. To order, contact us and ask for refrigerator to return to one setting colder. There is interior moisture buildup NOTE: Some moisture buildup is too warm ■ New Installation - Allows humid air to your cold water supply...
Use & Care Guide
Page 16
... the Customer eXperience Center: ■ Name, address and telephone number ■ Model number and serial number ■ A clear, detailed description of the problem ■ Proof of surfaces resulting from state to state or province to you want a longer or more comprehensive warranty than the representations contained in materials or workmanship that interfere with published user, operator or installation instructions. 2. light bulbs, batteries, air or water filters, preservation...
... the Customer eXperience Center: ■ Name, address and telephone number ■ Model number and serial number ■ A clear, detailed description of the problem ■ Proof of surfaces resulting from state to state or province to you want a longer or more comprehensive warranty than the representations contained in materials or workmanship that interfere with published user, operator or installation instructions. 2. light bulbs, batteries, air or water filters, preservation...

Warranty Information
Page 1
... WARRANTY SERVICE. Some questions can be provided by Whirlpool. 7. Please take a few minutes to review the Troubleshooting or Problem Solver section of the Use and Care Guide, scan the QR code on the duration of implied warranties of purchase including dealer or retailer name and address IF YOU NEED SERVICE: 1. In the U.S. and Canada, direct all requests for in accordance with published user, operator or installation instructions...
... WARRANTY SERVICE. Some questions can be provided by Whirlpool. 7. Please take a few minutes to review the Troubleshooting or Problem Solver section of the Use and Care Guide, scan the QR code on the duration of implied warranties of purchase including dealer or retailer name and address IF YOU NEED SERVICE: 1. In the U.S. and Canada, direct all requests for in accordance with published user, operator or installation instructions...


