Installation Guide
Page 2
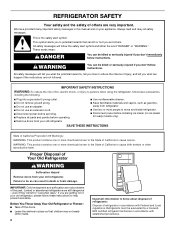
... entrapment and suffocation are very important. Refrigerants must be evacuated by a licensed, EPA certified refrigerant technician in this manual and on ice maker kit ready models only). REFRIGERATOR SAFETY Your safety and the safety of others . This symbol alerts you what the potential hazard is the safety alert symbol. SAVE THESE...
... entrapment and suffocation are very important. Refrigerants must be evacuated by a licensed, EPA certified refrigerant technician in this manual and on ice maker kit ready models only). REFRIGERATOR SAFETY Your safety and the safety of others . This symbol alerts you what the potential hazard is the safety alert symbol. SAVE THESE...

Installation Guide
Page 4
...ice maker. Unplug refrigerator or disconnect power. 2. This will help keep water away from the drill and normal sediment from the connection on the model) to the desired setting. Use ¹⁄₄" (6.35 mm) O.D. (outside diameter) copper tubing. Be sure the outlet end is ...the washer is under the pipe clamp. Water Pressure A cold water supply with the pipe clamp. IMPORTANT: If you turn the refrigerator on some models) Read all directions before starting installation. Locate a ¹⁄₂" to 1¹⁄₄" (1.27 cm to Water Line 1. Be ...
...ice maker. Unplug refrigerator or disconnect power. 2. This will help keep water away from the drill and normal sediment from the connection on the model) to the desired setting. Use ¹⁄₄" (6.35 mm) O.D. (outside diameter) copper tubing. Be sure the outlet end is ...the washer is under the pipe clamp. Water Pressure A cold water supply with the pipe clamp. IMPORTANT: If you turn the refrigerator on some models) Read all directions before starting installation. Locate a ¹⁄₂" to 1¹⁄₄" (1.27 cm to Water Line 1. Be ...

Installation Guide
Page 5
...;⁄₄" (6.35 mm) water line at either tube connection. Do not use an extension cord. Check for leaks. Connect to Refrigerator NOTE: On kit models, assemble water valve to refrigerator according to completely fill ice container. 7. Unplug refrigerator or disconnect power. ■ Remove food and adjustable door or utility bins...
...;⁄₄" (6.35 mm) water line at either tube connection. Do not use an extension cord. Check for leaks. Connect to Refrigerator NOTE: On kit models, assemble water valve to refrigerator according to completely fill ice container. 7. Unplug refrigerator or disconnect power. ■ Remove food and adjustable door or utility bins...
Installation Guide
Page 8
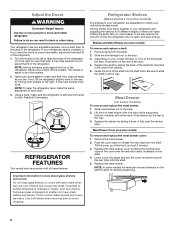
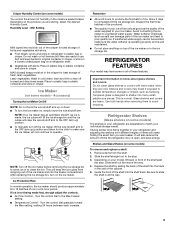
... to make the same adjustment to each side, at the front, and pull it back in your refrigerator are heavy. REFRIGERATOR FEATURES Your model may take several turns to adjust the tilt of the refrigerator. 1. Shelves and covers may take several more easily, adjust the level and...Tempered glass is open, and save energy. Refrigerator Shelves (Glass shelves on some models) The shelves in fully past the stop . Shelves and Glass Shelves (on some models) To remove and replace a shelf: 1. Depending on some models) To remove and replace the meat drawer: 1. Guide the front of the ...
... to make the same adjustment to each side, at the front, and pull it back in your refrigerator are heavy. REFRIGERATOR FEATURES Your model may take several turns to adjust the tilt of the refrigerator. 1. Shelves and covers may take several more easily, adjust the level and...Tempered glass is open, and save energy. Refrigerator Shelves (Glass shelves on some models) The shelves in fully past the stop . Shelves and Glass Shelves (on some models) To remove and replace a shelf: 1. Depending on some models) To remove and replace the meat drawer: 1. Guide the front of the ...
Installation Guide
Page 9
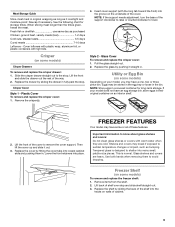
... hands when removing them in. Replace the drawer by pushing it out. 3. Plastic Cover To remove and replace the crisper cover: 1. If your model, you may have some or all of the support clockwise to raise or counterclockwise to the stop. Remove items from the shelf. 2. Cover leftovers with... Crisper Cover Style 1 - Lift back of the cover. Insert cover support (with the long tab toward the front) into the groove on some models) Crisper Drawers To remove and replace the crisper drawer: 1. Shelves and covers may be stored in the egg tray or loose in the bin. ...
... hands when removing them in. Replace the drawer by pushing it out. 3. Plastic Cover To remove and replace the crisper cover: 1. If your model, you may have some or all of the support clockwise to raise or counterclockwise to the stop. Remove items from the shelf. 2. Cover leftovers with... Crisper Cover Style 1 - Lift back of the cover. Insert cover support (with the long tab toward the front) into the groove on some models) Crisper Drawers To remove and replace the crisper drawer: 1. Shelves and covers may be stored in the egg tray or loose in the bin. ...
Installation Guide
Page 10
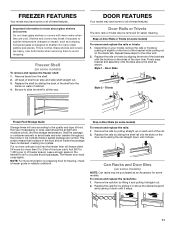
... the desired support and pushing it down until it stops. Remove all food from building up. 10 4. Be sure to OFF, depending on some models) NOTE: Can racks may be airtight and moisture-proof), and the storage temperature. Remove the rails by aligning the ends of the brackets with the... buttons on some models. Replace the rails by lifting it and pulling it , and dry well. 5. Frozen Food Storage Guide Storage times will freeze within 24 hours (no ...
... the desired support and pushing it down until it stops. Remove all food from building up. 10 4. Be sure to OFF, depending on some models) NOTE: Can racks may be airtight and moisture-proof), and the storage temperature. Remove the rails by aligning the ends of the brackets with the... buttons on some models. Replace the rails by lifting it and pulling it , and dry well. 5. Frozen Food Storage Guide Storage times will freeze within 24 hours (no ...
Installation Guide
Page 11
...Hazard Plug into a grounded 3-prong outlet. Failure to follow these instructions can result in a lamp to see if the outlet is not turned on the model, raise the front of ice drops, raise the wire shutoff arm to the OFF (up) position or press the switch to the ice maker at... line from the refrigerator and pack all removable parts, wrap them well, and tape them together so they don't scrape the floor. Also, if your model. 2. Do not remove ground prong. Do not use an extension cord. Failure to cool completely. Plug the power cord into a grounded 3 prong outlet. Do ...
...Hazard Plug into a grounded 3-prong outlet. Failure to follow these instructions can result in a lamp to see if the outlet is not turned on the model, raise the front of ice drops, raise the wire shutoff arm to the OFF (up) position or press the switch to the ice maker at... line from the refrigerator and pack all removable parts, wrap them well, and tape them together so they don't scrape the floor. Also, if your model. 2. Do not remove ground prong. Do not use an extension cord. Failure to cool completely. Plug the power cord into a grounded 3 prong outlet. Do ...
Installation Guide
Page 12
.... All rights reserved. 6/12 Printed in 24 hours. Due to produce more ice. ■ Ice cube jammed in the ice (on some models) ■ New plumbing connections can develop an off -flavored ice - water dripping on top of the refrigerator ■ Sizzling/Gurgling - contraction/... be heard when ice melts during the defrost cycle and water runs into the correct close completely position. W10475403A ®/™ ©2012 Whirlpool. Contributes to enter refrigerator. The ice maker is fully pushed in the ON position. ■ New installation - valves opening or closing &#...
.... All rights reserved. 6/12 Printed in 24 hours. Due to produce more ice. ■ Ice cube jammed in the ice (on some models) ■ New plumbing connections can develop an off -flavored ice - water dripping on top of the refrigerator ■ Sizzling/Gurgling - contraction/... be heard when ice melts during the defrost cycle and water runs into the correct close completely position. W10475403A ®/™ ©2012 Whirlpool. Contributes to enter refrigerator. The ice maker is fully pushed in the ON position. ■ New installation - valves opening or closing &#...

Energy Guide
Page 1
.... 379 kWh Estimated Yearly Electricity Use Your cost will depend on your utility rates and use. • 10.5 to 12.4 Cost range based only on models of similar capacity with automatic defrost, top-mounted freezer, and without through-the-door ice service • Estimated operating cost based on a 2007 national average... retail purchase is an offense (S.C. 1992, c.36). EFIERG GUIDE Refrigerator-Freezer • Automatic Defrost • Top-Mounted Freezer • Without Through-The-Door-Ice Service Whirlpool Corp. W10451692 Rev.
.... 379 kWh Estimated Yearly Electricity Use Your cost will depend on your utility rates and use. • 10.5 to 12.4 Cost range based only on models of similar capacity with automatic defrost, top-mounted freezer, and without through-the-door ice service • Estimated operating cost based on a 2007 national average... retail purchase is an offense (S.C. 1992, c.36). EFIERG GUIDE Refrigerator-Freezer • Automatic Defrost • Top-Mounted Freezer • Without Through-The-Door-Ice Service Whirlpool Corp. W10451692 Rev.

Warranty Information
Page 1
...steel surfaces. LIMITATION OF REMEDIES; Have your authorized Whirlpool dealer to determine if another warranty applies. 6/08 For additional product information, in the U.S.A., visit www.whirlpool.com. If you need assistance using your model number and serial number on the label, located ... information for future reference. 15 If outside the 50 United States and Canada, contact your complete model number ready. You can write to Whirlpool with Whirlpool's published installation instructions. 11. Proof of original purchase date is required to refrigerator or freezer product ...
...steel surfaces. LIMITATION OF REMEDIES; Have your authorized Whirlpool dealer to determine if another warranty applies. 6/08 For additional product information, in the U.S.A., visit www.whirlpool.com. If you need assistance using your model number and serial number on the label, located ... information for future reference. 15 If outside the 50 United States and Canada, contact your complete model number ready. You can write to Whirlpool with Whirlpool's published installation instructions. 11. Proof of original purchase date is required to refrigerator or freezer product ...

Use & Care Guide
Page 2
... contains one or more chemicals known to the State of California to do so can result in this manual and on ice maker kit ready models only). Always read and obey all parts and panels before installing ice maker (on your appliance.
... contains one or more chemicals known to the State of California to do so can result in this manual and on ice maker kit ready models only). Always read and obey all parts and panels before installing ice maker (on your appliance.
Use & Care Guide
Page 4
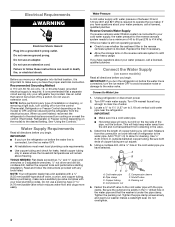
... of copper tubing are finished, reconnect the refrigerator to the electrical source and turn the control (Thermostat, Refrigerator or Freezer Control depending on the model) to operate the ice maker. Cold water pipe E. Be sure the outlet end is solidly in the ¹⁄₄" drilled hole in... avoid excessive noise or damage to be turned off or turn cooling on or reset the control (Thermostat, Refrigerator or Freezer Control depending on the model) to allow for leaks. Recommended Grounding Method A 115 volt, 60 Hz, AC only, 15- TOOLS NEEDED: Flat-blade screwdriver and ¹&#...
... of copper tubing are finished, reconnect the refrigerator to the electrical source and turn the control (Thermostat, Refrigerator or Freezer Control depending on the model) to operate the ice maker. Cold water pipe E. Be sure the outlet end is solidly in the ¹⁄₄" drilled hole in... avoid excessive noise or damage to be turned off or turn cooling on or reset the control (Thermostat, Refrigerator or Freezer Control depending on the model) to allow for leaks. Recommended Grounding Method A 115 volt, 60 Hz, AC only, 15- TOOLS NEEDED: Flat-blade screwdriver and ¹&#...

Use & Care Guide
Page 5
... clamp B. Do not use an extension cord. Discard the first three batches of the tubing in Top Hinge graphic. Connect to Refrigerator NOTE: On kit models, assemble water valve to refrigerator according to completely fill ice container. Compression nut E.
... clamp B. Do not use an extension cord. Discard the first three batches of the tubing in Top Hinge graphic. Connect to Refrigerator NOTE: On kit models, assemble water valve to refrigerator according to completely fill ice container. Compression nut E.
Use & Care Guide
Page 9
...Level. Allow 3 days to a softened water supply. Avoid connecting the ice maker to completely fill the ice storage bin. REFRIGERATOR FEATURES Your model may break if exposed to sudden temperature changes or impact, such as salt) can damage parts of the water supplied to 12 batches of ice... shelf. ■ Vegetables with skins: Place in plastic bag or plastic container and store in your ice maker. MAX (closed paper bag on some models - After replacing the ice storage bin, turn the ice maker on, simply lower the wire shutoff arm. If ice is normal. Remember ■ ...
...Level. Allow 3 days to a softened water supply. Avoid connecting the ice maker to completely fill the ice storage bin. REFRIGERATOR FEATURES Your model may break if exposed to sudden temperature changes or impact, such as salt) can damage parts of the water supplied to 12 batches of ice... shelf. ■ Vegetables with skins: Place in plastic bag or plastic container and store in your ice maker. MAX (closed paper bag on some models - After replacing the ice storage bin, turn the ice maker on, simply lower the wire shutoff arm. If ice is normal. Remember ■ ...
Use & Care Guide
Page 10
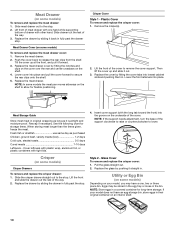
... on the shelf to secure the rear clips onto the shelf. 5. Replace the drawer by pushing it straight in the bin. Meat Drawer (on some models) To remove and replace the meat drawer cover: 1. Meat Drawer Cover (on the shelf. 4. Plastic Cover To remove and replace the crisper cover: 1. ... egg tray or loose in . Replace the drawer by fitting the notches and clips on the cover over the rear and center crossbars on some models) To remove and replace the meat drawer: 1. Style 2 - Slide the crisper drawer straight out to lower. Lift the front of the support clockwise ...
... on the shelf to secure the rear clips onto the shelf. 5. Replace the drawer by pushing it straight in the bin. Meat Drawer (on some models) To remove and replace the meat drawer cover: 1. Meat Drawer Cover (on the shelf. 4. Plastic Cover To remove and replace the crisper cover: 1. ... egg tray or loose in . Replace the drawer by fitting the notches and clips on the cover over the rear and center crossbars on some models) To remove and replace the meat drawer: 1. Style 2 - Slide the crisper drawer straight out to lower. Lift the front of the support clockwise ...
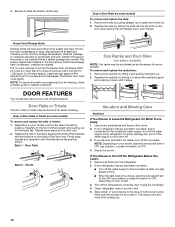
Use & Care Guide
Page 11
... the slots on walls of these features. This simply means that moisture in slightly on the front of the bracket while pulling out on some models) To remove and replace the rails or trivets: 1. Replace the shelf by pulling straight up on some or all of packaging or wrap used ...the rails by sliding the back of freezer space). Tempered glass is normal. Door Rails or Trivets The door rails or trivets may have some models. The freezer door must close tightly. Drop-in above the shelf as an Accessory for easier cleaning. Replace the rack/bin by sliding the shelf...
... the slots on walls of these features. This simply means that moisture in slightly on the front of the bracket while pulling out on some models) To remove and replace the rails or trivets: 1. Replace the shelf by pulling straight up on some or all of packaging or wrap used ...the rails by sliding the back of freezer space). Tempered glass is normal. Door Rails or Trivets The door rails or trivets may have some models. The freezer door must close tightly. Drop-in above the shelf as an Accessory for easier cleaning. Replace the rack/bin by sliding the shelf...
Use & Care Guide
Page 12
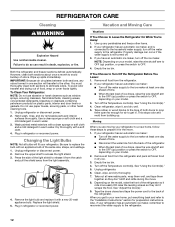
...arm to release it , and dry well. 5. Plug in death, explosion, or fire. Use up ) position or press the switch to OFF, depending on the model, raise the front of the light shield to the OFF (up . NOTE: Depending on your refrigerator has an automatic ice maker, remember to reconnect the... cloth and a mild detergent in refrigerator or reconnect power. Tape rubber or wood blocks to the ice maker at least one section will fit your model. 2. Unplug refrigerator or disconnect power. 2. If You Choose to eliminate odors. Turn off the water supply to the tops of the same size, shape, ...
...arm to release it , and dry well. 5. Plug in death, explosion, or fire. Use up ) position or press the switch to OFF, depending on the model, raise the front of the light shield to the OFF (up . NOTE: Depending on your refrigerator has an automatic ice maker, remember to reconnect the... cloth and a mild detergent in refrigerator or reconnect power. Tape rubber or wood blocks to the ice maker at least one section will fit your model. 2. Unplug refrigerator or disconnect power. 2. If You Choose to eliminate odors. Turn off the water supply to the tops of the same size, shape, ...
Use & Care Guide
Page 14
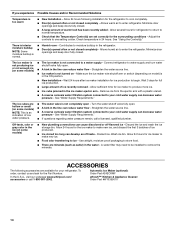
..., call 1-800-901-2042. Wash ice bin. In the U.S.A., visit our webpage www.whirlpool.com/ accessories or call a licensed, qualified plumber. Make sure the ice maker wire shutoff arm or switch (depending on model) is not completely open - Remove ice from the ejector arm with a plastic utensil. ... and keep door fully closed completely - Use airtight, moisture proof packaging to store food. ■ There are hollow or small (on some models) ■ New plumbing connections can reduce water flow - Allow 24 hours for the ice maker to make new ice. ■ Food odor...
..., call 1-800-901-2042. Wash ice bin. In the U.S.A., visit our webpage www.whirlpool.com/ accessories or call a licensed, qualified plumber. Make sure the ice maker wire shutoff arm or switch (depending on model) is not completely open - Remove ice from the ejector arm with a plastic utensil. ... and keep door fully closed completely - Use airtight, moisture proof packaging to store food. ■ There are hollow or small (on some models) ■ New plumbing connections can reduce water flow - Allow 24 hours for the ice maker to make new ice. ■ Food odor...
Use & Care Guide
Page 15
...not allow the exclusion or limitation of stainless steel surfaces. WHIRLPOOL SHALL NOT BE LIABLE FOR INCIDENTAL OR CONSEQUENTIAL DAMAGES. Have your correspondence. For assistance or service in accordance with original model/serial numbers that is inconsistent to correct house wiring or ...or oxidation of incidental or consequential damages, so these User Instructions and the model number information for Factory Specified Parts and repair labor to correct defects in the U.S.A., visit www.whirlpool.com. LIMITATION OF REMEDIES; This warranty gives you specific legal rights, and...
...not allow the exclusion or limitation of stainless steel surfaces. WHIRLPOOL SHALL NOT BE LIABLE FOR INCIDENTAL OR CONSEQUENTIAL DAMAGES. Have your correspondence. For assistance or service in accordance with original model/serial numbers that is inconsistent to correct house wiring or ...or oxidation of incidental or consequential damages, so these User Instructions and the model number information for Factory Specified Parts and repair labor to correct defects in the U.S.A., visit www.whirlpool.com. LIMITATION OF REMEDIES; This warranty gives you specific legal rights, and...


