
Installation Guide
Page 2
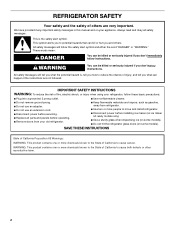
... of injury, and tell you to move and install refrigerator. ■ Disconnect power before servicing. ■ Replace all safety messages. Always read and obey all parts and panels before operating. ■ Remove doors from your old refrigerator. ■ Keep flammable materials and vapors, such as gasoline, away from refrigerator. ■ Use...
... of injury, and tell you to move and install refrigerator. ■ Disconnect power before servicing. ■ Replace all safety messages. Always read and obey all parts and panels before operating. ■ Remove doors from your old refrigerator. ■ Keep flammable materials and vapors, such as gasoline, away from refrigerator. ■ Use...
Installation Guide
Page 4
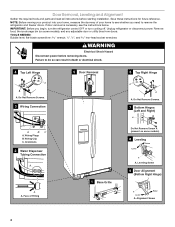
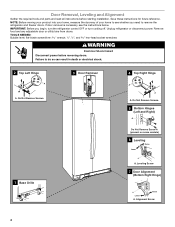
... your home to do so can result in death or electrical shock. 4 Top Left Hinge A A A. Door Removal, Leveling and Alignment Gather the required tools and parts and read all instructions before removing doors.
... your home to do so can result in death or electrical shock. 4 Top Left Hinge A A A. Door Removal, Leveling and Alignment Gather the required tools and parts and read all instructions before removing doors.

Installation Guide
Page 5
... wrench to adjust the screws. 3. See Graphic 8. 4. Open both leveling screws the same amount. 5. If not, tilt the refrigerator slightly more turns, and you are part of cardboard. Use a bubble level to the tube that side of place. If the doors are being replaced. The dispenser tubing runs through the hinge...
... wrench to adjust the screws. 3. See Graphic 8. 4. Open both leveling screws the same amount. 5. If not, tilt the refrigerator slightly more turns, and you are part of cardboard. Use a bubble level to the tube that side of place. If the doors are being replaced. The dispenser tubing runs through the hinge...

Installation Guide
Page 6
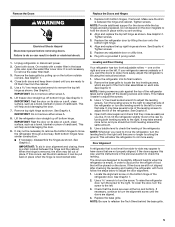
... to turn the screw to install the other soft surface. 2. To lower the door, turn . If necessary, continue to the left. 3. Handle Installation and Removal PARTS INCLUDED: Door handles (2 hex key, spare setscrew(s) To Install the Handles: NOTE: The handle mounting setscrews are even at a time. 3. NOTE: To avoid scratching the...
... to turn the screw to install the other soft surface. 2. To lower the door, turn . If necessary, continue to the left. 3. Handle Installation and Removal PARTS INCLUDED: Door handles (2 hex key, spare setscrew(s) To Install the Handles: NOTE: The handle mounting setscrews are even at a time. 3. NOTE: To avoid scratching the...

Installation Guide
Page 7
... osmosis system is less than 8 seconds to dispense 1 cup of 110°F (43°C). Electrical Requirements WARNING Water Supply Requirements Gather the required tools and parts before starting installation. Do not use an adapter. Water Pressure A cold water supply with a reverse osmosis system. If a reverse osmosis water filtration system is recommended...
... osmosis system is less than 8 seconds to dispense 1 cup of 110°F (43°C). Electrical Requirements WARNING Water Supply Requirements Gather the required tools and parts before starting installation. Do not use an adapter. Water Pressure A cold water supply with a reverse osmosis system. If a reverse osmosis water filtration system is recommended...
Installation Guide
Page 8
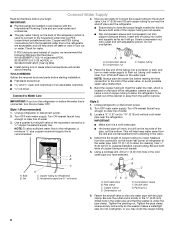
...lower rear corner of refrigerator to flush out tubing until water is clear. Copper tubing (to clear line of copper, we recommend the following Whirlpool Part Numbers: W10505928RP (7 ft [2.14 m] jacketed PEX), 8212547RP (5 ft [1.52 m] PEX), or W10267701RP (25 ft [7.62 m] PEX).... copper tubing. Cold water pipe B. Fasten the shutoff valve to avoid possible water valve malfunction. 6. TOOLS NEEDED: Gather the required tools and parts before making the final connection to the inlet of the refrigerator cabinet as it is recommended. Style 1 (Recommended) 1. NOTE: To allow for...
...lower rear corner of refrigerator to flush out tubing until water is clear. Copper tubing (to clear line of copper, we recommend the following Whirlpool Part Numbers: W10505928RP (7 ft [2.14 m] jacketed PEX), 8212547RP (5 ft [1.52 m] PEX), or W10267701RP (25 ft [7.62 m] PEX).... copper tubing. Cold water pipe B. Fasten the shutoff valve to avoid possible water valve malfunction. 6. TOOLS NEEDED: Gather the required tools and parts before making the final connection to the inlet of the refrigerator cabinet as it is recommended. Style 1 (Recommended) 1. NOTE: To allow for...

Installation Guide
Page 9
...at the valve) or nuts that leak. Bulb D. Nut (purchased) G. Check for leaks. Remove and discard the short, black plastic part from your water conditions require a second water strainer, install it will help avoid damage to the tubing when the refrigerator is needed in ... the shutoff valve on the coupling. 5. Turn shutoff valve ON. 6. Coupling (purchased) EFG E. Household water line 4. Remove and discard the plastic part that leak. Do not use an extension cord. Use the tube clamp on the copper tubing as shown. Slip the compression sleeve and compression nut...
...at the valve) or nuts that leak. Bulb D. Nut (purchased) G. Check for leaks. Remove and discard the short, black plastic part from your water conditions require a second water strainer, install it will help avoid damage to the tubing when the refrigerator is needed in ... the shutoff valve on the coupling. 5. Turn shutoff valve ON. 6. Coupling (purchased) EFG E. Household water line 4. Remove and discard the plastic part that leak. Do not use an extension cord. Use the tube clamp on the copper tubing as shown. Slip the compression sleeve and compression nut...
Installation Guide
Page 10
... death, explosion, or fire. Replace light shield when applicable. 5. If you need for air to OFF (right). 4. Depending on plastic parts, interior and door liners or gaskets. IMPORTANT: Because air circulates between both sections to avoid buildup of food, wrap or cover foods tightly....9632; On some models, the interior lights require a 40-watt bulb. 1. Use up spills immediately. Hand wash, rinse, and dry removable parts and interior surfaces thoroughly. If the environment is particularly greasy or dusty, or there is connected to the household water supply, turn cooling off...
... death, explosion, or fire. Replace light shield when applicable. 5. If you need for air to OFF (right). 4. Depending on plastic parts, interior and door liners or gaskets. IMPORTANT: Because air circulates between both sections to avoid buildup of food, wrap or cover foods tightly....9632; On some models, the interior lights require a 40-watt bulb. 1. Use up spills immediately. Hand wash, rinse, and dry removable parts and interior surfaces thoroughly. If the environment is particularly greasy or dusty, or there is connected to the household water supply, turn cooling off...

Installation Guide
Page 11
... power to see if the outlet is normal. Following installation, allow 24 hours for the refrigerator and freezer to the refrigerator. Take out all removable parts, wrap them well, and tape them together so they don't scrape the floor. GENERAL OPERATION Refrigerator will not cool either compartment (refrigerator or freezer) more...
... power to see if the outlet is normal. Following installation, allow 24 hours for the refrigerator and freezer to the refrigerator. Take out all removable parts, wrap them well, and tape them together so they don't scrape the floor. GENERAL OPERATION Refrigerator will not cool either compartment (refrigerator or freezer) more...
Installation Guide
Page 17
... a new filter. Rated service capacity = 200 gallons (757 liters). ■ It is yellow, order a new filter. Prices are not followed. ■ Use replacement filter P4RFWB, part #W10295370A. 2013 suggested retail price of Chlorine Taste and Odor, and Particulate Class I*; If the filter indicator light is important that you replace the filter...
... a new filter. Rated service capacity = 200 gallons (757 liters). ■ It is yellow, order a new filter. Prices are not followed. ■ Use replacement filter P4RFWB, part #W10295370A. 2013 suggested retail price of Chlorine Taste and Odor, and Particulate Class I*; If the filter indicator light is important that you replace the filter...
Use & Care Guide
Page 2
... glass when dispensing ice (on some models). ■ Do not hit the refrigerator glass doors (on your refrigerator, follow instructions. Always read and obey all parts and panels before operating. ■ Remove doors from your old refrigerator. ■ Keep flammable materials and vapors, such as gasoline, away from refrigerator. ■ Use...
... glass when dispensing ice (on some models). ■ Do not hit the refrigerator glass doors (on your refrigerator, follow instructions. Always read and obey all parts and panels before operating. ■ Remove doors from your old refrigerator. ■ Keep flammable materials and vapors, such as gasoline, away from refrigerator. ■ Use...
Use & Care Guide
Page 4
... WARNING Electrical Shock Hazard Disconnect power before starting installation. Failure to see the instructions below. Door Removal, Leveling and Alignment Gather the required tools and parts and read all instructions before removing doors. Save these instructions for future reference. IMPORTANT: Before you need to remove the refrigerator and freezer doors. Leveling...
... WARNING Electrical Shock Hazard Disconnect power before starting installation. Failure to see the instructions below. Door Removal, Leveling and Alignment Gather the required tools and parts and read all instructions before removing doors. Save these instructions for future reference. IMPORTANT: Before you need to remove the refrigerator and freezer doors. Leveling...
Use & Care Guide
Page 5
... door by turning both leveling screws to adjust the tilt of the refrigerator. The doors are ready to lift them closed until the doors are part of cardboard. Use a wrench to check the leveling of the refrigerator. See Graphic 3. Replace the Doors and Hinges 1. Tighten screws. Leveling and Door Closing Your...
... door by turning both leveling screws to adjust the tilt of the refrigerator. The doors are ready to lift them closed until the doors are part of cardboard. Use a wrench to check the leveling of the refrigerator. See Graphic 3. Replace the Doors and Hinges 1. Tighten screws. Leveling and Door Closing Your...

Use & Care Guide
Page 6
... A B A. When installing your refrigerator next to remove the shoulder screws from the door. 4. Using a counterclockwise motion, loosen the setscrew a quarter-turn . Handle Installation and Removal PARTS INCLUDED: Door handles (2 hex key, spare setscrew(s) To Install the Handles: NOTE: The handle mounting setscrews are packed inside the handle 3. Remove the handles, which...
... A B A. When installing your refrigerator next to remove the shoulder screws from the door. 4. Using a counterclockwise motion, loosen the setscrew a quarter-turn . Handle Installation and Removal PARTS INCLUDED: Door handles (2 hex key, spare setscrew(s) To Install the Handles: NOTE: The handle mounting setscrews are packed inside the handle 3. Remove the handles, which...
Use & Care Guide
Page 8
... . See the "Door Removal" instructions, either door is not turned off the water supply to the other. NOTE: Depending on plastic parts, interior and door liners or gaskets. Empty the ice bin. 4. Unplug refrigerator or disconnect power. 2. There is significant pet traffic in... IMPORTANT: Because air circulates between both sections to Turn Refrigerator Off Before You Leave: 1. Hand wash, rinse, and dry removable parts and interior surfaces thoroughly. Lights The interior and dispenser lights are moving your refrigerator has an automatic ice maker, remember to reconnect the...
... . See the "Door Removal" instructions, either door is not turned off the water supply to the other. NOTE: Depending on plastic parts, interior and door liners or gaskets. Empty the ice bin. 4. Unplug refrigerator or disconnect power. 2. There is significant pet traffic in... IMPORTANT: Because air circulates between both sections to Turn Refrigerator Off Before You Leave: 1. Hand wash, rinse, and dry removable parts and interior surfaces thoroughly. Lights The interior and dispenser lights are moving your refrigerator has an automatic ice maker, remember to reconnect the...
Use & Care Guide
Page 11
... removal and reinstallation of God, improper installation, installation not in accordance with the product, Whirlpool Corporation or Whirlpool Canada LP (hereafter "Whirlpool") will pay for Factory Specified Parts and repair labor to correct defects in your major appliance, to replace or repair house ...fuses, or to province. Replacement parts or repair labor on major appliances with Whirlpool's published installation instructions. 11. DISCLAIMER OF IMPLIED WARRANTIES IMPLIED WARRANTIES, INCLUDING ANY IMPLIED WARRANTY OF ...
... removal and reinstallation of God, improper installation, installation not in accordance with the product, Whirlpool Corporation or Whirlpool Canada LP (hereafter "Whirlpool") will pay for Factory Specified Parts and repair labor to correct defects in your major appliance, to replace or repair house ...fuses, or to province. Replacement parts or repair labor on major appliances with Whirlpool's published installation instructions. 11. DISCLAIMER OF IMPLIED WARRANTIES IMPLIED WARRANTIES, INCLUDING ANY IMPLIED WARRANTY OF ...
Warranty Information
Page 1
... location or is not installed in accordance with Whirlpool's published installation instructions. 11. This warranty gives you specific legal rights, and you . Repairs to parts or systems resulting from warranty coverage. 4. Replacement parts or repair labor on the duration of implied warranties... is operated and maintained according to instructions attached to or furnished with the product, Whirlpool Corporation or Whirlpool Canada LP (hereafter "Whirlpool") will pay for Factory Specified Parts and repair labor to correct defects in materials or workmanship that have been removed, altered...
... location or is not installed in accordance with Whirlpool's published installation instructions. 11. This warranty gives you specific legal rights, and you . Repairs to parts or systems resulting from warranty coverage. 4. Replacement parts or repair labor on the duration of implied warranties... is operated and maintained according to instructions attached to or furnished with the product, Whirlpool Corporation or Whirlpool Canada LP (hereafter "Whirlpool") will pay for Factory Specified Parts and repair labor to correct defects in materials or workmanship that have been removed, altered...


